Field Validations
Was this helpful?
Was this helpful?
Field validations in VMS allows administrators to set rules for most input fields, ensuring data aligns with customer requirements. Validations alert users or restrict data that doesn't comply with these rules.
When field validations are configured, fields in the interface visually change to provide feedback to the user regarding their current status:
Correct Input: When fields are filled out correctly according to the validation rules, they will display normally without visual indicators.
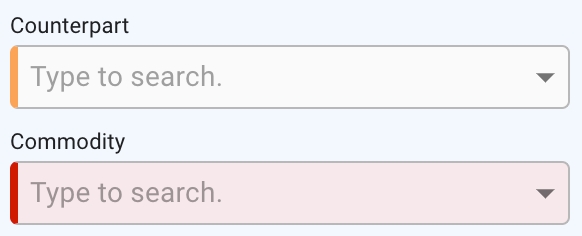
Warnings: If a field violates a warning-level validation rule, it will display with an orange outline, but users can still proceed with their actions.
Errors: If a field violates an error-level validation rule, it will display with a red outline and a light red background, sometimes preventing the user from submitting or saving the data.
When a field in a drawer triggers a warning or error, a notification will be displayed within the application. This notification provides additional context, helping users identify and resolve the issue quickly, but the user is not prevented from filling in the data.
In create-type modals, field validation errors will block the user from completing the "Create" action until all errors are resolved. Warnings in these dialogues will not block the creation process but will encourage the user to review the input.
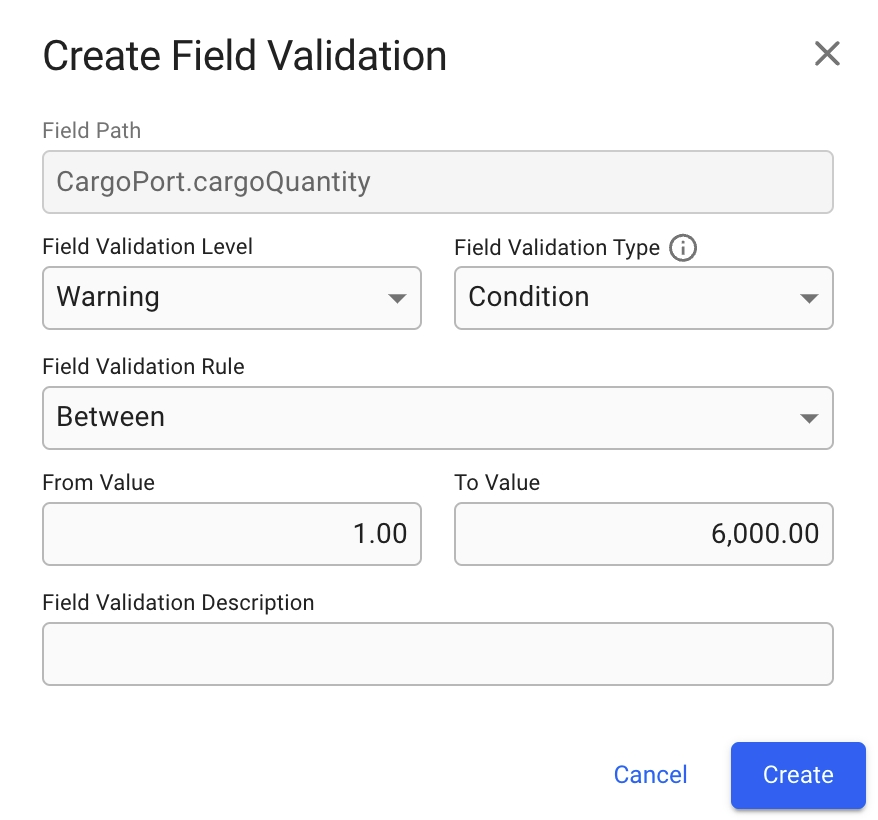
To configure a new or existing field validation, you can right-click almost any input field and click Field Validation in the menu that opens. When creating a field validation, you will see a configuration dialog, like the one below.
Field Path: This is the unique identifier of the field for which the validation is being set. It is pre-filled based on the input field you right-clicked and cannot be changed.
Field Validation Level:
Error: Prevents the user from saving invalid data in create-type modals.
Warning: Allows saving but alerts the user to potential issues.
Field Validation Type: Determines the kind of rule to apply. The available options are:
Condition: Validates numerical ranges (e.g., between specific values).
Length: Sets limits on the character length of the input.
List: Restricts inputs to a predefined comma-separated list of values.
Mandatory: Requires the field to have a value.
Field Validation Rule: This option appears when the "Condition" type is selected, allowing you to specify if the input must be between two values or greater than or less than a specific value.
When the validation type is "Condition" and the rule is "Between," "Less Than," or "Greater Than," the fields specify the numerical range. In the example provided, the range is set from 1.00 to 6000.00.
Field Validation Description (Optional): Enter a custom message to display to users when validation fails. This helps provide clear guidance about what is expected.
Let’s walk through an example of setting a numeric range validation for a field:
Open the Voyages -> Create Voyage Charter dialogue.
Right-click on the Cargo Quantity input field.
Select Field Validation from the context menu.
In the Field Validation Type dropdown, choose Condition.
Set the Field Validation Rule to Between.
Enter 1.00 as the From Value and 6,000.00 as the To Value.
Add an optional description like: “Cargo quantity must be between 1 and 6,000.”
Click Create to finalise the validation.
To apply the validation, close and reopen the Create Voyage Charter dialogue.
This ensures that users are warned if they enter values outside the specified range, helping maintain data integrity.
To modify existing validations, right-click a field with field validation applied. This displays almost the same dialogue as creation. Additionally, it has a "status" switch at the top – turning it off disables the validation.
To adjust field validations without going through right-clicking a field, navigate to Setup -> Field Validations. Here, you can view all validations, check their statuses, and edit the rules as needed.

