This page outlines the basic functions of the new grids and provides examples to enhance your workflow.
The table below lists the base functions available in the grid header. With a a few exceptions, these functions are consistent across the different grids. The order matches the column headers in Figure 1.
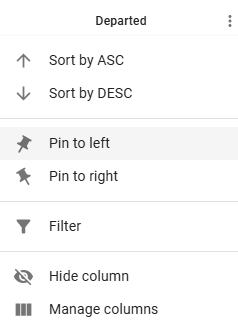
Each column includes a built-in menu, accessible by clicking the vertical ellipsis icon (see Figure 2).
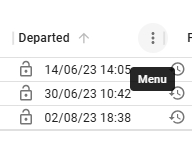
Expanding the menu displays a list of options for the column (see Figure 3), including sorting, pinning the column's position, and column management options. Basic sorting can also be performed by clicking the arrow that appears when hovering over a column or by clicking the column header itself (see Figure 2).
You can adjust the header's width by placing your cursor at the intersection between two columns and dragging to resize. Also, double clicking the column divider autosizes the column such that the entire header text is visible. To change a column's position, click and drag the column to the desired position.
Each row in the grid includes a vertical ellipsis menu for row-specific options, typically located in the right-most column (see Figure 4). The menu's contents and available options depend on the grid type.
or through the menu will directly impact the system data. For instance, selecting the delete option will remove both the row and its associated data.
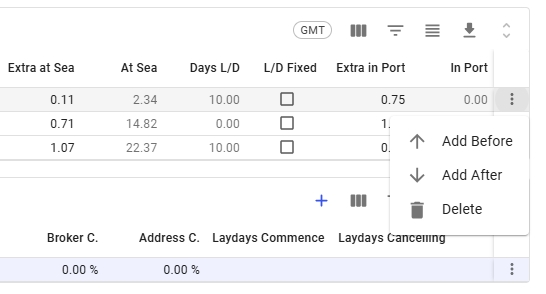
If the grid supports insertions, you can insert a new row before or after the currently selected row, as seen in Figure 4. However, this option may not be available in all grids. Some grids also support copying a row, along with its associated object.
The grid includes a column for opening the associated drawer or modal, located in the left-most column by default (see Figure 5). When clicking the icon, the results will be displayed on top of the full-screen drawer. As seen in Figure 6.
You can use the grid's filter option to create custom filters. Some grids also offer, which are not customizable, unlike the base filters in the column header.
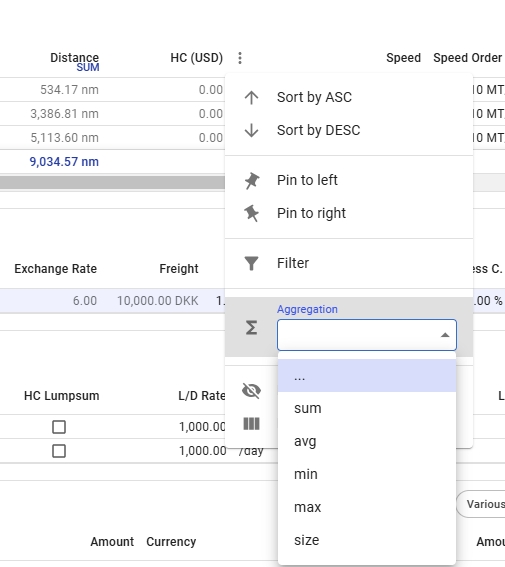
The new grid allows you to apply aggregations to numerical columns. This option is accessible via the vertical ellipsis menu that appears when hovering over a column. Figure 8 shows the menu and the result of applying the "sum" option to the distance column.
This section offers tips to help you become familiar with the new grid and use it effectively to enhance your workflow.
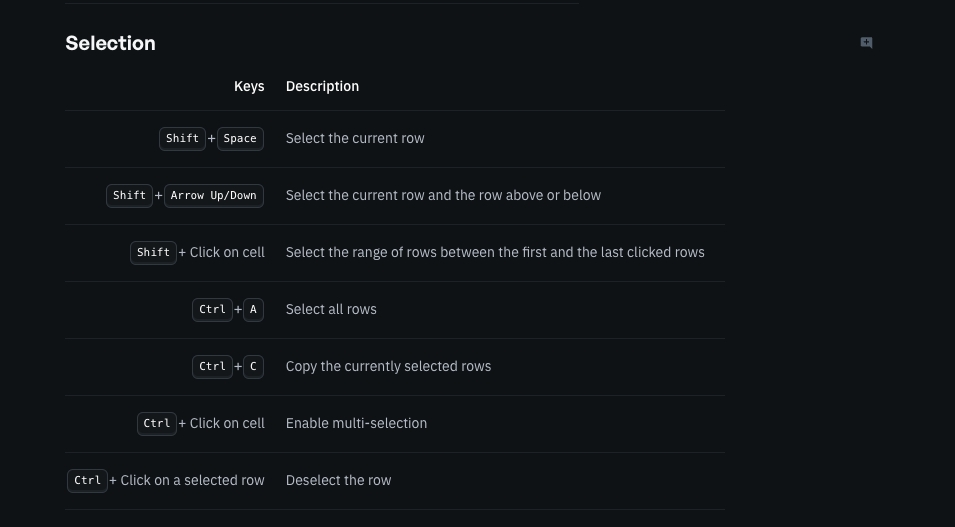
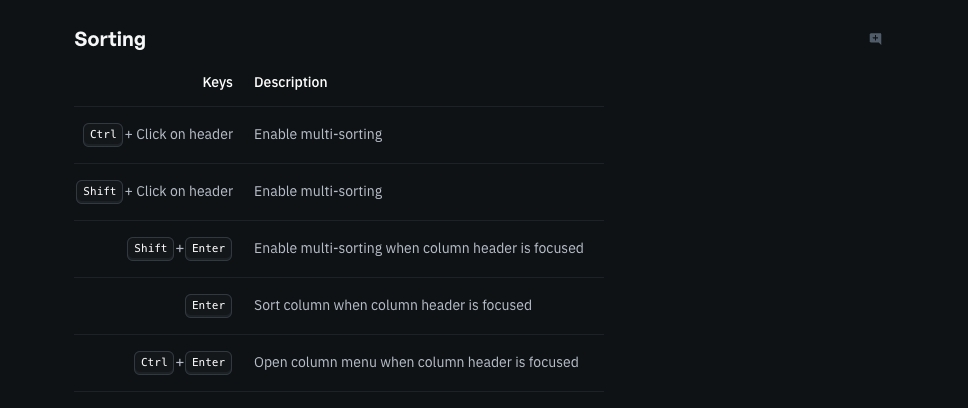
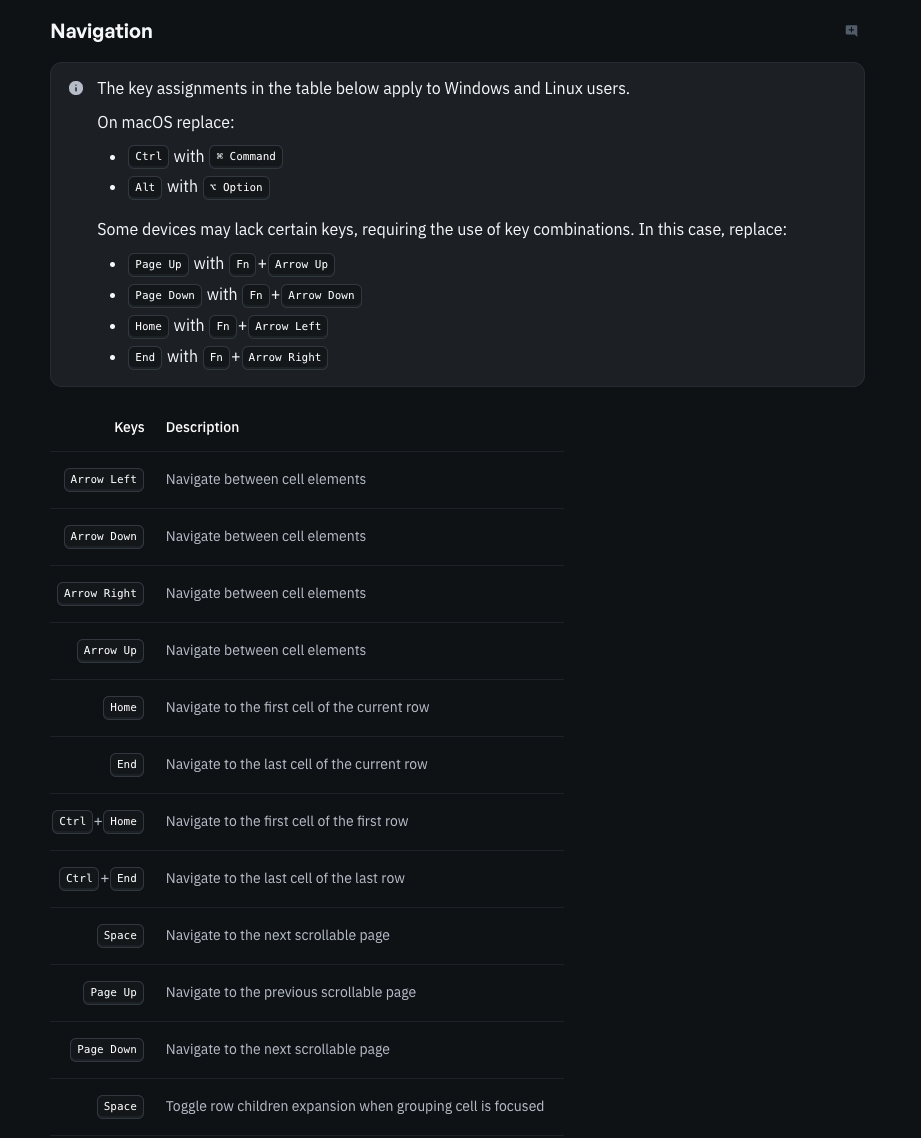
Using keyboard shortcuts is a powerful way to boost efficiency when working with the grid. Below are general instructions for using the grid, while Figures 9–11 list available shortcuts along with brief descriptions.
To change the value in a cell you can start typing when it is highlighted, or double click/press ENTER to go into edit-mode of that cell
When in edit mode of a cell with select menu, SPACE opens the menu showing all options, and you can select options with ENTER or TAB.
ESC exits edit-mode of a cell and discards the changes made.
When a column header is focused:
CTRL/CMD + ENTER opens column menu
ENTER toggles column sorting and SHIFT + ENTER toggles multi column sorting
Customise Columns
Makes it possible to select which columns should be displayed in the grid. Aslo includes search functionality.
Show filters
Displays the filter options. It is possible to define your own filters.
Density
Changes the density, that is, the spacing of the grid.
Export
Displays the export options for the data in the grid.
Expand
Expands the given grid to display more rows. Is enabled or disabled based on number of available rows in the data.
To improve accessibility, the port calls list has been relocated from the port call drawer to the voyage drawer in full-screen view. Note that it is still possible to access the port calls through the regular means as well.
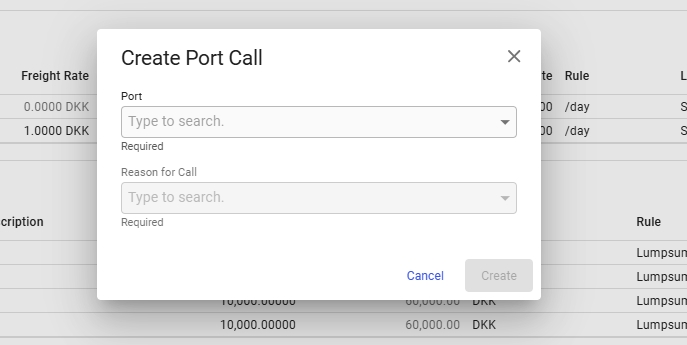
To add a new port call, open the vertical ellipsis menu in the last column. From this you can insert the new port call either before or after the selected one. When selected, this opens the "Create Port Call" modal, as illustrated in the figures below.
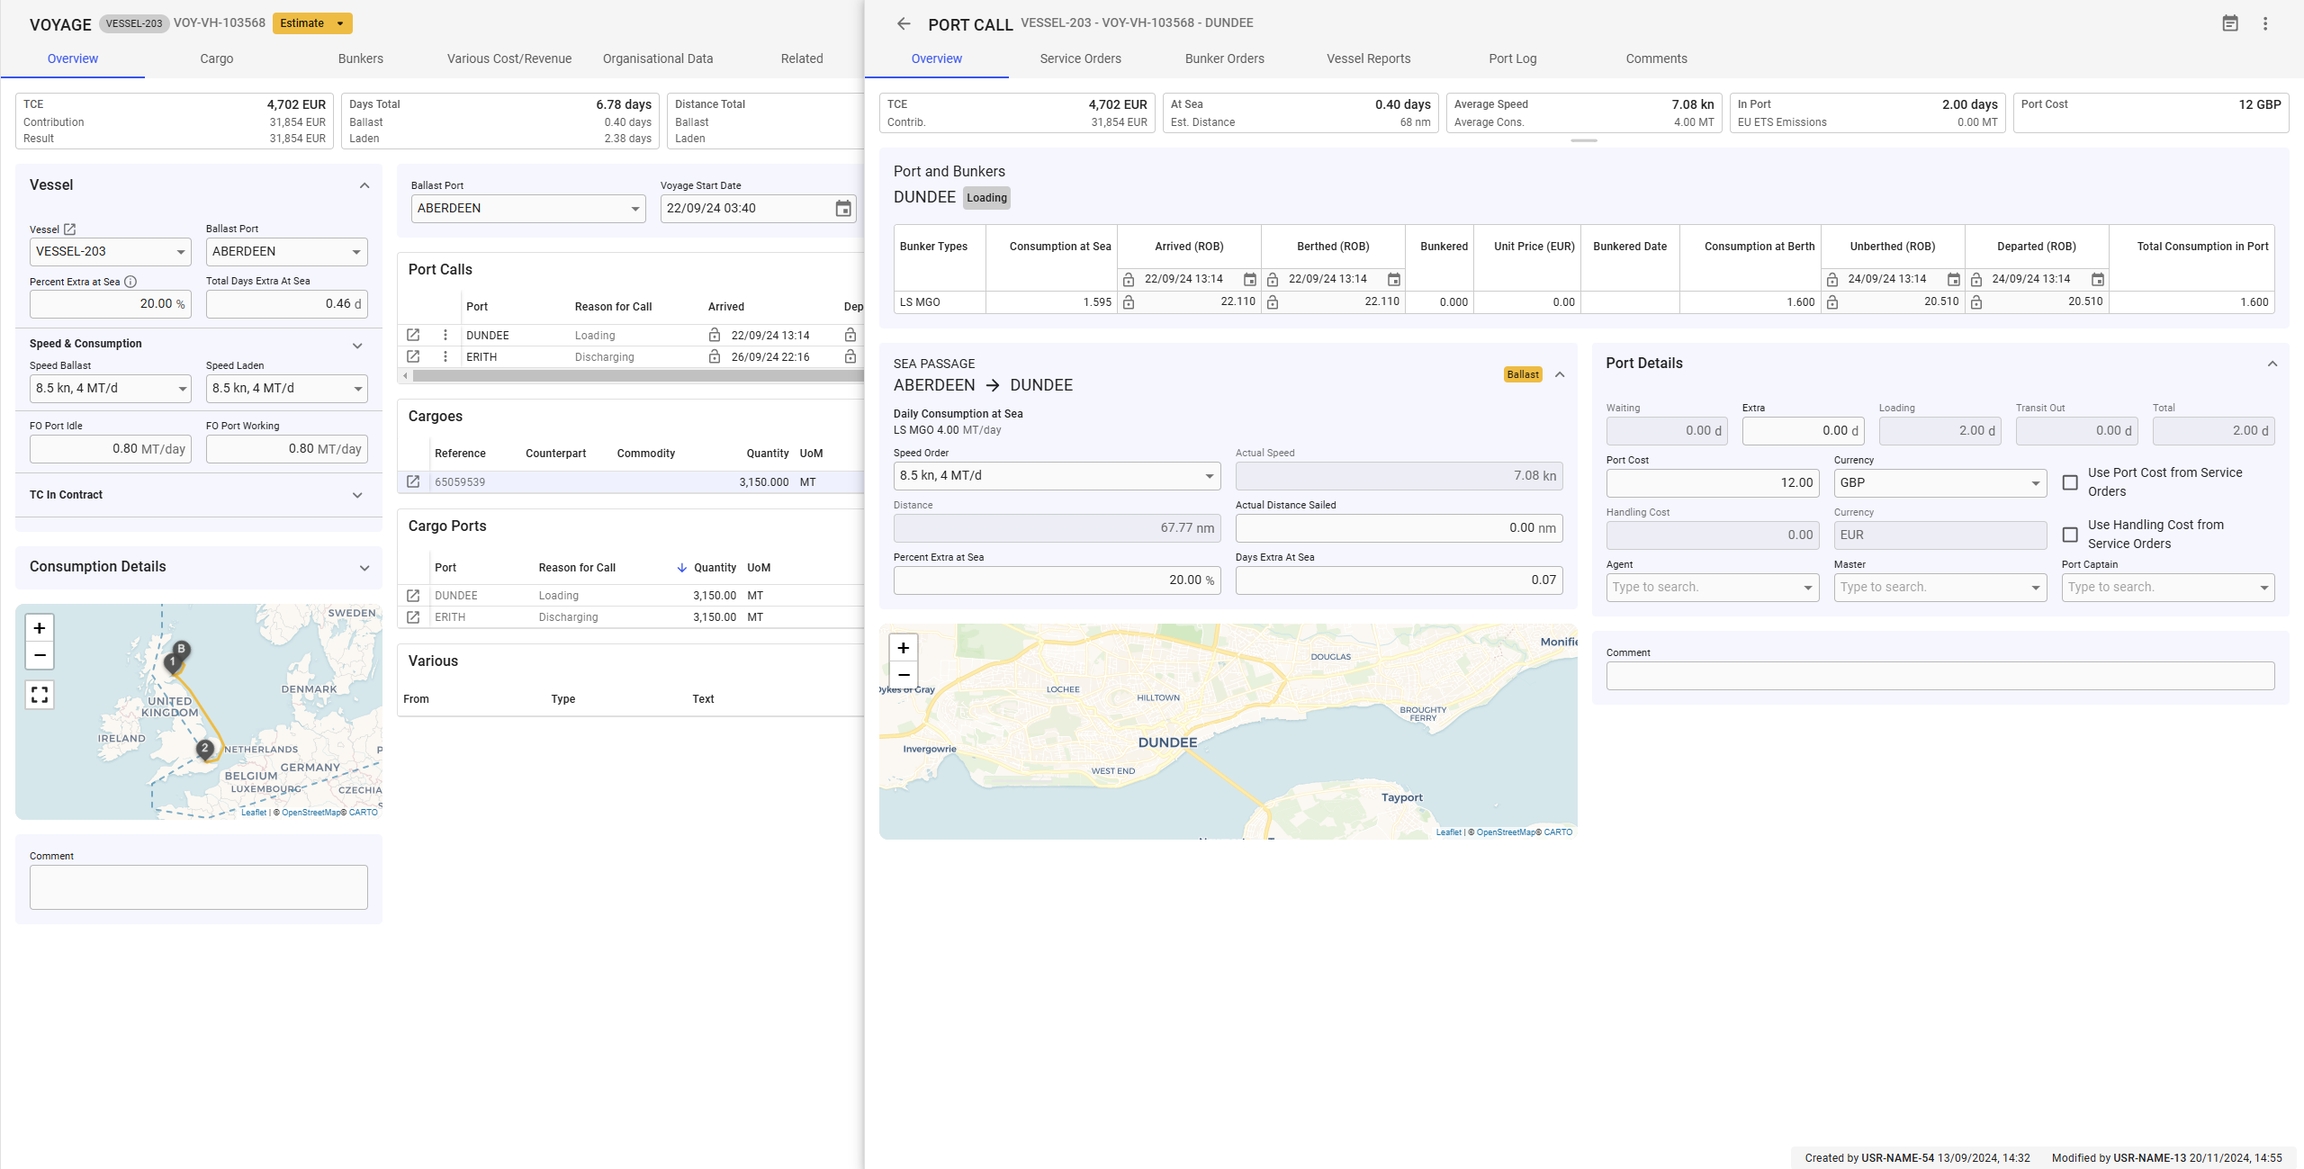
Like all grids, the Port Call fields can be edited directly within the grid. Alternatively, you can click the Open Port Call icon in the left-most column to access the Port Call drawer. This drawer will appear on top of the voyage drawer (see Figure 4).
To delete a Port Call, you can click the vertical ellipsis menu in the rightmost column and select the delete option. When clicked, a popup asking for confirmation or instructions on how to delete when the port call is connected to cargo port, will appear to prevent unintended actions. See figures below.
The port calls grid has a button in the header to convert the time and date to GMT. It is important to note that when this is done, it is not possible to edit the dates. This also includes the voyage start date (see Figure 6).
You can select a port call in the grid by double-clicking it. When a port call is selected and the port call type filter is applied, the will display the variouses specific to the selected port call.
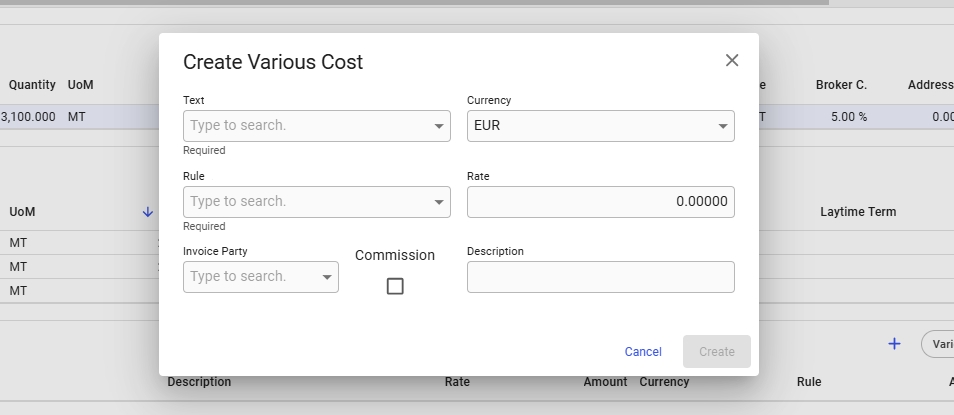
It is possible to create a new various for the port call. This is done by clicking the vertical ellipsis in the right-most column. From this, you can select the option to create a new various cost or revenue. This will open a modal where you can define the new various.
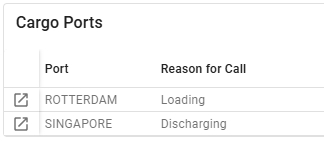
Cargo Ports have been moved from the collapsible "Cargo List" to a dedicated grid, improving accessibility and increasing maintainability and flexibility when editing cargo ports.
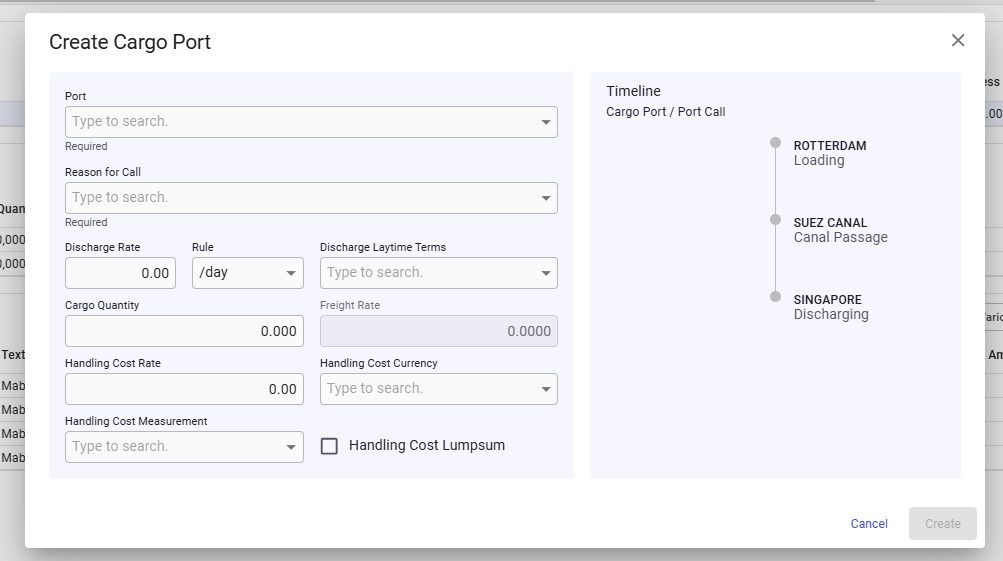
To add a new cargo port to the voyage, click the blue plus sign on the right-hand side of the grid header (see Figure 1). This will open a modal, as shown in Figure 2, where you can create the new cargo port.
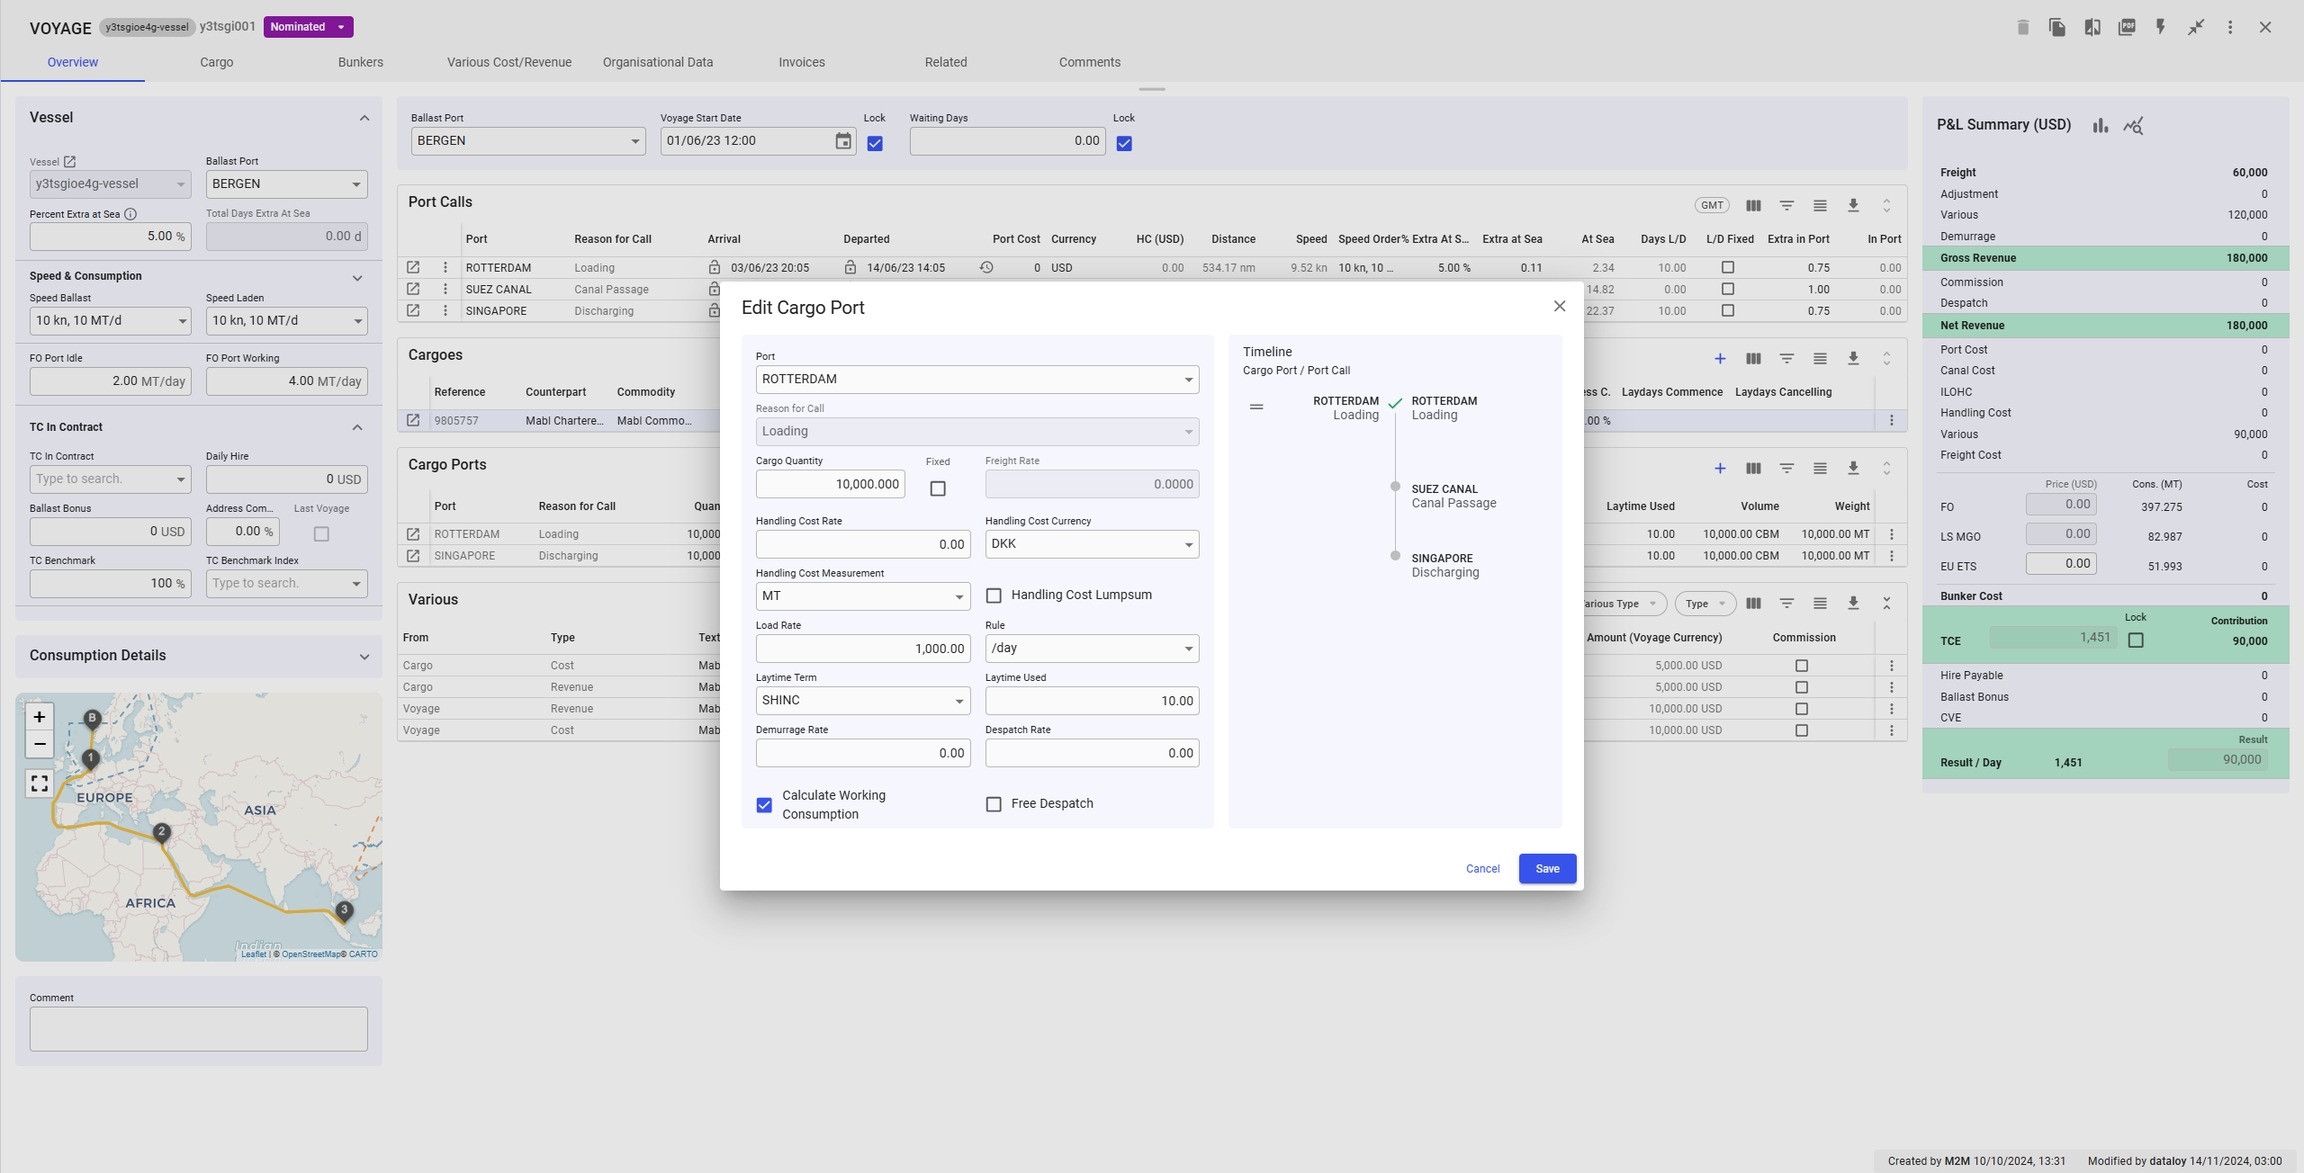
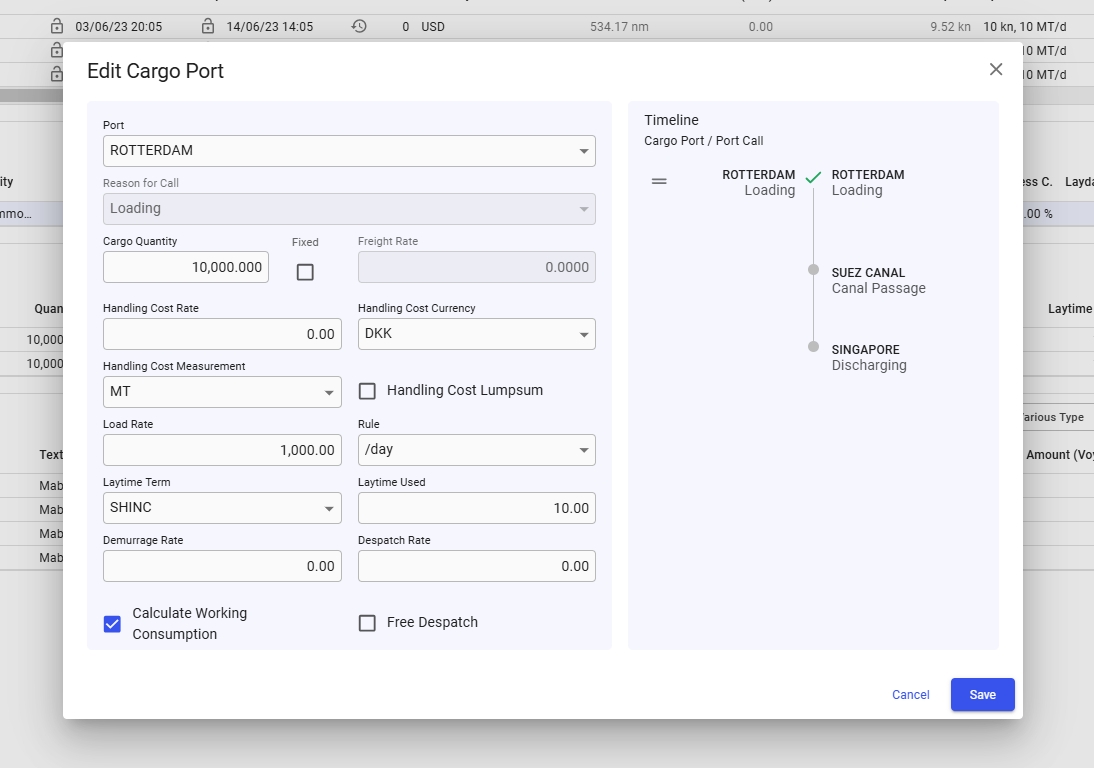
Like all grids, the Cargo Ports fields can be edited directly within the grid. Alternatively, you can click the Edit Cargo Port icon in the left-most column (see Figure 1) to open the "Edit Cargo Port" modal. The modal will appear on top of the voyage drawer as seen in the figure below.
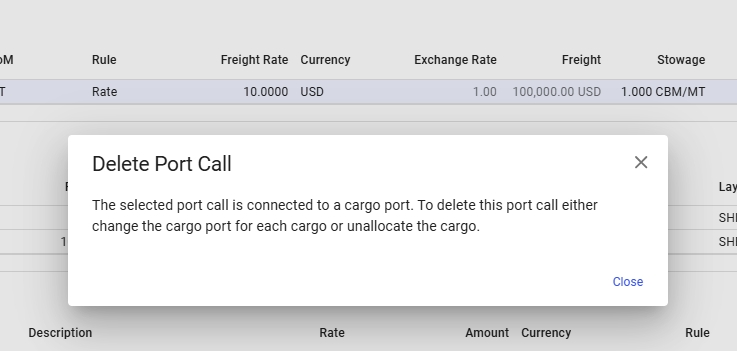
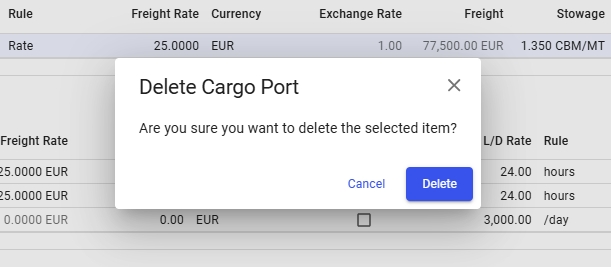
It is possible to delete a Cargo Port by clicking the vertical ellipsis menu in the right-most column (see Figure 4). When clicked, a popup asking for confirmation will appear to prevent unintended actions, as illustrated in Figure 5.
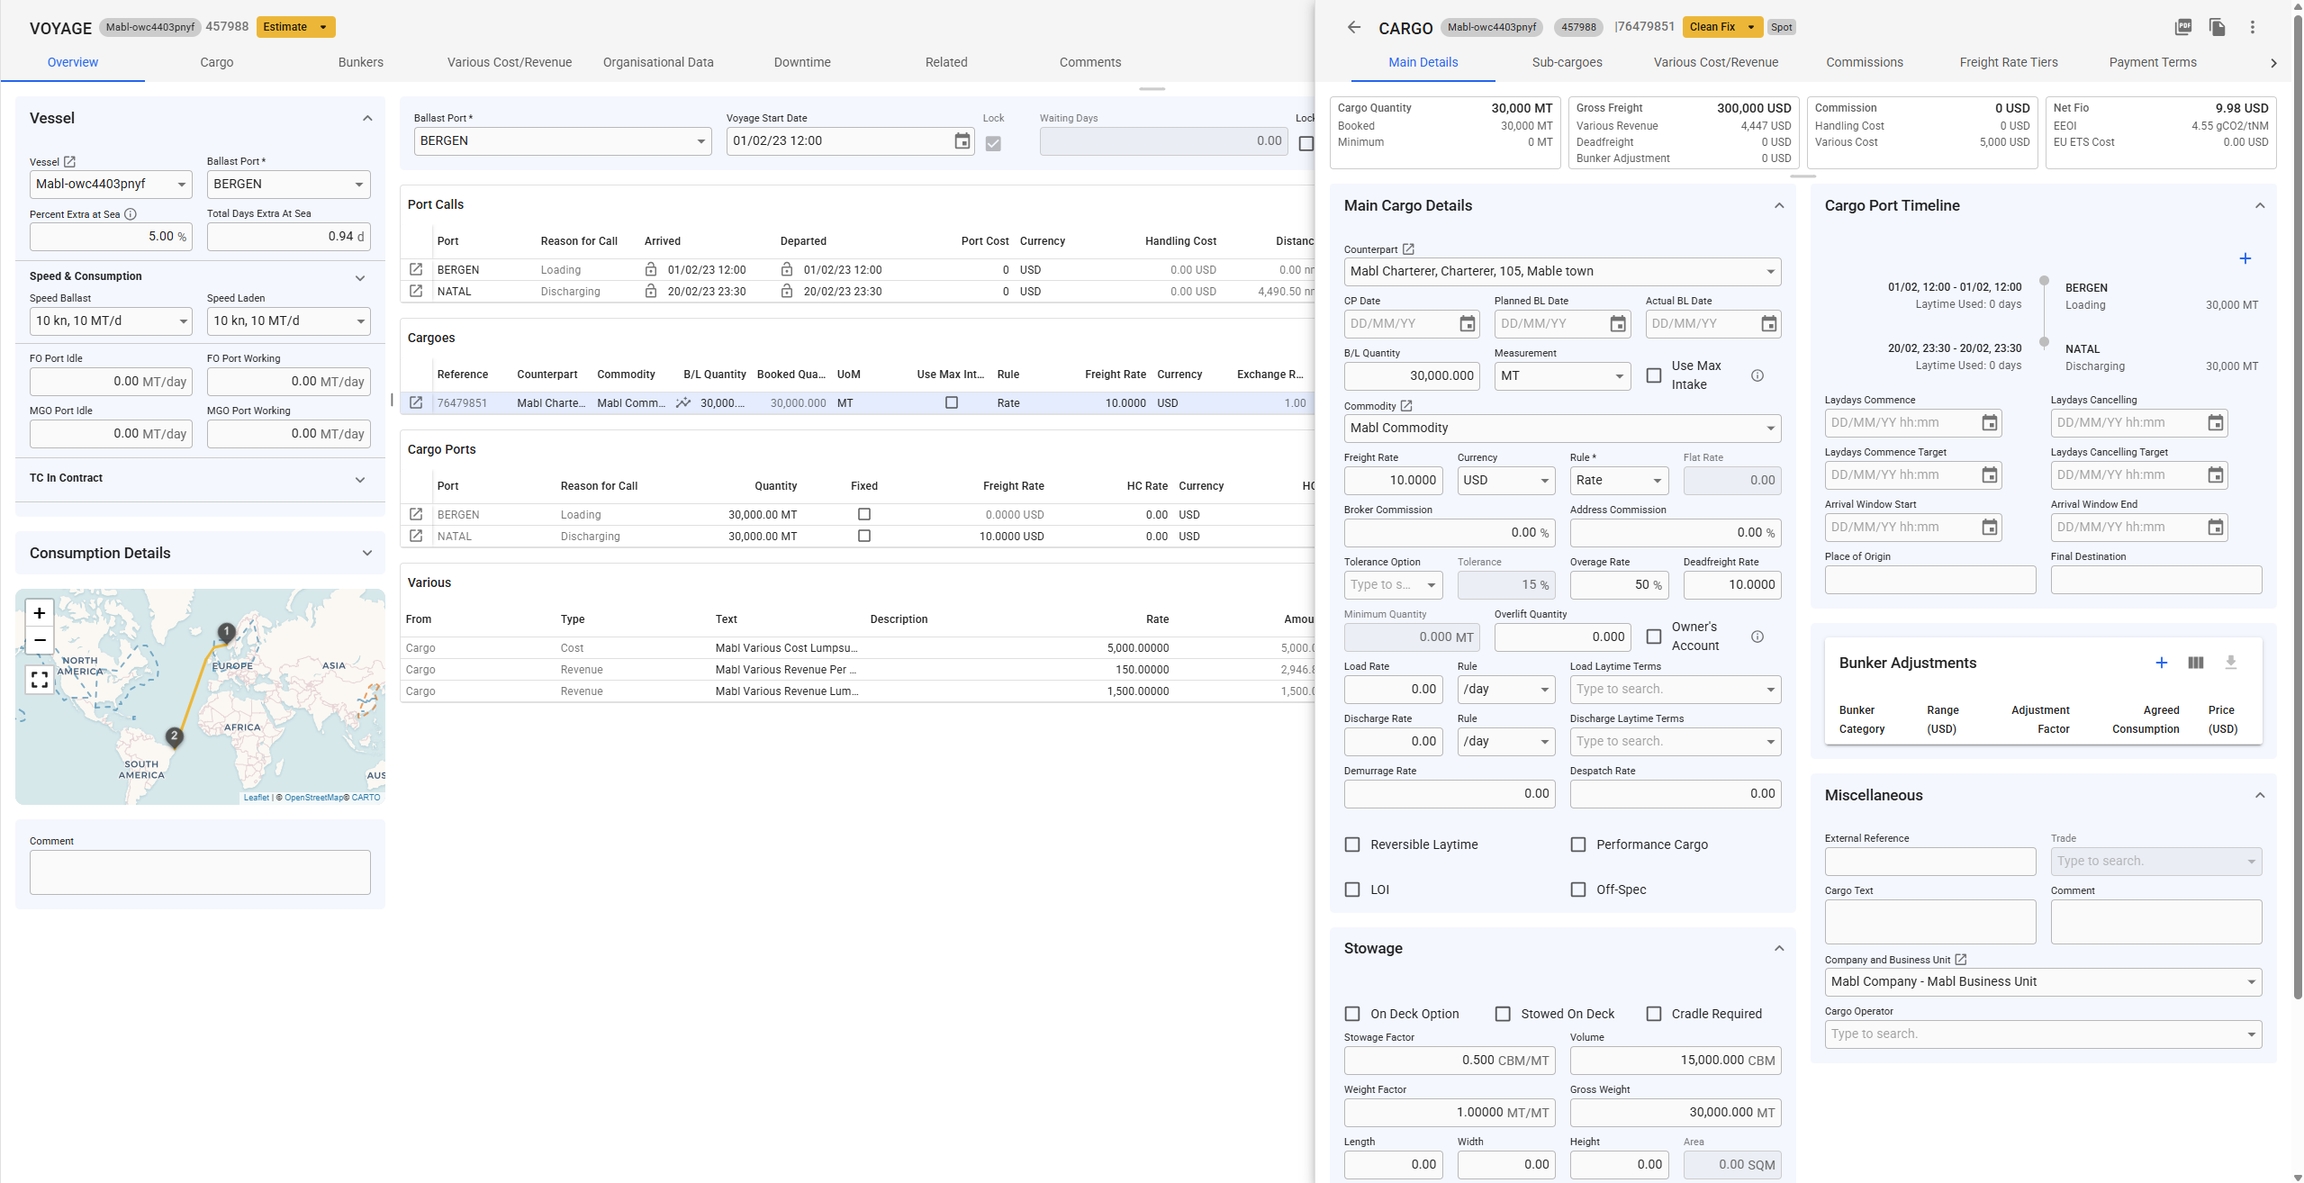
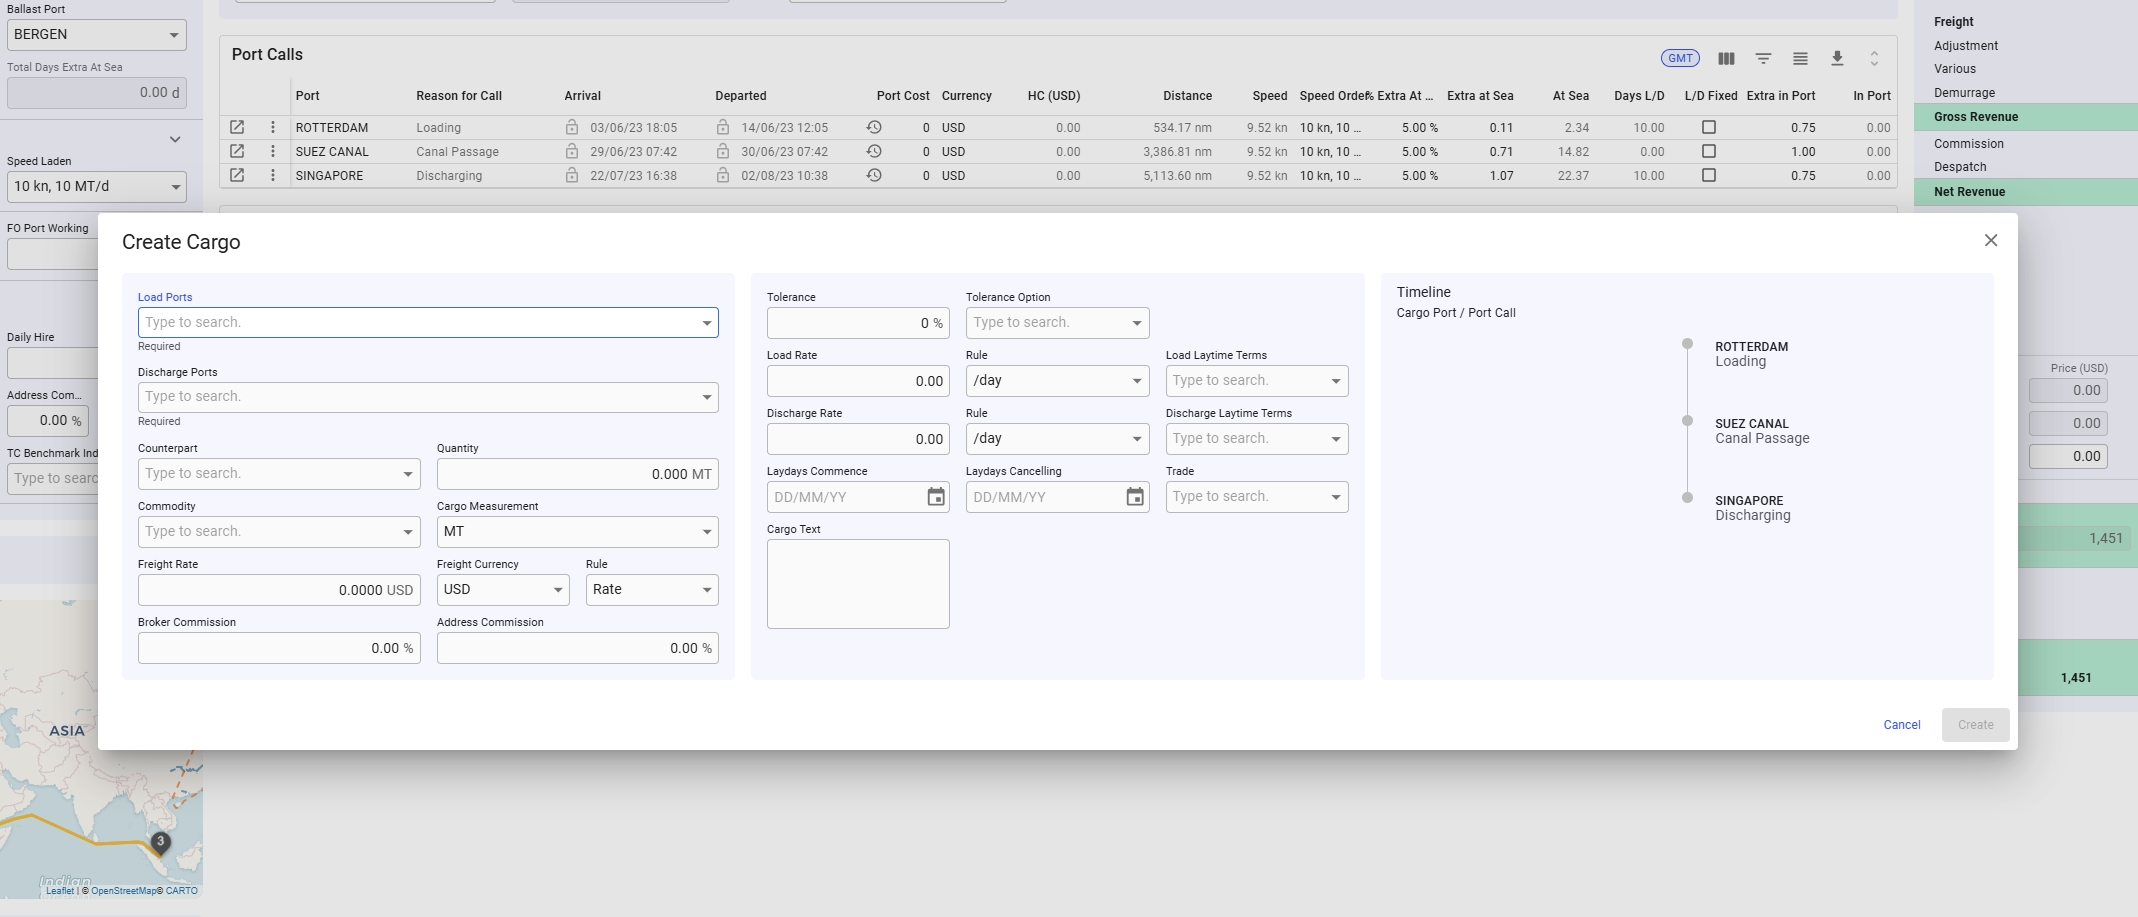
The voyage's cargoes have been relocated from the cargo tab, and the collapsible section for editing cargo has been removed in the full-screen view (see Figure 1).
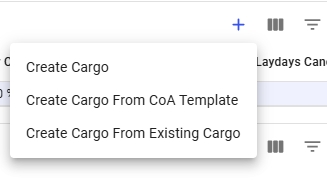
Click the blue cross icon on the right side of the grid header to display a list of options for creating a new cargo (see figures below). After selecting an option, the appropriate "Create Cargo" modal will appear.
Like all grids, the Cargo fields can be edited directly within the grid. Alternatively, you can click the Open Cargo icon in the left-most column to access the Cargo drawer. This drawer will appear on top of the voyage drawer (see Figure 4).
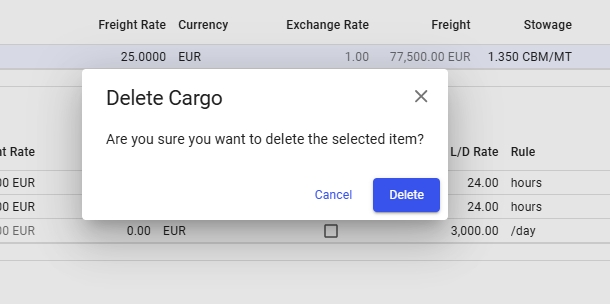
It is possible to copy or delete a Cargo by clicking the vertical ellipsis menu in the right-most column. This opens a menu where you get the option to copy or delete the Cargo (see figure 5). When either options are selected, a popup asking for confirmation will appear to prevent unintended actions.
It is possible to select a cargo in the Cargoes grid by double-clicking the cargo. When this is done, and the cargo type filter is applied in the various grid, the various grid will display the variouses specific to the selected Cargo.
It is possible to create a new various for the Cargo. This is done by clicking the vertical ellipsis in the right-most column (see Figure 5). From this, you can select the option to create a new various cost or revenue. This will open a modal where you can define the new various, as seen in the figure below.
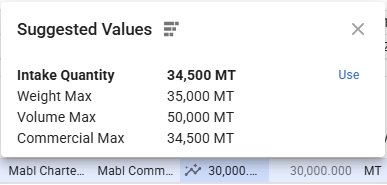
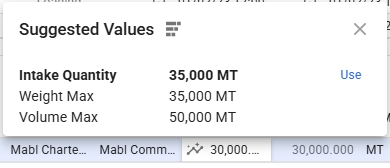
In the cargo quantity cell in the cargo grid there is now a special icon. If you click this icon a pop-over will appear where you can apply the current intake quantity to the cargo quantity. In the pop-over you can see what the current intake quantity is and what numbers is used in deciding what the intake is. If the tolerance option is MOLOO for the cargo a third option. For more information about the different quantities see Automatically set cargo quantity to max intake for explanations. Note that the automatically part is not relevant here. It does however use the same numbers.
Various costs and revenues are now accessible directly from the voyage drawer in addition to the existing Various Cost/Revenue tab. This change reduces the steps needed to view and modify the variouses connected to the voyage.
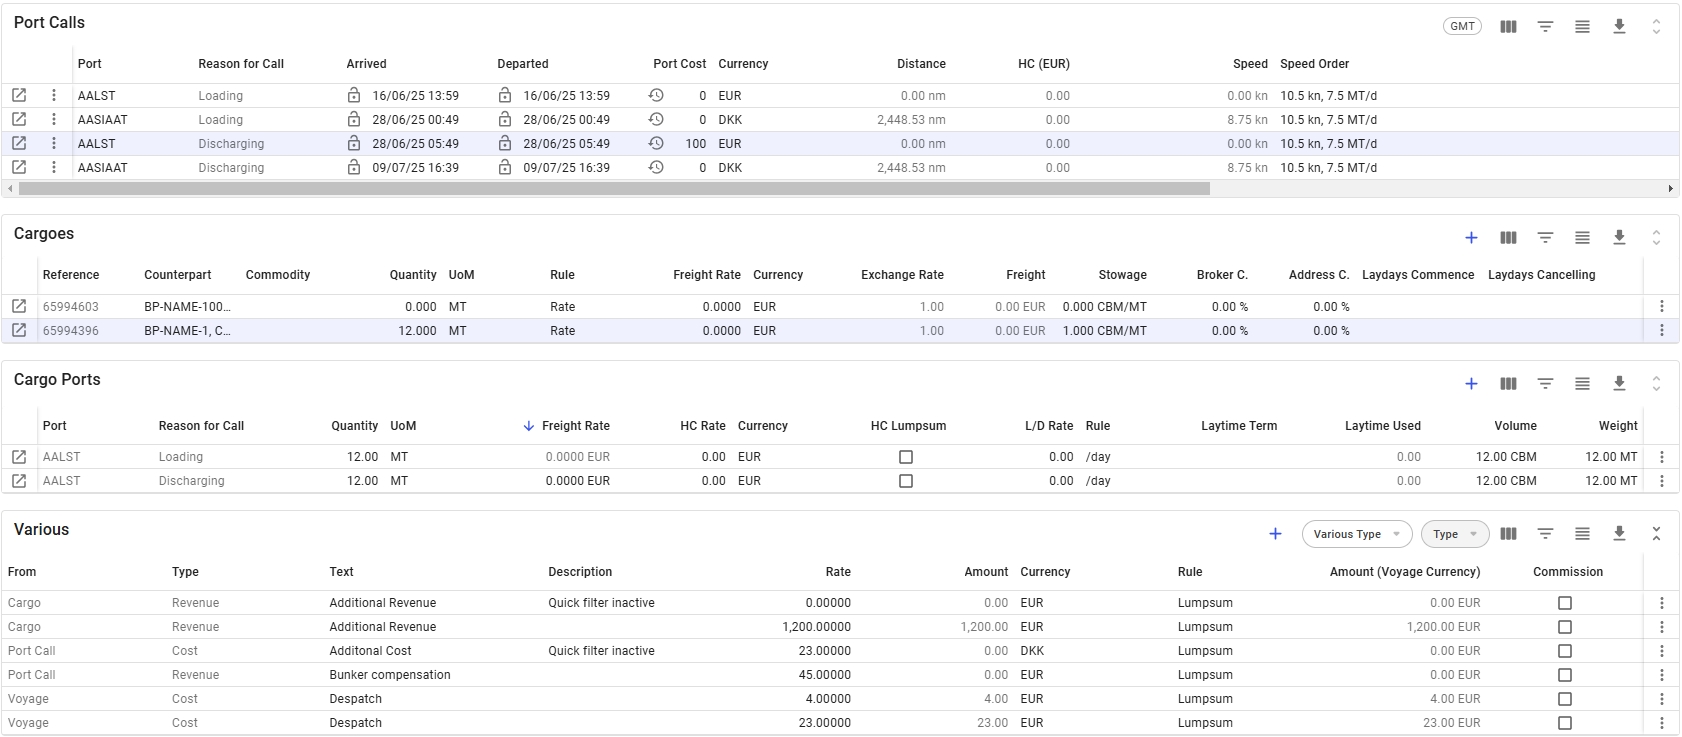
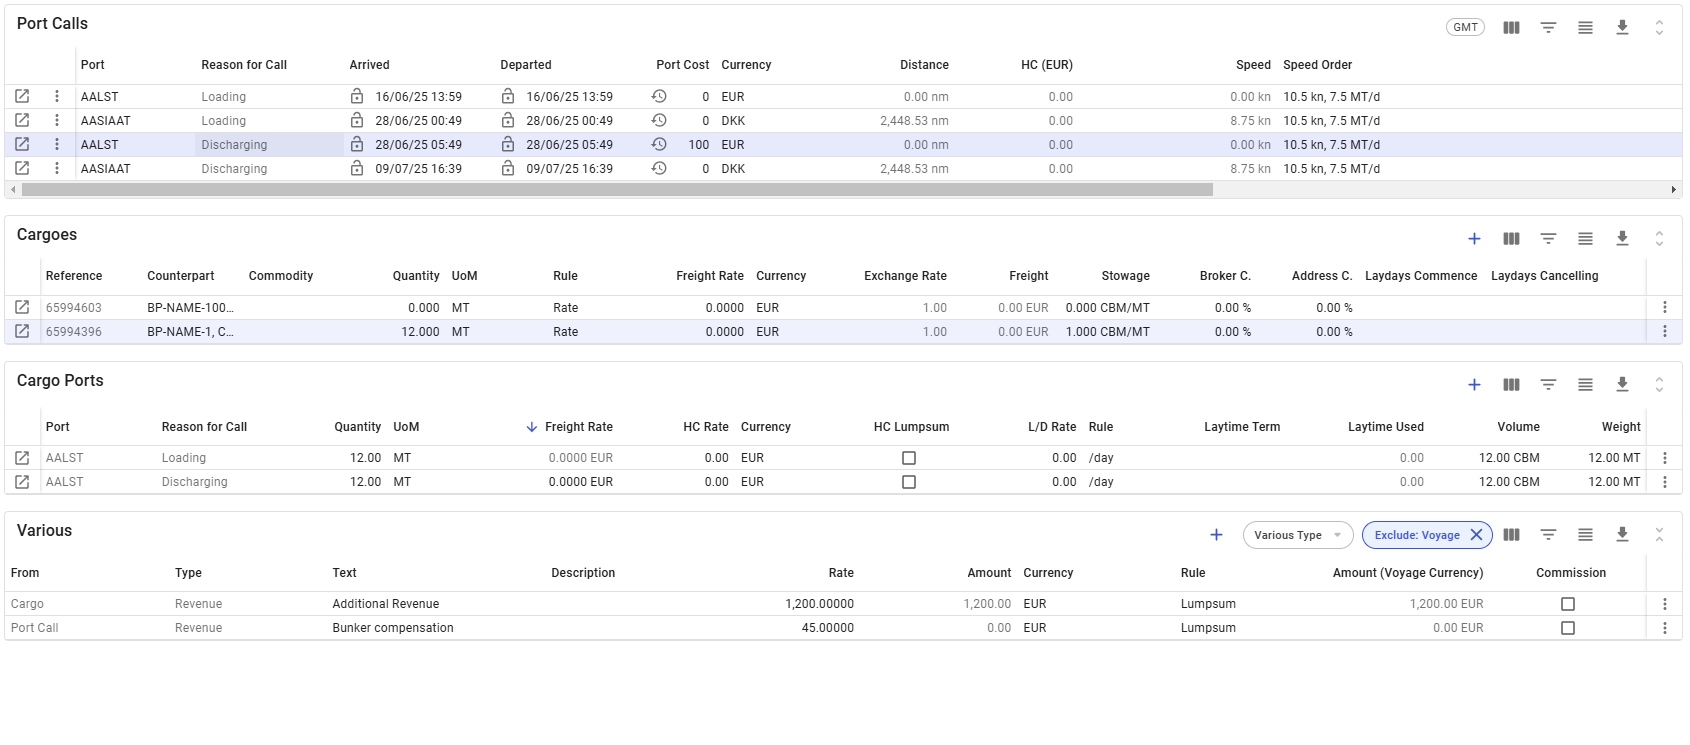
Along with the base filters available in the grid, the Various grid includes quick filtering options. These quick filters allow you to filter variouses by type, such as cost or revenue, and by the source type, such as Voyage or Cargo. Details of these options are shown in Figure 2.
The Various grid and Cargoes grid are linked through the selected cargo. When a specific cargo is selected and "Cargo" is chosen in the type quick filter, the Various grid will show only the entries associated with the selected cargo, rather than all cargo-related variouses in the voyage.
To display all cargo variouses, de-select or clear the "Cargo" option in the quick filter.
This behavior also applies when selecting a port call in the Port Calls, when done, the Various grid will display entries for the selected port call only.
Note: Voyage variouses are not affected by these selections and will continue to display unless excluded through the filter options.
To create a new Voyage Various, click the blue plus sign in the column header. This opens a modal where you can specify the type of various to be created.
You can also create new Port Call variouses directly in the Port Calls grid and new Cargo variouses in the Cargoes grid. These processes are explained in the sections and respectively.
Like all grids, the Various fields can be edited directly within the grid. Alternatively, for Voyage and Cargo, you can can edit the various field in their respective drawers. That is, in the tab located in the header of the drawers.
TIP: You can open easily open the cargo drawer by clicking the "Open Cargo" option in the left-most column in the
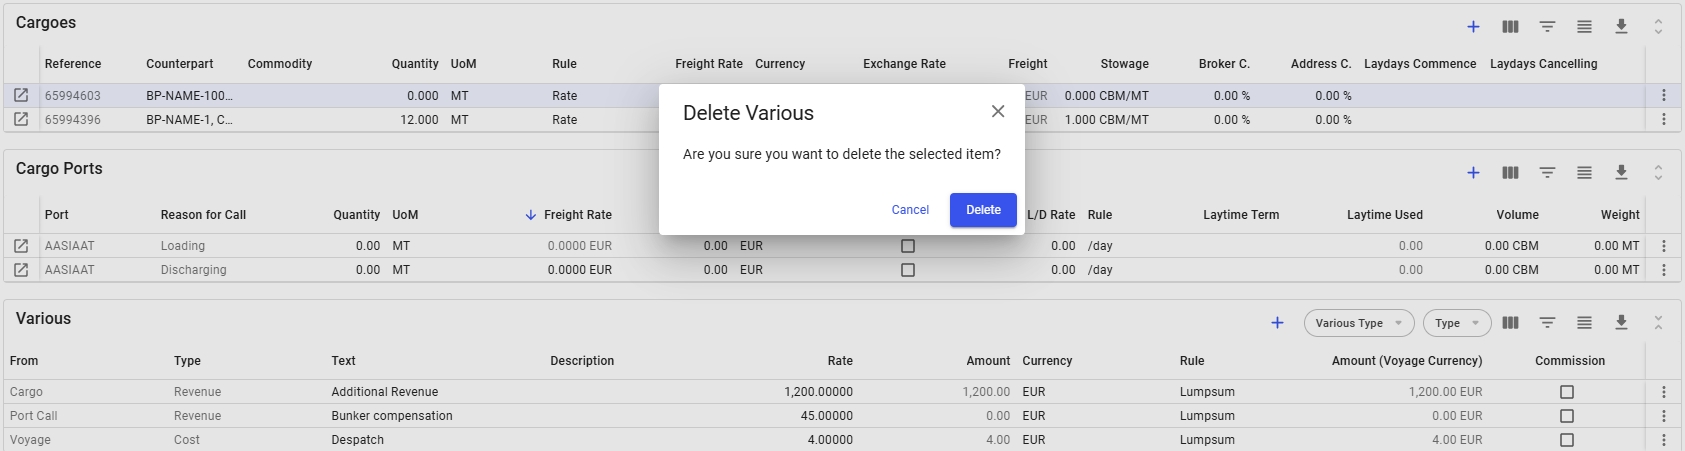
To delete a various, simply click the vertical menu in the right-most column and select the delete option. This will prompt a popup asking to confirm the deletion of the selected various (see Figures below). For Voyage and Cargo variouses, it is still possible to delete them through the various tab in the respective drawers.