Welcome to the main source of information on the Dataloy product suite.
VMS: Step-By-Step Guides
View Vessel Route from Previous Port to Next Port
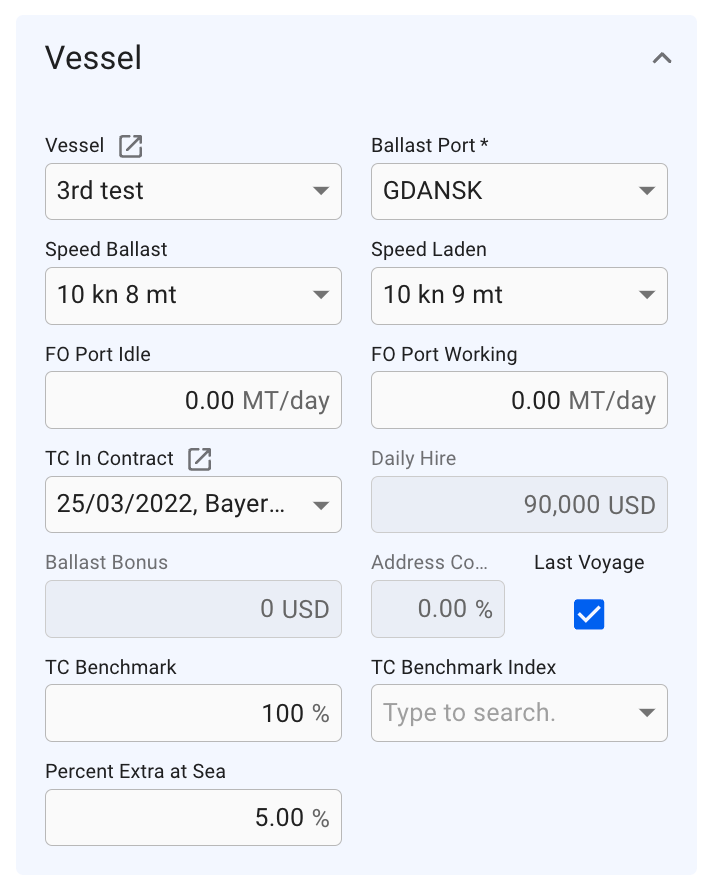
In the vessel drawer on the top right side there is a small map displaying the vessels last known position. This position is retrieved from AIS-positions for vessels which are subscribing to this feature, for vessels which are not subscribing the latest position is retrieved from the latest position report entered in the system. In addition to this you can now view the route from Dataloy Distance Table from previous port to next port displayed in the same map. The route is the green line in the map.
Trades
Load & Discharge Rates
The Load and Discharge rates section is an an overview of the load and discharge rates applicable for ports and terminals. It must not be mixed with the vessels' max load and discharge rates.
Open the Vessels module.
Open the vessel drawer
Vessel "Load & Discharge Rates" data can be accessed in the top tab menu.
Details can be maintained directly from the table actions.
AIS & Weather Reports
Open the Vessels module in the Master Data section.
Open the vessel drawer
Vessel "AIS Data and Weather Report" data can be accessed in the top tab menu.
For the tab to be enabled an AIS position has to be available.
AIS-subscription
How to enable or disable AIS-subscription
You can enable or disable the subscription to AIS-positions for a vessel.
Open the Vessels module in the Master Data section.
Open the vessel drawer
Create New Trades
Open the Trades module in the Core menu in the upper left corner
Click Create Trade in the top right corner.
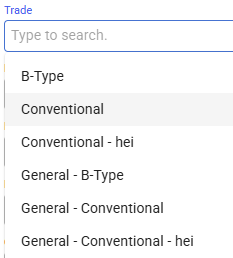
Fill in the required fields Trade Description, Trade Code, and select the Route(s) that the Trade is part of. The Trade Code has to be a unique code that no other Trade has.
Maintain Trades
To maintain the trade click the trade in the list. The selected trade will be opened in a trade drawer where you can view all the voyages from a trade and the port calls and bunkers from these voyages, and edit the trade details.
Create New Voyages
Layout:
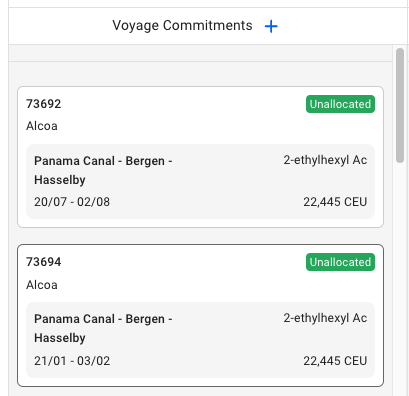
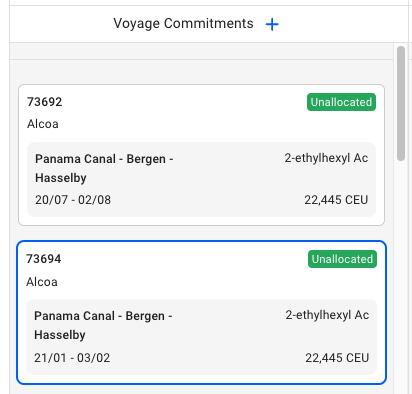
The Voyages module contains of a large list of different types of voyages; unallocated, estimate, allocated, nominated, etc. In this list, you can filter the voyages based on several key endpoints to effectively view the required information on your screen. There is a sort icon to the far right, with different options for sorting the list as well. You can read more here: .
Below you can click to read how to create different types of voyages:
By default, the new voyages have Voyage Progress set to "Estimate" and Voyage Status set to "T".
You can use the quick filters to find the port cost you are looking for.
The following filters are available in Port Cost History List:
Vessel name
Deadweight (DWT)
Reason for call
Currency
Commodity
Counterpart
Voyage Secondary Actions
Load & Discharge Rates Tab
Click Create when every field is filled
Create Trade modal
If the vessel has an IMO-number, click on the icon in the top right.
A light grey icon indicates that the vessel has no IMO-number registered.
A dark grey icon indicates that it is not subscribing to AIS-positions.
A blue icon indicates that the vessel is subscribing to AIS-positions.
Trade drawer
Copy Vessel
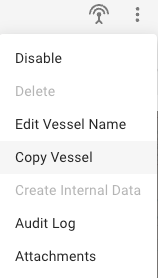
To copy any vessel, open the Vessel drawer and click the More button in the top right to bring up the menu.
Secondary Action Menu with Copy Vessel
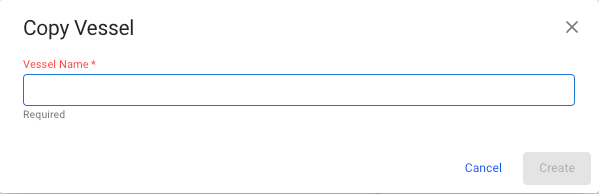
Clicking Copy Vessel will open a Copy Vessel modal where you are prompted to enter a new name for the new copy.
Copy Vessel Modal
When you click Create, the data from the original Vessel will be copied over to the new Vessel, with a few exceptions.
Voyages & Port Calls
Voyages and Port Calls will not be copied to the new Vessel.
Main Vessel Description
IMO Number will not be copied to the new Vessel.
The internal data of the copied vessel will be given default values for some fields like company, business unit, vessel code and vessel class.
The vessel code will be set to the unique key value for the Vessel, used by the API.
Pool and Pool Earning Points will not be copied to the new Vessel.
Find Vessels
Depending on your access permissionsthe list of Vessels might not be visible.
Open the Vessels module in the Core Menu list on the top left corner.
There are several sorting and filtering options available for you to narrow down what you include in the list view, including a "My Vessels" filter that shows all the vessels of which the logged-in user is set as one of the following:
Master User
Responsible Accountant
Operator
Claims Operator
You can also of the Vessels list to add, reorder or hide columns. The columns Operator, Built, and Schedulable are hidden by default.
On top of the list, you may find three tabs: Operative, All, and Map.
Moreover, filters found on the same line as the tabs, apply to both tables. If you switch between tabs, the filters will remain the same, facilitating navigation. The All tab has two additional filters, Archived and Disabled. The Archived filter filters all vessels that have fleet exit date set before current date when enabled. And then there is a disabled filter that shows all vessels that have been disabled.
A click on the Operative tab will load a table, that contains only operable vessels. In other words, the vessels whose fleet exit date is either not set, or set in the future, and has at least one voyage that has either Nominated status or further, but not Closed.
On the other hand, the All tab shows all vessels in the system that are enabled.
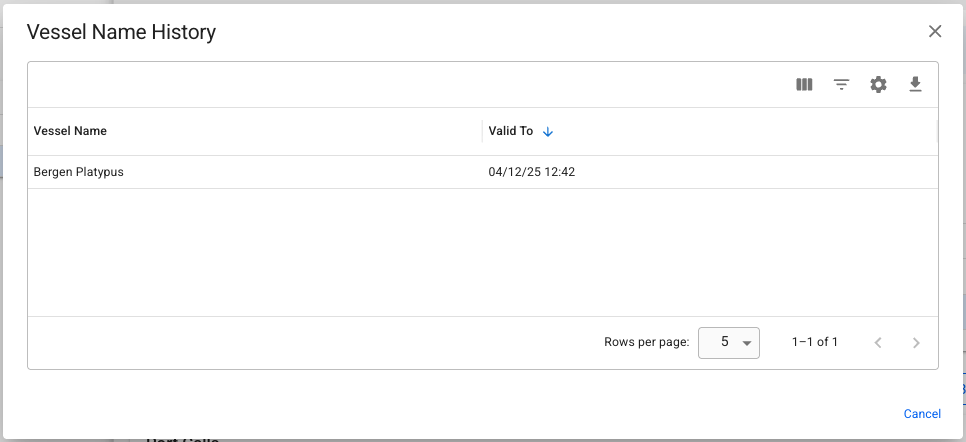
Vessel Name History
Whenever the name of a vessel is changed, the previous name is saved to the vessel name history.
To view the history, click the More () button in the top right of the vessel drawer, and select Vessel Name History. This will bring up a small modal, listing all the names the vessel has been sailing under.
This vessel was sailing under the name Bergen Platypus until 04.12.2025
Ex-names and voyages
Changing the vessel name will also update voyages with status Nominated or Operational. In the event the vessel has changed names after the voyage was set to Operationally Closed (or any later statuses), a small notice with the ex-name will be displayed in the vessel section when viewing those voyages later.
Bergen Corvus, ex-Bergen Platypus, as seen in the voyage drawer.
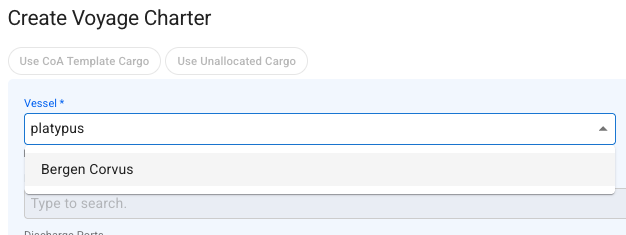
Using ex-names for filtering and searching
It is possible to filter and search for a vessel by her ex-name in most of the modules of the system. Search results will return the vessel's current name, even if you searched using an ex-name.
Manage Load And Discharge Rates
To manage load and discharge rates on a vessel for selected ports and terminals, navigate to the Load and Discharge Rate section of the Vessel drawer. Use the table in the tab to edit, delete or add a new rate.
Load and Discharge Rates Table
Actions
Create
In the table, click Add icon and fill in the fields
Edit
Click on a row to edit and use the modal to make changes.
Delete
Use the checkboxes to select the rows to delete. Click Delete iconand confirm.
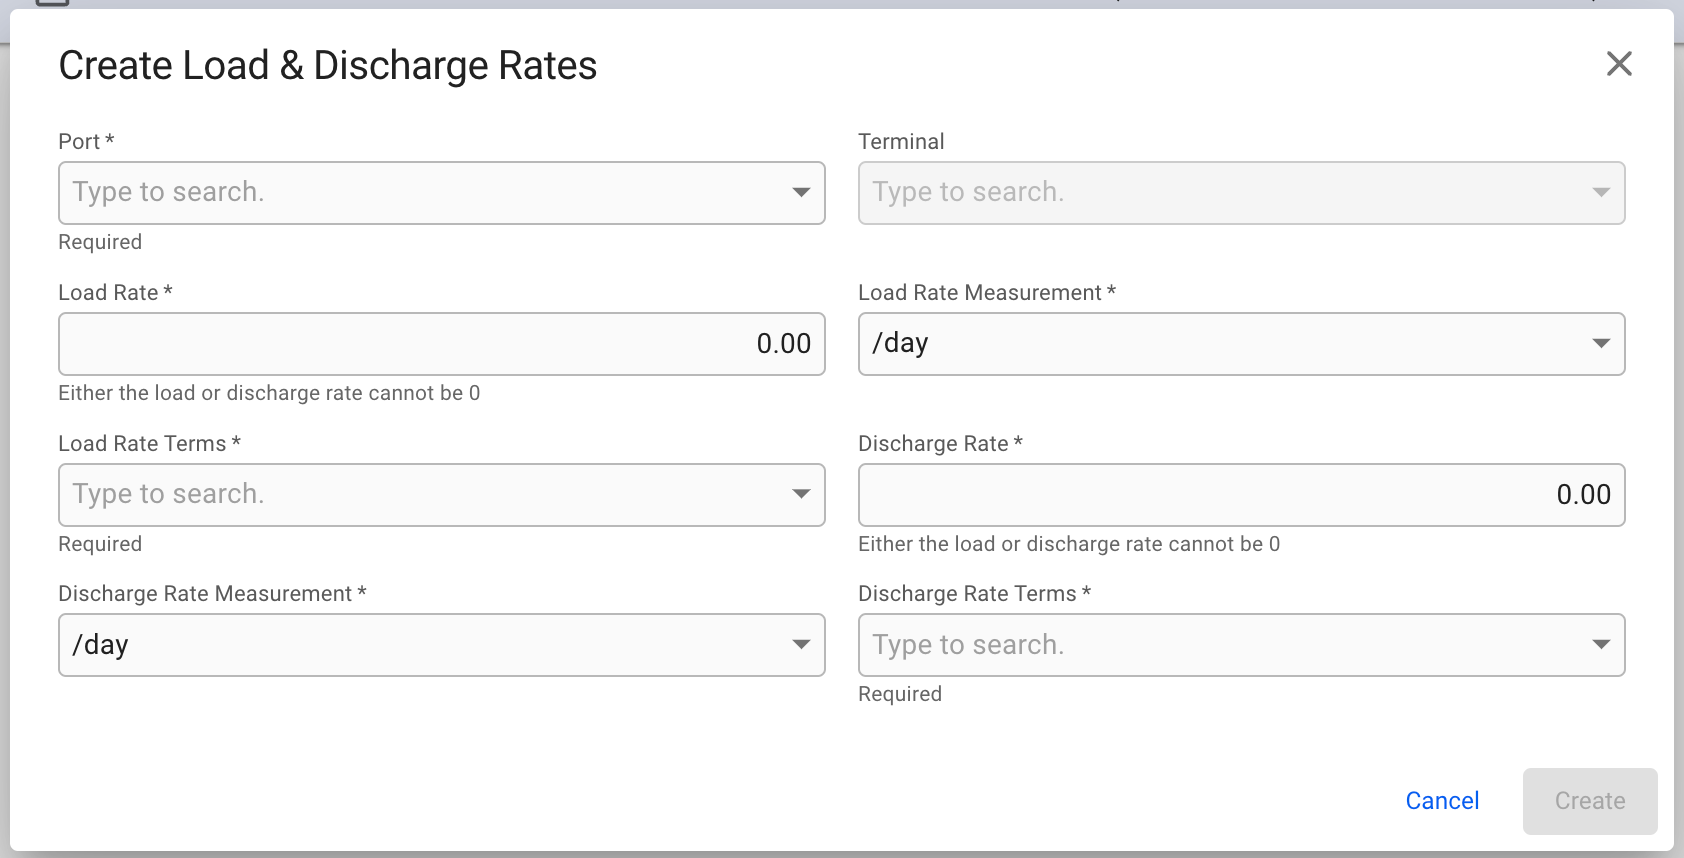
Create and Edit Modal
Allocating Voyages to a Trade
There are different ways to allocate a voyage to a trade.
Voyage Drawer
In the voyage drawer you have to navigate to the Organisational Data tab, and then you will find the Trade dropdown as the second field on this page.
Organisational Data tab on the Voyage Drawer
Every trade dropdown in the system will list up the options following this rule:
Single item is Trade (First and second option in the image below)
Two items are either
Trade - Pattern (Third option)
Route - Trade (Fourth and fifth options)
Three Items are Route - Trade - Pattern (Last option)
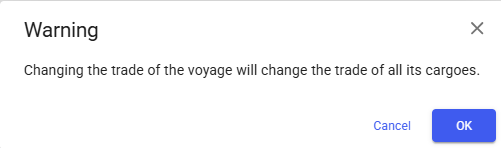
Selecting a Trade here will display the warning below as the system will change the trade for all cargoes on the voyage to the Trade you selected.
In the lower right corner of both the Create Voyage Charter and -Create Template Voyage modals there is the option to selected which Trade the voyage will be part of. The field is highlighted in the image below.
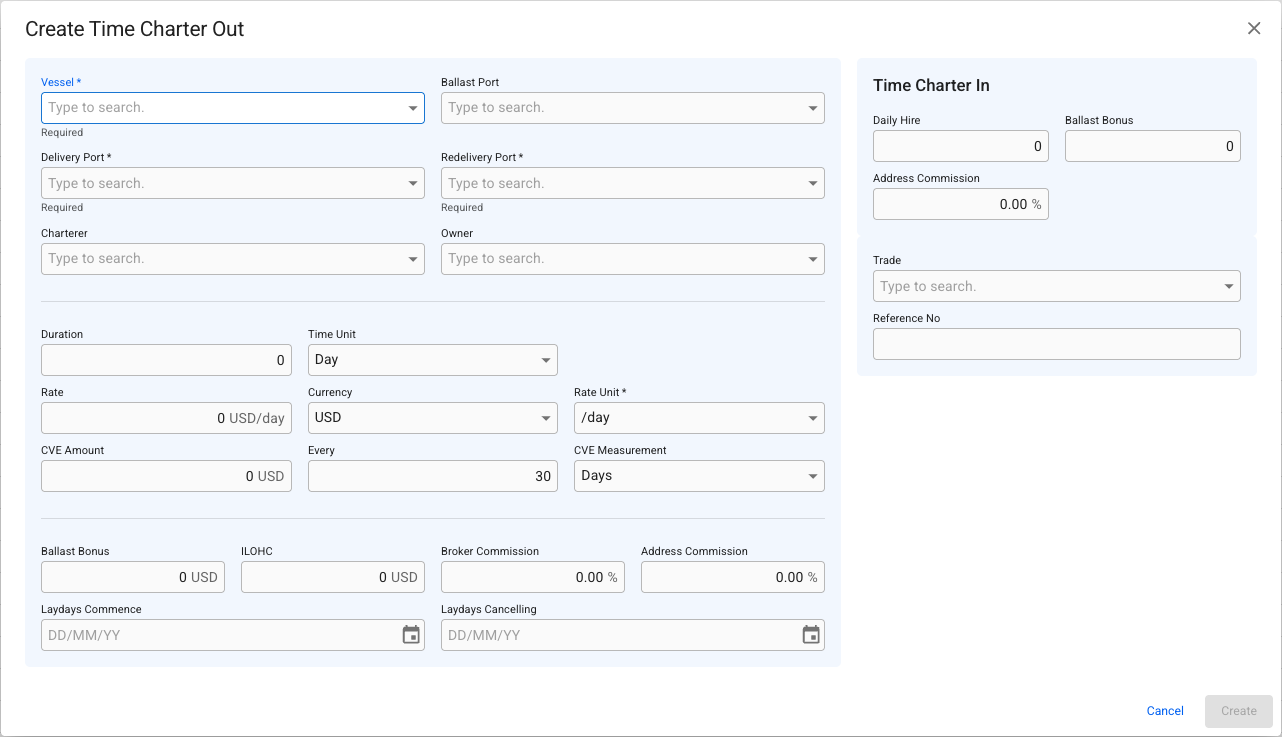
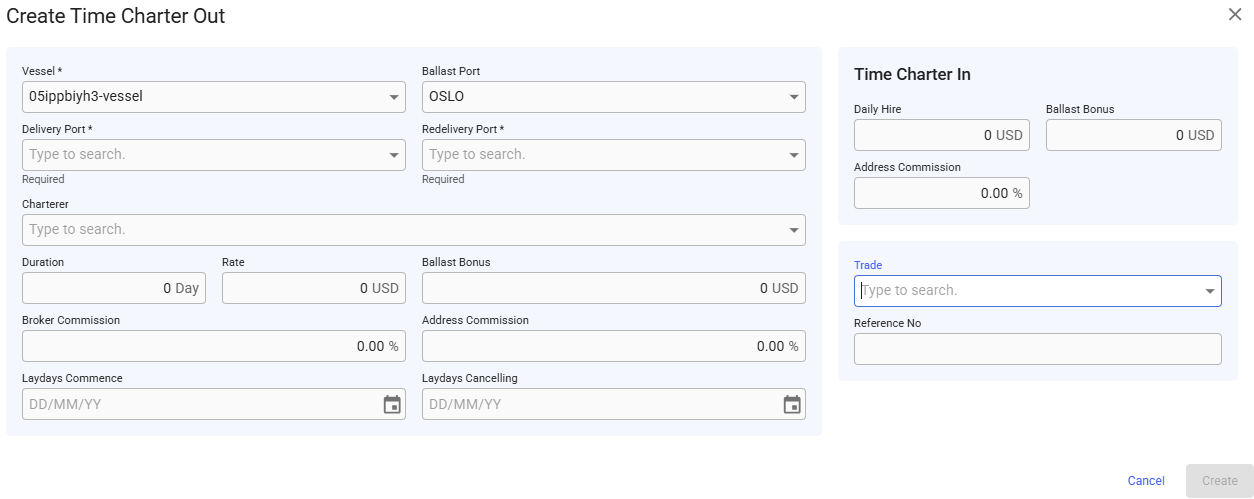
In the bottom right section of the Create Time Charter Out modal the Trade dropdown is located.
Create Voyage From Template (CoA)
To efficiently create a voyage, and link them with CoAs, you can create voyage based on a . The CoA Templates Voyage are the template voyages that are maintained in the Budgets module.
Steps:
Open the Voyages module from the menu on the left.
In the top right corner, click Create .
Select Create Voyage From Template.
In the modal, you can apply various filters to narrow down the selection. Clicking a CoA template voyage selects it. The new voyage will inherit the values from the template displayed in the modal, as well as the Company and Business Unit of the template.
Click Create.
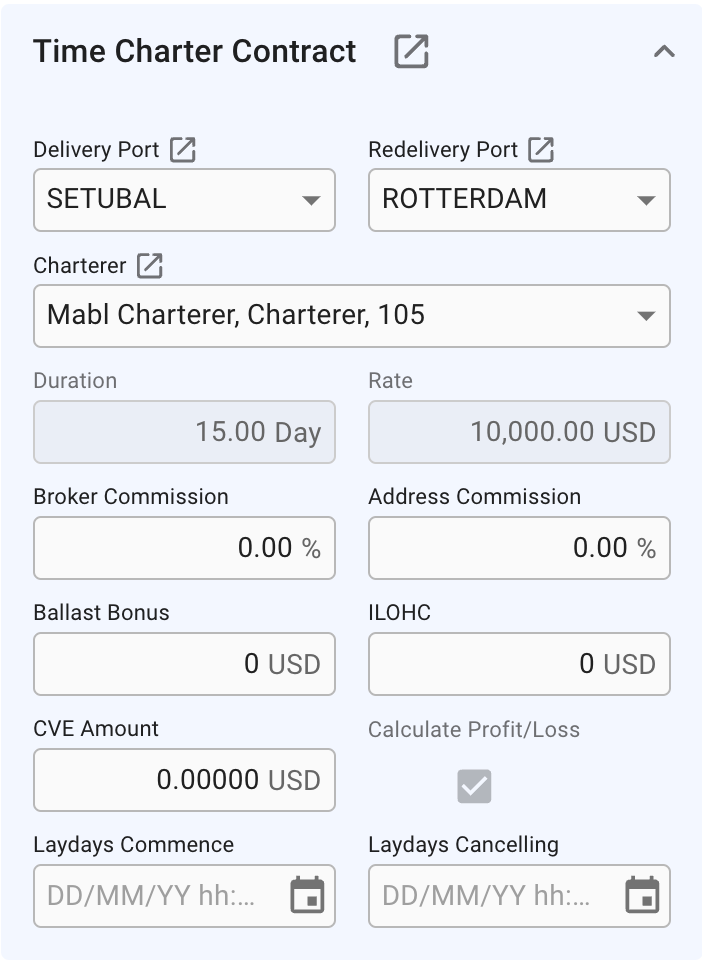
TC
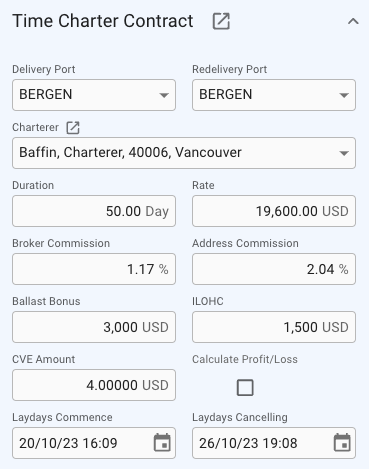
This section is visible on TC voyages.
This small section gives you the most important details of the TC Out contract, as well as the option to change them. Click the icon to open the full TC contract drawer.
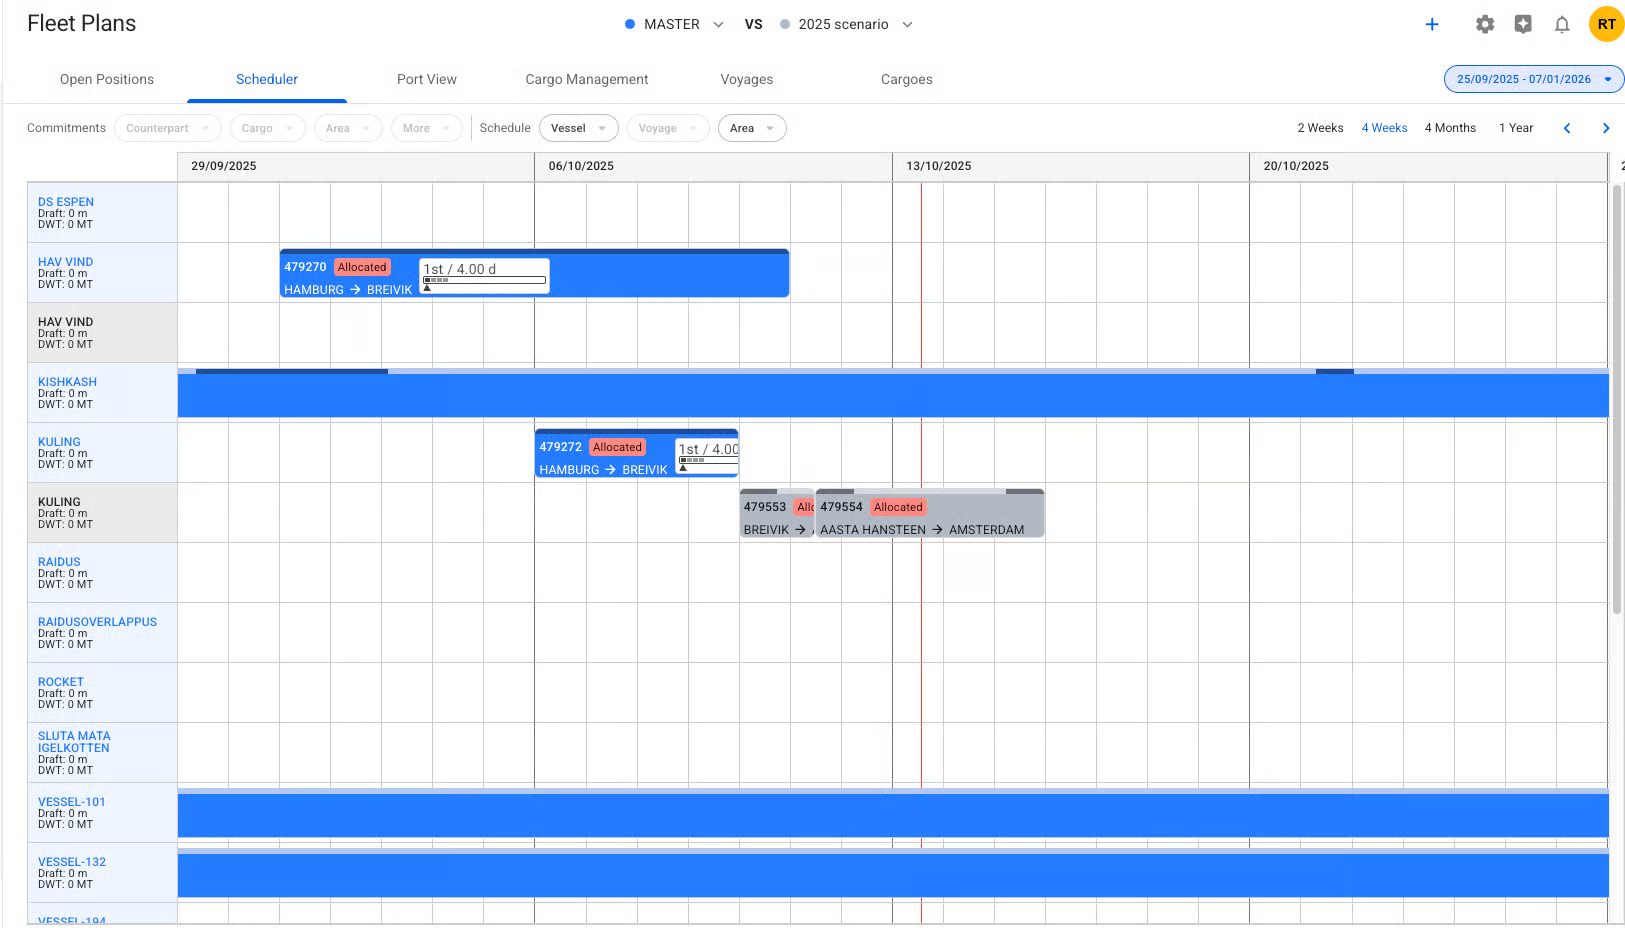
Long Time Charter Schedule
Long TC Voyages, Schedule, and the functionality.
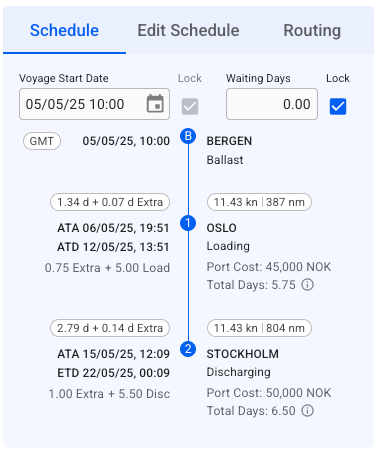
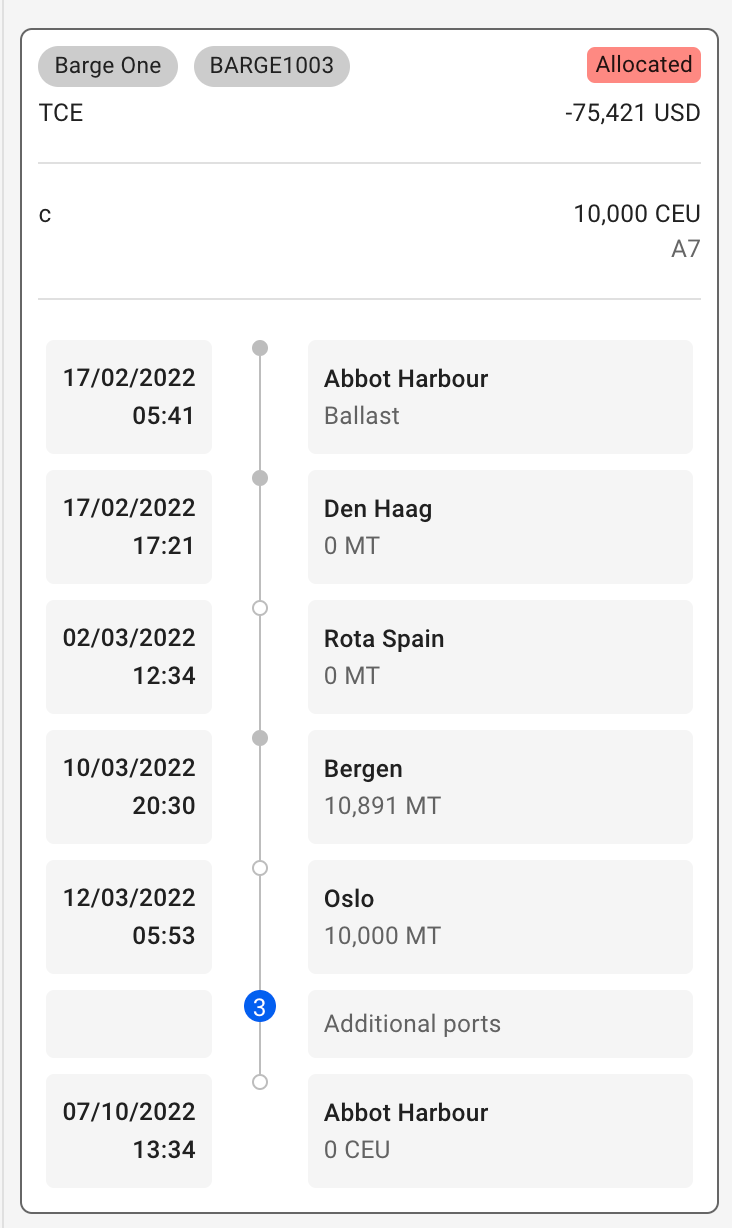
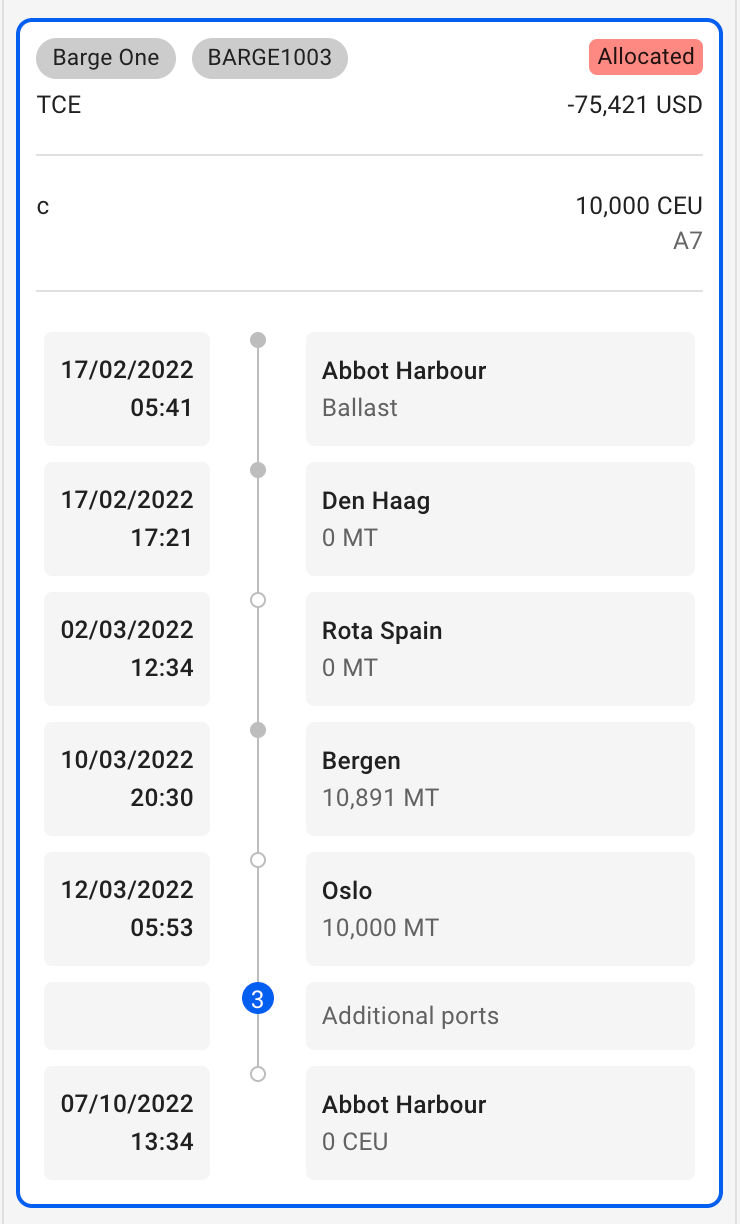
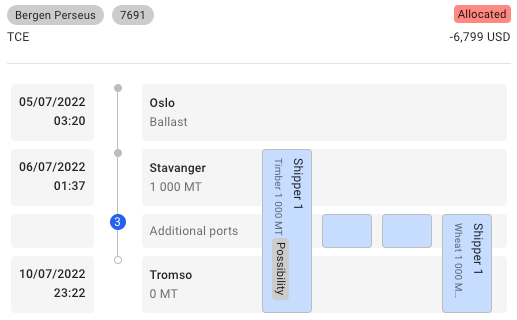
To recognize Long TC Voyages in the system, look for two key indicators: the Voyage Type labeled as (TC) and information in the schedule section. An example of a Long TC Voyage is shown in the screenshot below:
Long TC Voyage Schedule
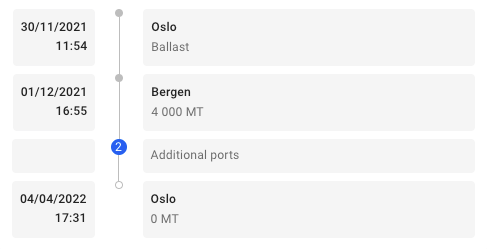
The blue rectangle represents Port Calls that occurred before the current Voyage.
"See All Port" is a link that, when clicked, opens a new browser tab displaying all Port Calls associated with the selected Voyage.
"Show More" is a link that allows you to add up to 5 additional Port Calls per click on the current Voyage's schedule. These added Port Calls will remain visible throughout the system unless the voyage is reopened.
Risk
This section provides the option to customize risk related values
In the risk section, located under the Profit & Loss section, you can change which TC market index the voyage should follow, what percentage of the index value it should use, and the market value of the vessel in the same currency as the voyage.
The risk section
Analysis
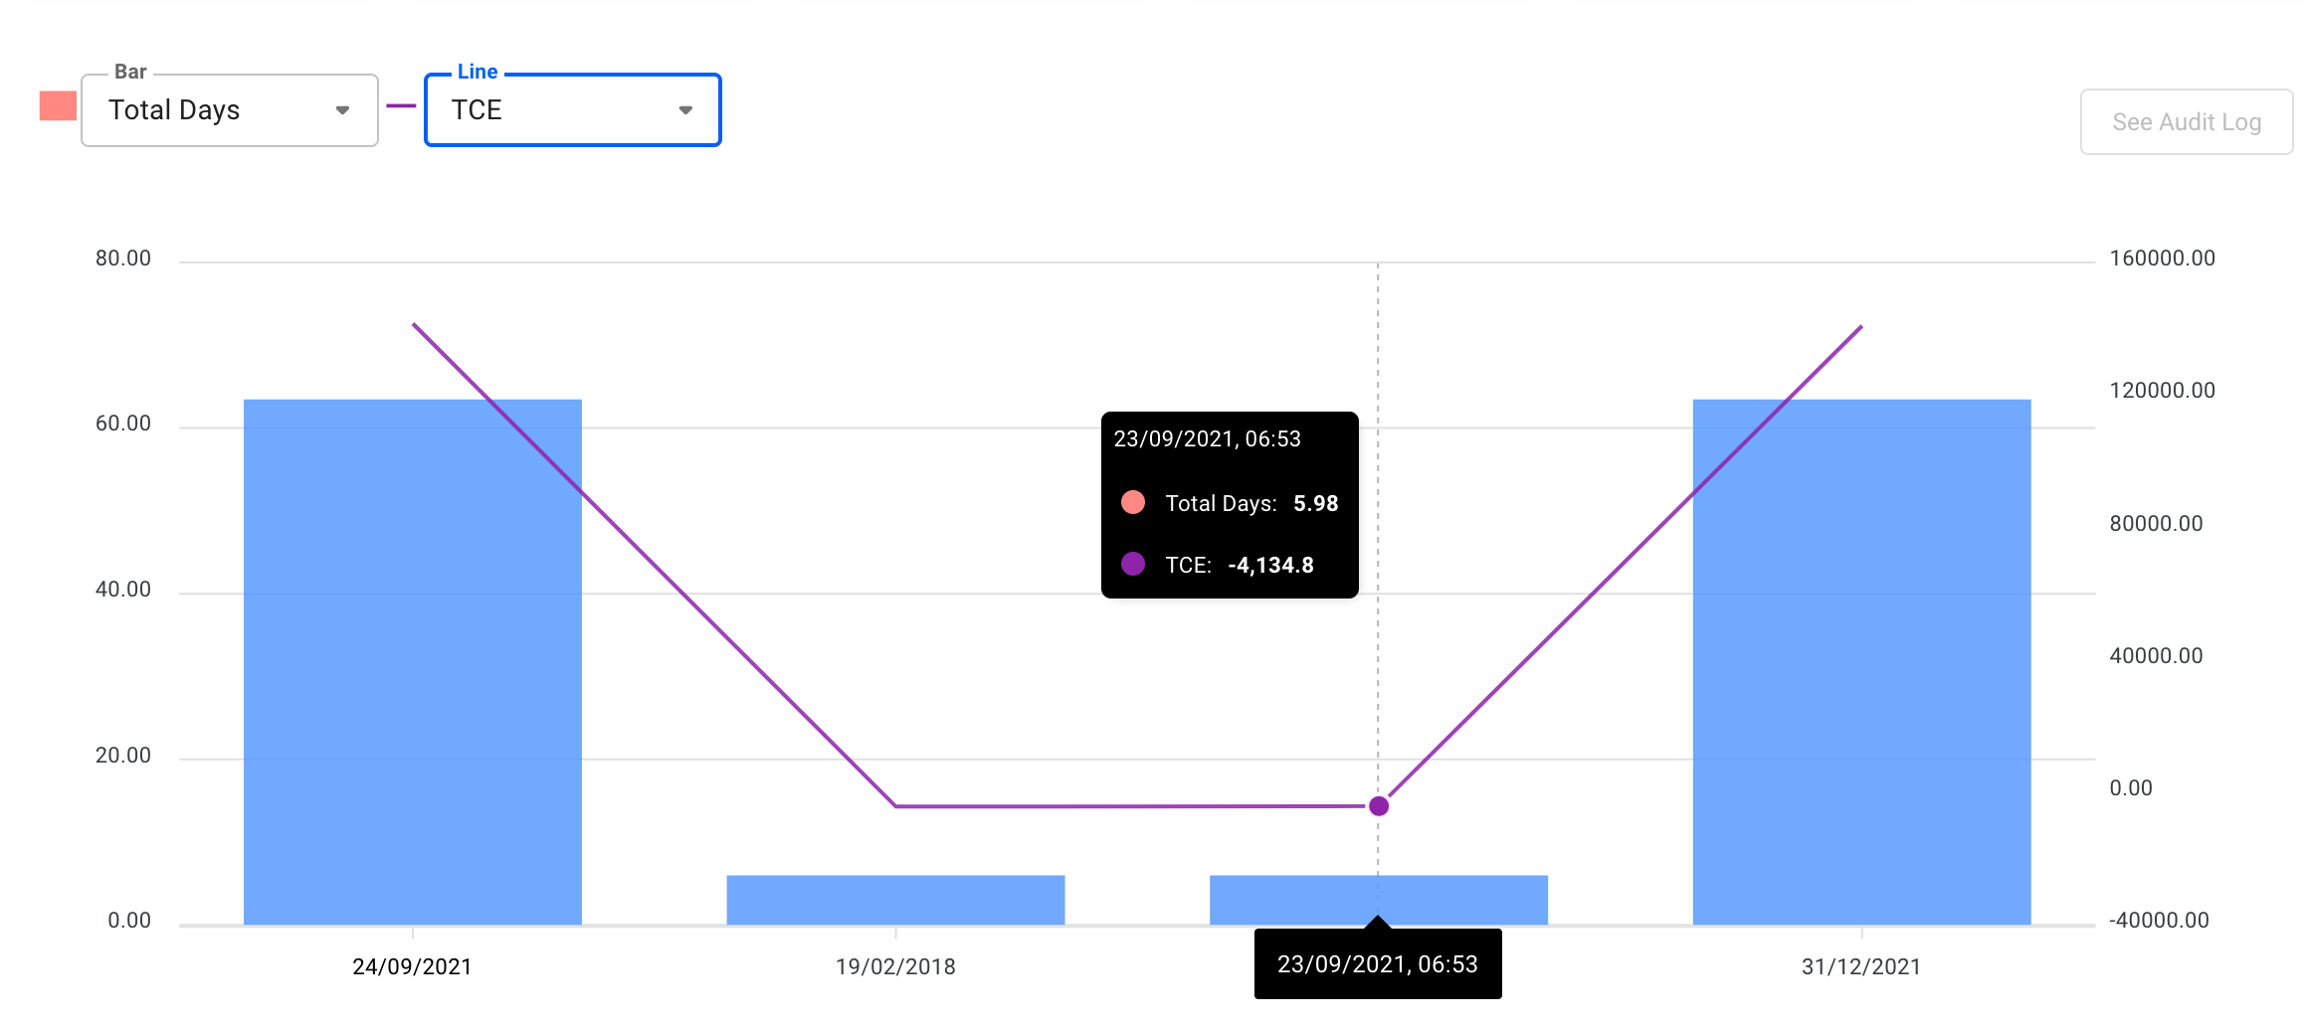
When in a voyage drawer the analysis tab is available in the tab section. In this tab you will be presented with a graph to give you a visual view of the development of key values in the selected voyage.
The graph that is displayed represents the total days for the columns, and the TCE for the line. These values can be changed in the dropdown fields on the top left. The timeline shown will be from the preliminary snapshot is taken to the current date. If the voyage is closed, the last value will be the last time the voyage was changed instead of todays date.
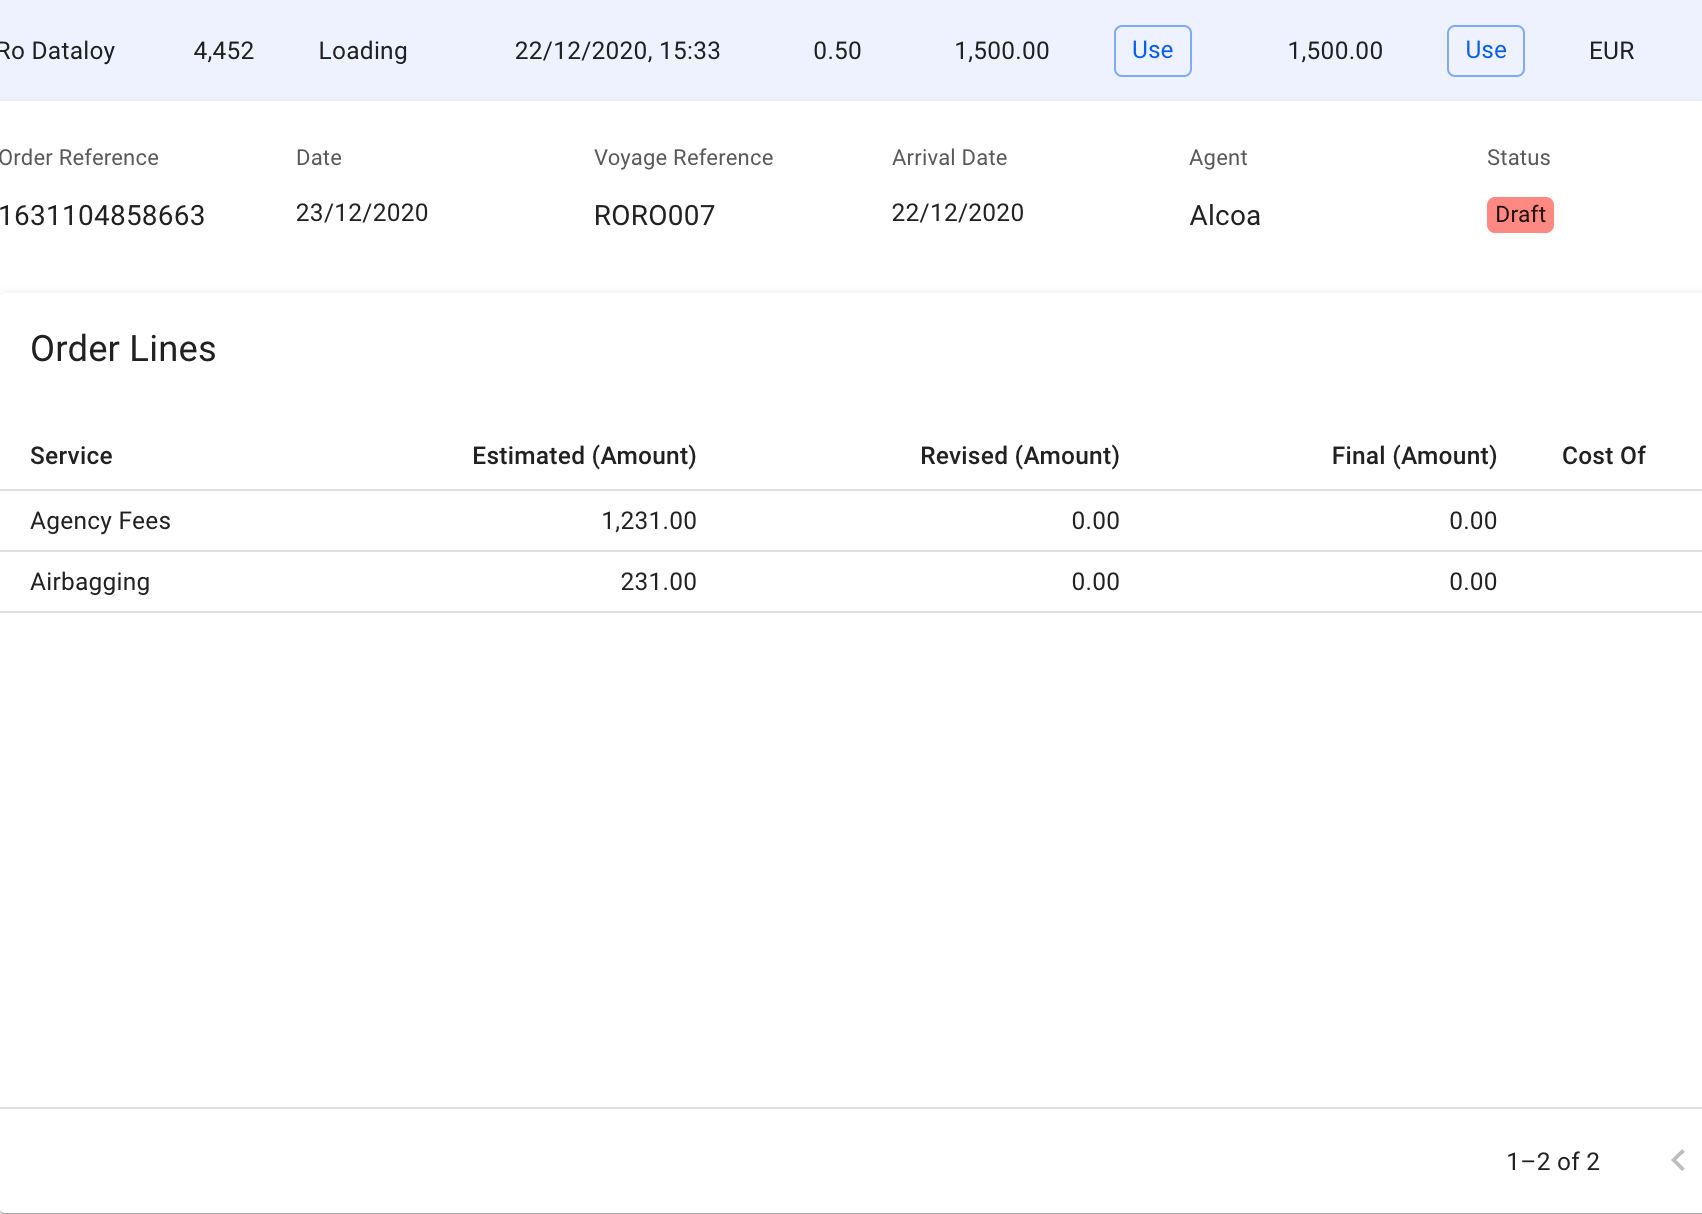
Maintain Port Costs
You can choose to use either the Actual Port Cost or Preliminary Port Cost of previous port calls to update the port cost of the selected port call.
To make use of a Preliminary Port Cost of a port call on the system, click the button to the right of the Preliminary column. To make use of an Actual Port Cost of a port call on the system , click the button to the right of the Actual column. Clicking this button will also update the currency of the port cost of the selected port call to the currency shown on the row.
Clicking any of the "Use" button will update the port call's port cost, which will be accumulated on the voyage's overall port costs.
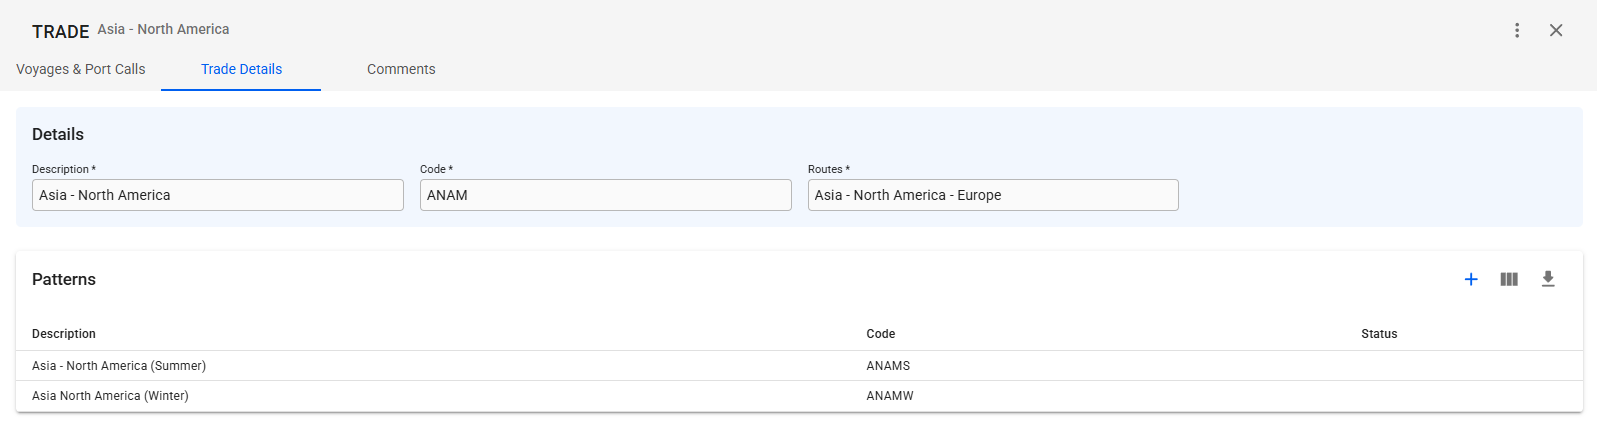
Trade Details
In the Trade Details tab there are two sections. Details and Patterns.
Details
In the details section you can see and edit the Trade's description, code, and which Routes the Trade is in. All of these fields are required, and cannot be empty. The Code field also has to be unique code that is not used by any other Trade.
Patterns
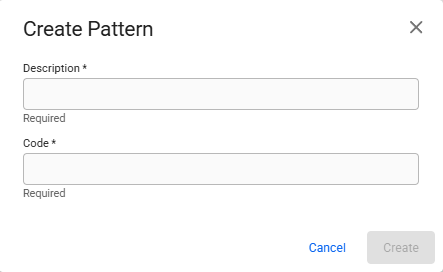
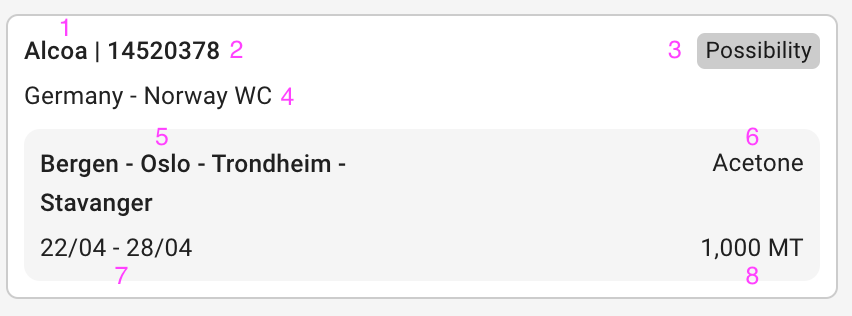
The Patterns list contains all the Patterns for selected Trade. You can create a new pattern by clicking the in the top right corner of the list. Clicking this will open the Create Pattern modal, as seen below. Both fields in the modal are required for being able to create a Pattern. The Code field also needs a unique code, that has not been used by any other pattern in your system.
Deviation Calculation
This page provides a detailed explanation of a Voyage Function - Deviation calculation.
The deviation calculation function offers a comprehensive analysis of the difference between the current voyage and the same voyage as if it were direct — from the ballast port to the last port call.
This function is particularly useful when freight rates are low, voyages must adhere to strict schedules, or deviations are required for compliance. It helps determine whether an additional detour can generate enough extra revenue to offset the added distance, time, emissions, and fuel costs.
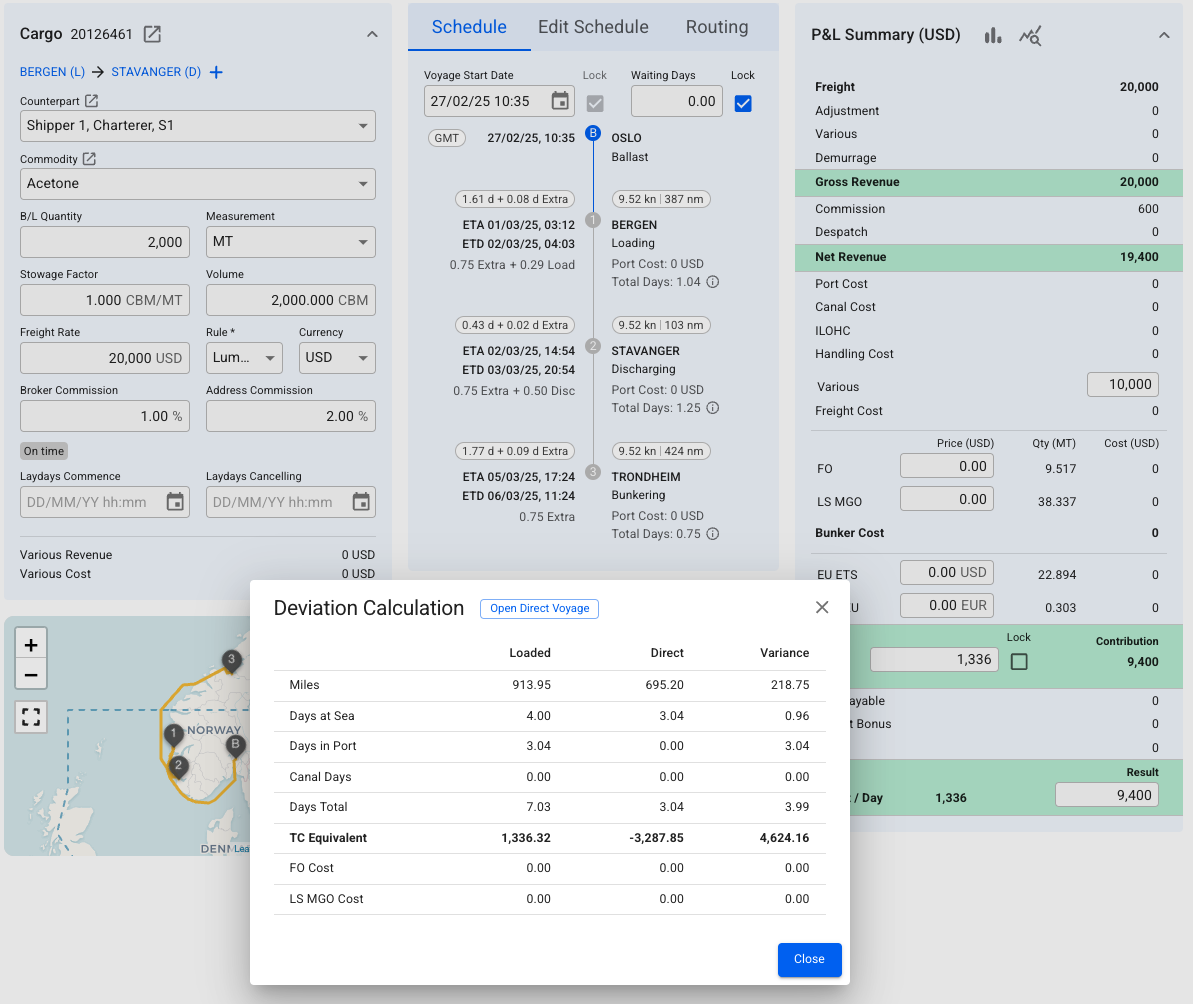
Figure 1. Deviation Calculation modal.
Figure 1 shows the Deviation Calculation window, comparing the current voyage results (in the Loaded column) with a hypothetical direct voyage (in the Direct column). The Variance column highlights the differences between the two. By clicking Open Direct Voyage, users can review the direct route’s details (Figure 2). In this example, the detour with cargo generates higher revenue, making it a more favourable option.
Prerequisites:
The Deviation Calculation function is available only for Estimate Voyages.
Downtimes
From the "Downtimes" tab in the voyage drawer, you can view the downtimes for the voyage. Click on an item in the list to go to the the corresponding drawer and view more information about the specific item.
Clicking the -icon on the table will bring up a modal to create a downtime.
If one or multiple Service Orders are present on a Port Cost the rightmost corner of the row will show an expandable arrow
By clicking the arrow , all the linked Service Orders will be shown.
An expandable arrow on the rightmost side of the Service Order row is also available, and clicking this will show the Service Order Lines for the selected order.
Configure Voyage as a “Last TC Voyage”
In the voyage drawer at the vessel section you will find a checkbox for setting "Last Voyage for Current CP". This checkbox is disabled when there is no TC In Contract registered.
Voyage Functions
The VMS provides powerful voyage tools for risk assessment and estimations on cargo capacity on port calls.
These tools are available from Voyages or Planning -> Fleet Plans
Click on a voyage in the voyages list or board to open it in the drawer.
A voyage can be converted to a TC Out voyage if the following conditions are met.
The voyage is not Closed
The voyage is not already a TC voyage
The voyage does not have any cargo
The voyage has both a delivery and redelivery port call
To convert the voyage, click on the three circles in the top right of the voyage drawer, in order to open the secondary actions menu, and click on the Convert to TC Out option.
This will bring up a conversion modal, with Owner and Duration fields pre-filled, based on the vessel and voyage. You can override the default duration by entering a new number. Unless the arrival and departure dates in the delivery and redelivery port calls are locked, the arrival date of the redelivery will be recalculated such that the voyage laden days will match the entered duration.
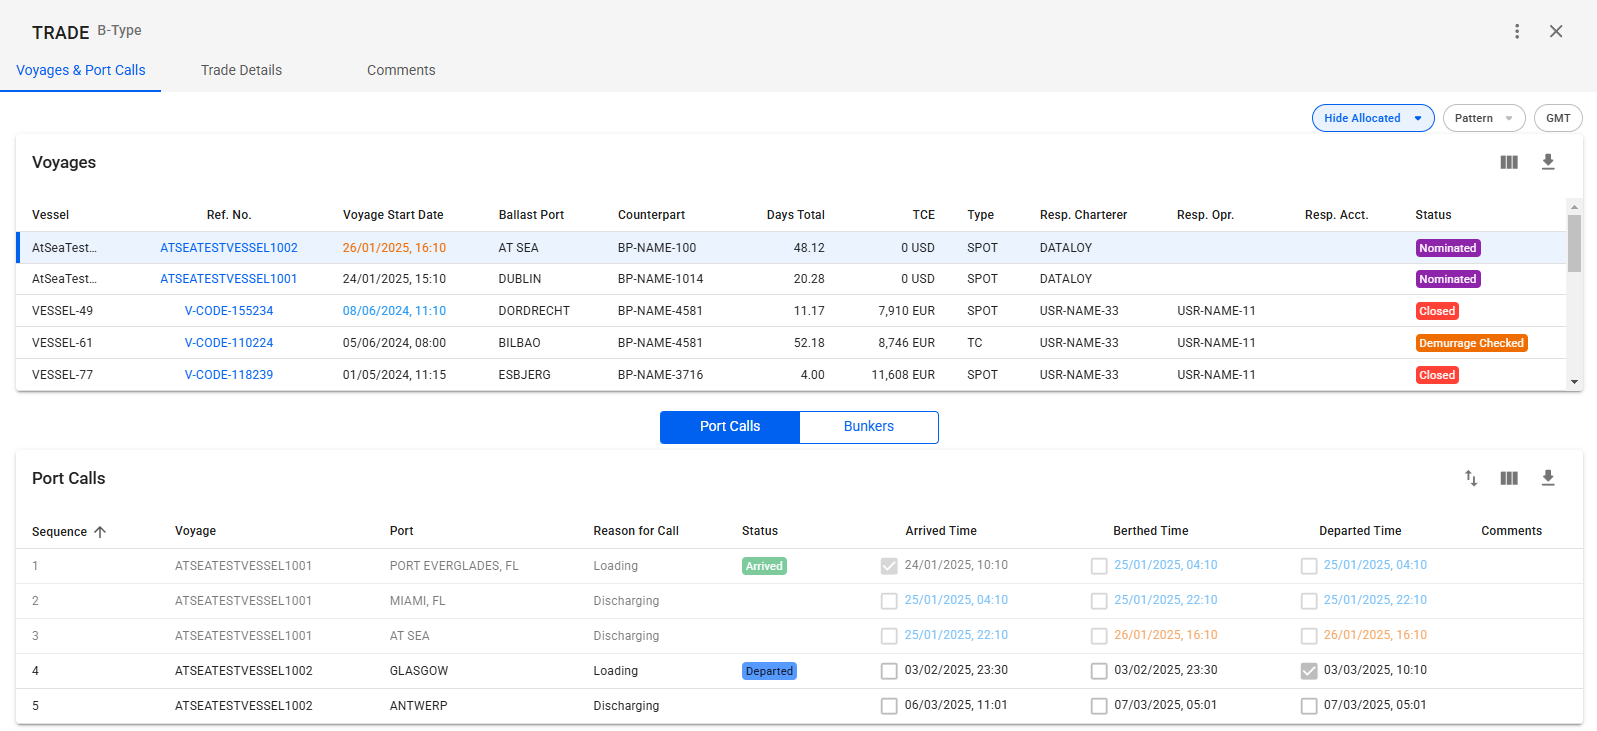
Voyages & Port Calls
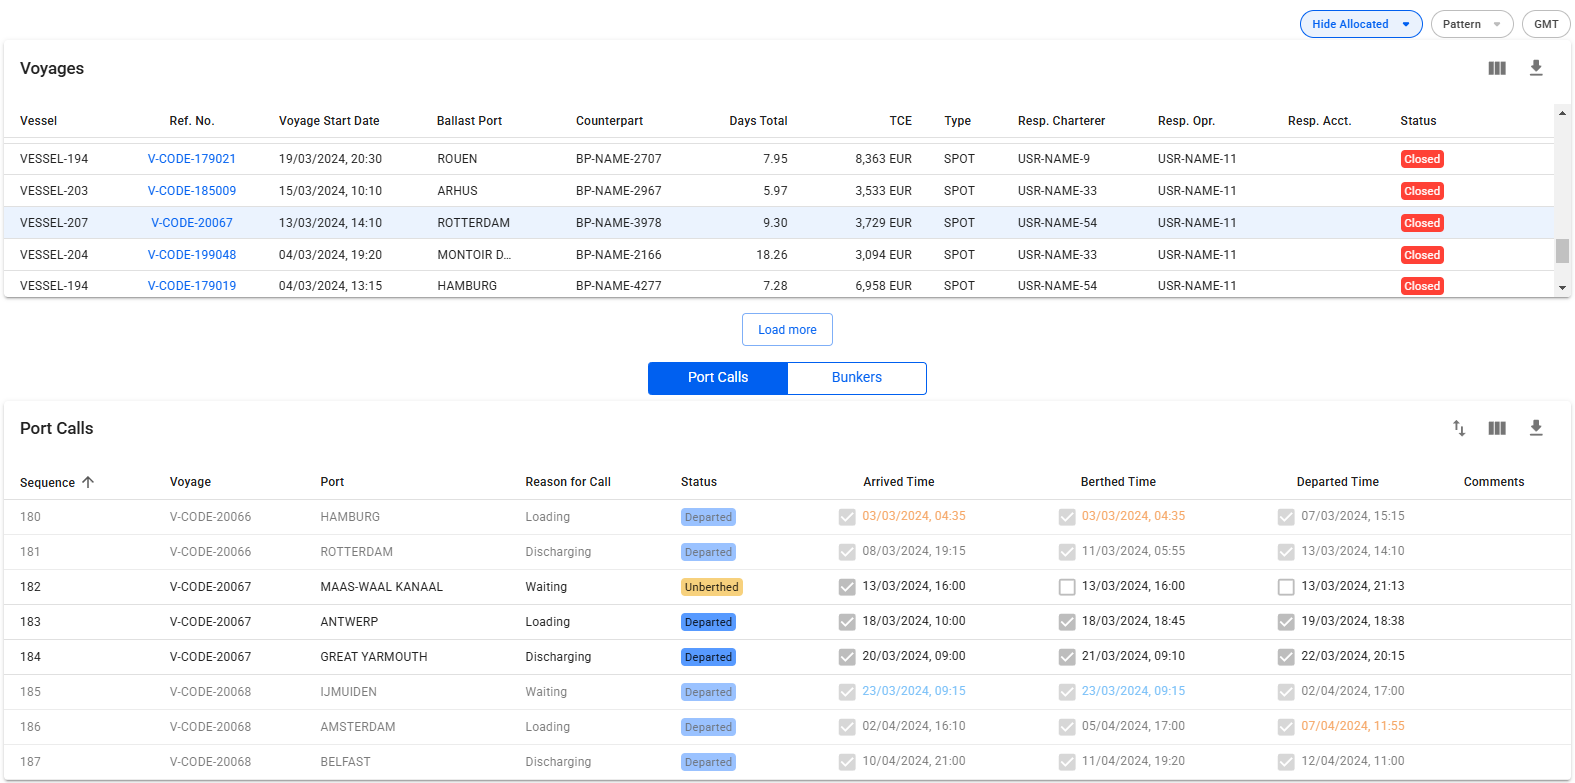
The Voyages & Port Calls tab has two sections. A list of all voyages for the selected trade, and then a choice between the port calls or bunkers for a selected voyage.
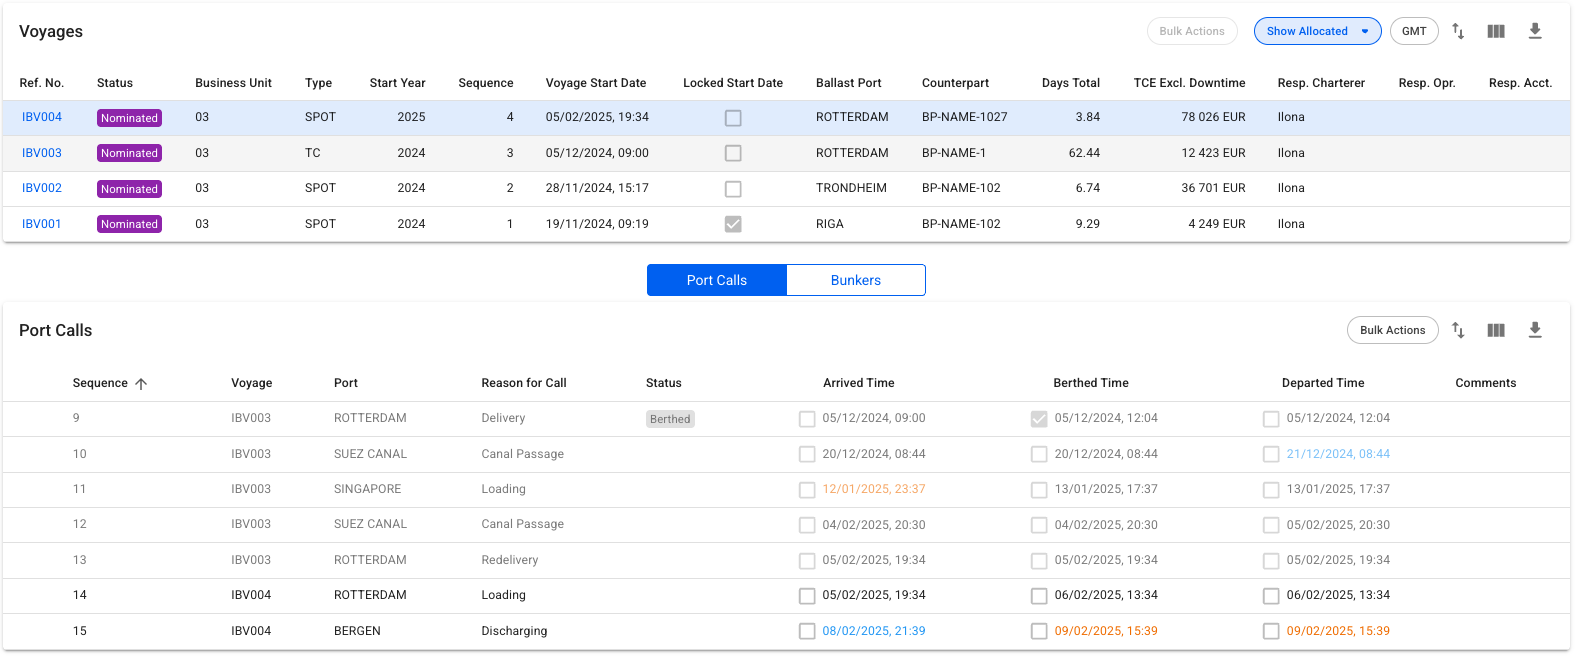
This is a list of voyages on the opened trade sorted by newest first. Clicking the icon will bring up a modal to customize which columns are visible. In the upper right corner of the list there is the option to hide/show allocated voyages for the selected trade, filter voyages based on which pattern they are part of, and show the times in GMT instead of local time. If there is an ongoing voyage in the list, it is indicated with a blue marker on the left side, as seen in the image below.
Below, you will find a list of either Port Calls or Bunkers, and a button to toggle between the two different views.
While in Port Call view, clicking on a voyage row will list all port calls of the selected voyage, as well as the port calls from the previous and next voyage on the same vessel as the selected voyage, if they exist. The port calls from the previous and next voyage on the same vessel will be in a slightly lighter colour, such that it is possible to tell them apart. Clicking directly on the reference number of the voyage will open up the
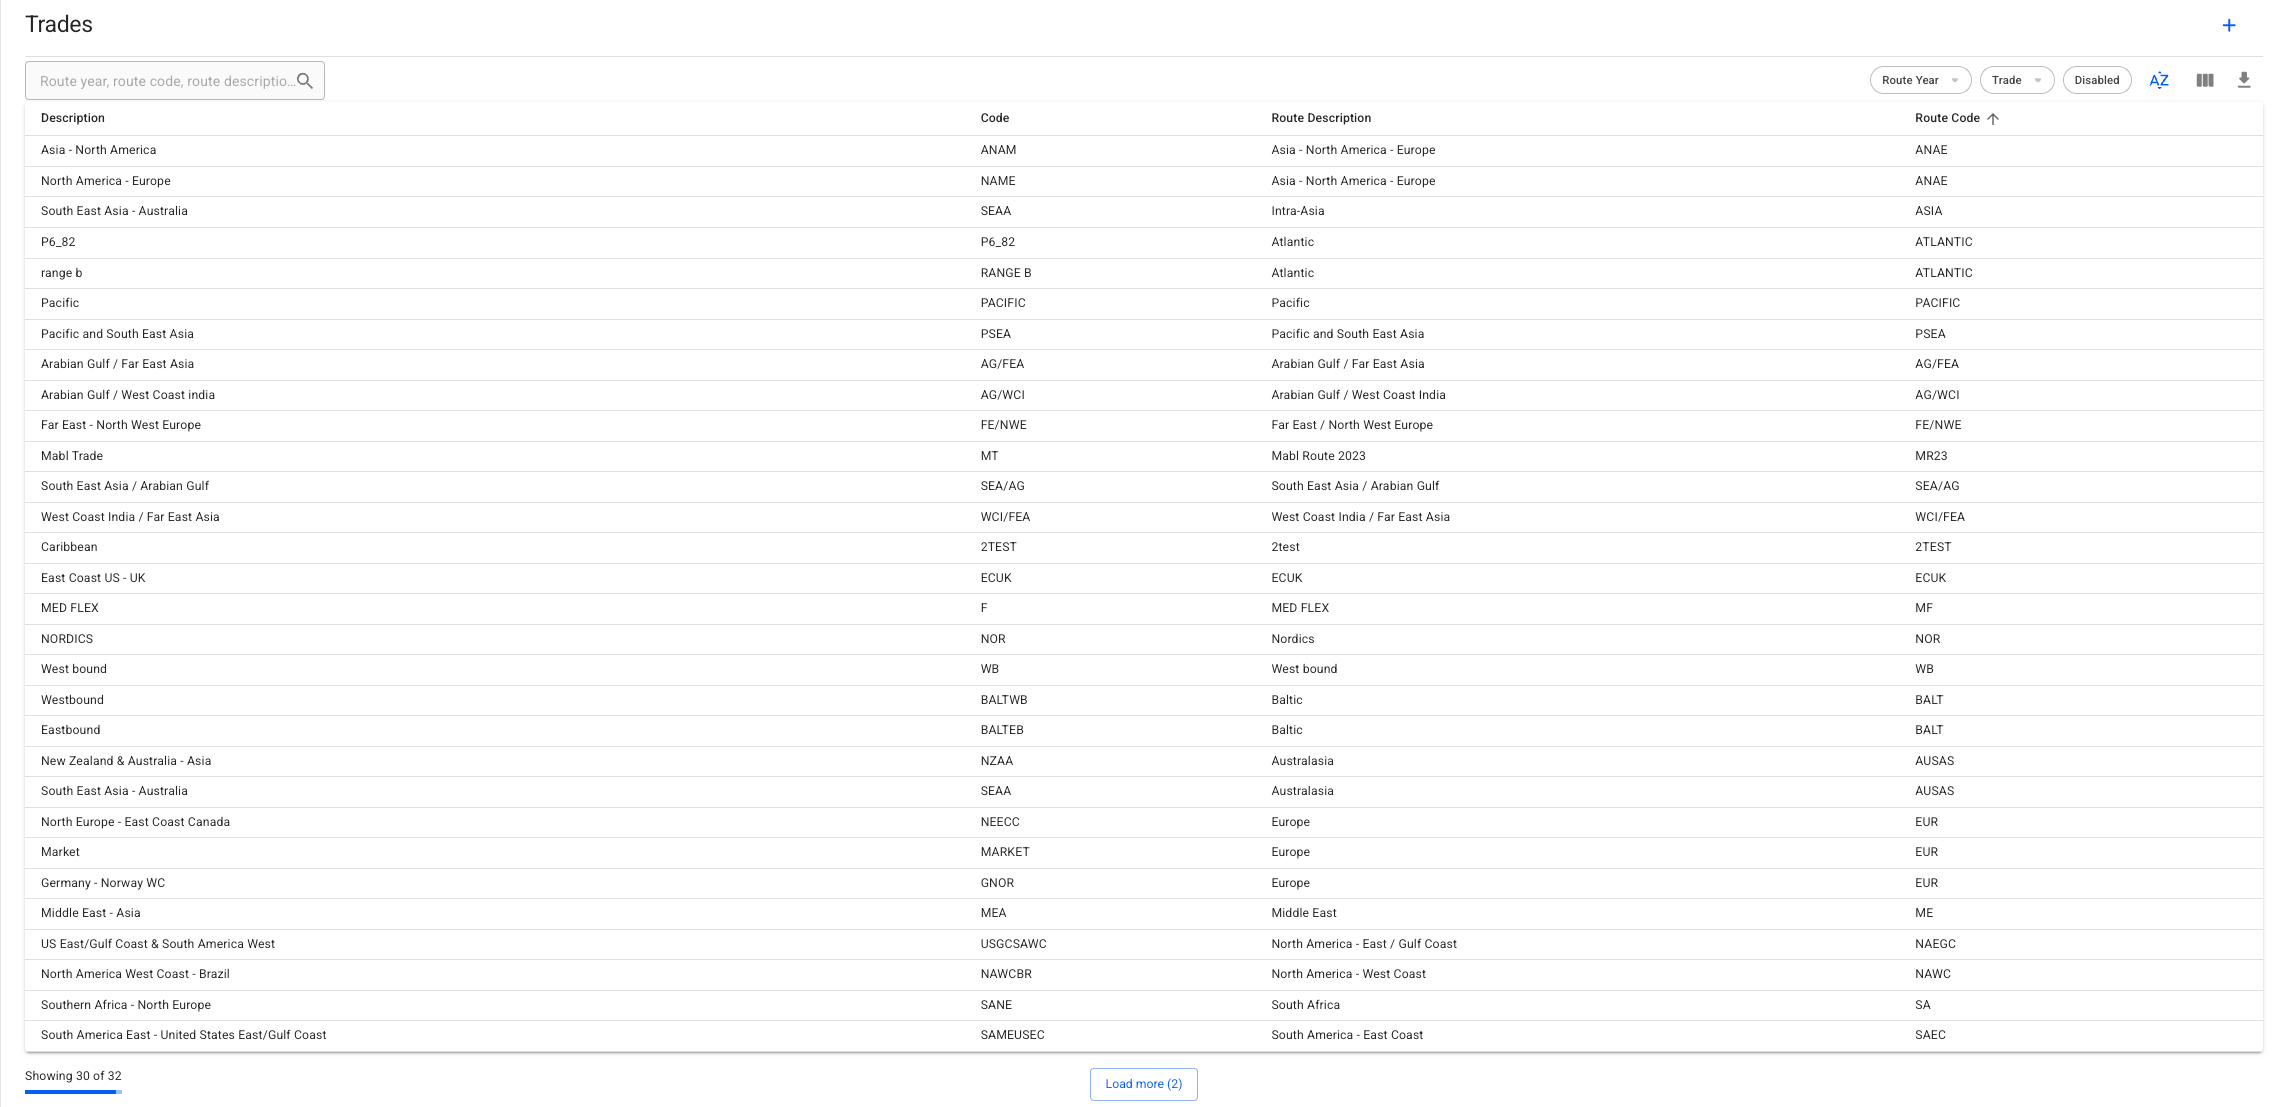
Find Trades
The Trades module contains a list over all Trades in your system. Here you can search for, filter and sort all your trades.
There are several options available for you to narrow down what you see in the list view, as well as the ability to toggle which columns are displayed (with the setup).
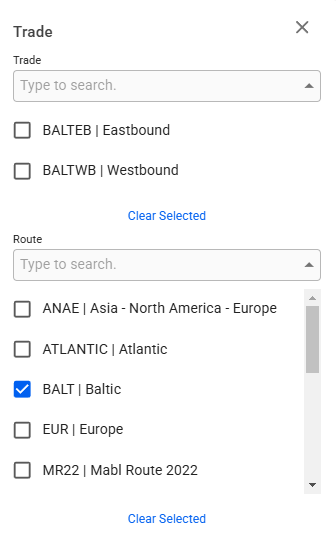
For sorting, look for the arrow to the right of the column headers or the blue icon above and to the right of the list. For filtering, you can use the quick filters provided above the Trades list. Which include filtering on the year, which trades and/or routes, and disabled trades.
The Trade quick filter consists of two filters. The top filter filters on specific trades and the bottom one filters trades based on the selected route(s), see the first tab below. The available options in the top filter will change based on the selected route(s). Such that the top filter will only show trades that are part of the selected route, see the second tab below.
Internal Data
Open the Vessels module in the Master Data section.
Open the Vessel drawer
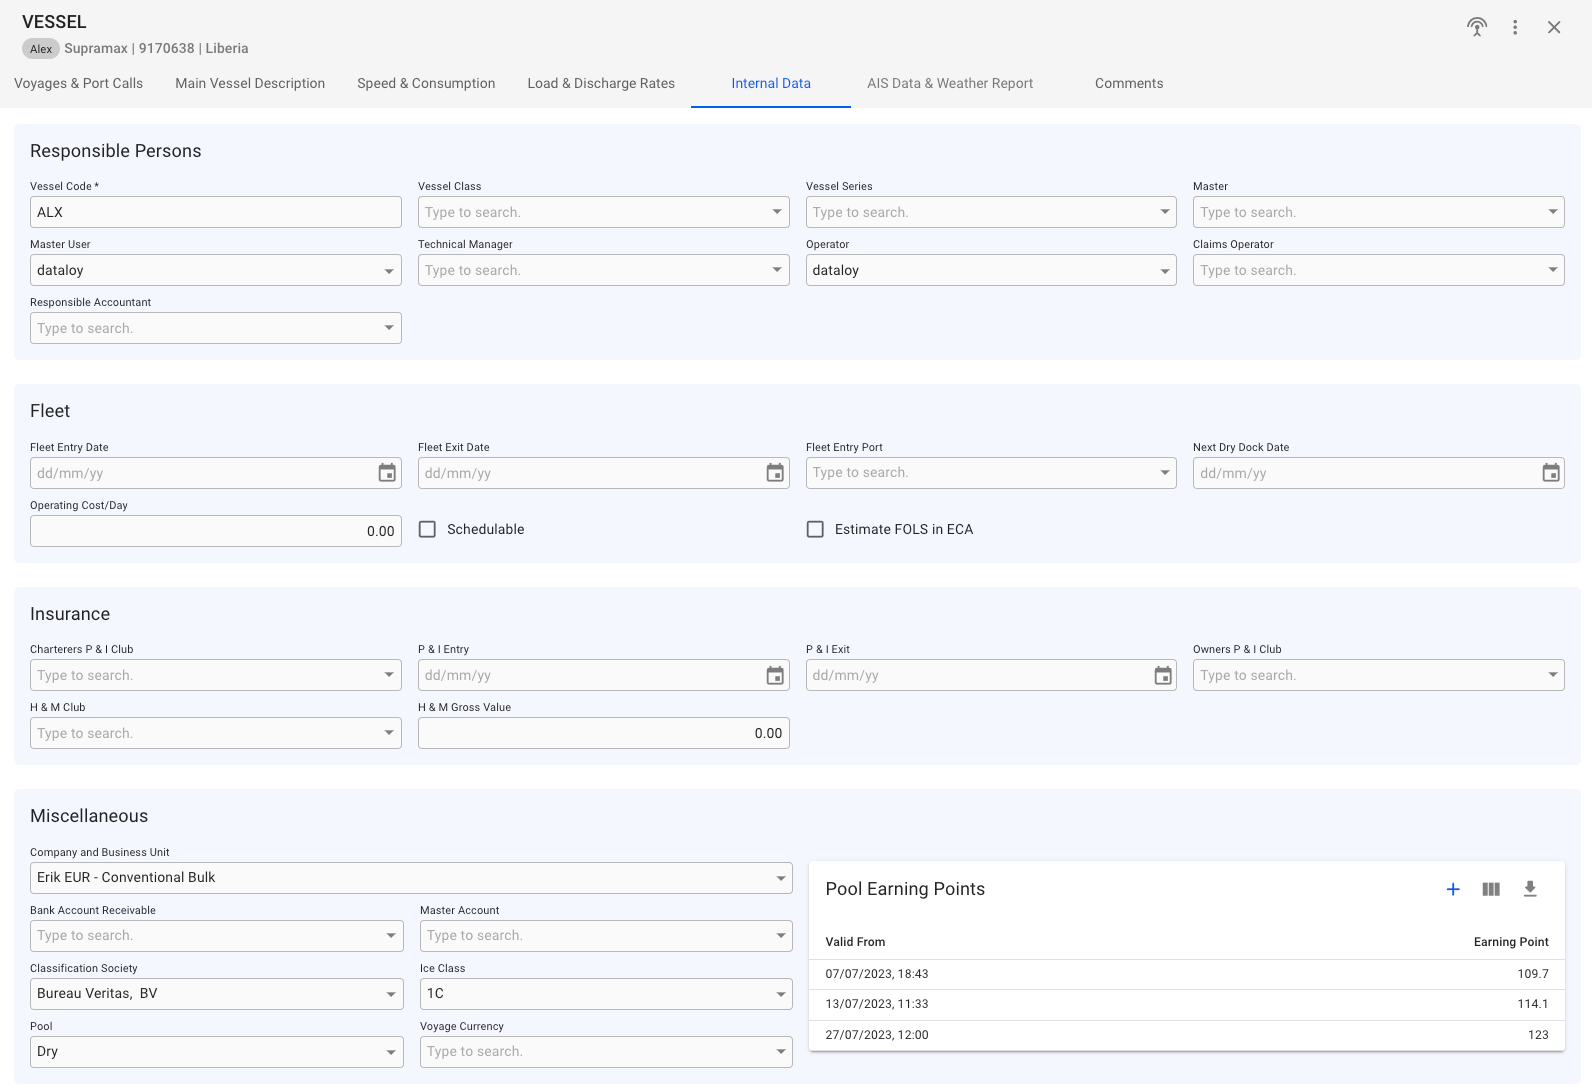
Miscellaneous:
Here, you can set fields like and Business Unit, Bank Account Receivable, Master Account, Classification Society, specify the
Create Vessels
Open the Vessels module in the Core menu in the top left corner.
Click Create Vessel in the top right corner.
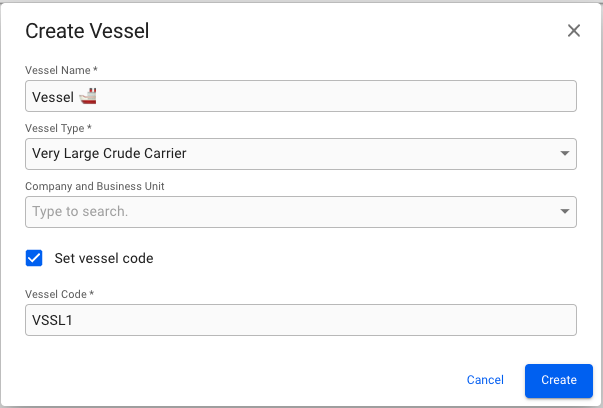
Fill in all required fields listed below in the Create Vessel window.
Create Time Charter Out
Open the Voyages module from the menu on the left.
On the top right corner, click the icon.
Select Create Time Charter Out.
Cargo
This section is visible on Spot and CoA voyages.
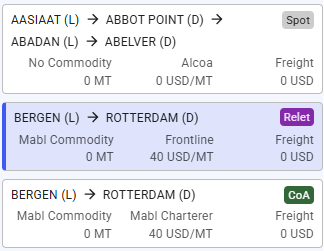
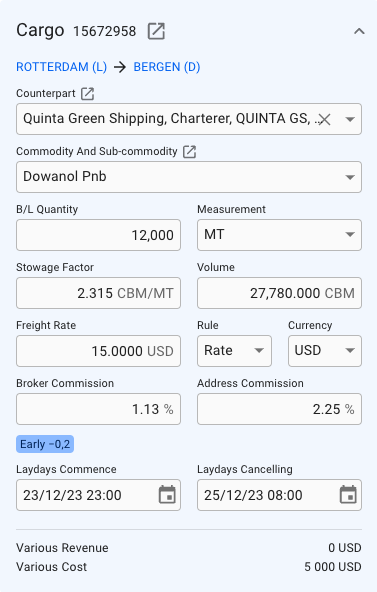
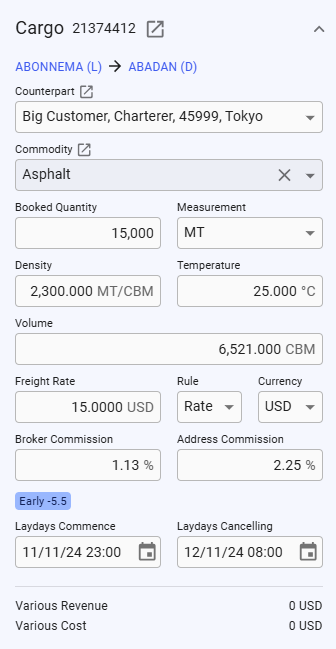
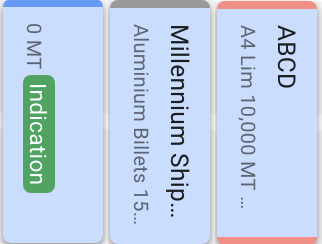
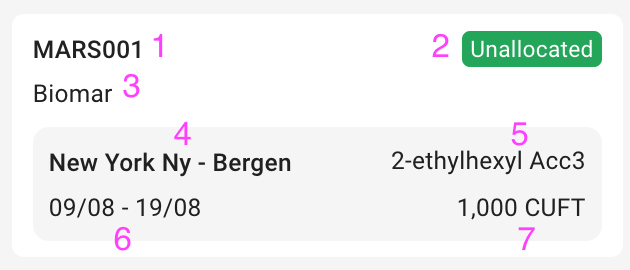
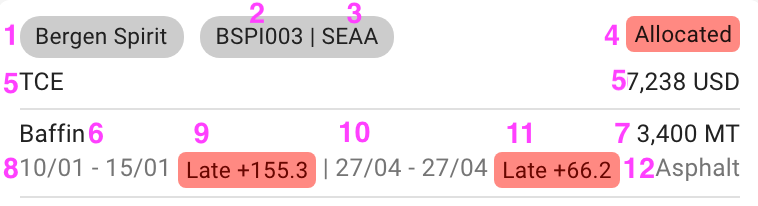
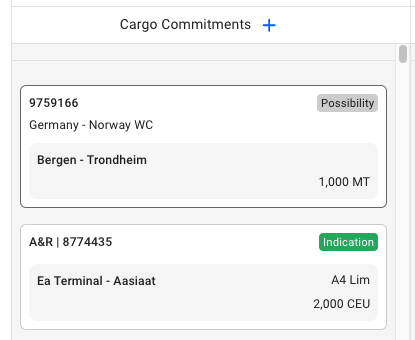
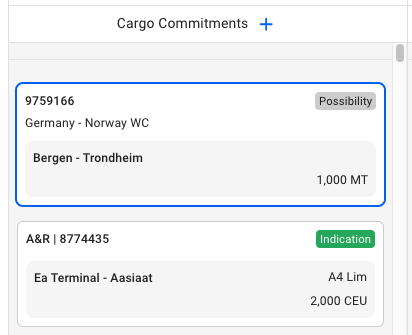
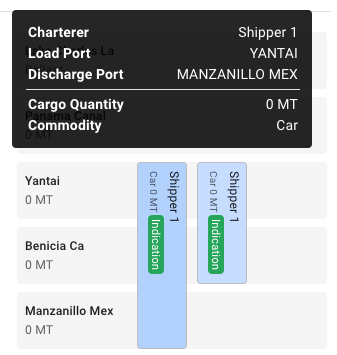
To the left, a scrollable list of cargoes are presented as small, blue cards, showing you some select details about the cargo. This is meant to be a quick overview, to be able to differentiate between the different cargos. Clicking on a cargo will select it, and the Cargo-section to the right will update. The currently selected cargo is marked by a blue line on the left side of the card. Hovering over a cargo card will bring up the option to copy it, or open the cargo drawer. While a cargo drawer is open, you may click on any part of the card to open the cargo drawer for that cargo:
Clicking the button in the top right to create a new cargo on the voyage, either from an existing CoA template, or as a brand new cargo.
The cargo section allows you to directly change some of the fields of theselected cargo (performance cargo by default) from the Voyage drawer without having to open the Cargo drawer. If you are looking for more fields however, you will need to open the up Cargo drawer (clicking the icon will open the drawer):
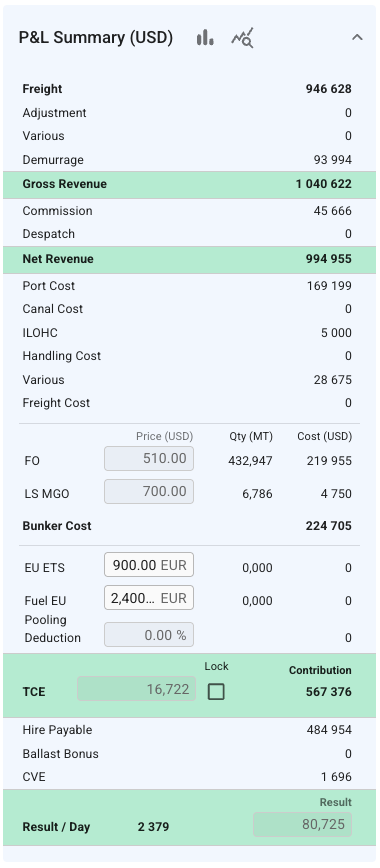
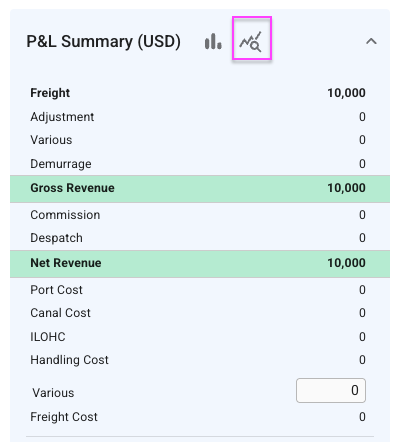
Profit/Loss Summary
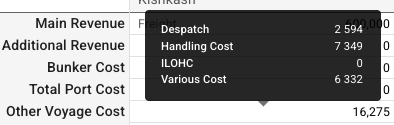
The summary section displays all cost/revenue items, including fuel consumption and price, related to either cargo, voyage, or port call. This breakdown displays different figures for Voyage Charter and Time Charter estimates.
When the voyage drawer is open, selecting Open Full Screenexpands the panel and shows an additional section/panel summarizing the profit/loss for this voyage.
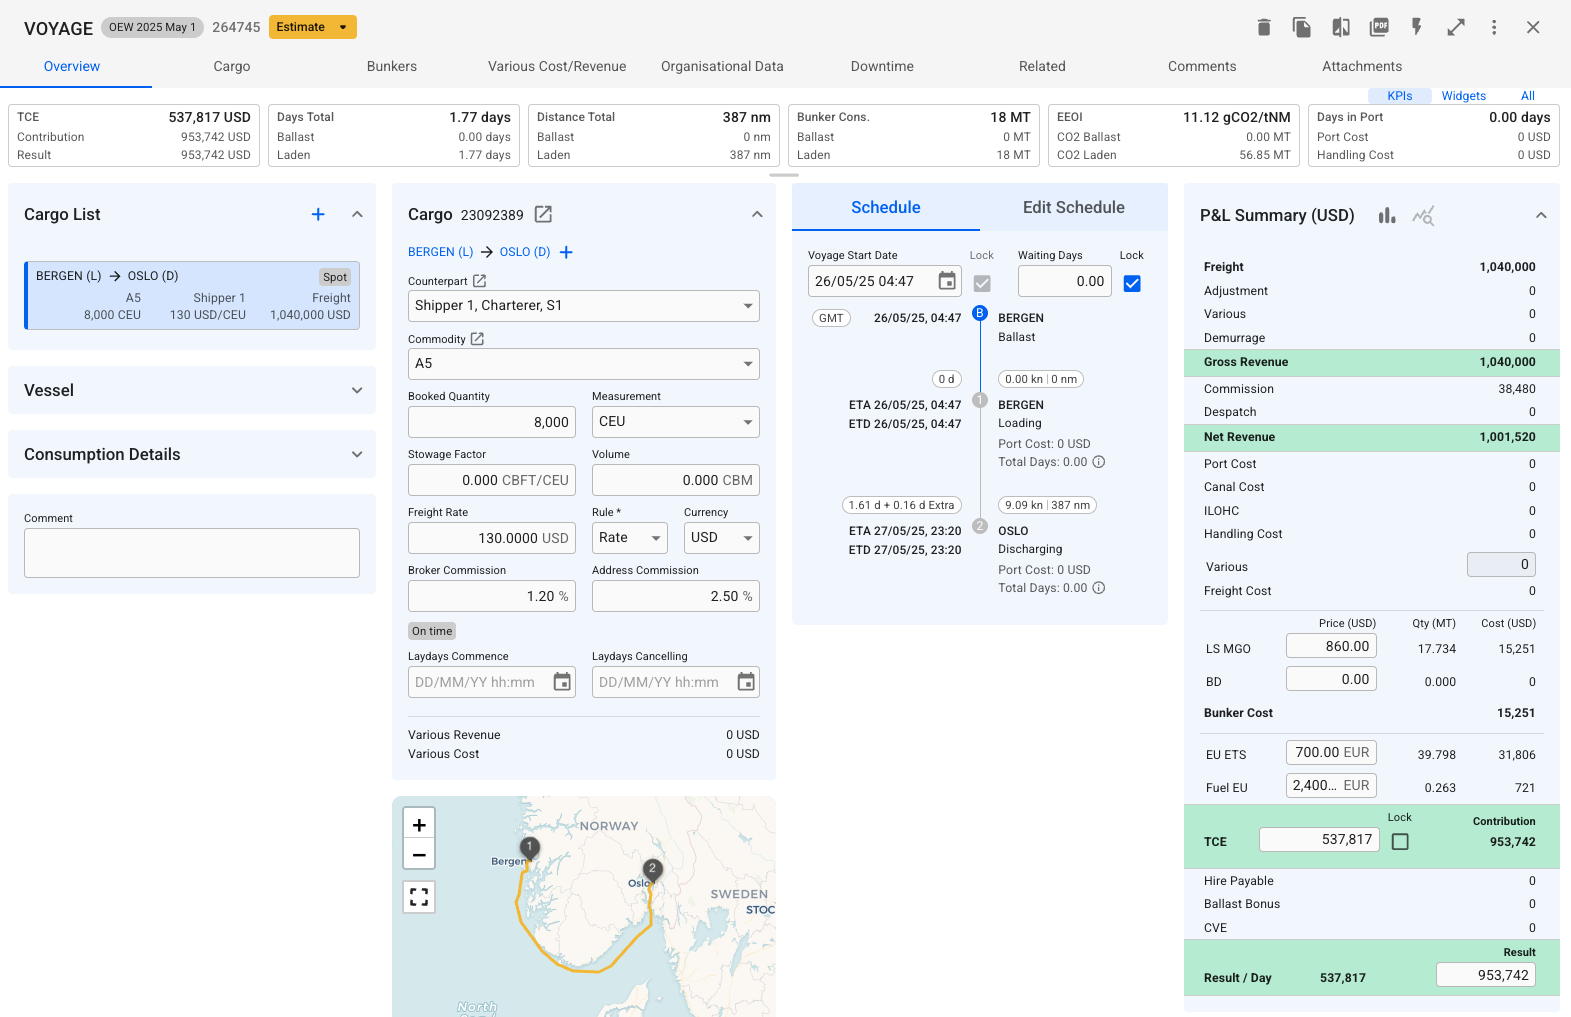
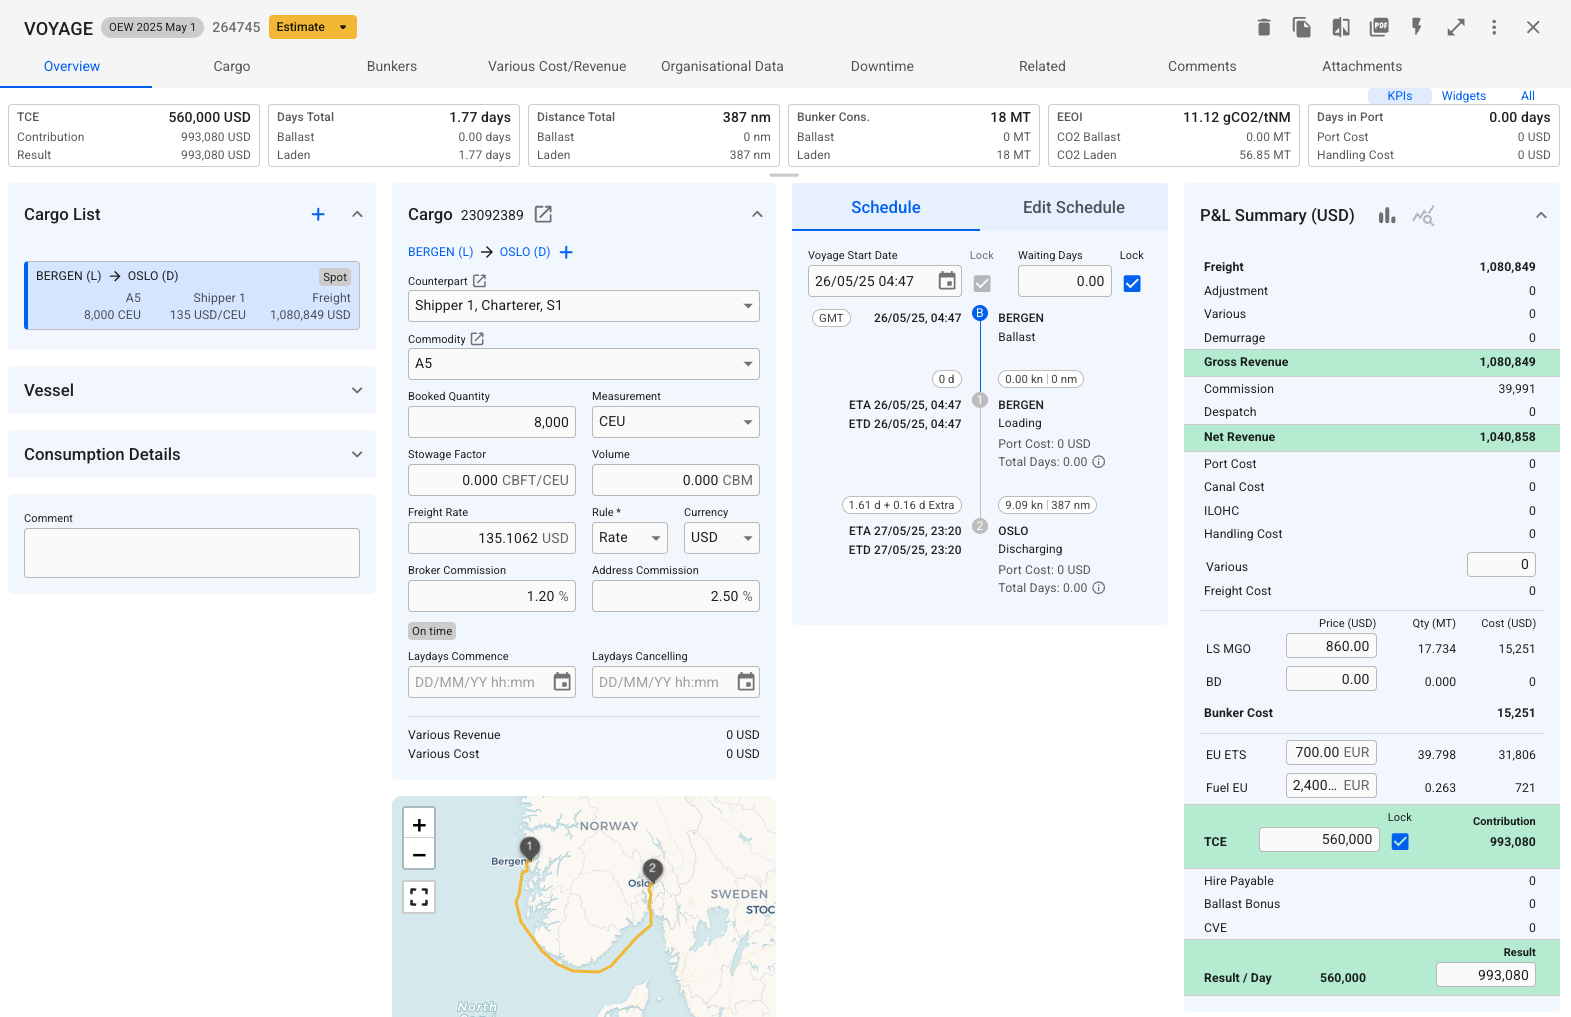
By selecting the TCE checkbox in estimates, you can override either TCE or Result. The system will then automatically compute the estimated freight or TC rate needed to reach this desired outcome.
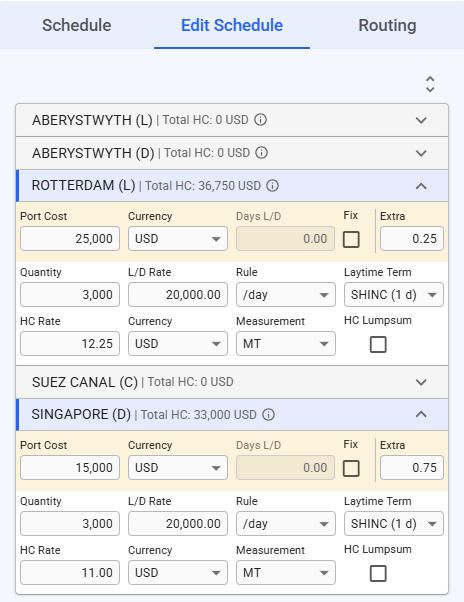
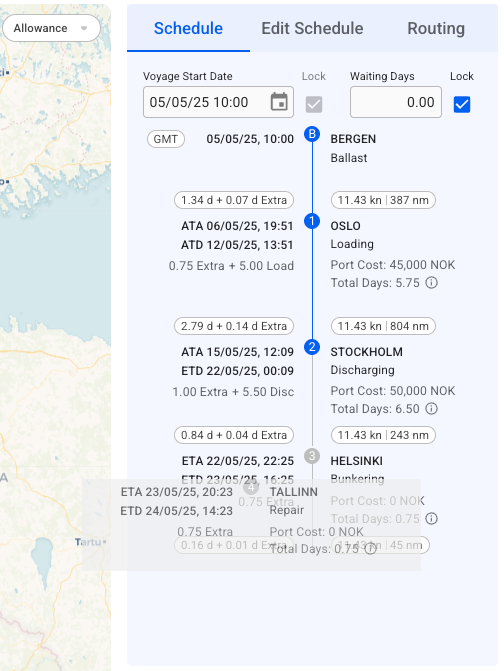
Schedule - Edit Schedule
The "Schedule" section in the Voyage drawer comprises three sub-sections: Schedule, Edit Schedule, and Routing. This part focuses on the 'Edit Schedule' tab.
This list displays a more detailed view of all the port calls in the schedule:
With this icon , you can either expand or collapse all of the port call items in the list (the list is expanded by default). You can also open and close the collapsable items, independent of each other, to view the detailed information.
The first row, in yellow highlight, you can find the Port Call's Port Cost, Currency, Days L/D, Fix checkbox and Extra (days in port).
The next two rows, you can find the
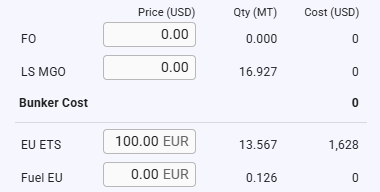
EU ETS Cost
When your system’s differs from the voyage currency, the EU ETS Costis computed in two phases but applied in one formula:
Base cost in default currency
Multiply the EUA price by the quantity (EU ETS emission).
Conversion to voyage currency
Apply the exchange rate between the default currency and the voyage currency.
In the figure below, the header shows USD (the voyage currency), while the price field’s end adornment shows EUR (the default currency). The EU ETS Cost is calculated according to the formula:
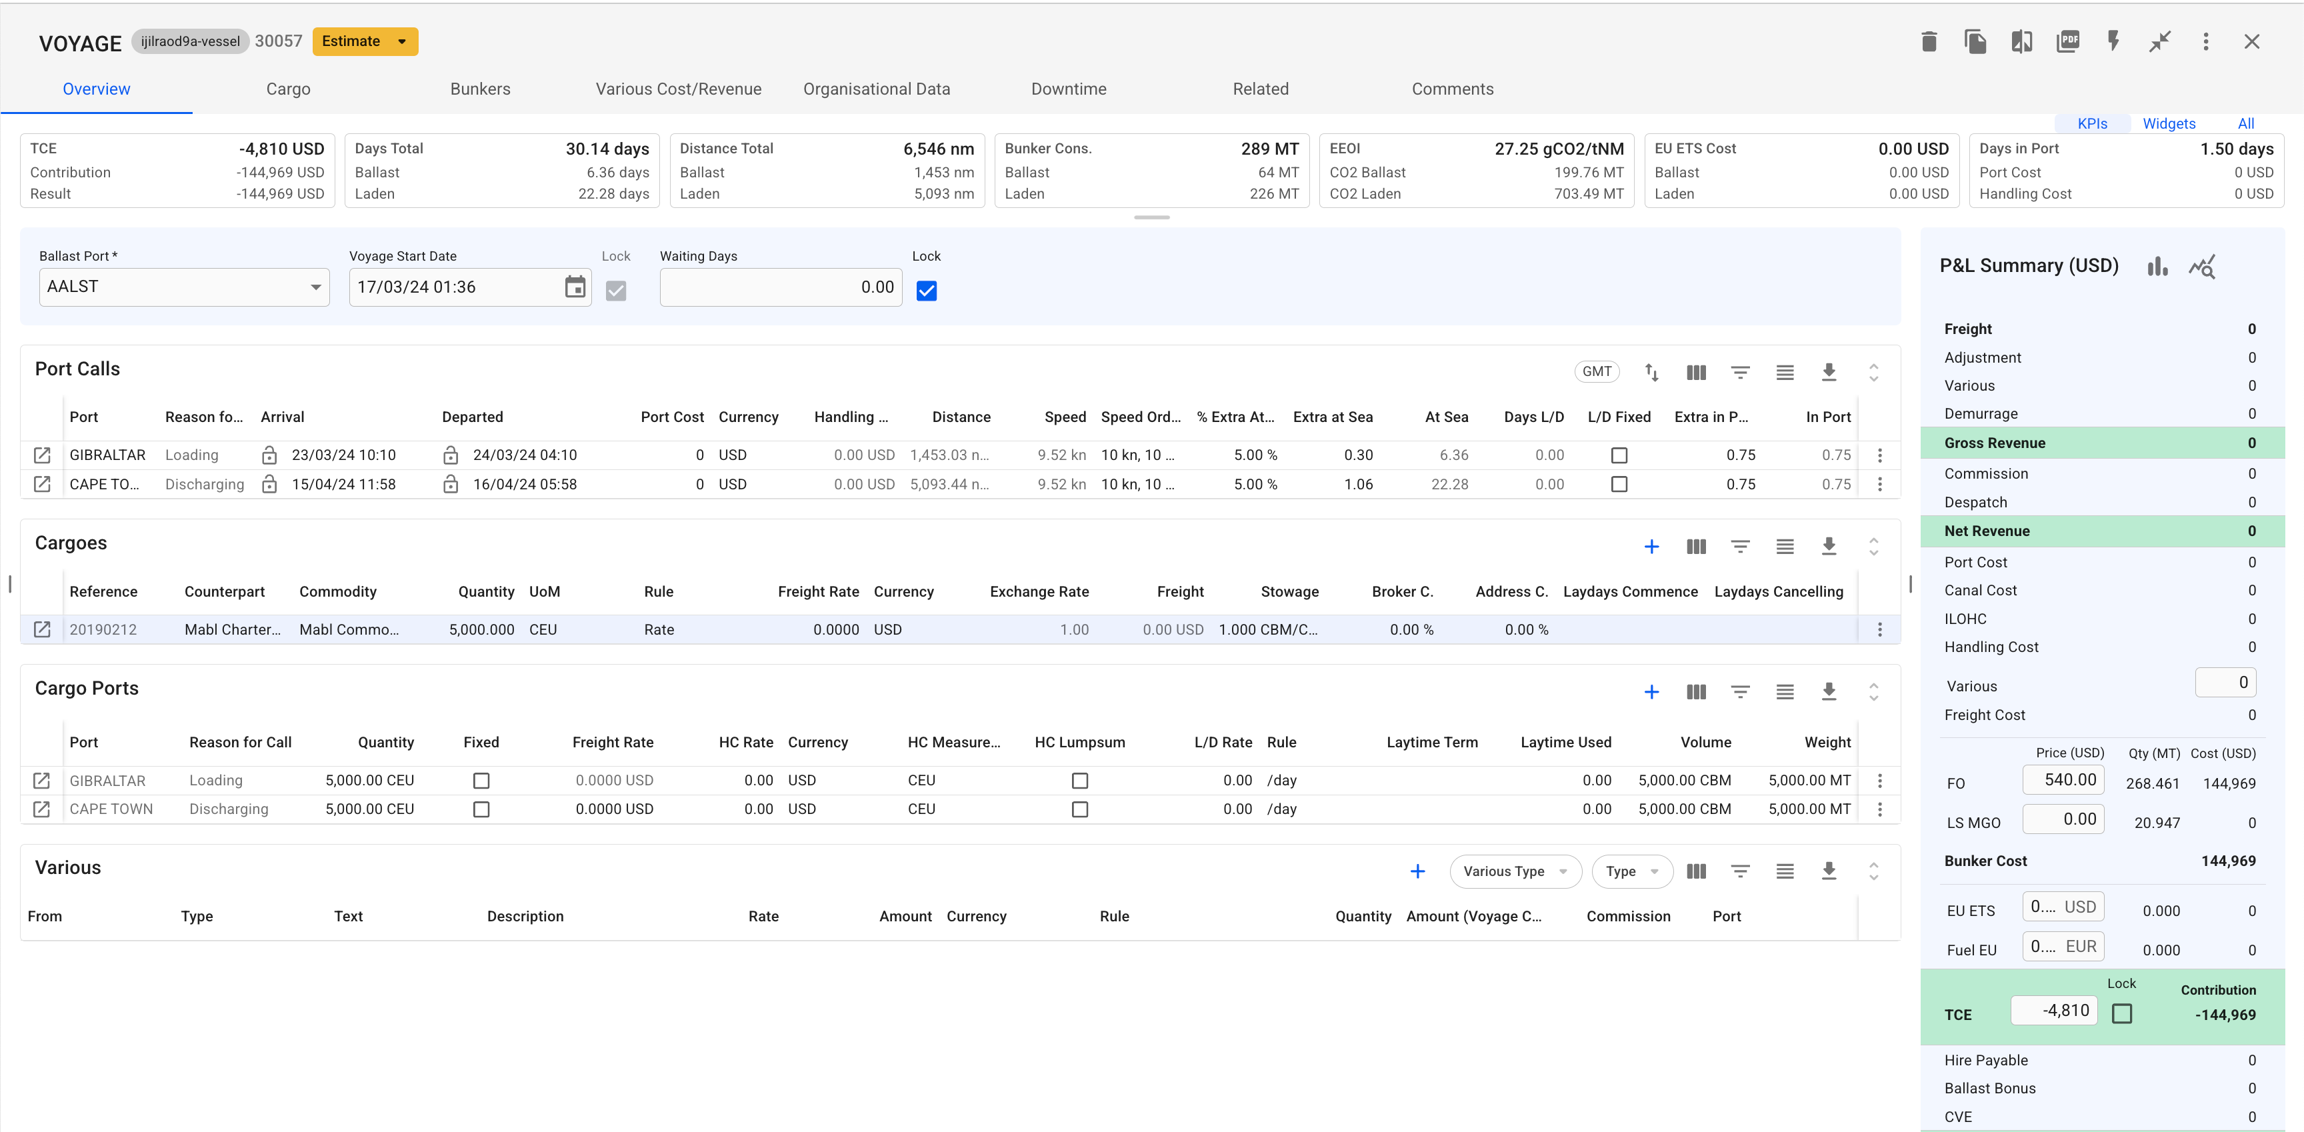
Voyages
To open the voyage drawer, go to the Voyages module.
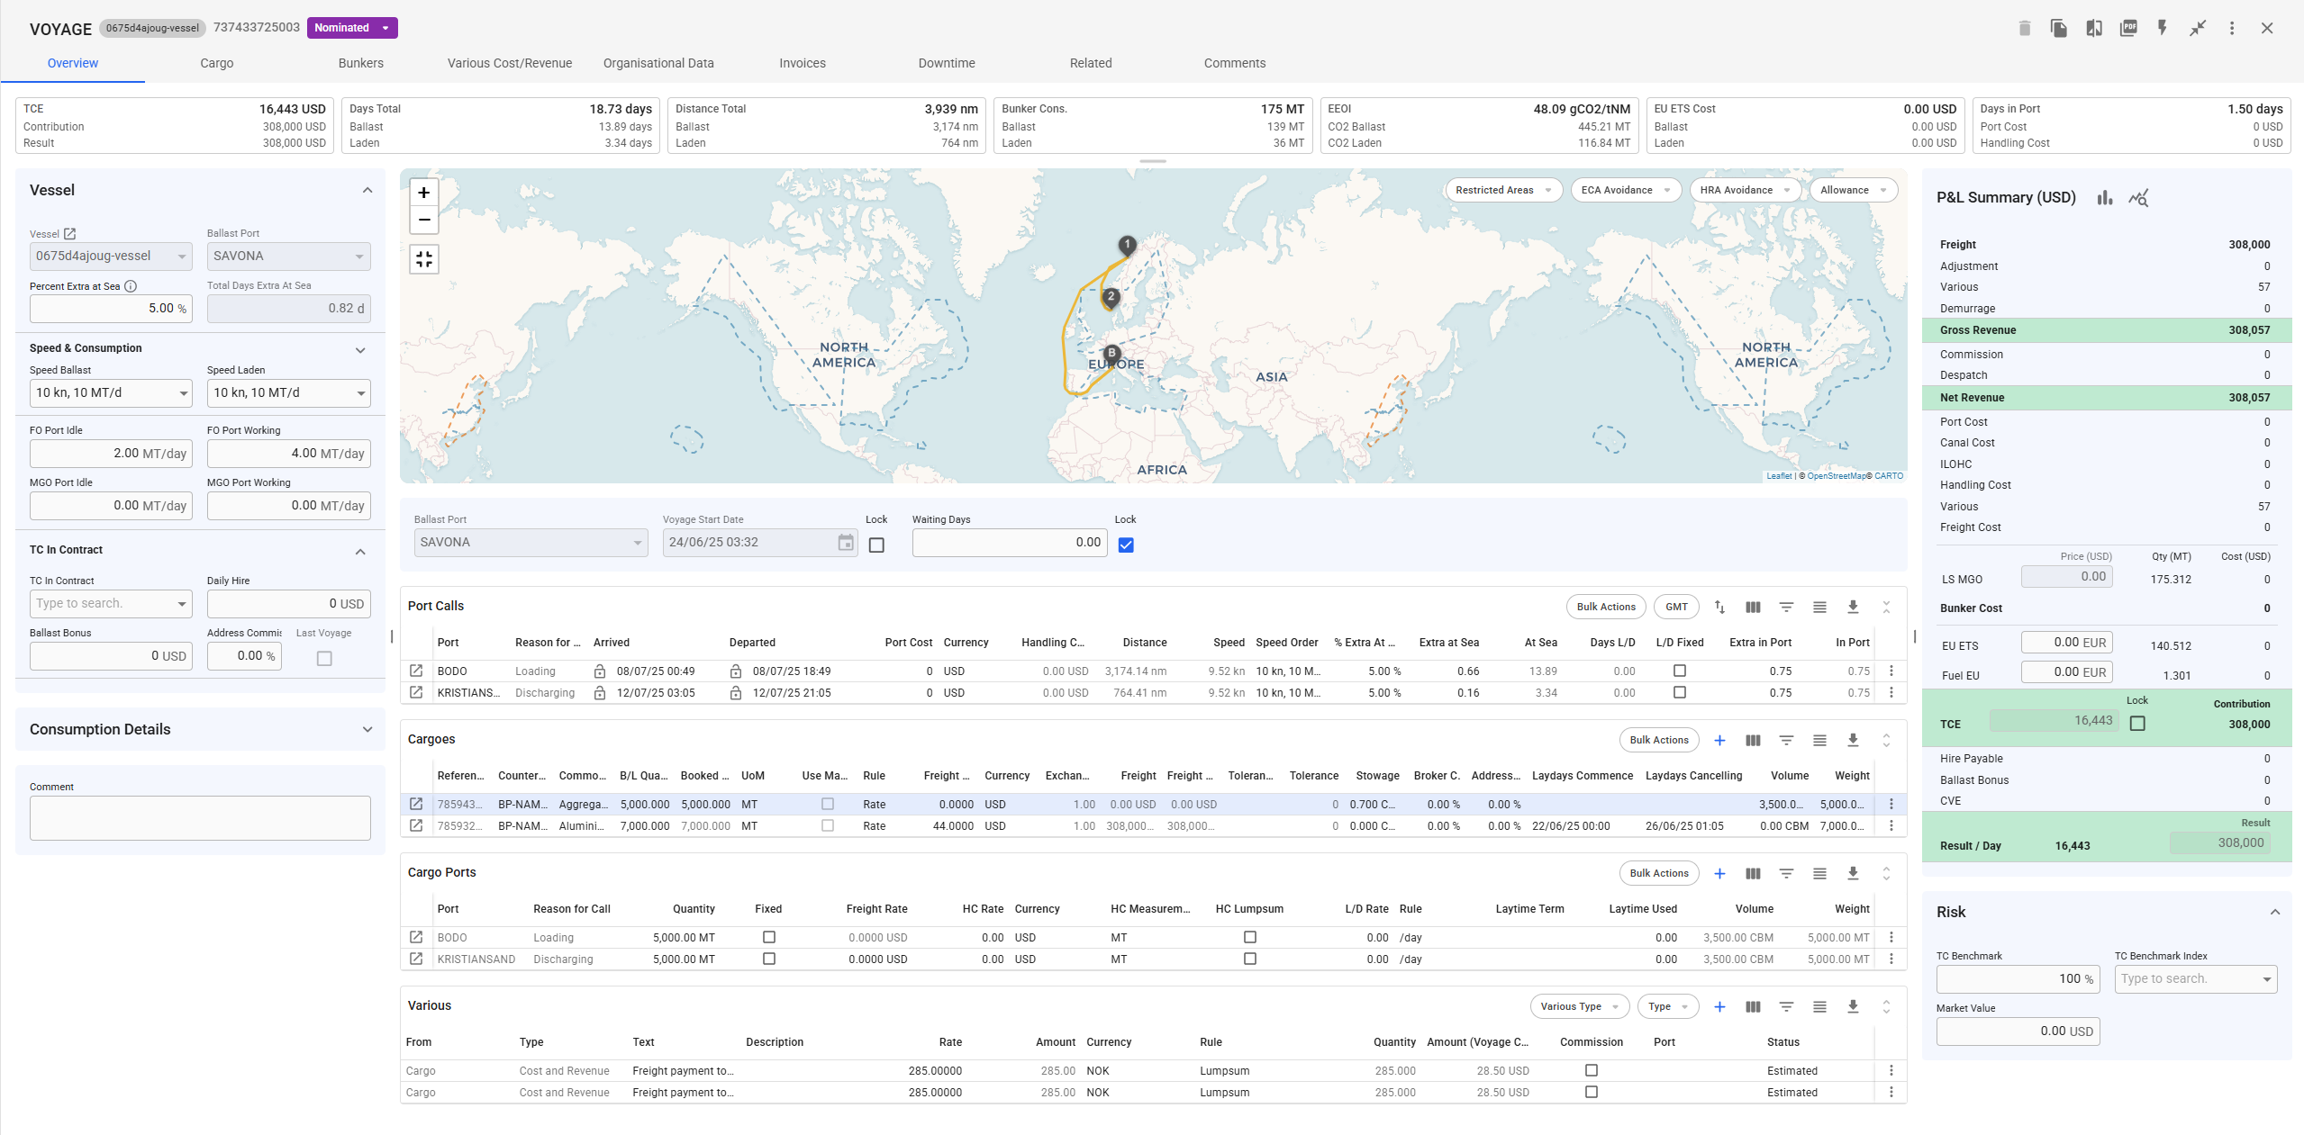
The top of the voyage drawer "Overview" tab has four summary cards for TCE, total days, hire costs, and bunker costs.
Note, If the status of the Voyage is closed, it is not possible to make any updates or changes to that particular Voyage.
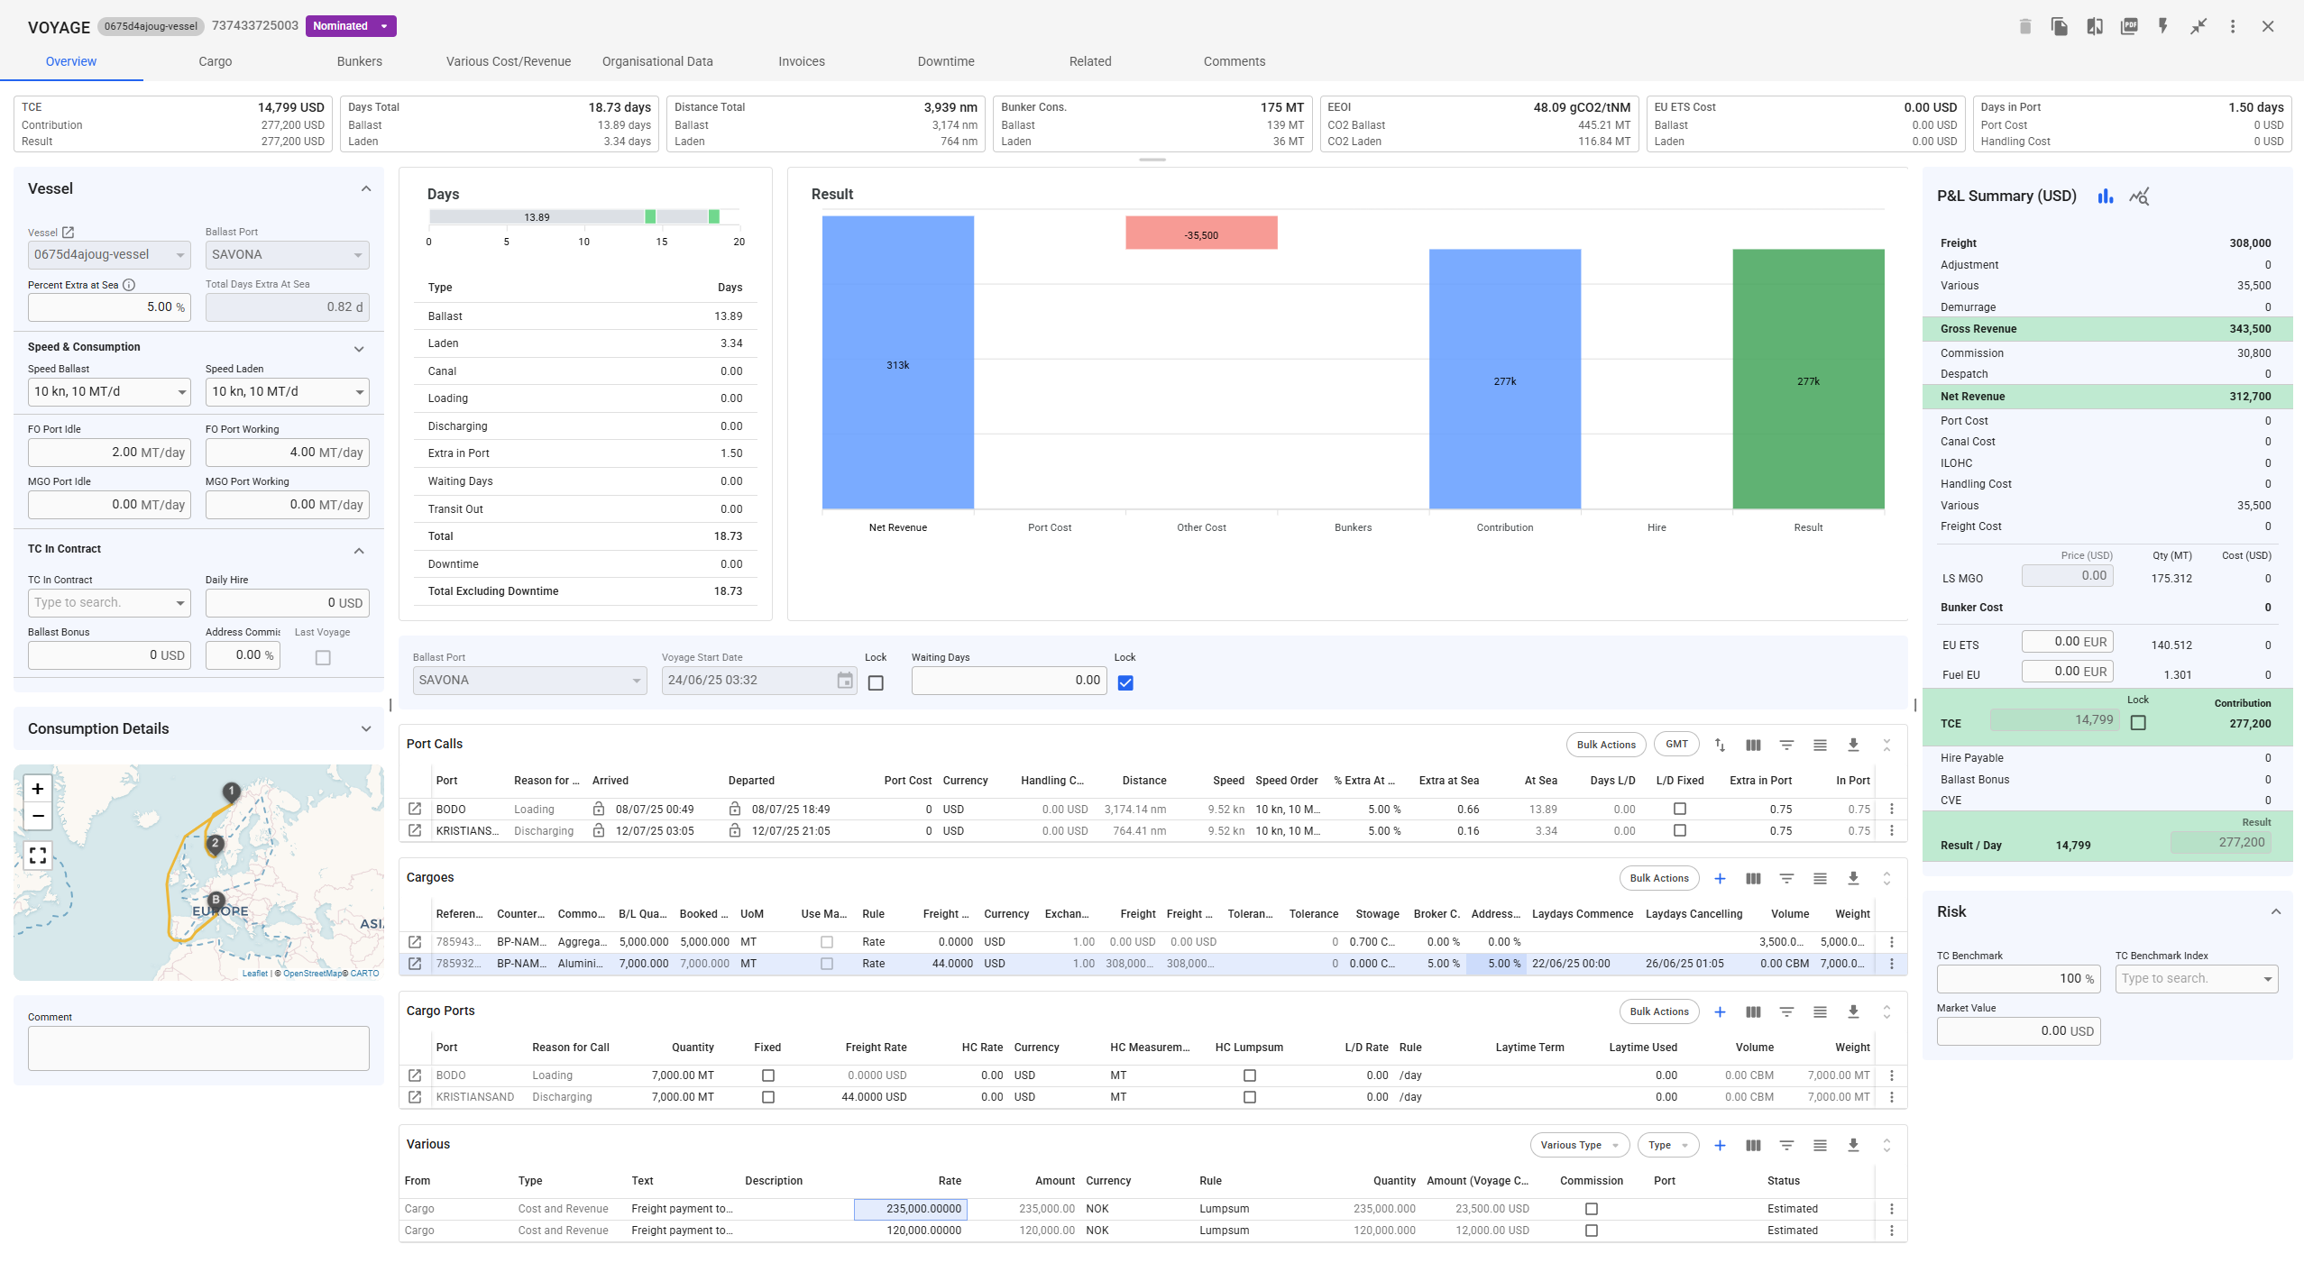
Click expandto open detailed charts for the numbers in the summary.
The "result" chart is a waterfall chart for costs and revenue on the voyage. Hover the mouse over the bars to see further details behind the calculation.
The "days" chart has a timeline chart for the port calls on the voyage and a table of the total days on the voyage.
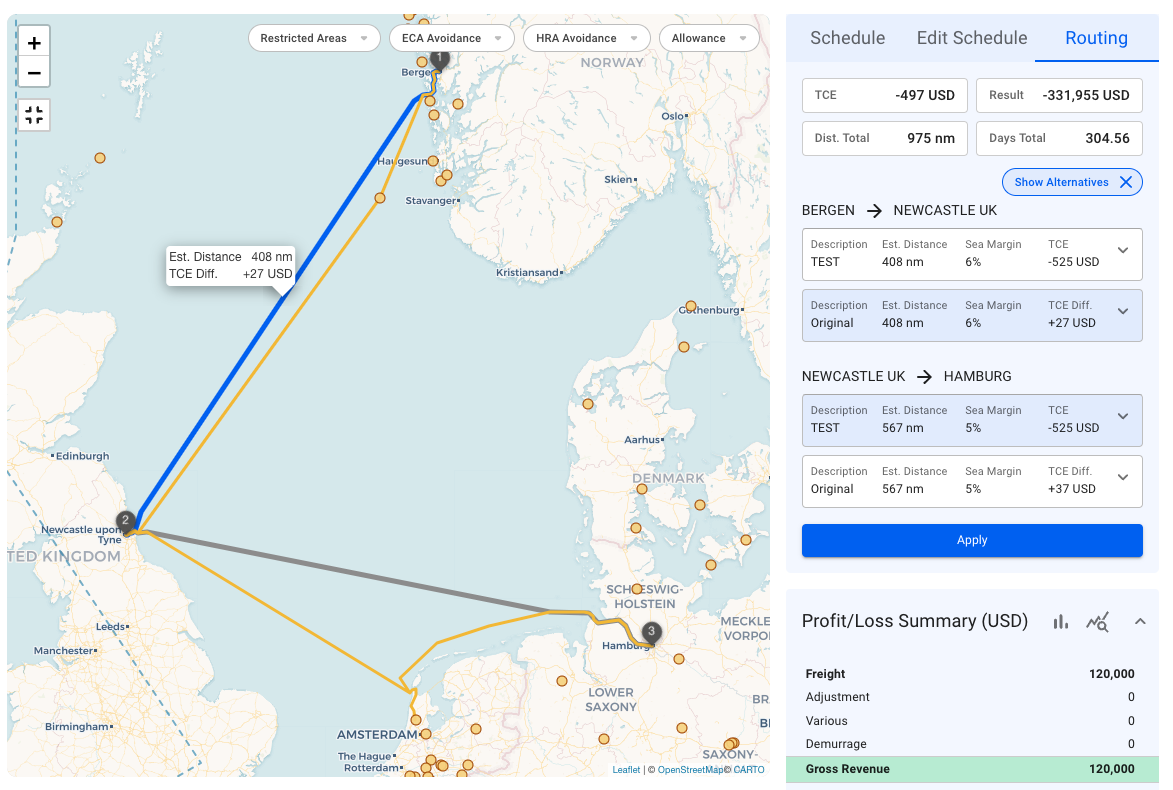
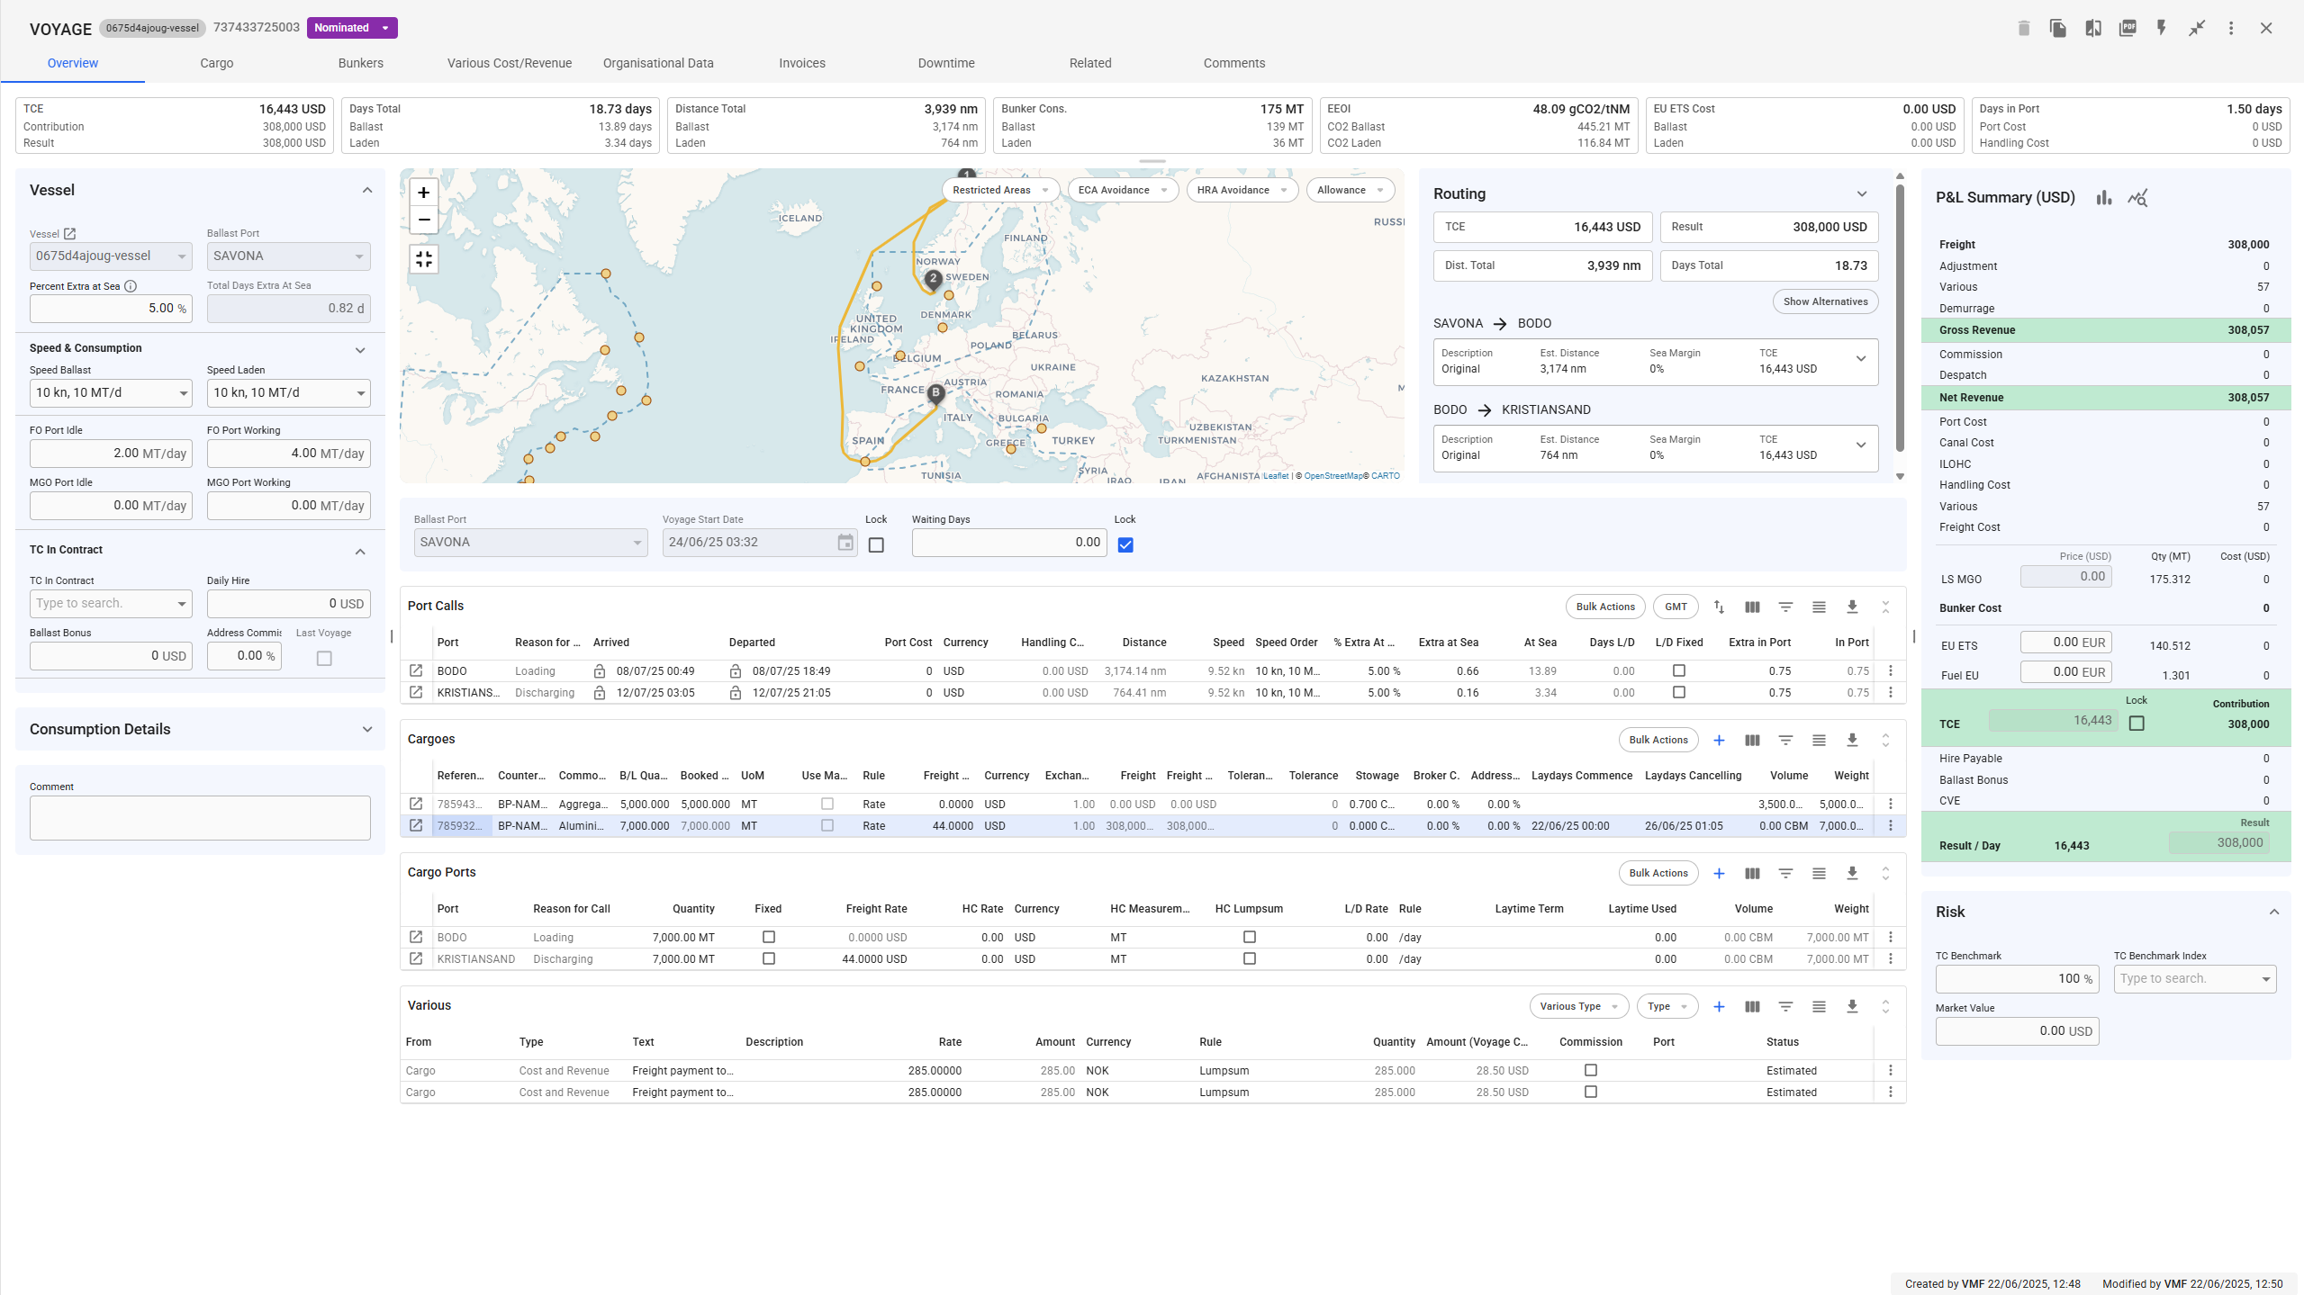
Schedule - Routing
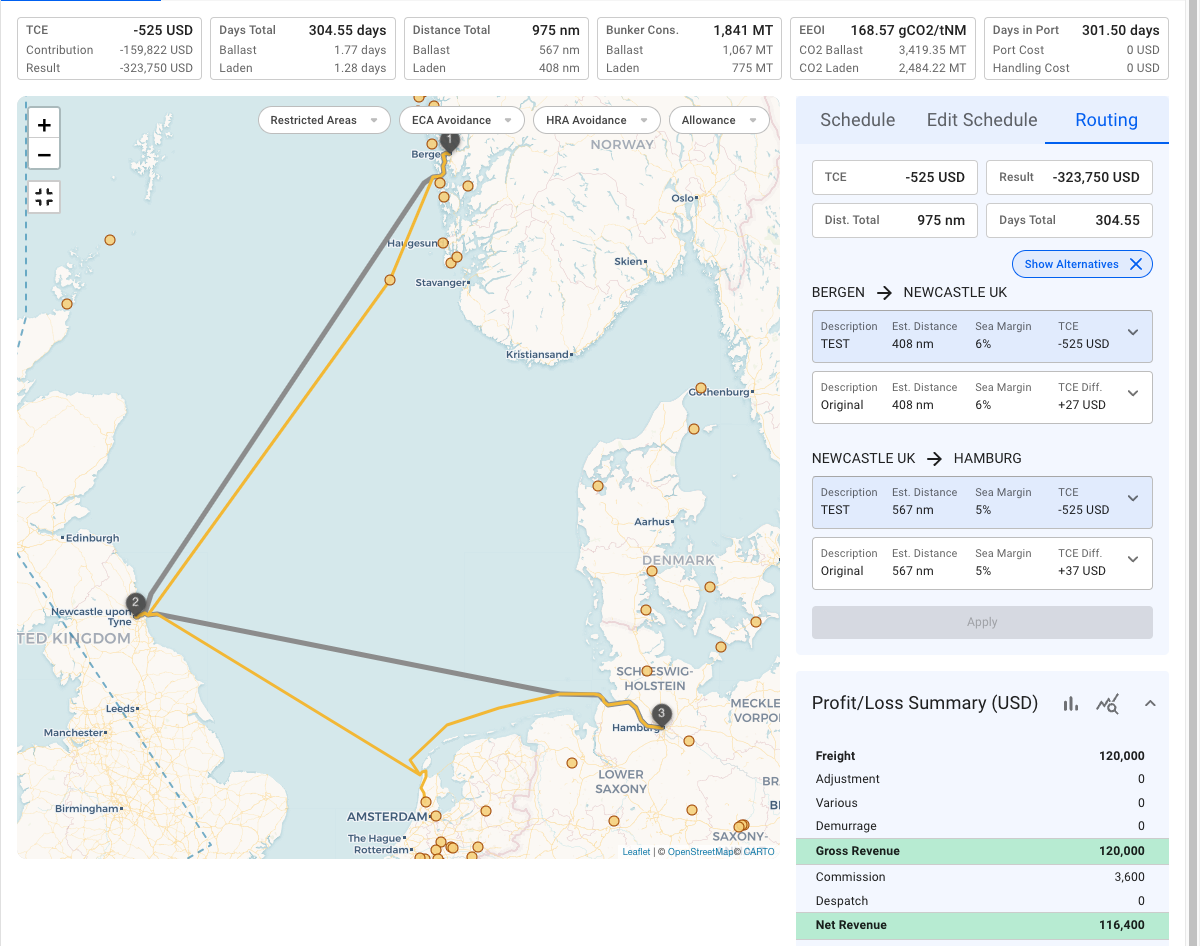
The "Schedule" section in the Voyage drawer comprises three sub-sections: Schedule, Edit Schedule, and Routing. This part focuses on the 'Routing' tab.
The routing tab is inactive by default. This feature provides alternative routes that can be used for each leg, estimating the adjusted TCE based on new distance, fuel consumption, sea margin, and more.
A voyage going from Bergen to Hamburg through Newcastle is displayed in Figure 1. The routing tab illustrates an alternative route for each leg. As presented in the screenshot, there is a key difference between the routes:
TCE Difference: the TCE difference indicator shows the difference between the alternative route TCE and the currently selected route TCE. So, for the leg, Bergen -> Newcastle, the current TCE is -525 USD. On the other hand, selecting the alternative route will result in +27 USD, which is -497 USD of TCE total (Figure 2).
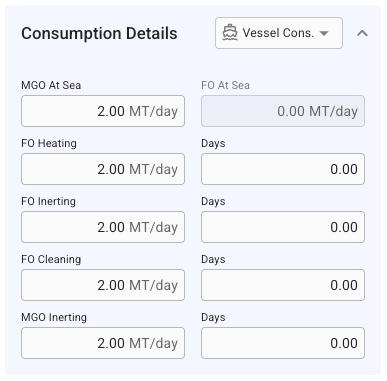
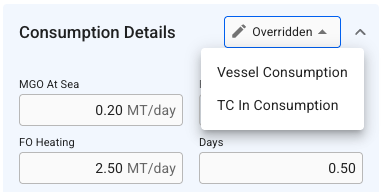
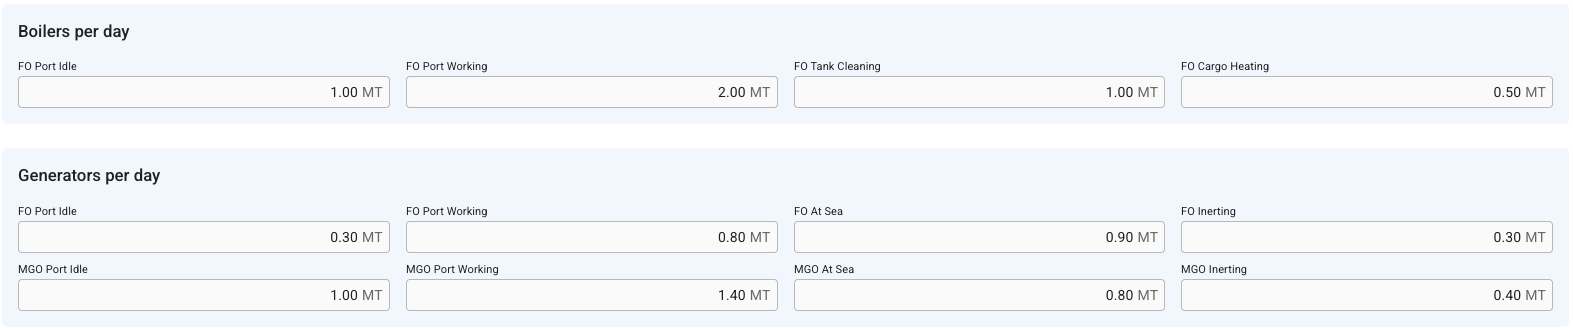
Consumption Details
This section suggests the option to customize additional voyage consumption values and explains the related calculations.
Figure 1 shows the additional parameters related to consumption. Initially, these values are taken from the vessel, but they can be modified or retrieved again from the vessel or the Tc In contract for each voyage.
Values from this section will influence the voyage's consumption calculations but will not affect the vessel’s .
The dropdown field in the top right of the section allows you to track the currently selected consumption source.
Vessel - all generator and boiler consumption fields* match the vessel’s generator and boiler consumption settings.
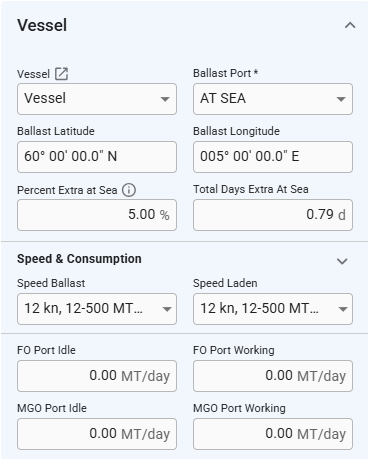
Ballast Port: Latitude & Longitude for 'At Sea'
This section explains the Ballast Latitude and Ballast Longitude fields and how they function.
Starting in Release 8.7, ballast port that are 'At Sea' will have latitude and longitude coordinates. These coordinates will be used for as well as for the. If a previous port call is available, the ballast port will automatically use its coordinates. Otherwise, the coordinates will default to (0,0) until.
Figures 1 and 2 illustrate how this works for consecutive voyages when the previous voyage ends at sea.
When a voyage has an 'At Sea' ballast port, the Ballast Latitude and Ballast Longitude fields appear in the of the voyage drawer (see Figure 3). If there is an open position port call available, its coordinates will be used by default. If no previous port call is available, both values will default to zero.
Users can also manually enter the ballast port’s position in these fields. If the ballast port is later changed to a another port, the fields will be hidden, and the voyage will use the coordinates of the selected port.
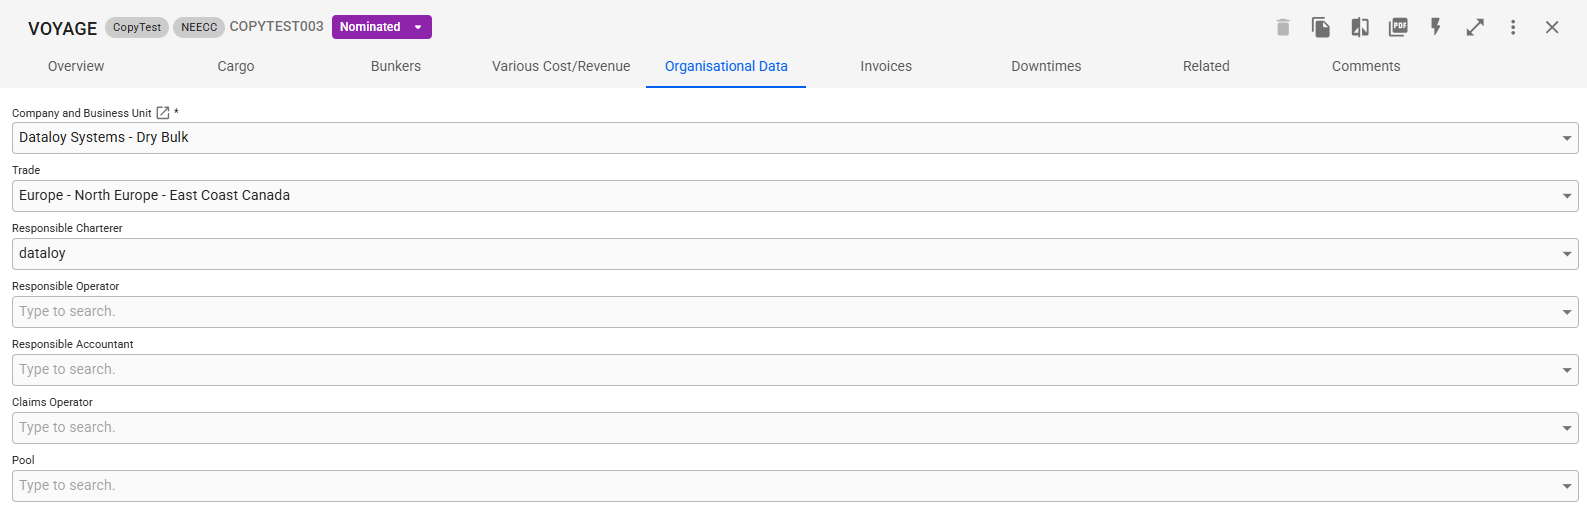
Organisational Data
Information about the "Organisational data" tab
In the Organisational data tab in the voyage drawer you can edit the following information:
Company and Business Unit
Trade
Create, Edit & Delete Various Cost/Revenue
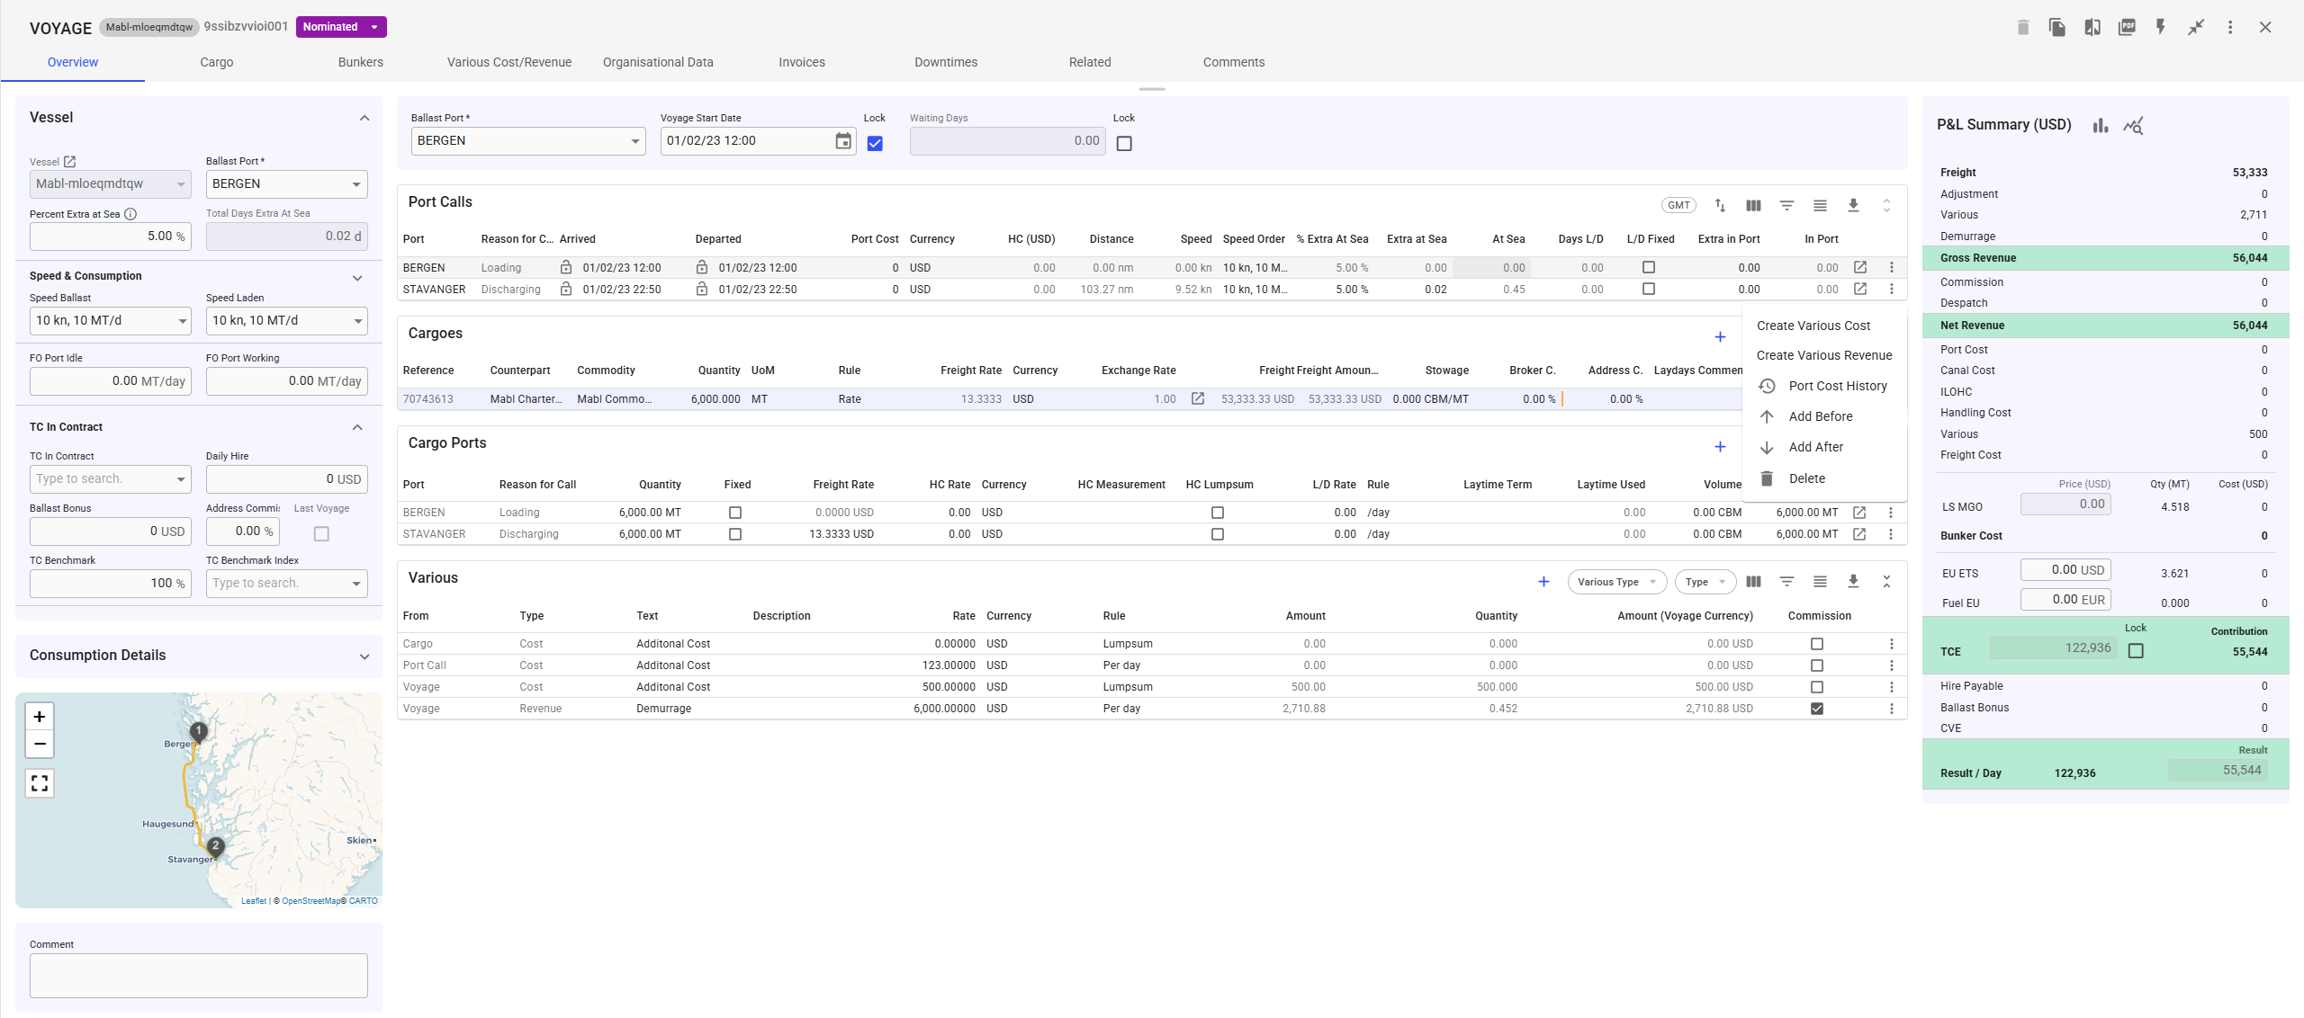
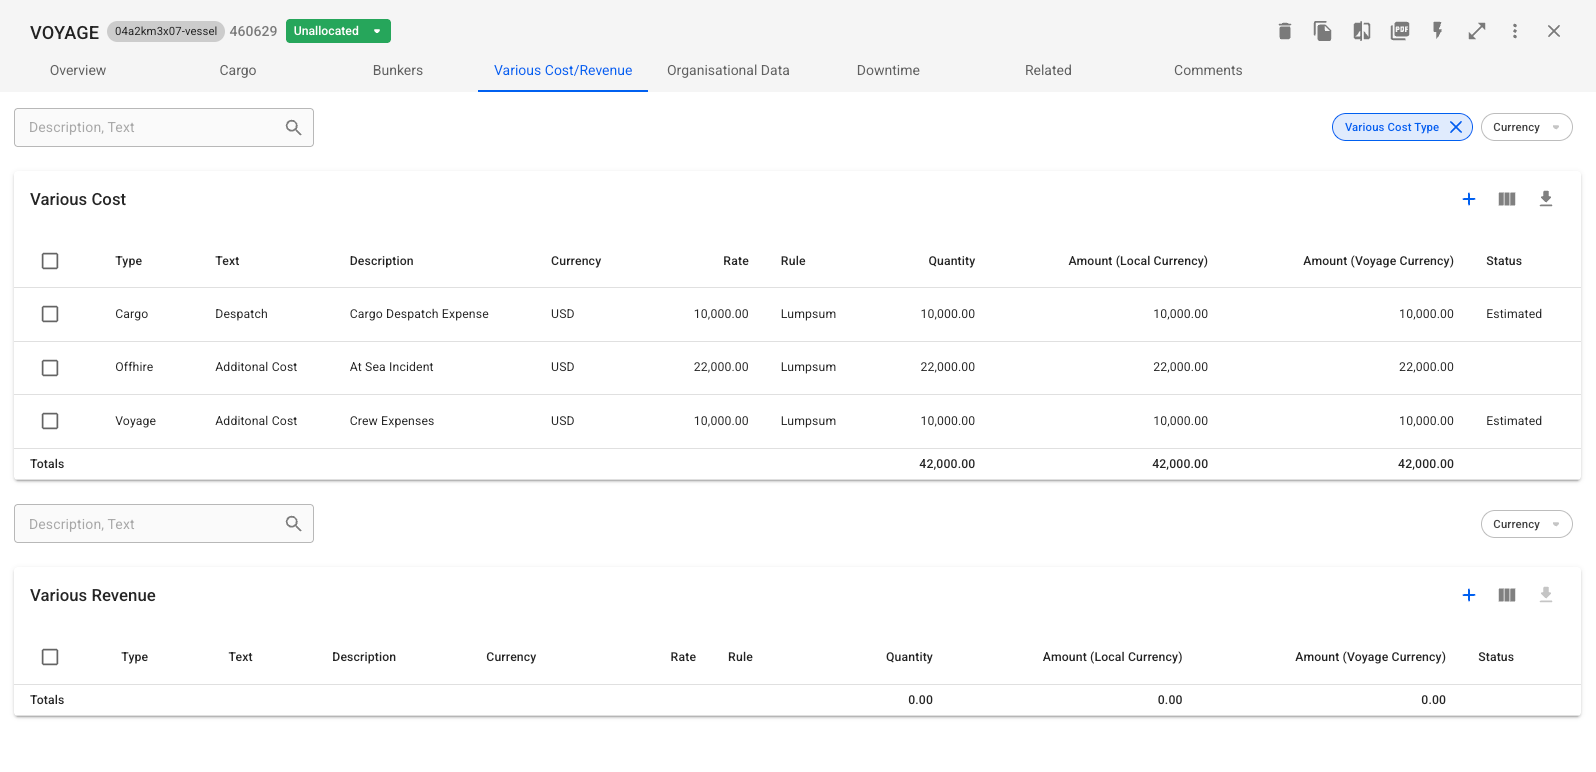
It is possible to create, edit, and delete Various Cost/Revenue entries for a voyage directly from the Various Cost/Revenue tab. Additionally, in the full-screen viewof the voyage drawer, you can create Various Cost/Revenue entries for Cargo and Port Call using the vertical ellipsis menu (see Figure 1 for reference).
All Various Cost/Revenue entries are also displayed in the Various Grid (accessible in full-screen view), allowing you to easily view, edit, or delete entries as needed.
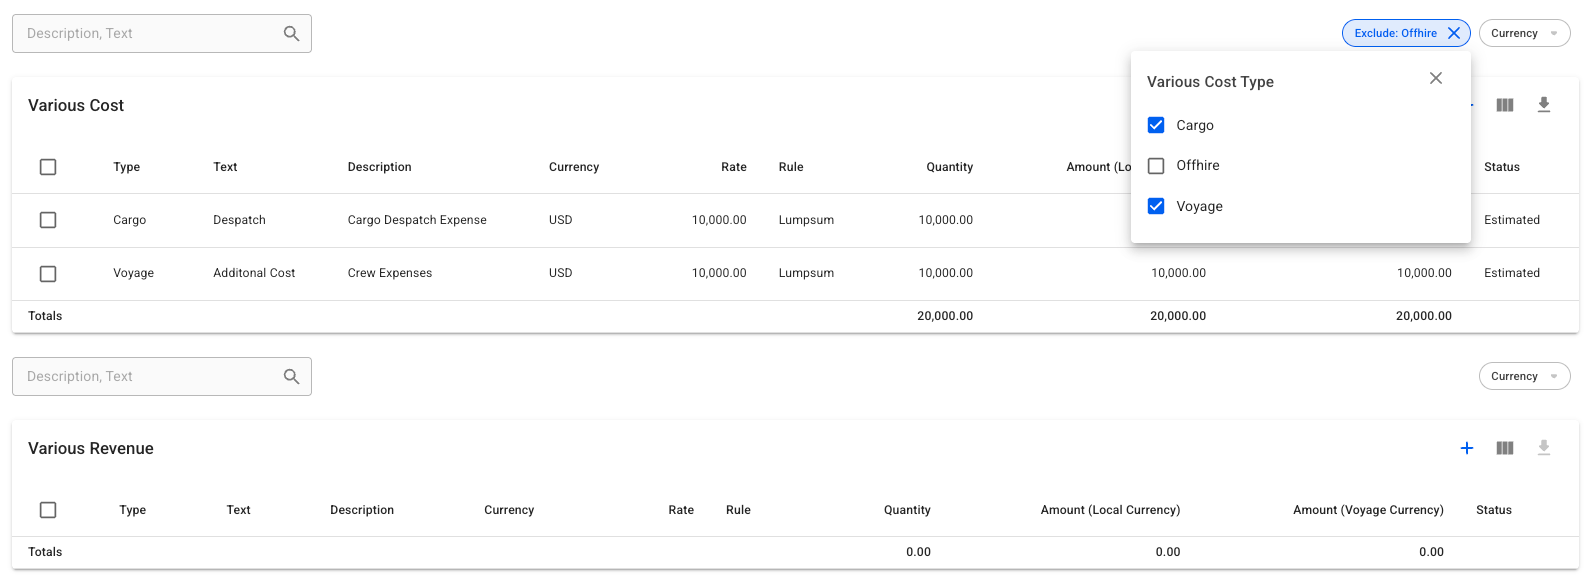
Search and Filter Variouses
You can search and filter the Various Cost/Revenue list to quickly find relevant entries.
Filters allow you to control which Various Cost/Revenue entries are displayed:
Voyage-Specific Filters – If the voyage includes Various Cost/Revenue linked to Cargoes or Off-hires, a filter will appear in thetop-right corner of the list. Use this filter to select which types of Various Cost/Revenue should be displayed.
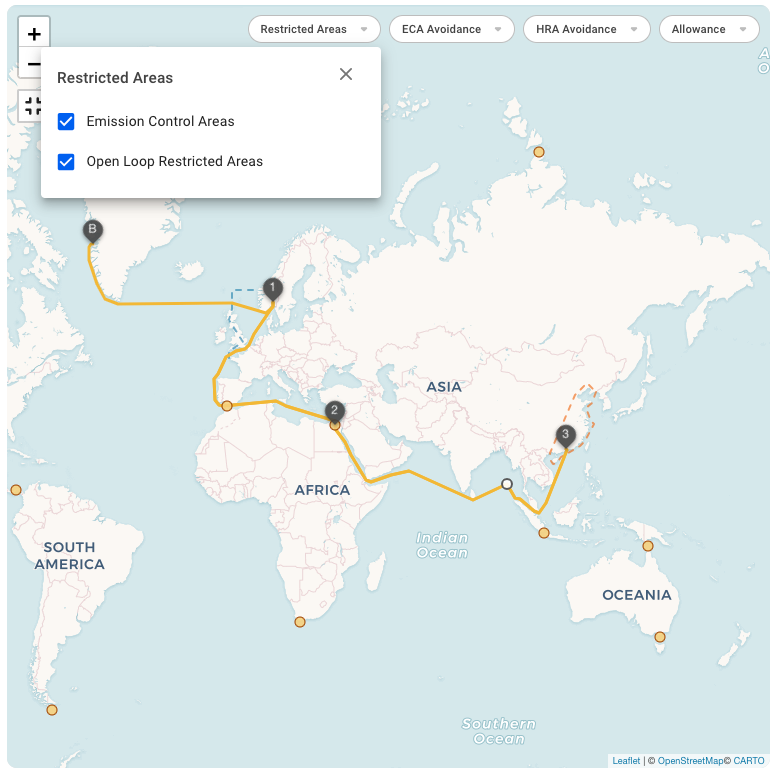
Voyage Map
The voyage map shows the voyage schedule, including alternative routing pointsthat can be added to the schedule between port calls. More routing points will be revealed as you zoom in on the map.
Click on a routing pointto show information about the point in a popup, including name, position, and GMT offset. When a routing point is clicked it will also be possible to add the routing point to the voyage route. When clicking 'Add to route', a pop-up will appear where you have to choose between which port calls the routing point shall be added.
Routing points that are on the voyage can be removed. When clicked, a button will become available 'Remove from voyage route'. When this is clicked, a confirmation box will appear. When confirmed, the routing point will be removed from the voyage.
The interactive Voyage Map features several restricted areas:
Swap Vessel
Swap Vessel is a functionality that allows you to change the vessel of the voyage, regardless the status of the voyage. There are two ways to change the vessel; through the Vessel field under Voyage Overview, or through the secondary action 'Swap Vessel'.
For voyages with status Estimate or Unallocated, you can only swap the vessel of the voyage through the Vessel field found under Voyage Overview section:
This works as a normal dropdown menu, that views all available vessels for you to click and swap to.
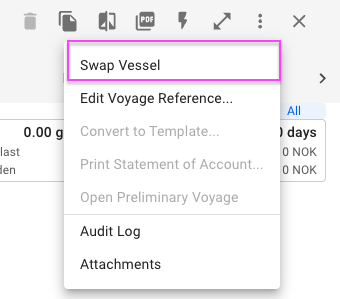
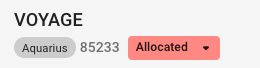
For voyages with status Allocated or above, you can only swap the vessel of the voyage through the secondary action called 'Swap Vessel':
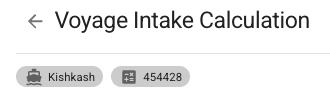
Voyage Intake Calculation
The intake calculator provides an overview of the vessel's intake capacity and key reduction factors for the voyage, allowing you to adjust and compare different loading scenarios.
To open the intake calculator, click on the icon in the top right of the voyage drawer, and select "Voyage Intake Calculation". This will take you to the calculator page.
In the top of the voyage intake calculator, you will find two chips displaying the vessel and voyage reference. Clicking the vessel chip will open up the vessel drawer.
The Opening Balance section shows bunkers onboard the vessel at the start of the voyage. These fields can be edited if any of the following conditions are met.
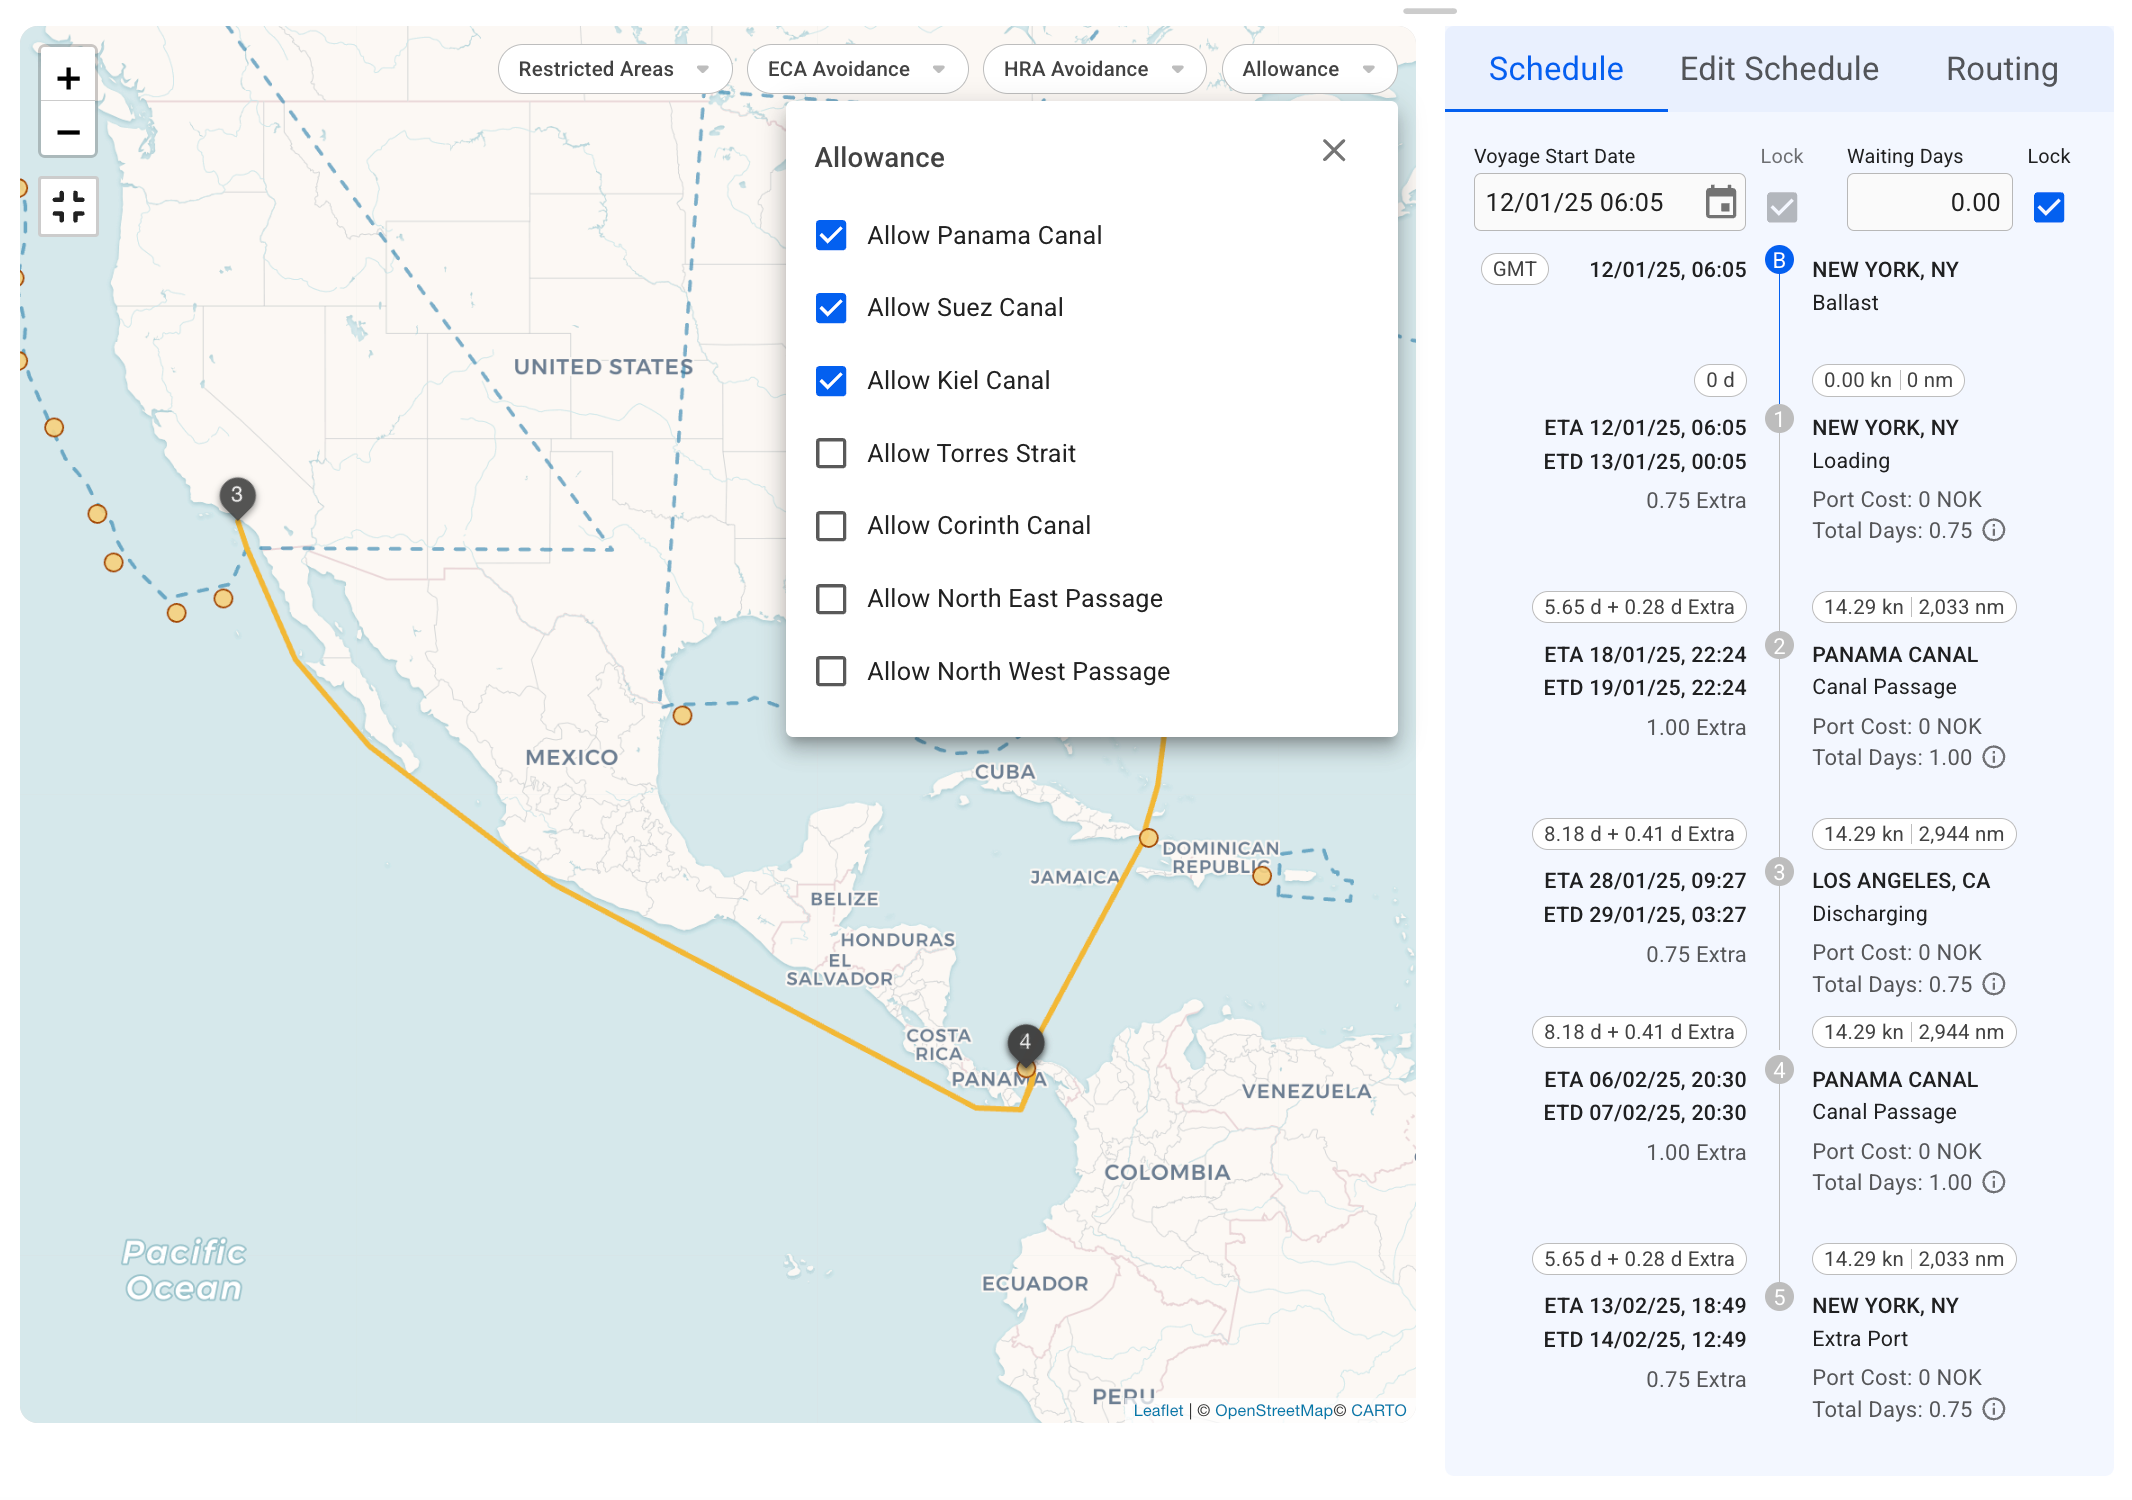
Canal Allowances
Certain voyage routes require specific canal allowances to be used. These allowances can either be applied to the entire voyage or to individual legs.
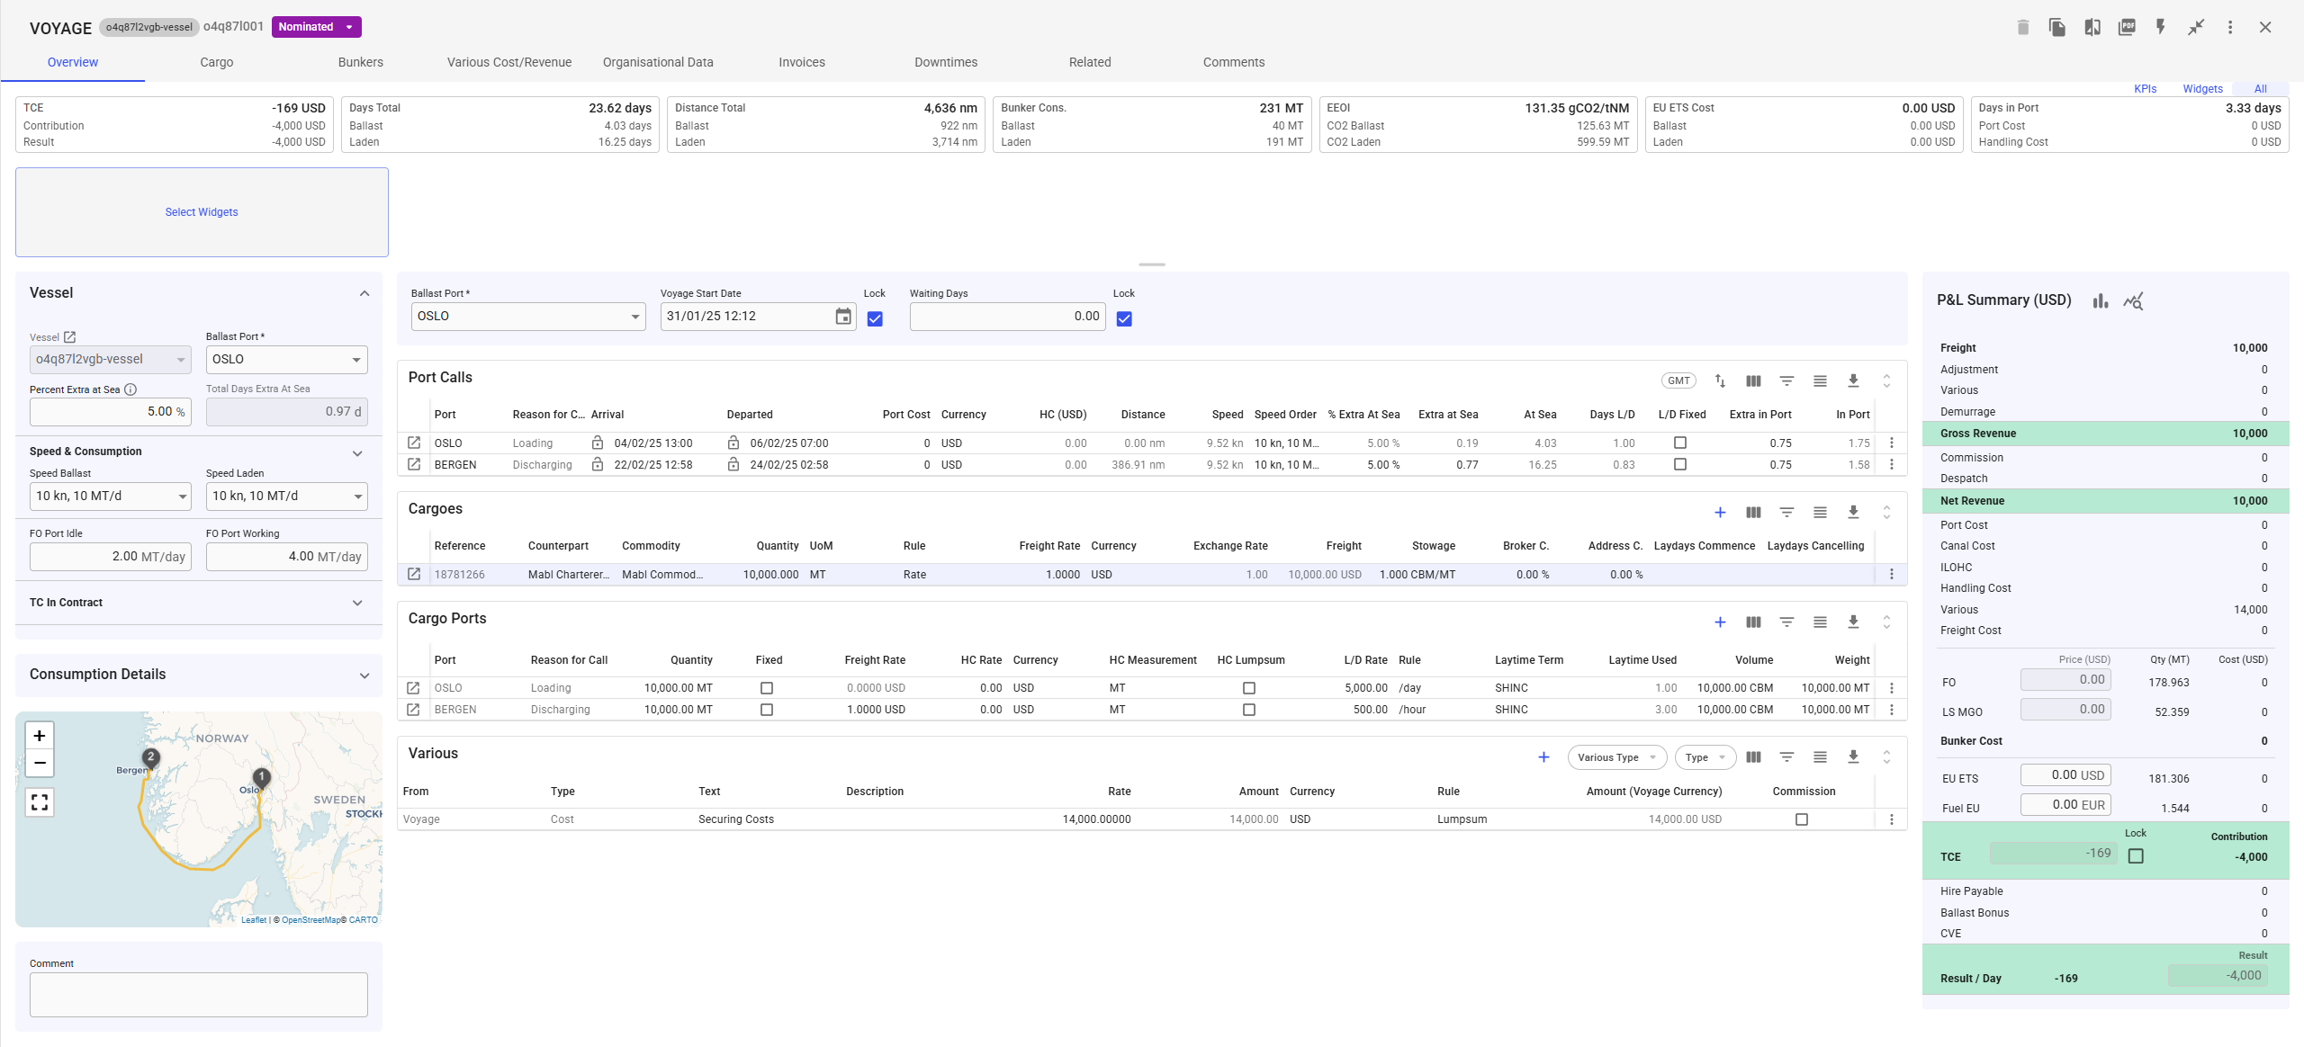
Canal allowance settings for the entire voyage is shown in the top right corner of the map in voyage drawer. Changing these allowances affects all sea passages on the voyage. For example, consider the following voyage going from New York > Los Angeles > New York:
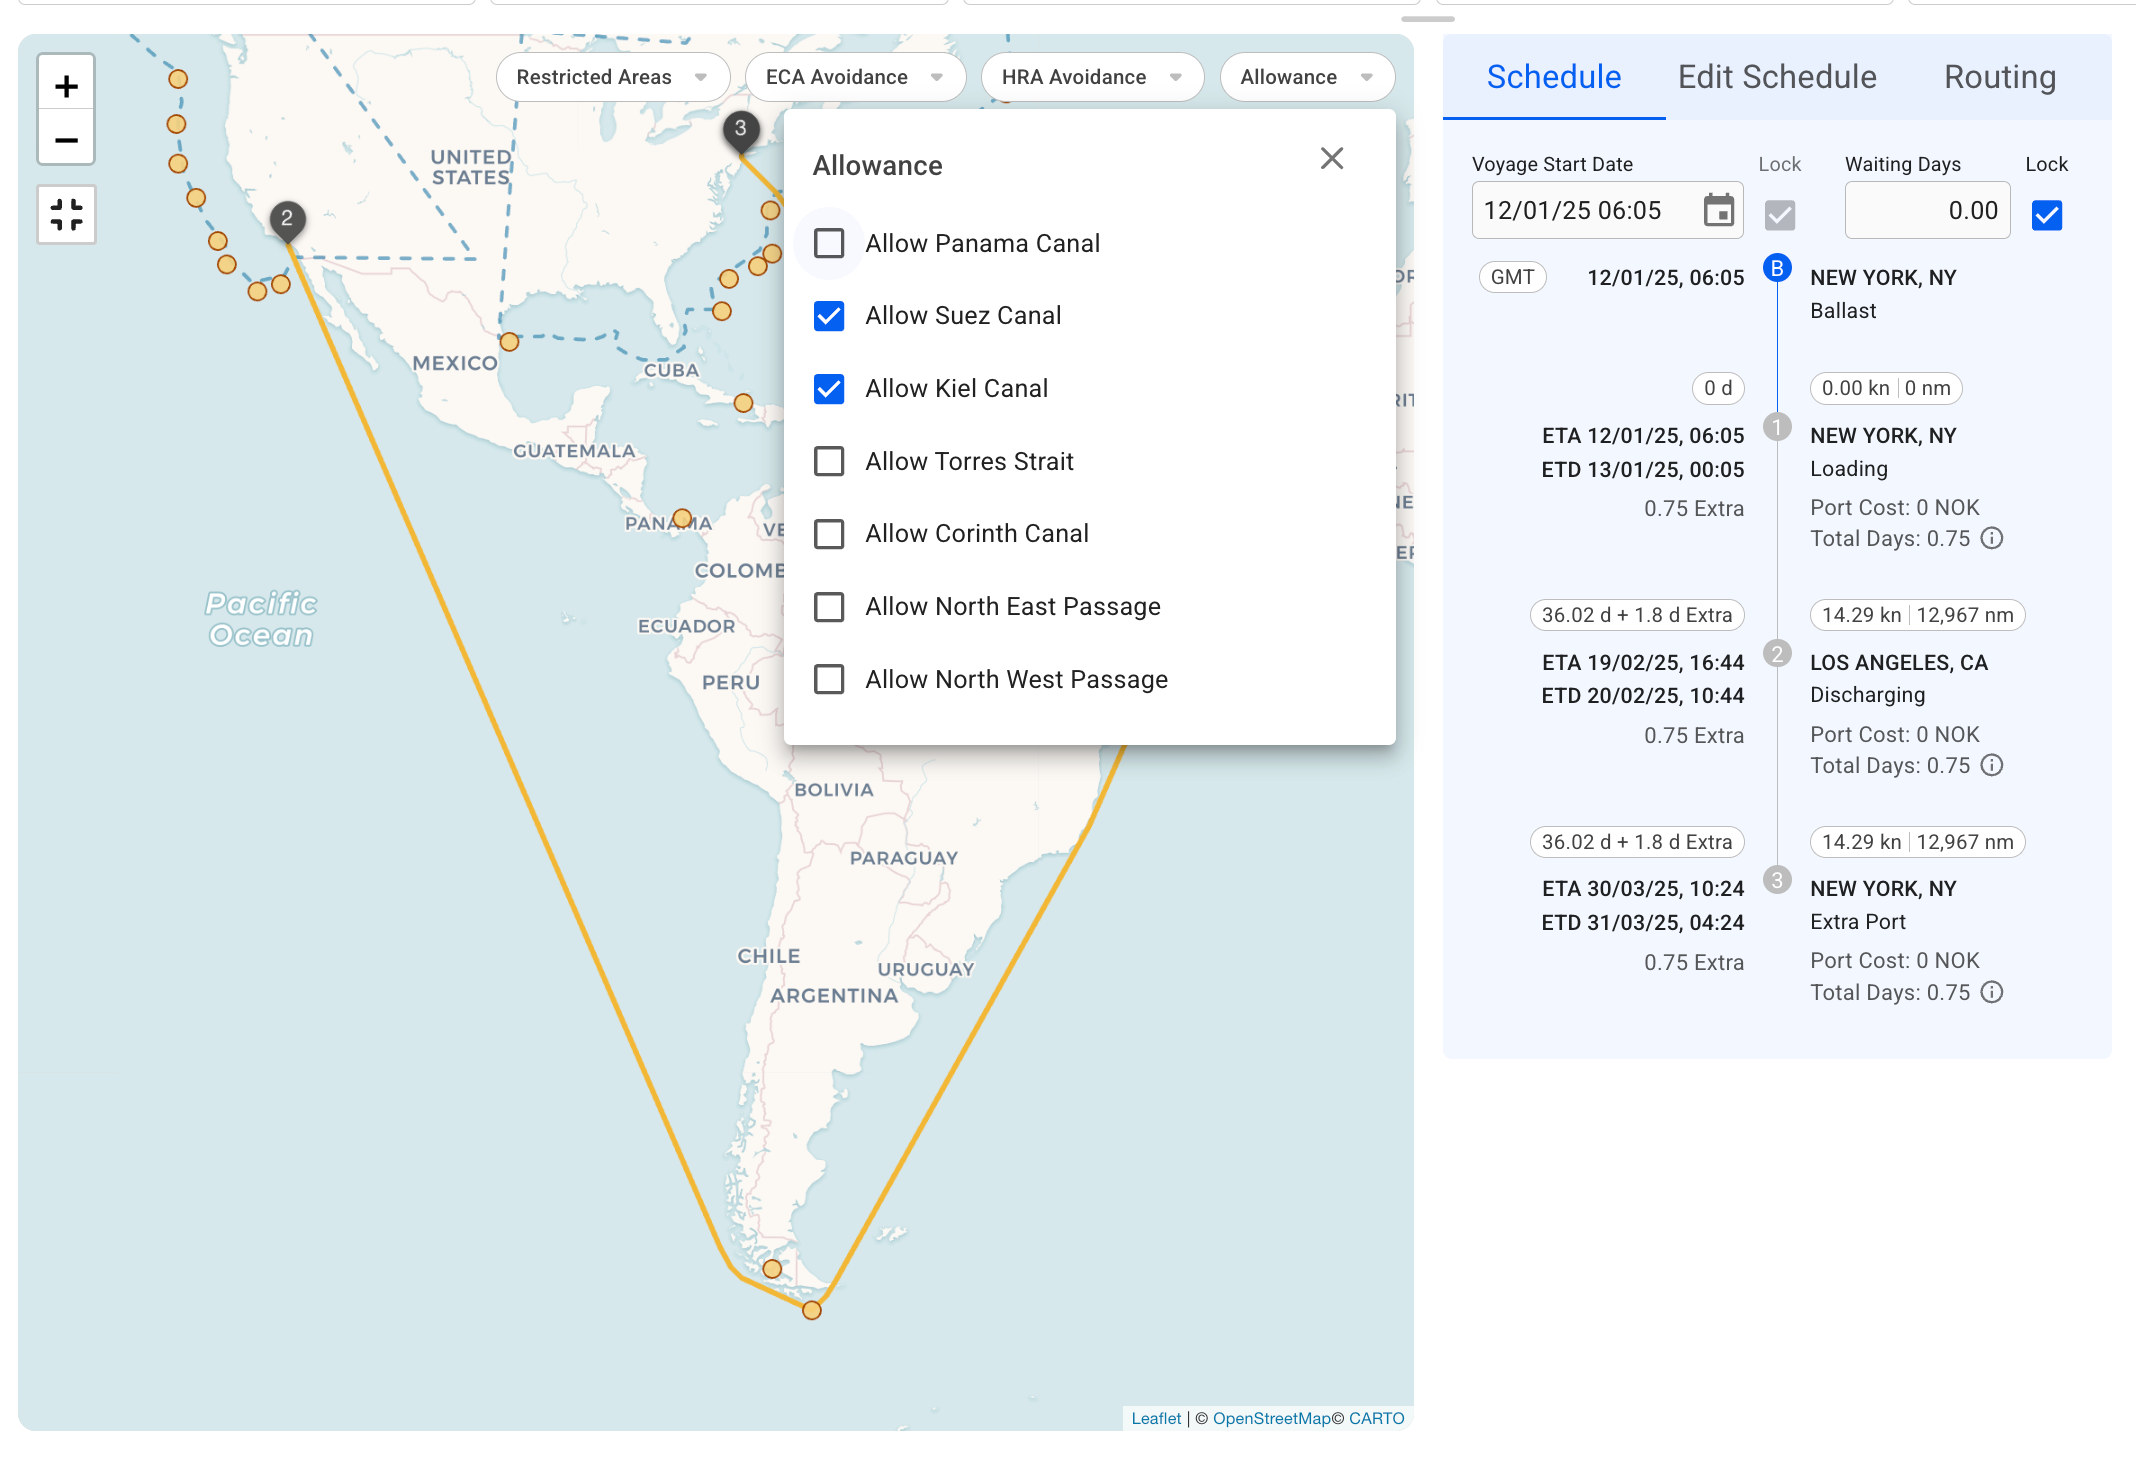
The voyage is currently allowed through the Panama Canal, and the route and schedule reflects this. If Panama Canal is deselected in the allowance settings, all instances of the canal are removed from the voyage:
However, note that changing allowance settings will not affect sea passages that are already completed (where the End of Sea Passage date is fixed).
Canal allowances can also be controlled for a single leg on the voyage, by going to the port call drawer:
Various Cost/Revenue
The feature allows you to manage cost and revenue entries associated with a voyage, including those linked to and These entries can be accessed and modified from the Various Cost/Revenue tab in the voyage drawer.
You can also use the Various Grid in the full-screen view of the voyage drawer to get an overview over all connected variouses. Here, you can:
View all Various Cost/Revenue entries related to the voyage.
Converting Voyage to Template
A voyage can be converted into Template Voyage, along with some other features
In order to convert a voyage to a template voyage, you need to open a Voyage's drawer and click the secondary actions menu in the top-right and select the "Convert to Template..." action:
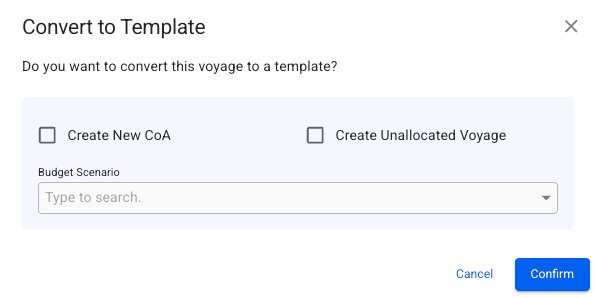
After selecting the action, you will get a modal which allows you to select the following actions:
Create New CoA - converts this voyage into a template, and creates a new CoA (Contract of Affreightment) that will be linked its performance cargo.
Create Unallocated Voyage - converts this voyage into a template, and creates a new non-template voyage of status 'Unallocated', that is linked to this template.
Clicking on port calls in the list opens the corresponding port call's drawer where you can make can changes:
The Port Calls list will display up to 30 items, and includes a separate scrolling functionality. By hovering over each of the "headers" (such as Voyage, Port, Reason for Call, etc.), you can also see an sorting array which will make you able to sort that specific column in either an ascending (ASC) or descending (DESC) order.
Port Calls of the previous, selected, and next voyage
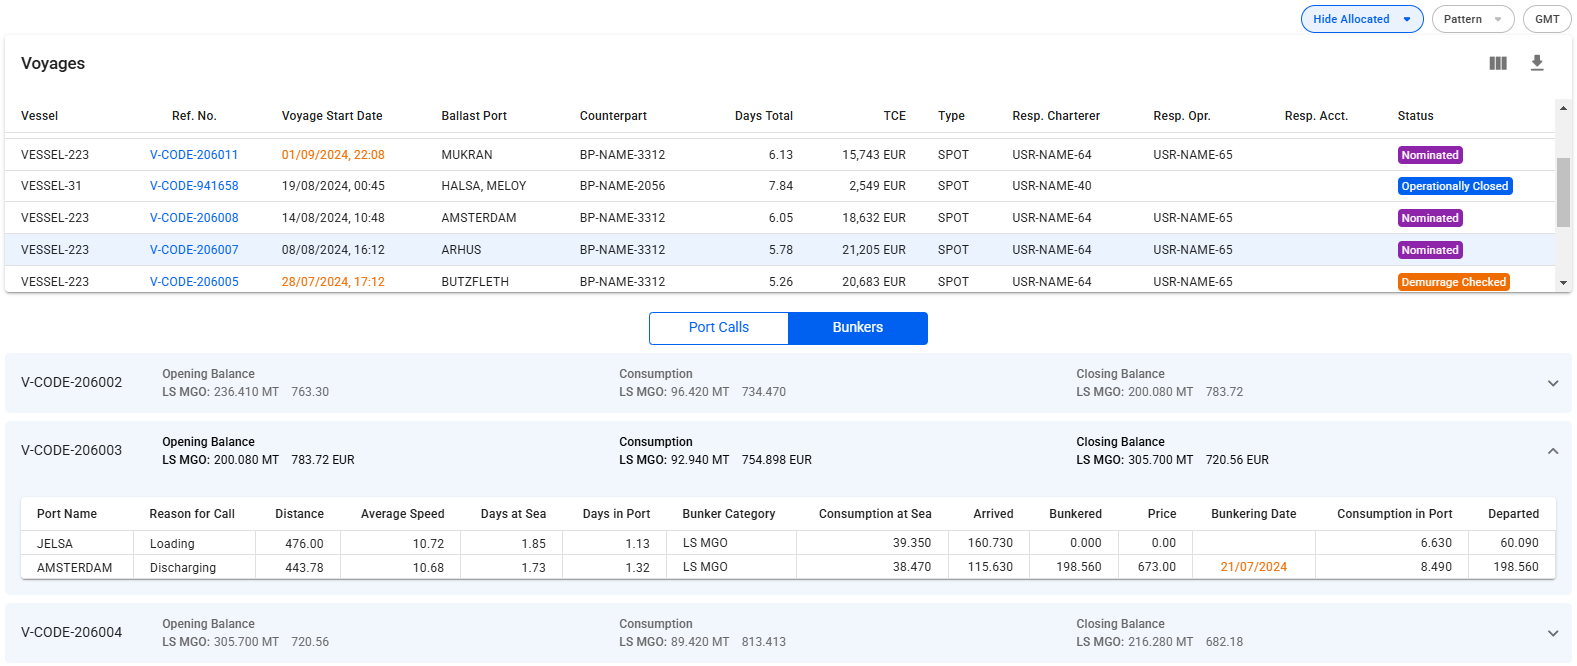
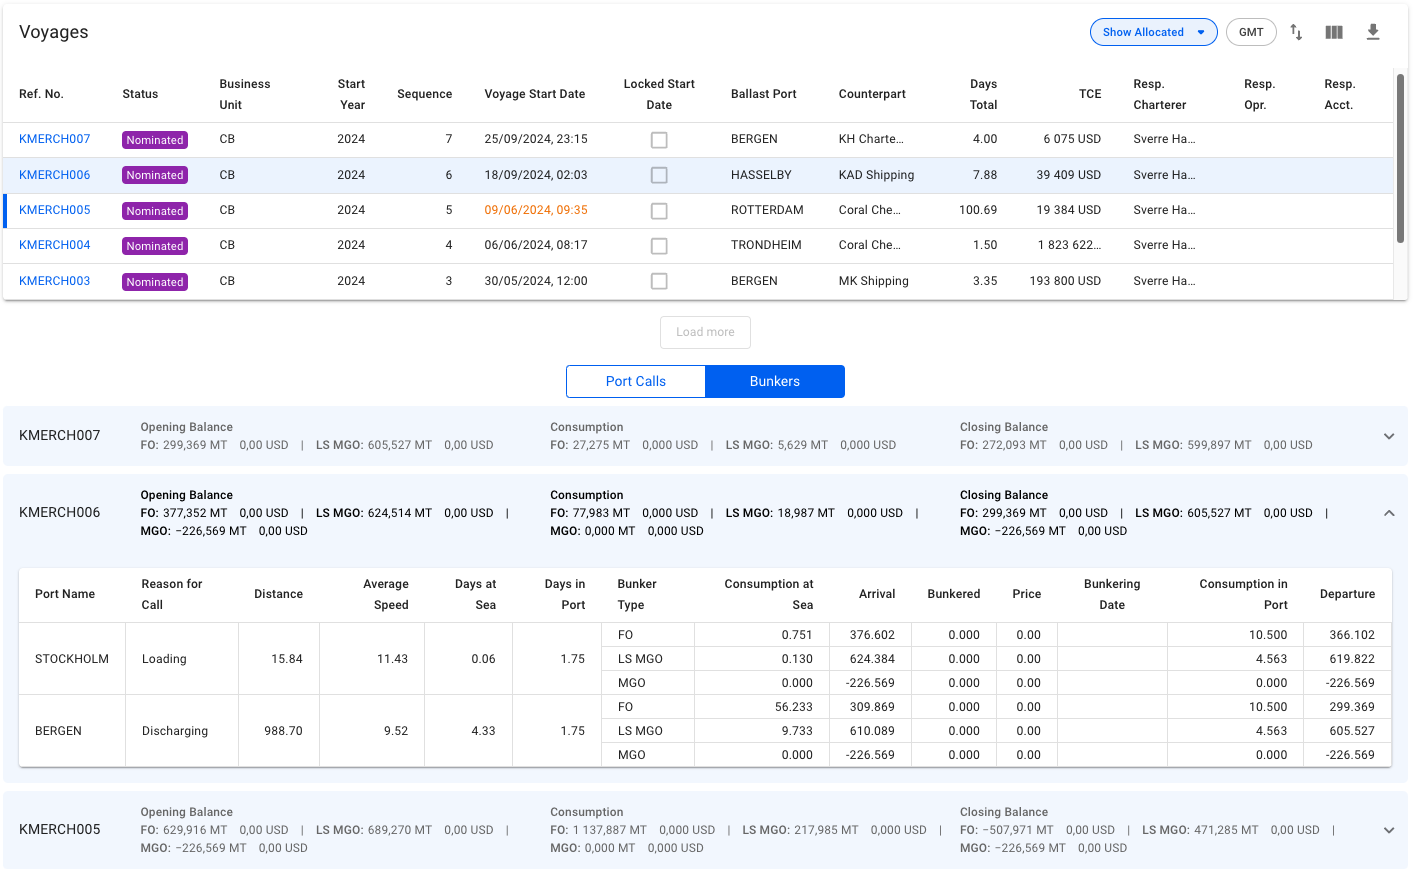
The Bunkers view removes the list in favour of up to three collapsible sections for the voyages. Similarly to the Port Calls view, clicking on a voyage row in the voyages list will select/open up the corresponding collapsible section, and fetch the data for the previous and next voyage on the same vessel:
Bunker consumption overview for the previous, selected, and next voyage
The top band of the section displays 4 columns; the reference number of the voyage, Opening Balance, Consumption and Closing Balance. Each of the latter three will show amount and price for up to 4 different bunker types, depending on which bunkers are actually being used by the selected voyage's vessel.
On this voyage, only FO and LS MGO has been consumed, so the balances and consumption columns only displays information for FO and LS MGO.
Expanding the collapsible section will give you a table overview of each port, with reason for call, distance, speed etc., as well as a detailed breakdown of the bunkers consumed. Only the bunkers actually used will be displayed here.
On this voyage, only FO and LS MGO has been consumed, so the breakdown also only displays information for FO and LS MGO.
Filtering
The bunker section can be filtered by bunker category to get a better overview for each category.
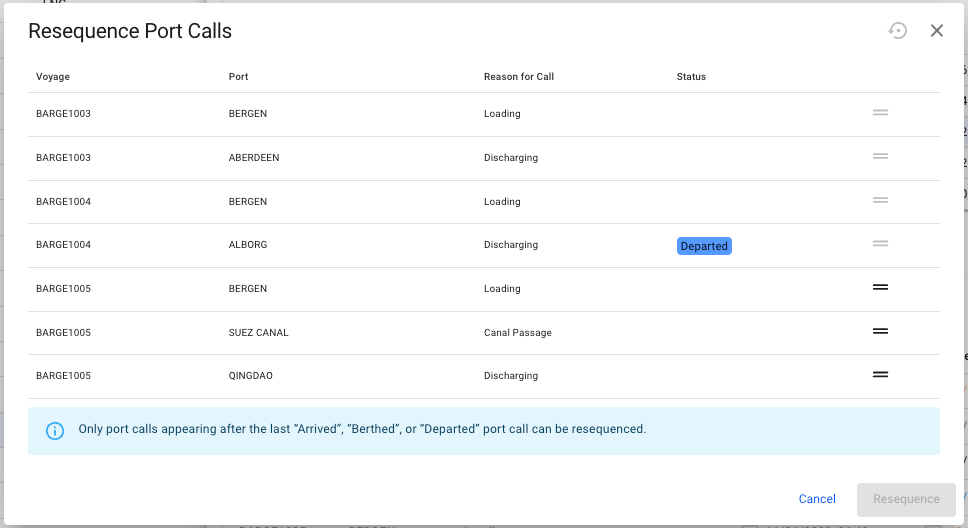
Port calls can also be resequenced to a different position within the previous, current, or next voyage. To resequence a port call, click the resequence symbol in the top right corner of the port calls list. A popup modal will then show and the port call can be dragged and dropped in the desired position (see screenshot below). Note that only one port call can be moved at a time. Also, only port calls after the last Arrived, Berthed or Departed port call can be moved in the list:
Resequence the port calls
Voyages
Port Calls
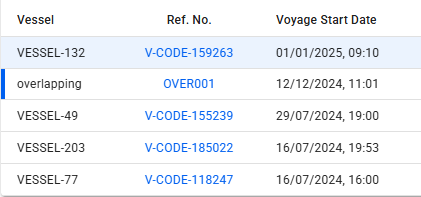
Voyages list
The ongoing voyage (overlapping) is marked by the solid deep blue bar on the left, while the selected voyage (132) is highlighted in blue
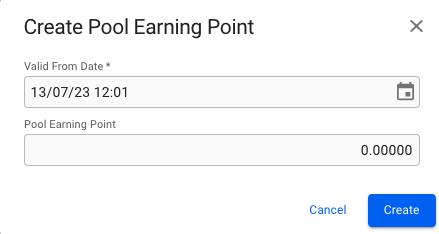
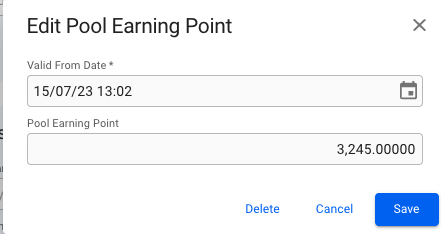
(if classification society is selected), and Pool, as well as the Pool Earning Points. In this table, you can create, edit, and delete a Pool Earning Point:
*The Vessel Code field is only visible and required if you have ticked off the "Set vessel code" checkbox. If the checkbox is not ticked off, a Vessel Code will automatically be generated for you.
In the modal, you can fill in the required fields and add any additional information about the new TC voyage.
After you have filled in, you can click Create.
Create Time Charterer Out modal
When choosing a Vessel, the Ballast Port, Owner and Currency fields will be automatically filled out with the vessels last port call, owner and default voyage currency.
The Currency field in the create modal is used for both Hire currency, as well as Bunkers and CVE currency.
In the trade field a combination of Route, Trade and Pattern can be selected to ensure trade is set properly. When changing to a different option, the cargoes on the voyage will be updated with the same trade.
Steps:
Trade
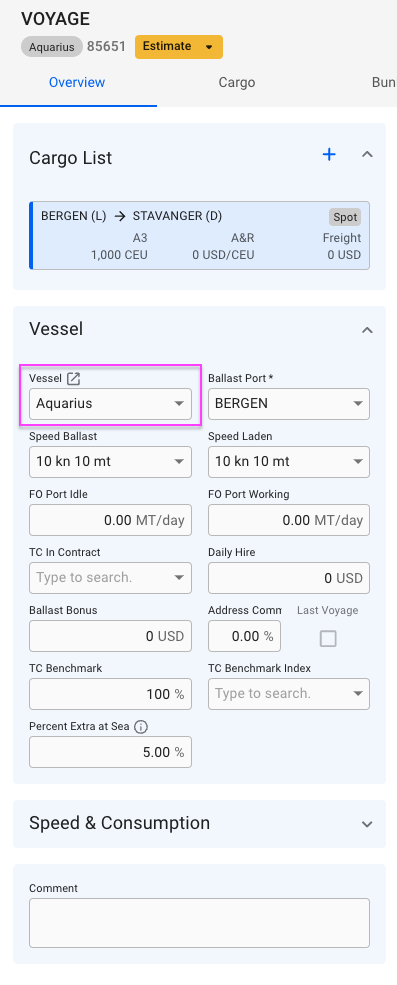
Cargo Section in Voyage Overview tab
Cargo Section in Voyage Overview tab
Cargo List
If the voyage is of type TC, a shortened list of cargo cards will be used, titled "Last Cargoes". Only the last 3 cargoes created will be displayed. To see the full list of all cargoes on the voyage, use the Cargo
Cargo Section
Cargo List in Voyage Overview tab
To show the analysis section, click Analysisat the top of the panel. To show an overview bar chart, click Result Chartat the top of the panel.
As you start to invoice various items on the voyage, the exchange rates used for calculating profit loss values will be an average of the rate used in each invoice, should those currencies differ from the voyage currency. As such, the numbers on display in the Profit/Loss summary may change slightly throughout the voyage, but should be exact once the final invoice has been issued.
Initial Estimate: A freight rate of 130 USD results in a TCE of 537,817 USD and a result of 953,742.
To achieve a TCE of 560,000 USD, the freight rate needs to be 135.1062 USD.
To achieve a result of 1,080,000 USD, the freight rate needs to be set at 146.3887.
All of these fields are editable. The cargo highlighted in blue in the Cargo List section will also have its port calls highlighted correspondingly in the Edit Schedule section, meaning, you are viewing the selected cargo's information.
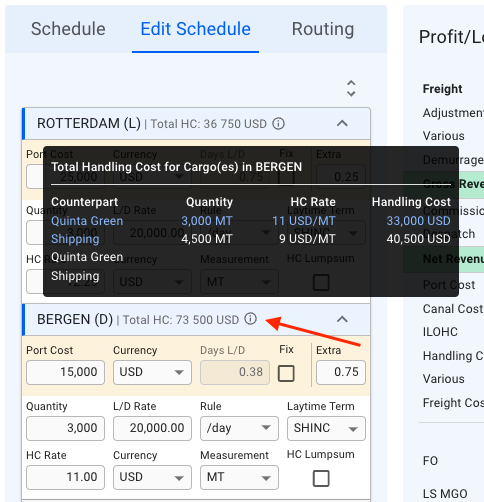
Additional Hover Information:
All of the collapsible headers are displaying the Port Call Name, Reason for Call and Total Handling Cost (HC). Next to the last mentioned, there is an icon, which you can hover on to display additional information inside a tooltip:
Tooltip for Additional Total Handling Cost Information
This tooltip displays, per Port Call, the Counterpart, Quantity, HC Rate and Handling Cost for each of it's Cargo Ports. Again, with the selected cargo from the Cargo List section highlighted in blue.
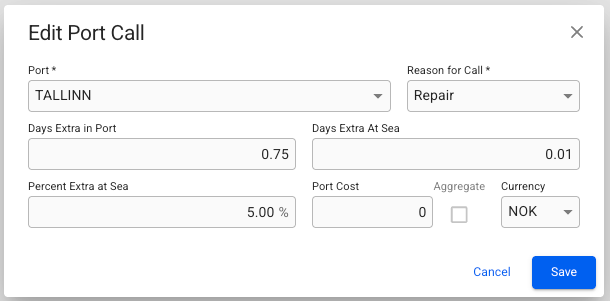
Managing Port Calls
Edit Schedule
Detailed Information
The Port Call Edit Schedule
Figure 1: Profit & Loss Example
The result, 1 628.00 USD, is what appears under EU ETS Cost for that voyage.
NOTE: In our example, the EUR to USD exchange rate on the date of calculation was 1.2.
The port calls timeline shows the days at sea and days in port. It also shows the names of the ports above the bars. Hover the mouse over each bar to see more information.
Here you may add organisational data to your voyage.
Note, The Company and Business Unit fields depend on each other. If one of the details is set, you may see linked items that correlate to the former attribute when selecting the second field. Moreover, if you proceed with an element not linked to the former attribute, the first field will be cleared.
* For example, there is Company A, which has a link to Business Unit A. When creating Voyage's organisational data, after selecting Company A and expanding the Business Unit, you will get a list of options. The list will contain all the Business Units, but Business Unit A will be marked as linked to the selected Company. Next, if linked Business Unit A is chosen, you will end up with Company A and Business unit A. Otherwise, if the selected Business Unit is not linked to the preferred Company, the Company field will get cleared, and you may observe a list of Companies related to the selected Business Unit.
Voyage drawer
Summary
Result
Days
Organisational Data
Figure 2. Alternative route TCE Difference
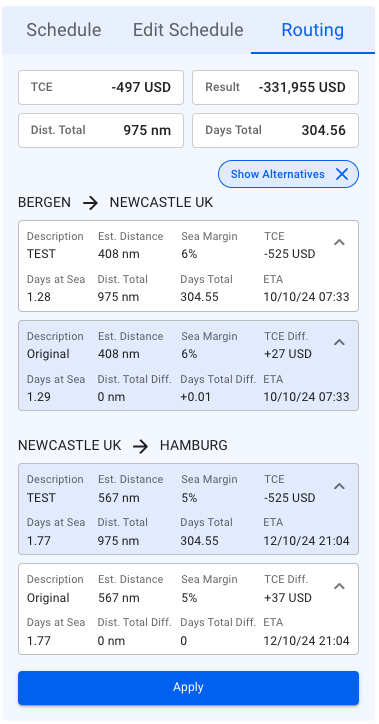
It is also possible to compare the routes in more detail! For instance, take a look at the screenshot below:
Figure 3. Routing - Detailed route comparison
Clicking the top-right arrow in each container expands the detailed information.
The apply button proceeds with the changes and saves the selected route for the current voyage.
The alternative routes may be created manually or must be coming from a third party, such as weather-based routes, etc.
For further details, please contact our sales team.
Figure 1. Schedule - Routing with alternative routes
Detailed Comparison:
Tc In - all generator and boiler consumption fields* match the TC In generator and boiler consumption settings.
Overridden - indicates that the voyage has uniquely defined generator and boiler consumption values.
Figure 2. Consumption source selector.
It is possible to update all generator and boiler consumption fields at once by selecting either the Vessel or TC In configuration.
Please review the detailed documentation of the Generator and Boiler consumption fields to understand how each field in this section affects the voyage consumption calculation.
Figure 3: At Sea Ballast Port selected
After creating a voyage, the ballast latitude and longitude can be modified by opening the voyage drawer and navigating to thevessel section (see Figure 3). These fields will only be available when the ballast port is set to 'At Sea'.
If the ballast port is changed from 'At Sea' to a another port, the latitude and longitude fields will disappear, and the voyage will automatically update to reflect the new port’s coordinates.
Figure 2: The consecutive voyage with ballast port At Sea
Editing the Ballast Latitude & Longitude
Changing the Ballast Port
Responsible Charterer
Responsible Operator
Responsible Accountant
Claims Operator
Pool
Figure 1. Organisational data tab
To edit any field in the tab, click into the field and start typing. Then select the desired option. Field will automatically save when you click outside or use tab key to exit the field.
Company and Business Unit field is mandatory if the voyage status is NOT Estimate or Unallocated.
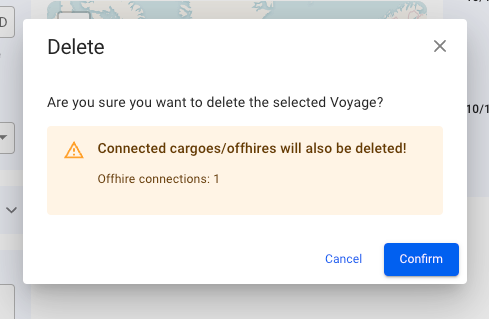
When editing company and/or business unit, you will get a warning that alerts the user that the connected cargoes will also have their companies and business units changed (Figure 1).
Figure 1. Warning when attempting to change company and business unit
When clicking the OK button, the company and/or business unit will be changed for the voyage and all the connected cargoes.
In the trade field a combination of Route, Trade and Pattern can be selected to ensure trade is set properly. When changing to a different option, the cargoes on the voyage will be updated with the same trade.
Company and Business Unit
Trade
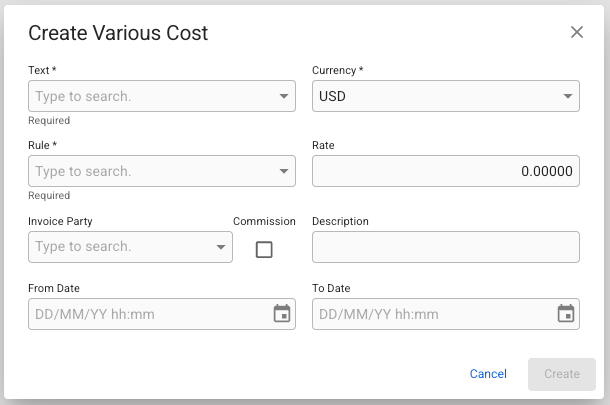
Click the Create Button
– Locate and click the
Create
button in the top-right corner of the header
(Figure 2)
.
Enter Required Information – A Create modal will appear, prompting you to fill in the necessary fields.
Create the Various– Once all required details are entered, click Create to finalize and add the new Various.
New various items will have status 'Estimated' by default.
Figure 2. Create Various Cost/Revenue
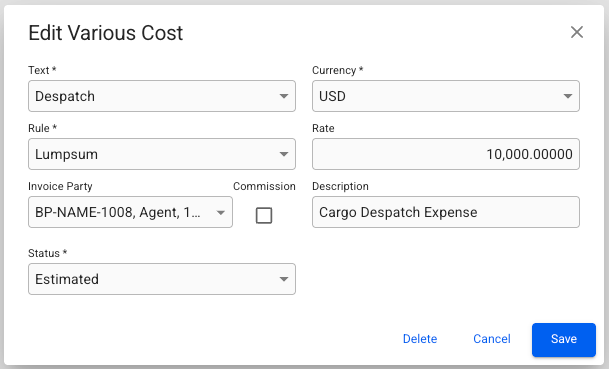
Select the Various– Click anywhere on the row of the Various you wish to edit in the list.
Modify Details – An Edit modal will appear (figure 4), allowing you to update the entry’s properties.
Save Changes – Click Save to apply the modifications.
Figure 3. Edit Various Cost/Revenue
Figure 5: Delete Various Cost/Revenue
Select Entries for Deletion – Use the checkboxes in the leftmost column to select the relevant entries.
Click the Delete Option – Once selected, a Delete button will appear in the top-right corner of the header.
Confirm Deletion – Click Delete, then confirm in the popup that appears to complete the removal.
⚠️ Note: Deleted entries cannot be restored. Be sure to review your selection before confirming deletion.
Create New Various Cost/Revenue
Figure 1: Voyage Full-Screen Create Port Call Various Cost/Revenue
Figure 2: Various Cost Create Button
Edit Various Cost/Revenue
Delete Various Cost/Revenue
Currency Filter – You can also filter entries by currency using the Currency filter, located in the top-right corner of the list. This allows you to view only entries in a specific currency.
You can apply multiple filters at the same time to narrow down your results.
Figure 1. Various Cost/Revenue Tab Filters and Search Bar
To search for a specific Various Cost/Revenue entry:
Use the Search Bar – Located in the top-left corner of the list (figure 1).
Enter a Keyword – You can search by description or various text.
View Results – The list will update automatically to show only entries that match your search.
Filtering and searching can be used together to quickly locate specific entries within the list.
Filter Various Cost/Revenue
Search for Various Cost/Revenue
Emission Control Areas
Open Loop Restricted Areas
Restricted Areas are visible on the map and depicted by Blue or Red dashed lines (See Figure 1).
Figure 1 - Restricted Areas on Voyage Map.
The leftmost dropdown filter allows changing the settings to include the particular group of Restricted Areas in the map or not.
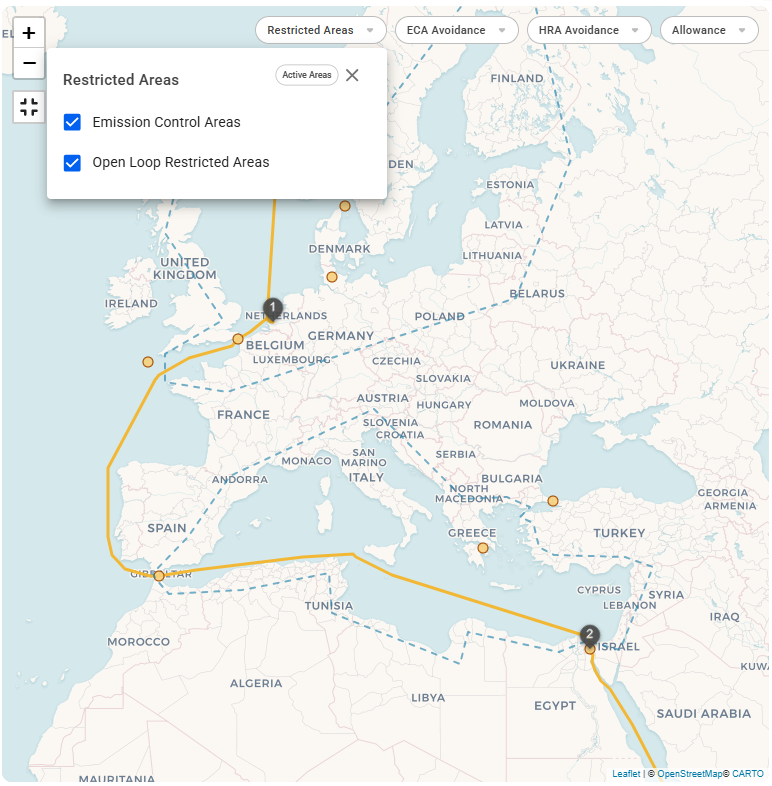
The voyage map now includes a "Active Areas" filter, allowing users to display Restricted Areas that are currently active based on their defined Start and End Dates. The filter is enabled by default and is voyage specific.
Figure 2 - 'Active Areas' filter not applied
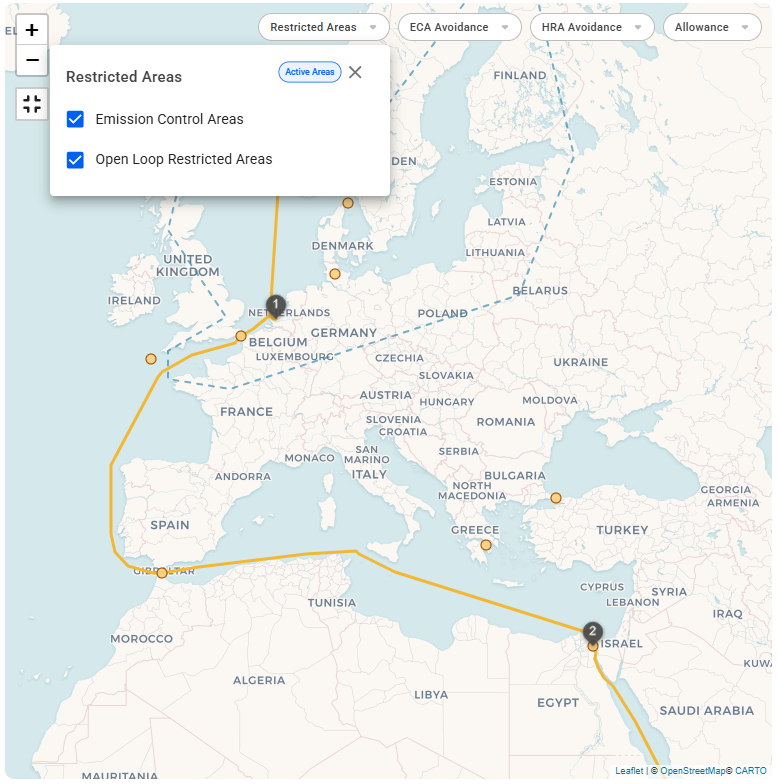
Figure 3 - 'Active Areas' filter applied
Viewing routing points
Remove existing routing points from the Voyage route
Restricted areas
Additional filter: "Active Areas"
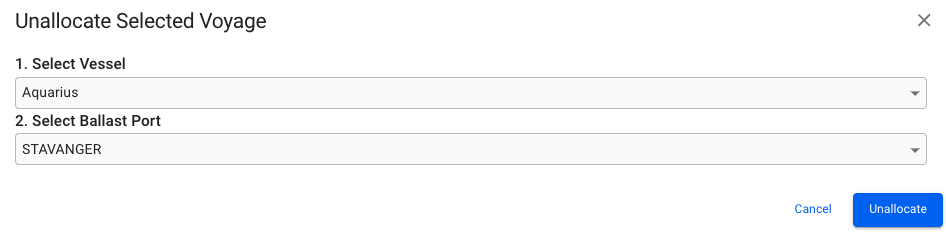
Swap Vessel secondary action
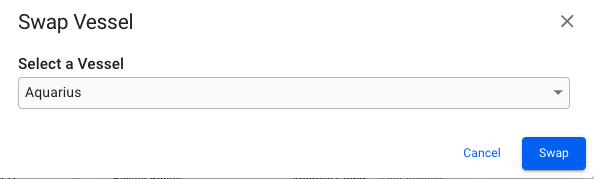
Followed by clicking the action, this modal will pop up:
Swap Vessel Modal
In this modal, a vessel must be selected to be able to swap. By default, the vessel you are currently on is selected. Meaning, you are always able to actually click on the Swap button (for now). After the swap, you are able to see the new vessel either as the above mentioned Vessel field under Voyage Overview, or at the top of the Voyage drawer, left-most (clickable) chip:
Vessel chip at the top, left-most
Swap Vessel for Estimate or Unallocated voyages
Swap Vessel for Allocated or above voyages
Vessel Field on the Voyage Overview Section
The voyage has status Estimate or Unallocated
The voyage has a fixed start date
The voyage is the first voyage on the vessel
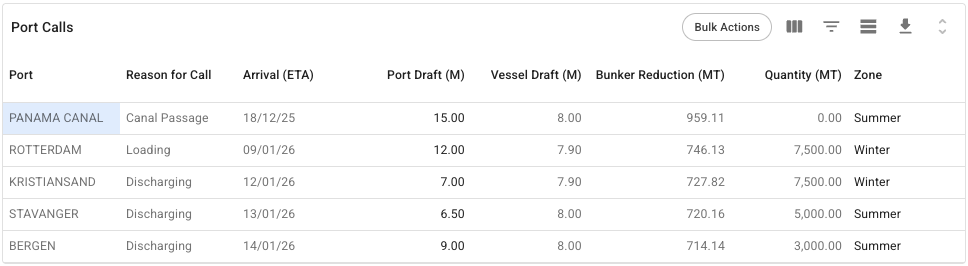
The Port Calls grid displays information about the voyage port calls, and allows you to specify the Port Draft and Zone of the individual port calls. Changing either of these values may have an impact on the intake calculation.
It is possible to set values for Port Draft and Zone in the Port Calls grid
Below the grid, you will find a graph for the intake calculation, with a bar for each of the port calls in the voyage schedule. Each port call will have a small Intake-label, displaying the maximum intake. The x-axis is scaled to the maximum deadweight of the vessel, given the port zones in the schedule.
Additional information can be displayed by hovering over a segment in the bar chart.
Hovering over each segment will give you additional information
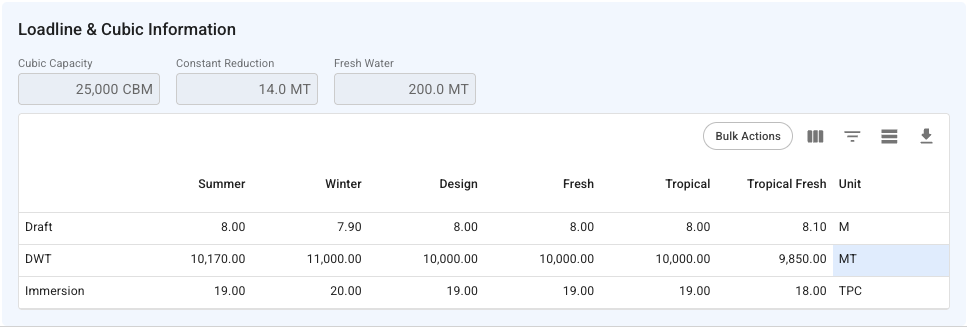
In the bottom of the Intake Calculator, you will find a section outlining the loadline and cubic information of the vessel. This section is for reference only.
Opening Balance section
Port Calls and intake graph
The Bunker Reduction and Quantity numbers are defined using the reason for call of the port calls
Loading port calls, the departure weight is used
Discharge port calls, the arrival weight is used
Loadline and Cubic Information
Canal Allowances Port Call Drawer (bottom right)
Changing these allowances only affects the sea passage leading to this port call. For example, if Panama Canal is deselected on Los Angeles port call, it is only removed from the leg going from New York to Los Angeles. Meanwhile, the canal is still used on the way back to New York:
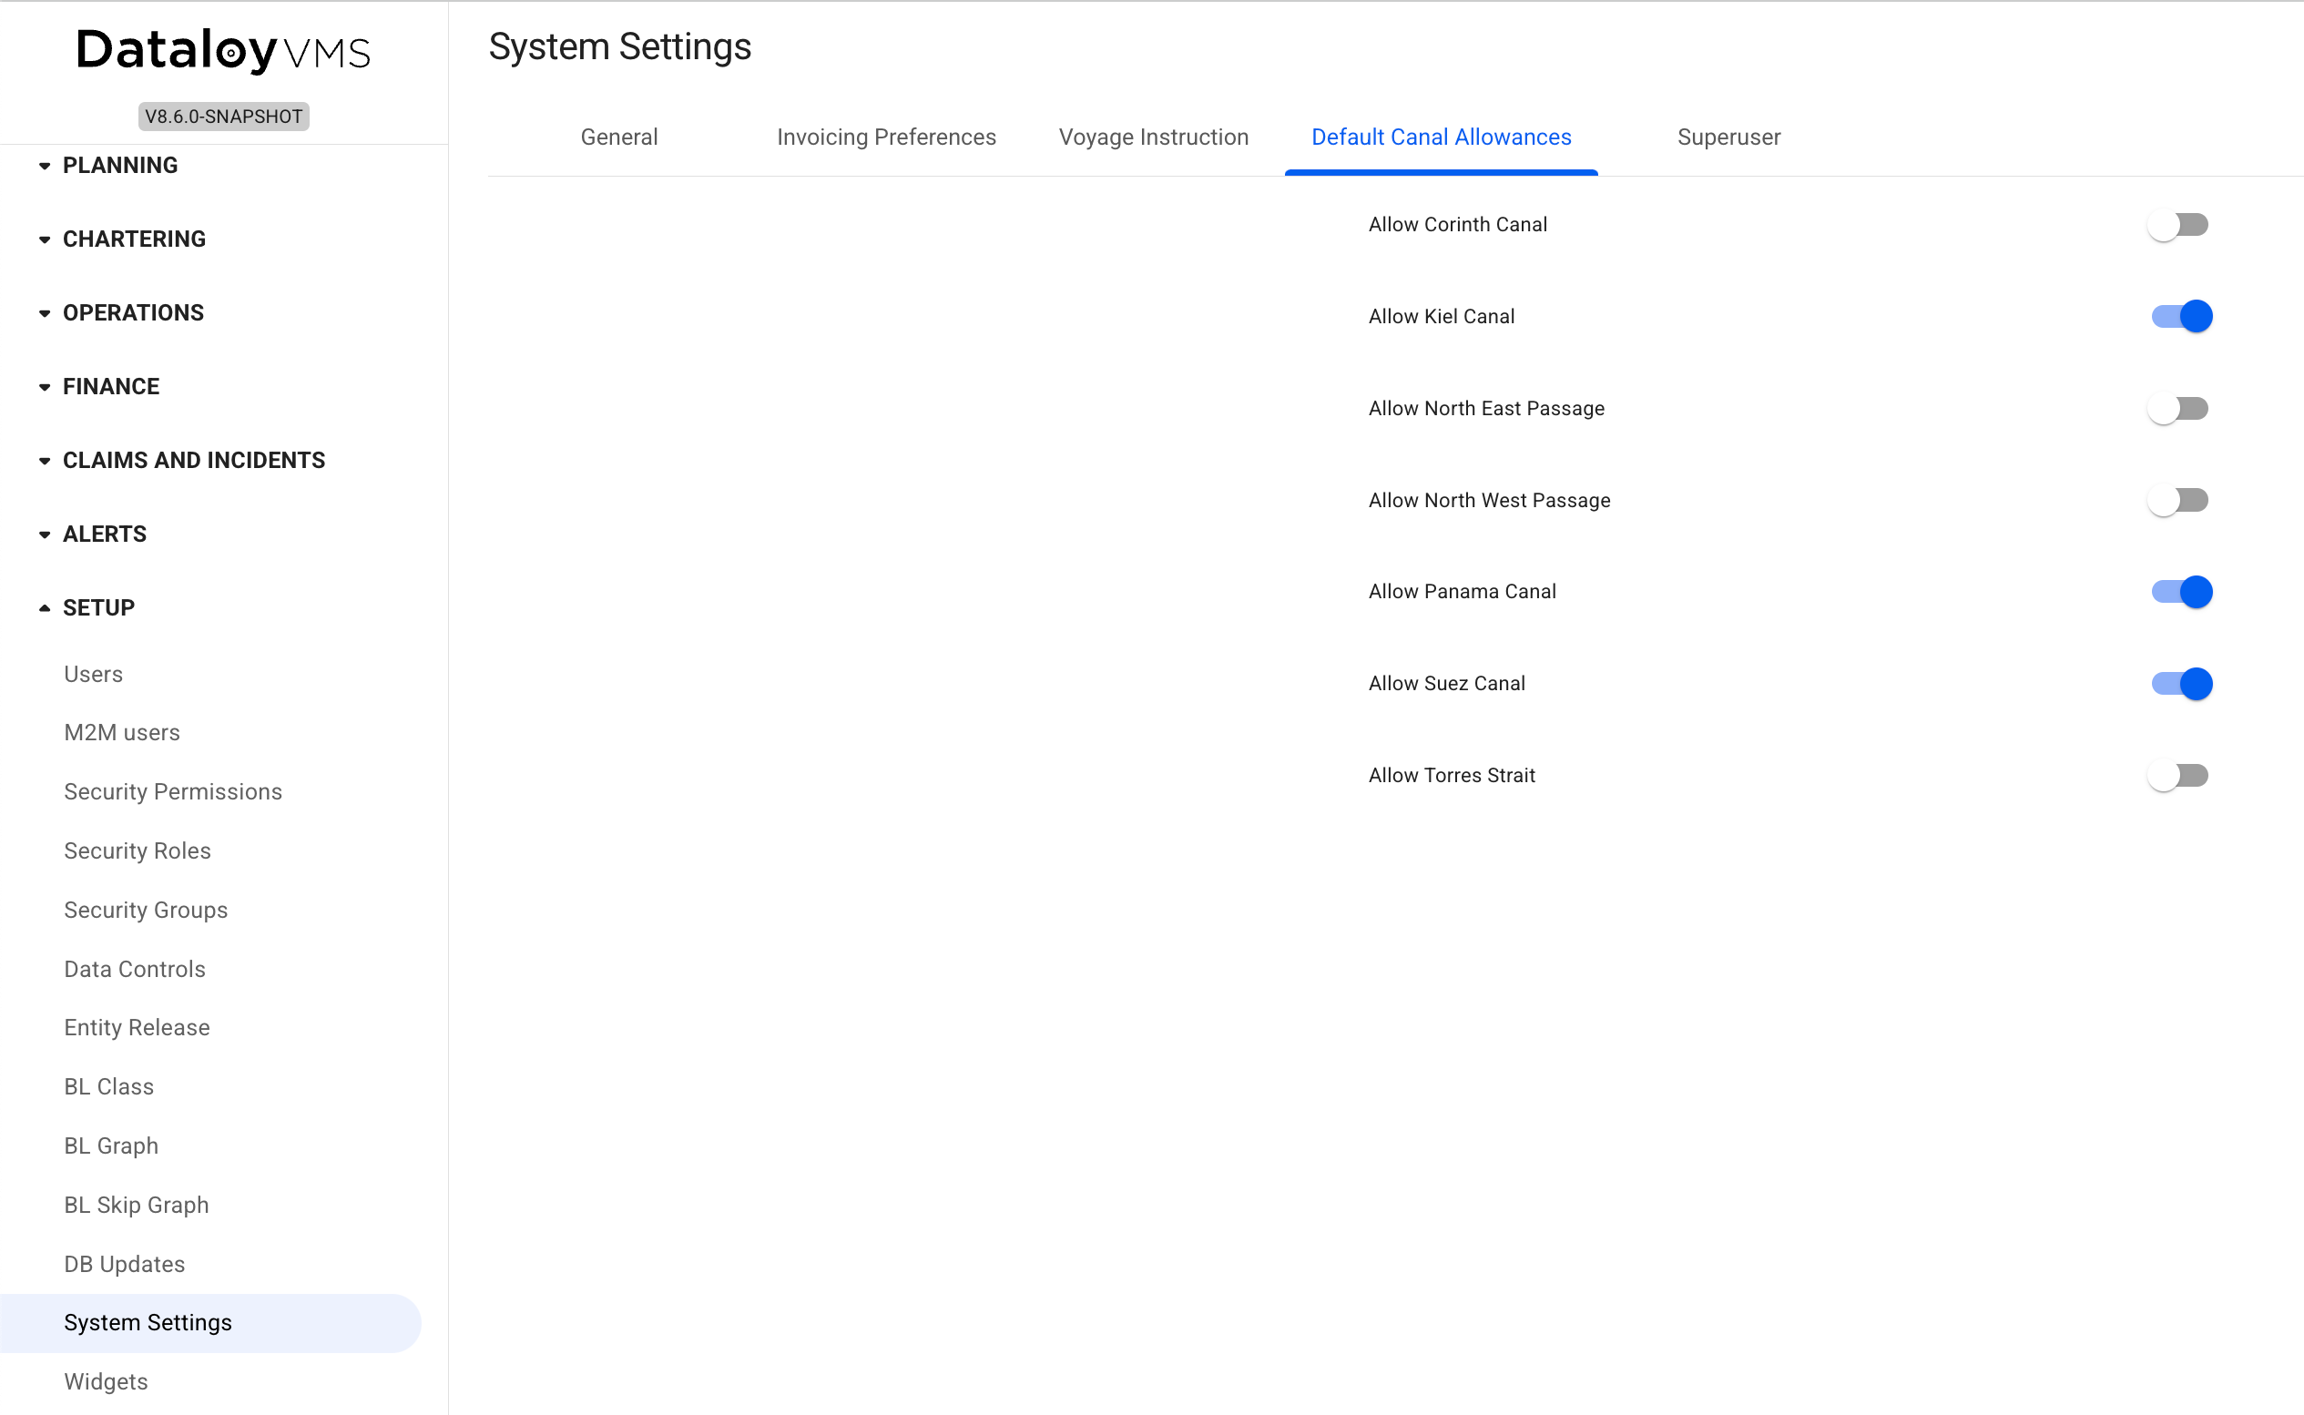
When creating a new voyage the system applies a set of default canal allowances. These can be controlled by Administrators on the system settings page:
System Default Canal Allowances
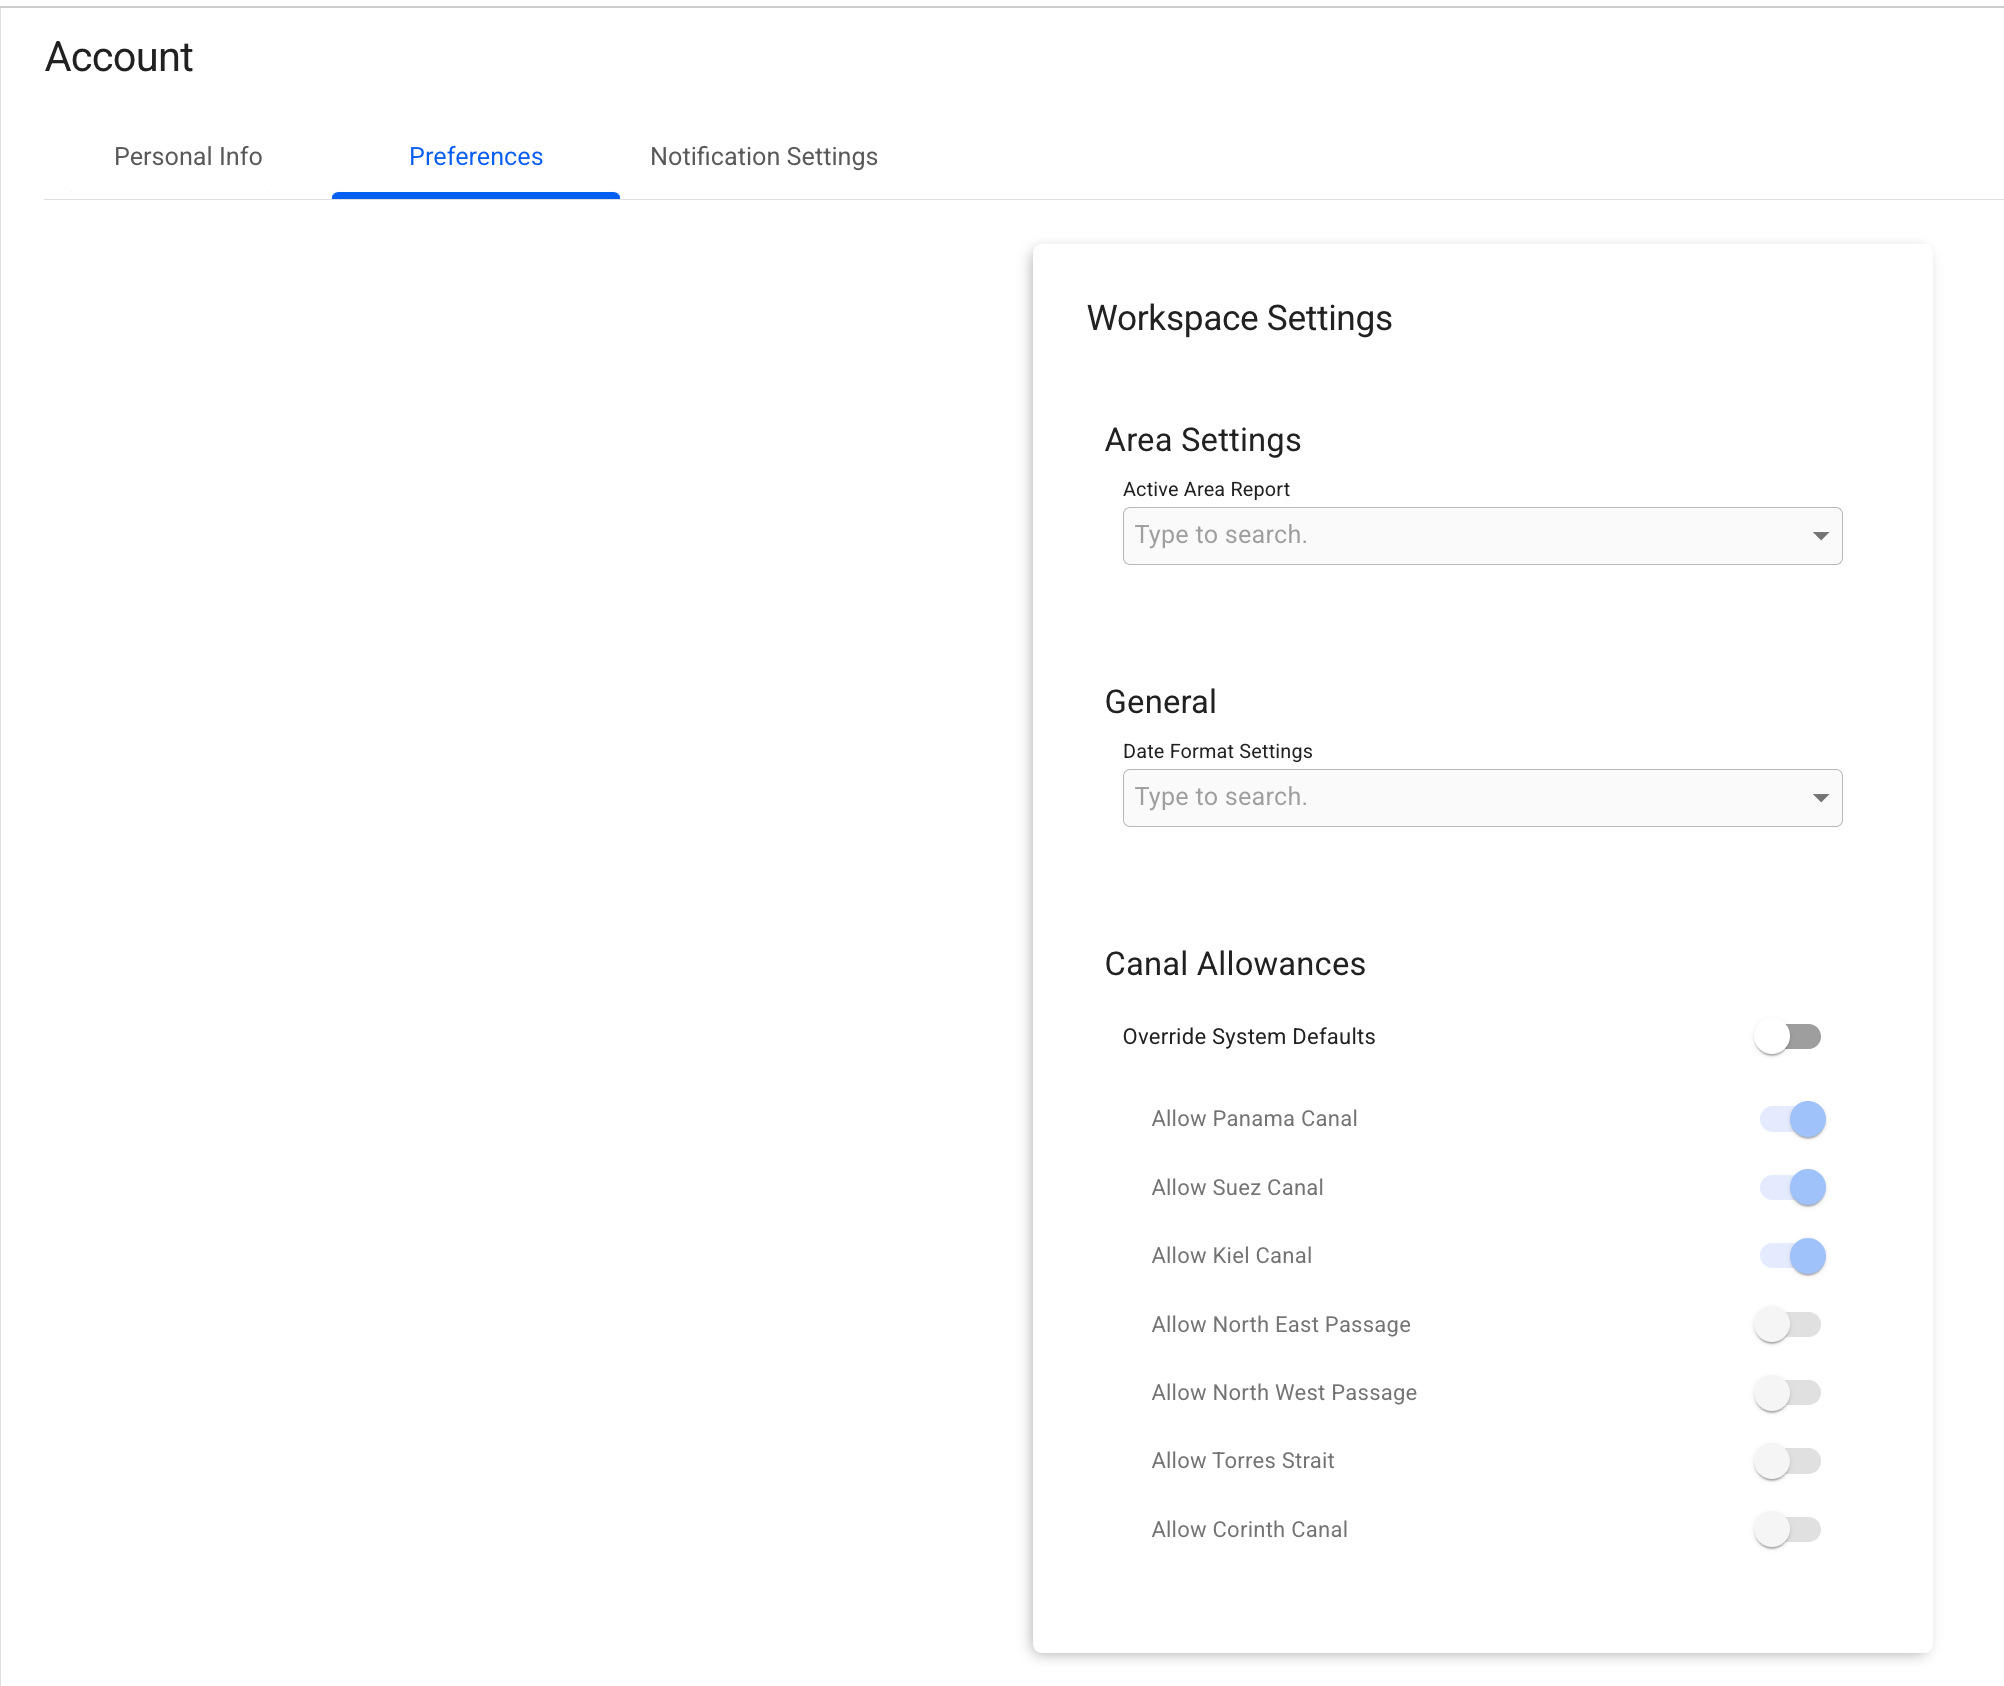
Initially, the system default allowances apply to all users when creating new voyages. However, each user can override the system defaults through their user preferences page:
Override System Defaults
Voyage Allowances
Port Call Allowances
Canal Allowances Voyage Drawer
Remove canal allowance
Default Allowances
Create new entries directly within the grid including various for Port Call and Cargo.
Modify existing entries by adjusting details as needed.
Budget Scenario - converts this voyage into a template, and sets the scenario to be the Budget scenario that is selected. The other options are disabled when choosing this option.
Cannot be converted into a template:
Template voyages
Unallocated voyages
Allocated voyages
Nominated voyages
Operational voyages
Invoiced voyages
Operationally Closed voyages
Closed voyages
The voyage's type (SPOT, TC & CoA) does not matter in regards to whether you're allowed to convert or not. However, there are some conditions for each type:
SPOT - both options will be available.
TC (and has cargoes) - none of the options will be available, but you can still convert.
CoA - both options will be available and the 'Create New CoA' option is selected by default. If deselecting this option, the template voyage will continue to use the old CoA instead of creating a new.
How to Convert
Options
Secondary actions menu
Convert to Template modal (for SPOT)
Requirements
Internal Data
Create Voyage Charter & Create Template Voyage
Create Time Charter Out
Trade options
Warning modal when selecting a Trade
Create Voyage Charter modal with Trade dropdown highlighted
Searching for a vessel in a selector using an ex-name.
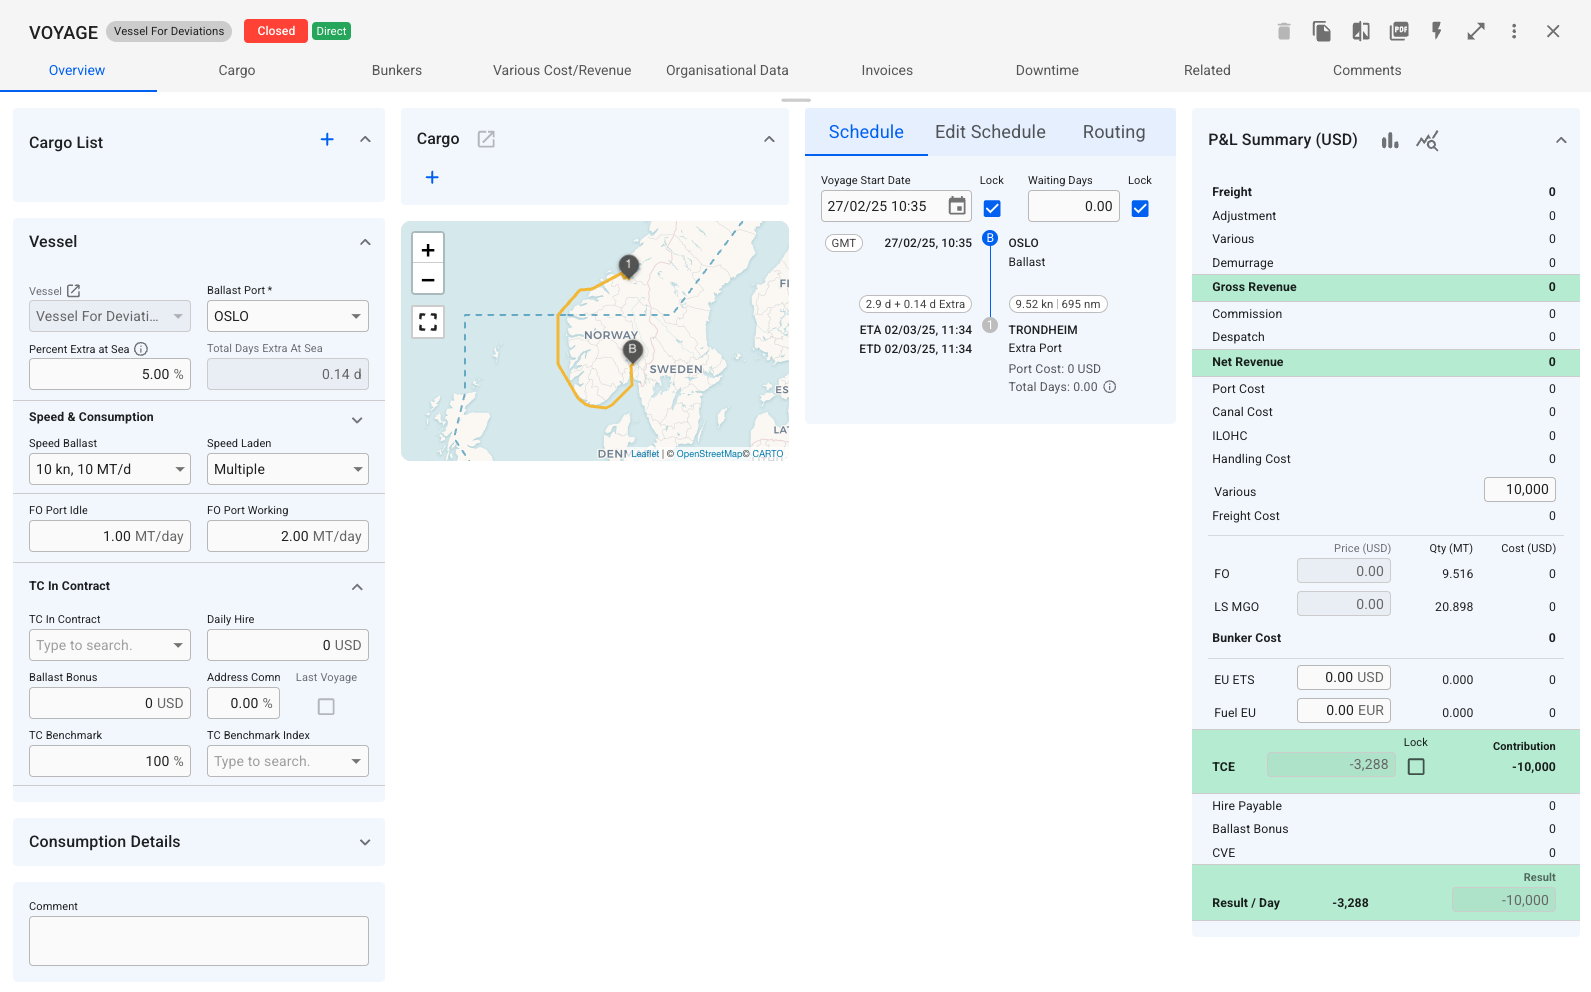
Figure 2. Direct Voyage from the Deviation modal.
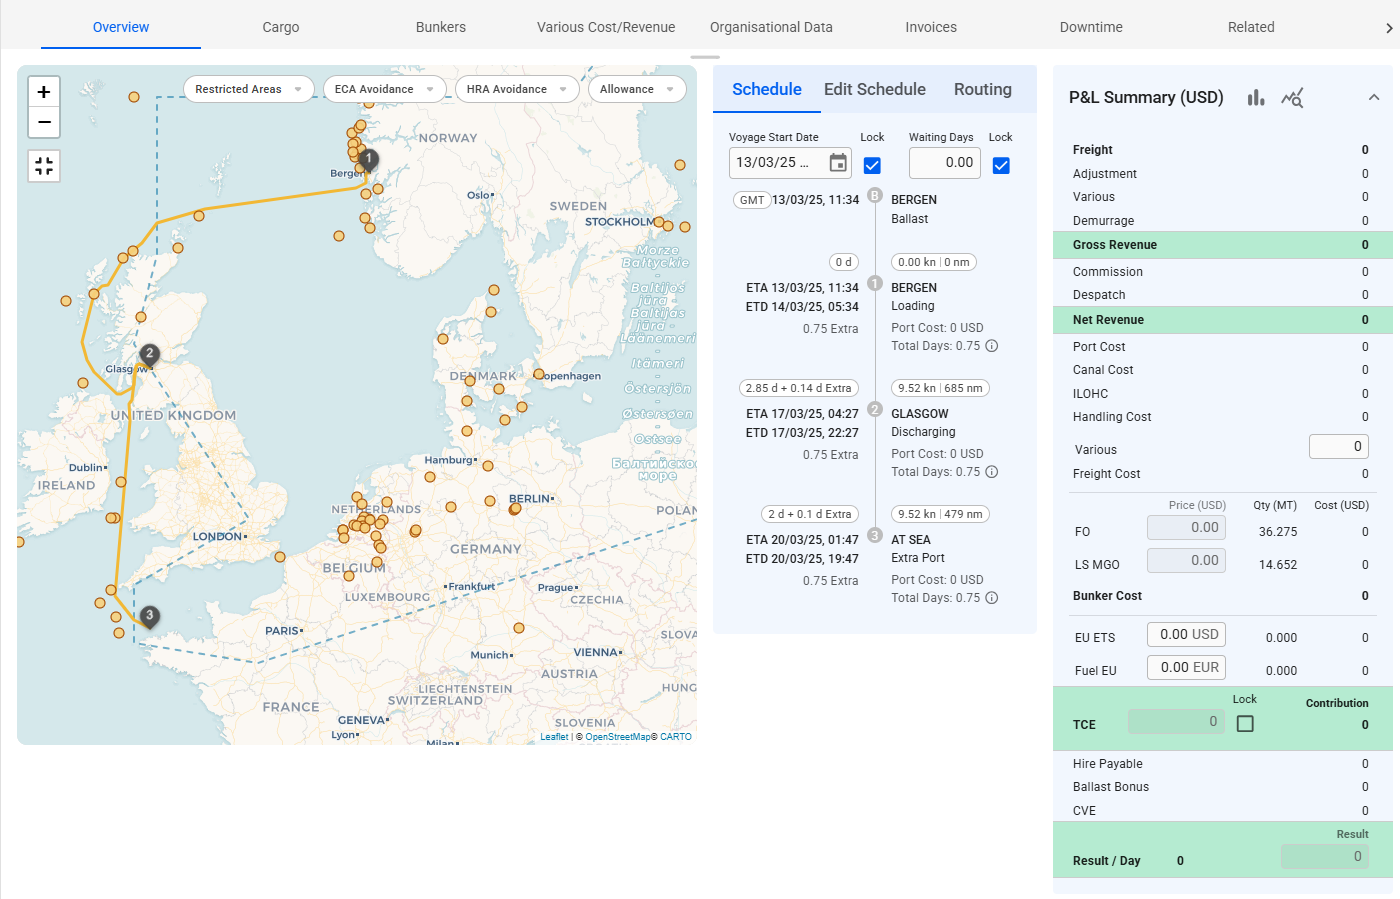
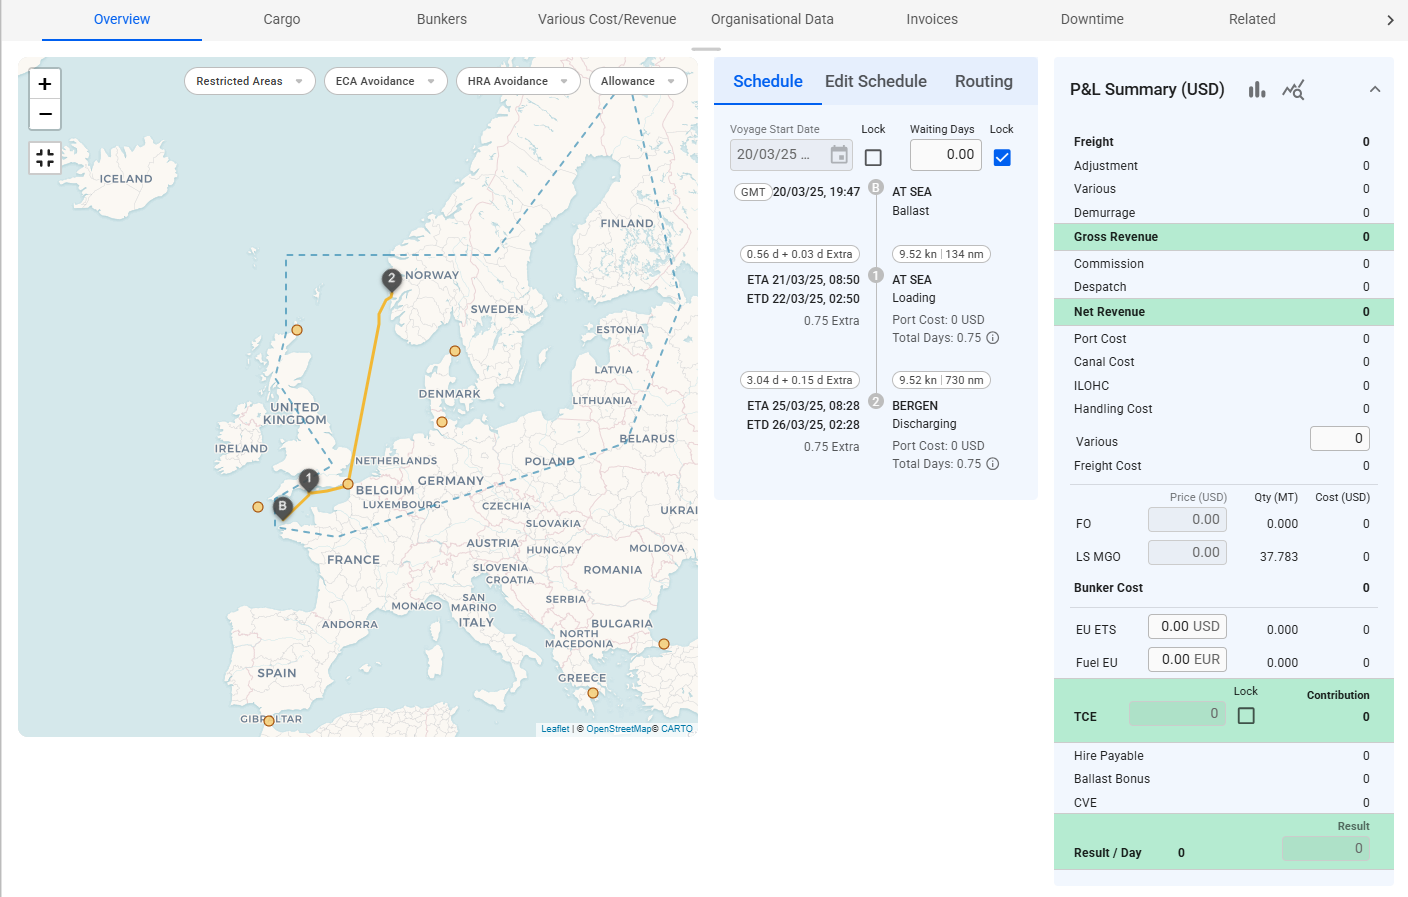
Schedule
The "Schedule" section in the Voyage drawer comprises three sub-sections: Schedule, Edit Schedule, and Routing. This part focuses on the 'Schedule' tab.
The Voyage schedule (Figure 1) visualization may be found on the right-hand side of a voyage drawer.
This section is highly customizable: for example, you can change the voyage start date, lock it, update the port call sequence, and edit port calls by hovering over a port call box.
Figure 1. Voyage Schedule
The Schedule Timeline is a fully interactive module. Each port represents a draggable block - if you reorder the blocks with not-fixed port calls (Figure 2), you will update the port call sequence on the opened voyage correspondingly:
Figure 2. Schedule Drag'n'Drop
Next, each Port Call block is clickable, and it brings up a Port Call drawer.
The small ovals inside of each Port Call block are called chips and include a piece of related information: Days at Sea + Extra Days at Sea, Actual Speed, and Distance between Ports. Every oval is clickable and allows editing corresponding sea passages (Figure 3).
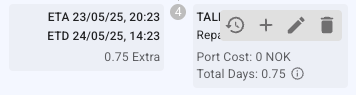
Moreover, the Port Call blocks include a small hover actions toolbar that provides the following actions on the voyage schedule sequence: show Port Cost history overview, create new Port Call to the current schedule, edit the selected Port Call, or delete the Port Call.
When hovering the mouse over a port call in the schedule, a toolbar in the upper right will appear.
and port costs for the selected port.
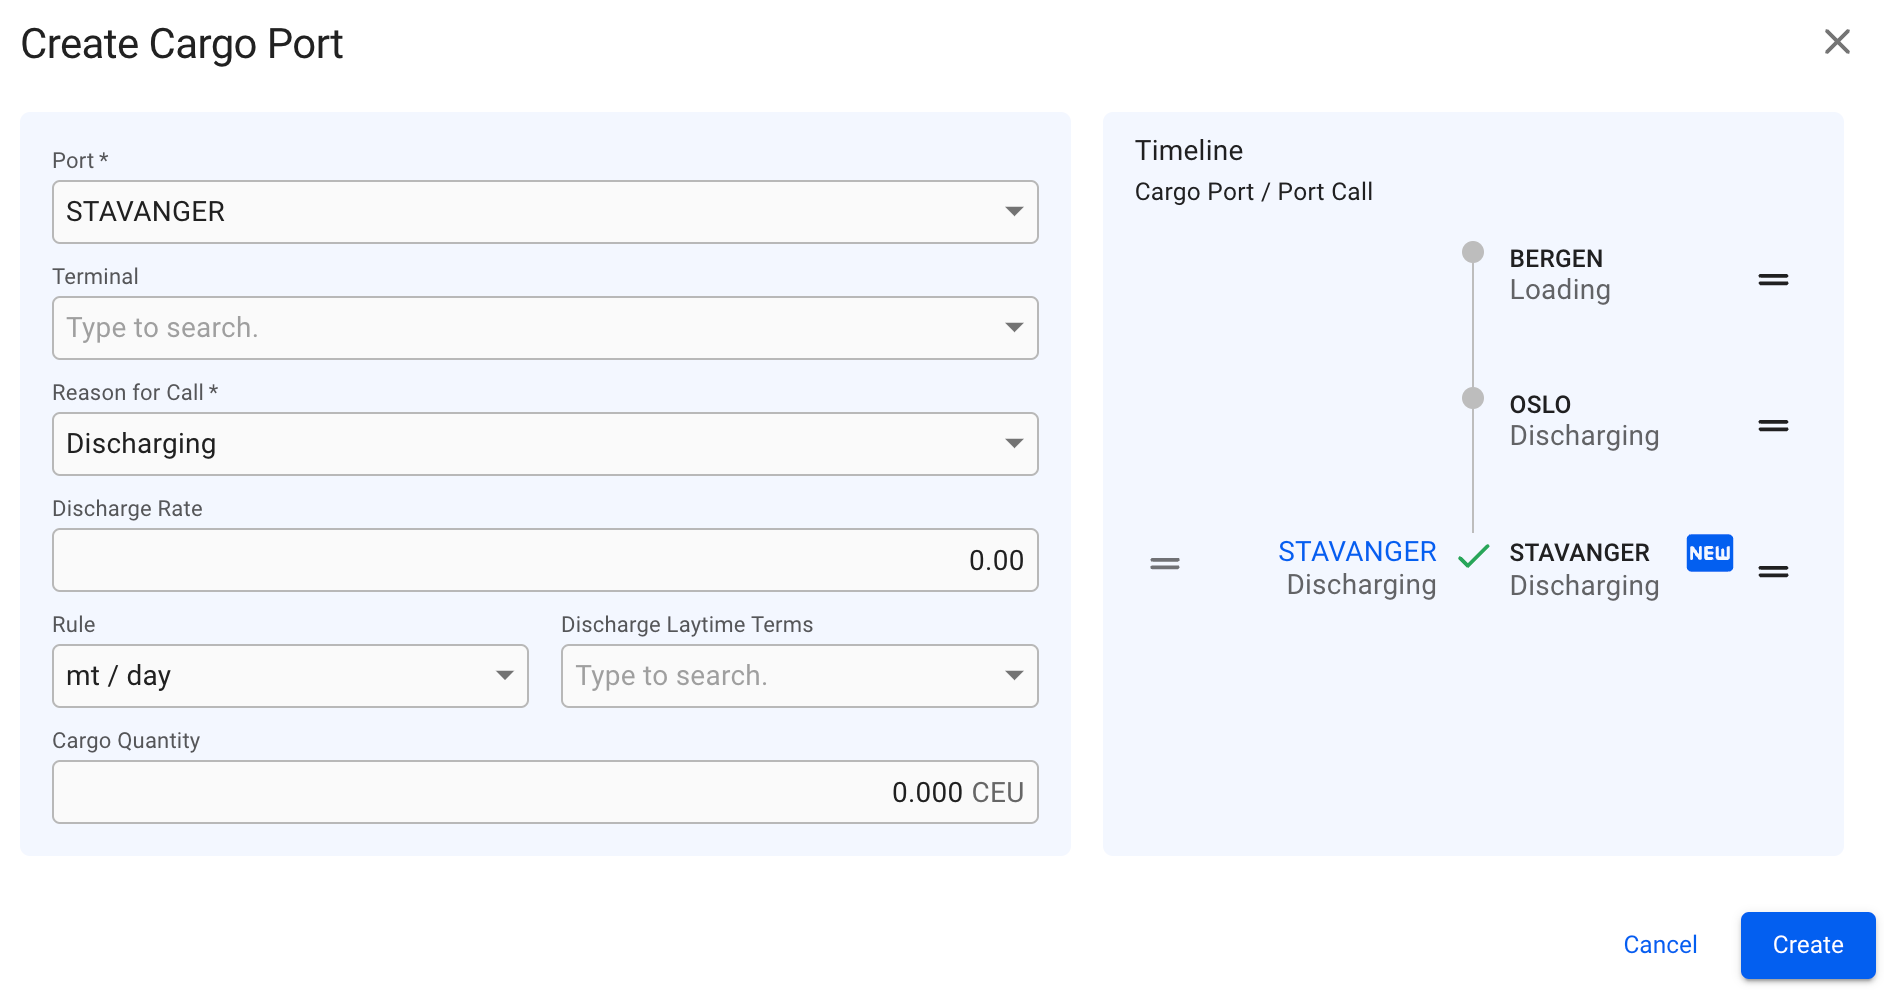
To insert a port call before or after the port call you are editing, click the Create button and select Before or After. A window to create a new port call then pops up.
To edit a port call, click the Edit button.
To edit a port call in the schedule, click the pencil icon in the action tooltip. A popup modal then shows with editable essential port call details (Figure 5).
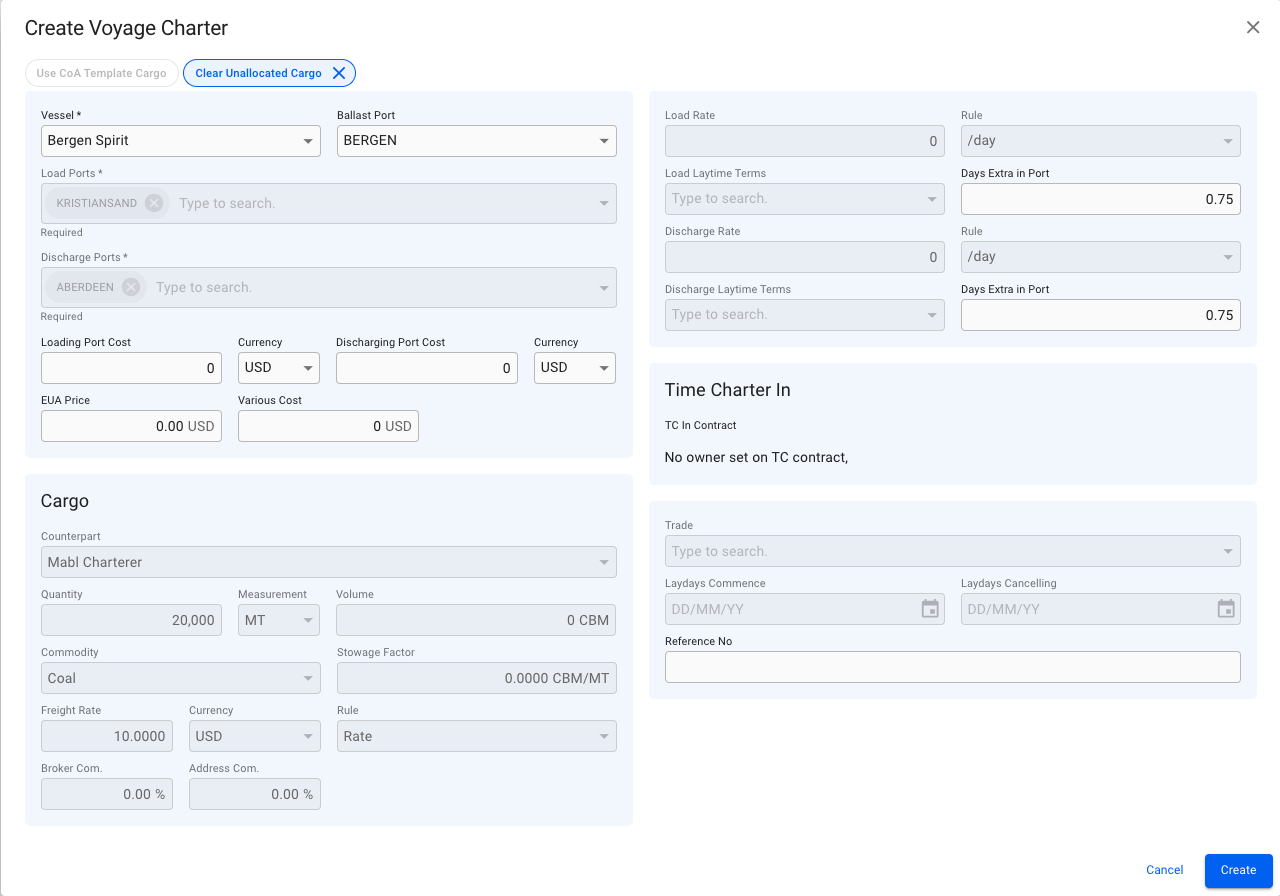
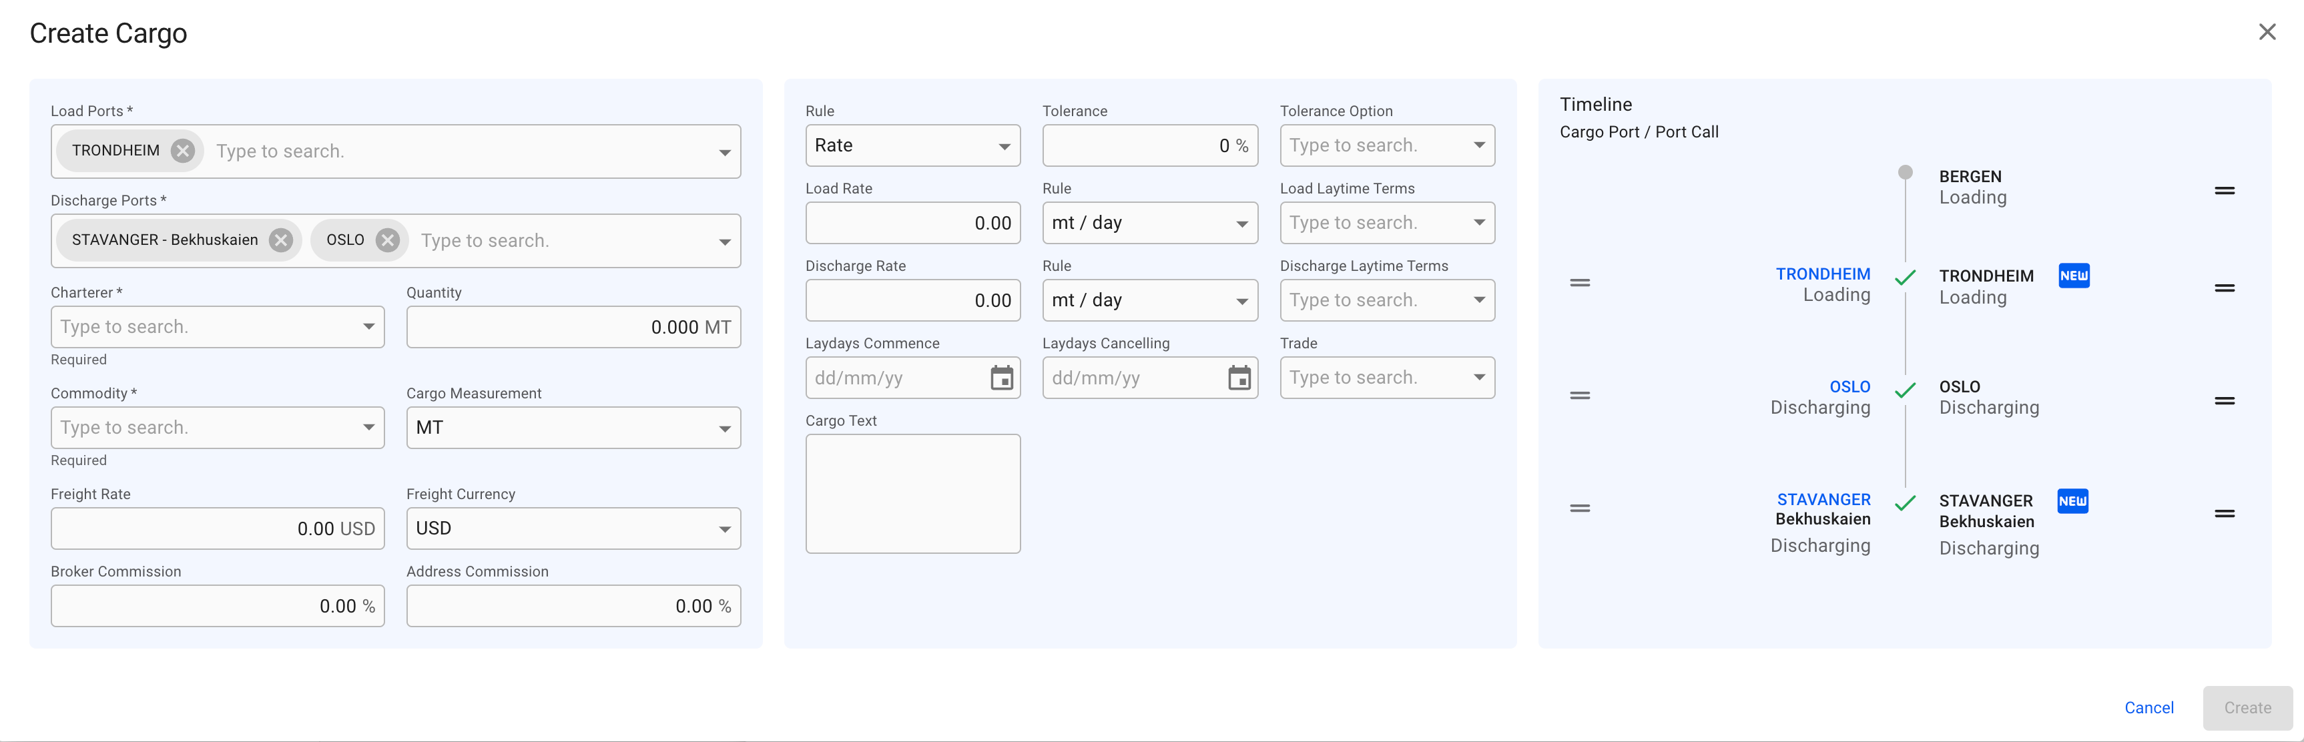
Create Voyage Charterer
Creating a voyage charter is fast and easy. The minimum amount of details required is a vessel and a port for loading and discharging.
Open the Voyages module from the menu on the left.
On the top right corner, click the icon.
Select Create Voyage Charterer.
Fill in the details manually, or choose between using a CoA Template Cargo or an existing unallocated cargo as basis for the voyage.
Click the Create-button.
After choosing a vessel, the previous Port on the Vessel will be set as Ballast Port. This can be overridden by entering another Port, if no Ballast Port is set then the first Load Port will be used.
To create the voyage using a CoA template as a basis, click the Use CoA Template Cargo button in the top of the modal. This will bring up another window, allowing you to select a template from a list of CoA templates. More details can be found here: .
Using a CoA template will give the voyage and cargo the same Company and Business Unit as the CoA.
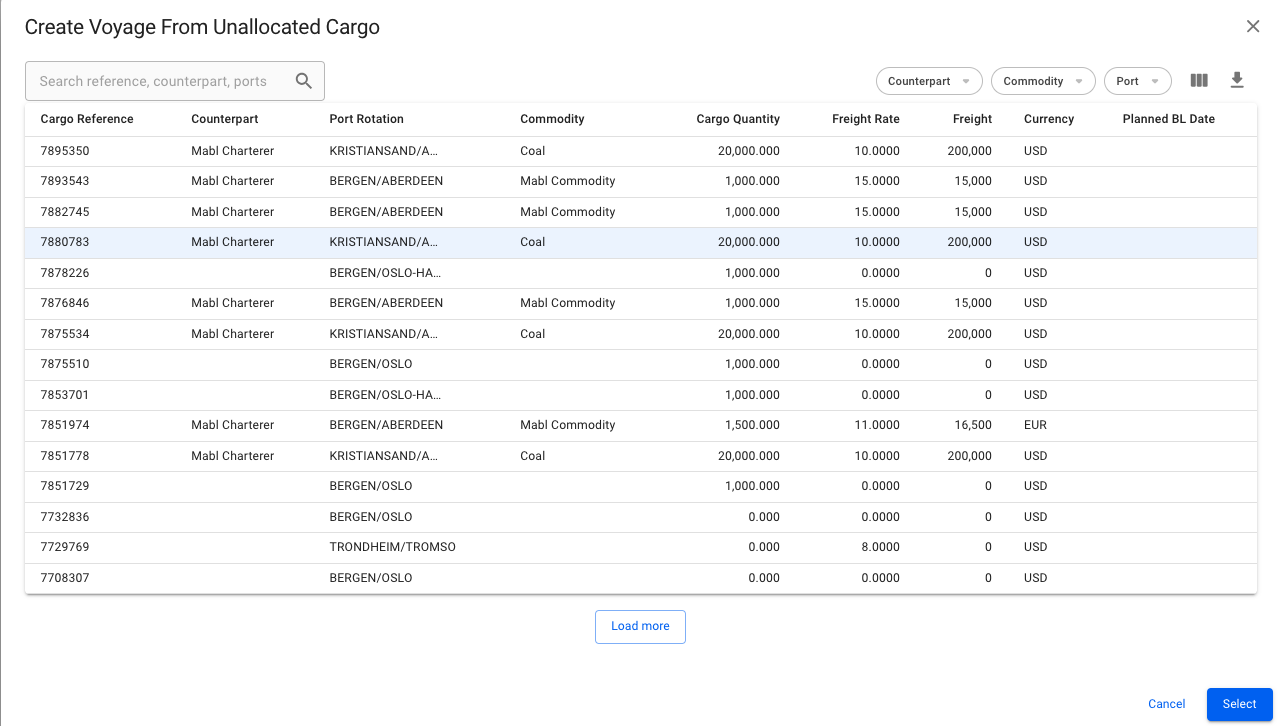
It is possible to create a new voyage and allocate an unallocated cargo by using the Use Unallocated Cargo button in the top of the modal. Clicking it will bring up another window with a list of unallocated cargos. Filter and search as needed, and select a cargo from the list.
After choosing a cargo, the create voyage modal will be automatically filled in with all the details from the cargo. Only the fields that are not coming from the cargo will remain editable.
When entering Quantity, Volume or Stowage Factor, the modal will automatically calculate the corresponding value. Updating Quantity or Stowage Factor will update Volume, and updating Volume will update the Stowage Factor. Selecting a Commodity will default the Stowage Factor to that of the commodity.
In the trade field a combination of Route, Trade and Pattern can be selected to ensure trade is set properly. The cargoes on the voyage will be updated with the same trade.
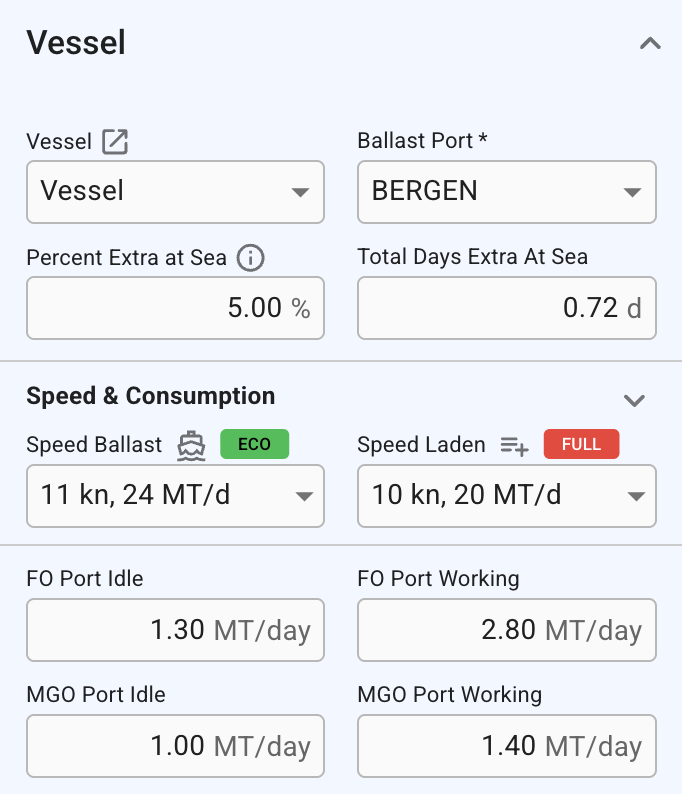
Vessel
This page reveals the essential information of the Vessel section in the Voyage Overview tab.
(Figure 1) Vessel section in Voyage Overview
Vessel
Field
Description
Vessel
Changing this updates the voyage’s company and business unit, as well as those of all connected cargoes, to match the selected vessel.
Ballast Port
Changing this updates the voyage’s route. Editable when the voyage status is "Estimate" or when the voyage start date is unlocked.
Displays the speed for ballast port calls when all port calls share the same value. If different speeds are set, the field is disabled and shows “Multiple”. Changing this value updates the speed for all ballast port calls.
Displays the speed for laden port calls when all port calls share the same value. If different speeds are set, the field is disabled and shows “Multiple”. Changing this value updates the speed for all laden port calls.
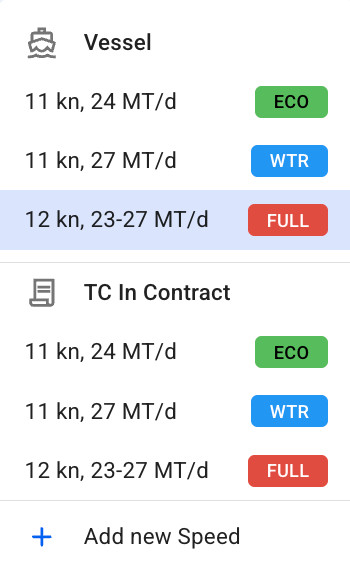
The dropdown initially includes speed options from the vessel and TC In contract configurations relevant to the selected passage. Speeds are grouped by source and labeled with a speed category chip (if applied).
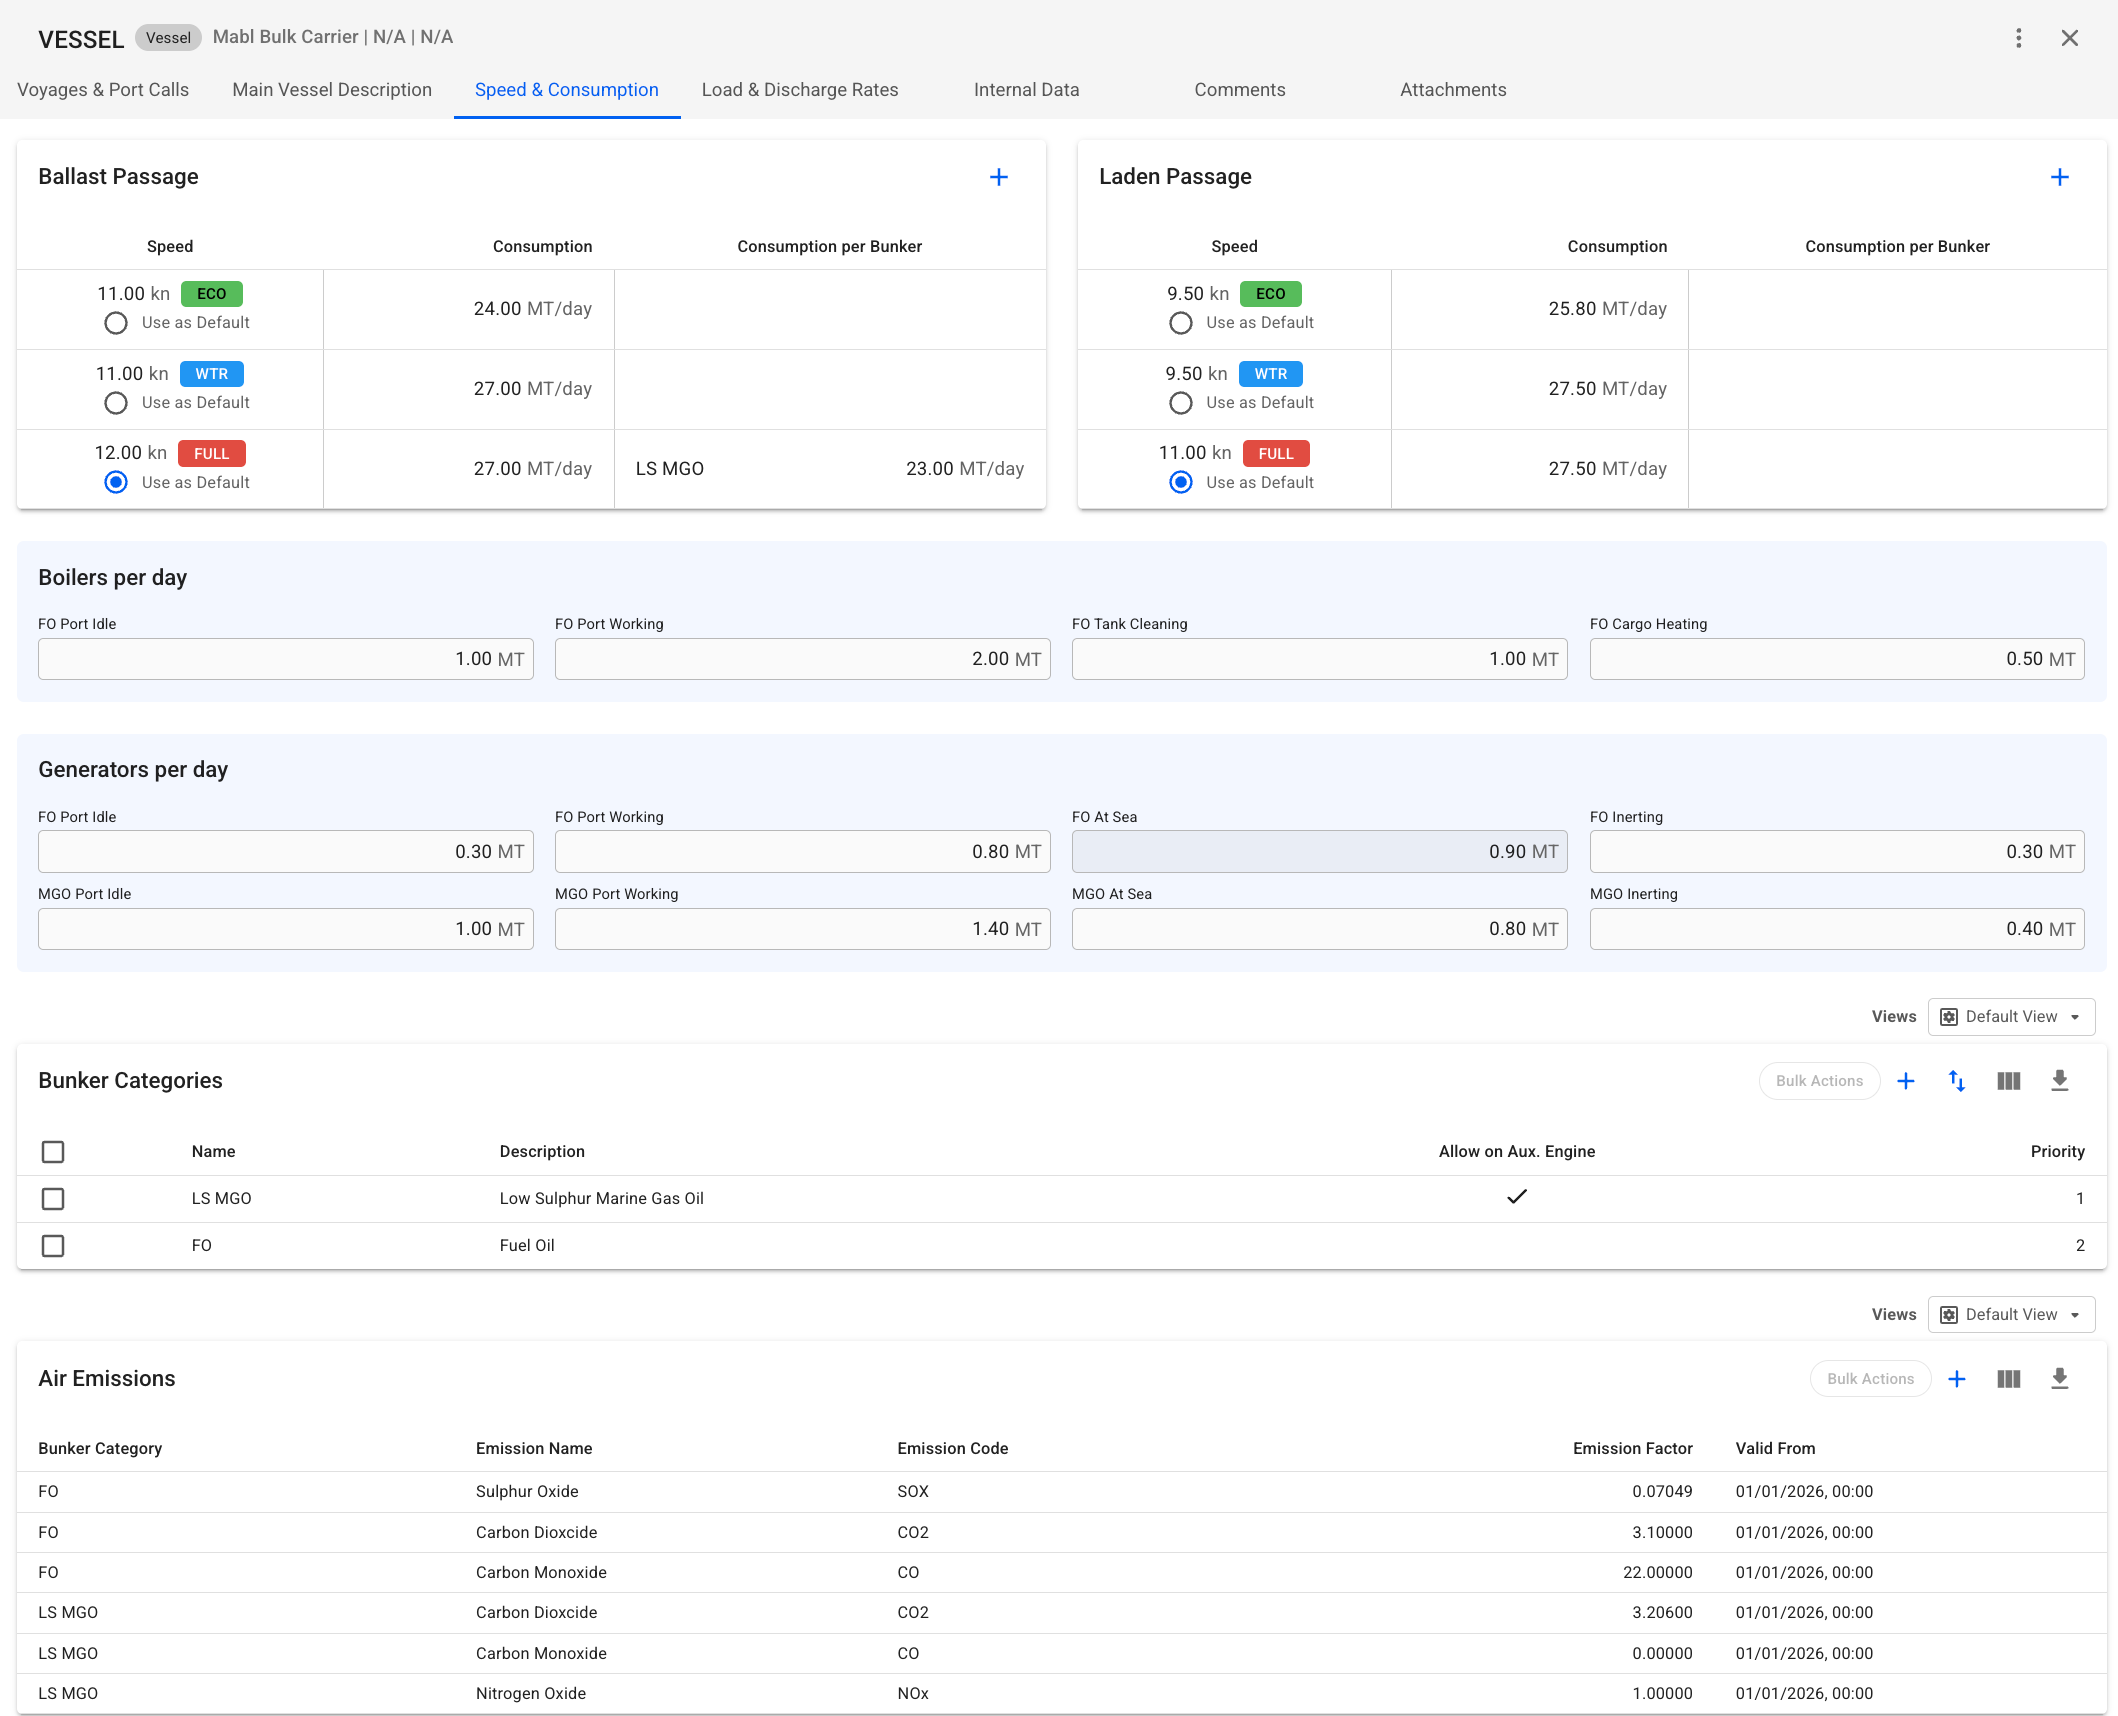
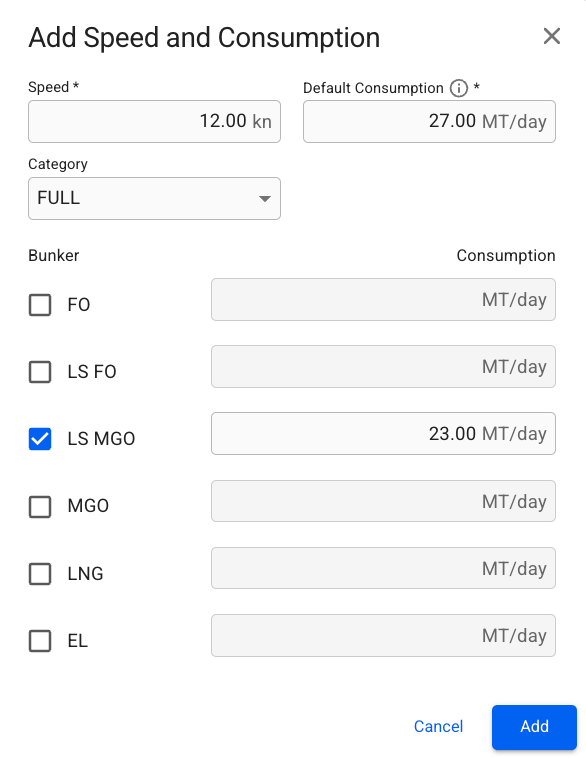
You can also select Add New Speed, which applies to all Ballast or Laden port calls on the selected voyage. Newly added speeds can be edited directly, while speeds inherited from parent configurations must be edited at their source. This added speed also applies to the Main Engine Port Idle and Main Engine Port Working fields. For more information, see the .
The selected speed’s source icon and speed category chip (if applicable) are displayed next to the field labels for easy reference.
The selected speed’s source icon and speed category chip (if applicable) are displayed next to the field labels for easy reference
Icon
Source
Description
Bunkers
This page gives an entail into the tab 'Bunkers' inside the Voyage module.
The Bunker module is split into three parts: 1. Bunker Indices; 2. Bunker Stock Summary; 3. Bunker Stock Details.
Yet, the Print EUA Statement button is always visible. This function generated a descriptive report of EU ETS consumed per port, specifying the percentage used in calculations, and associated consumption per leg.
Bunker Indices: this section helps to have a better overview of bunker indices even when the fuel types FO and LS MGO are not consumed by a vessel. By default, the section is collapsed, providing information regarding the bunker indices. Once expanded, the indices can be altered. Refer to Figure 1 for example:
(Fig. 1) Bunker Indices.
The Bunker Stock Summary contains cards associated with the respective consumed fuel type. The core idea is to provide a brief overview of consumed bunkers and derived costs (Ref. Figure 2).
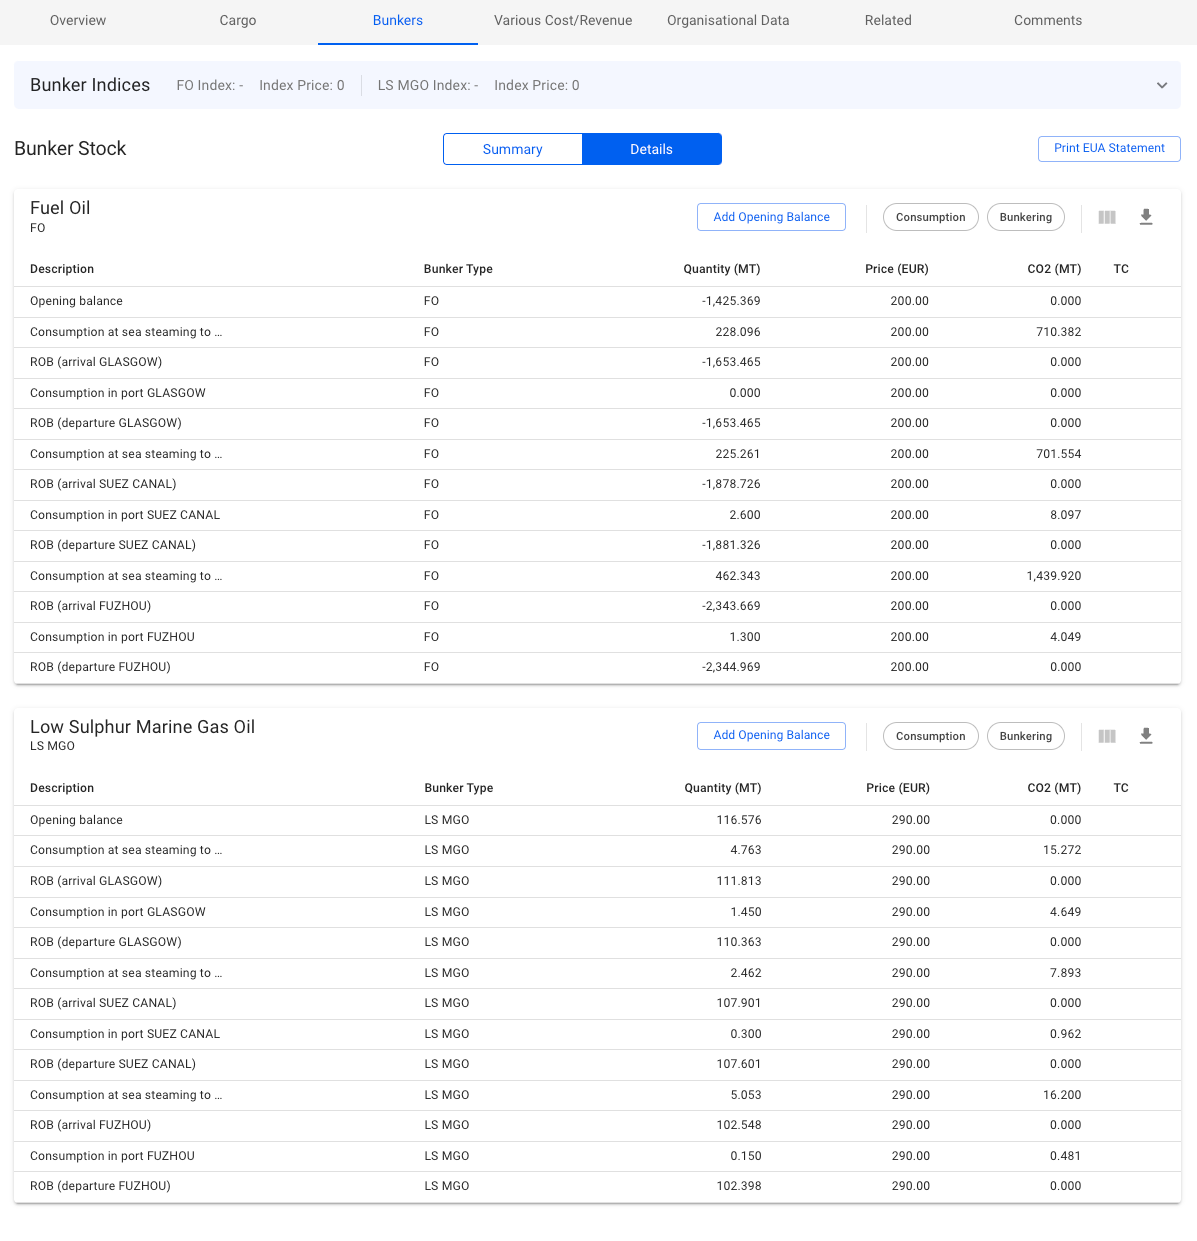
Bunker Details serves the same idea as Bunker Stocks Summary but provides more detailed and specific information. The table items can be filtered to show only the Consumption or Bunkering rows (ⓘ interact with the filter options in the top right of each table card).
3.1 Opening Balance
Each list starts with the opening balance of the stock. The opening balances displays the balance of the bunker stocks at the beginning of the voyage and are generated based on the previous fixed voyage. When creating voyage estimates the opening balances are generated based on the last fixed voyage on the vessel.
Opening balances can be updated on voyages with status Estimate or Unallocated to be able to do quick calculations. Once a voyage is fixed, the opening balance will be recalculated based on the previous fixed voyage and will no longer be editable.
Opening balances are also editable on voyages where the voyage start date is fixed.
To edit an opening balance on voyages where this is enabled,
click on the opening balance row and a modal with the editable values will appear
edit the values
click Confirm to save your changes
It is possible to add additional opening balances for each bunker category on voyages that have the status Estimate or Unallocated and for voyages where the start date of the voyage is fixed.
To add an opening balance:
in bunker stocks list click on the Add Opening Balance button located above the bunker stock list for a given bunker category
enter the values
click Confirm to save the opening balance
The new opening balance will be added after the last existing opening balance in the list.
Voyage full-screen
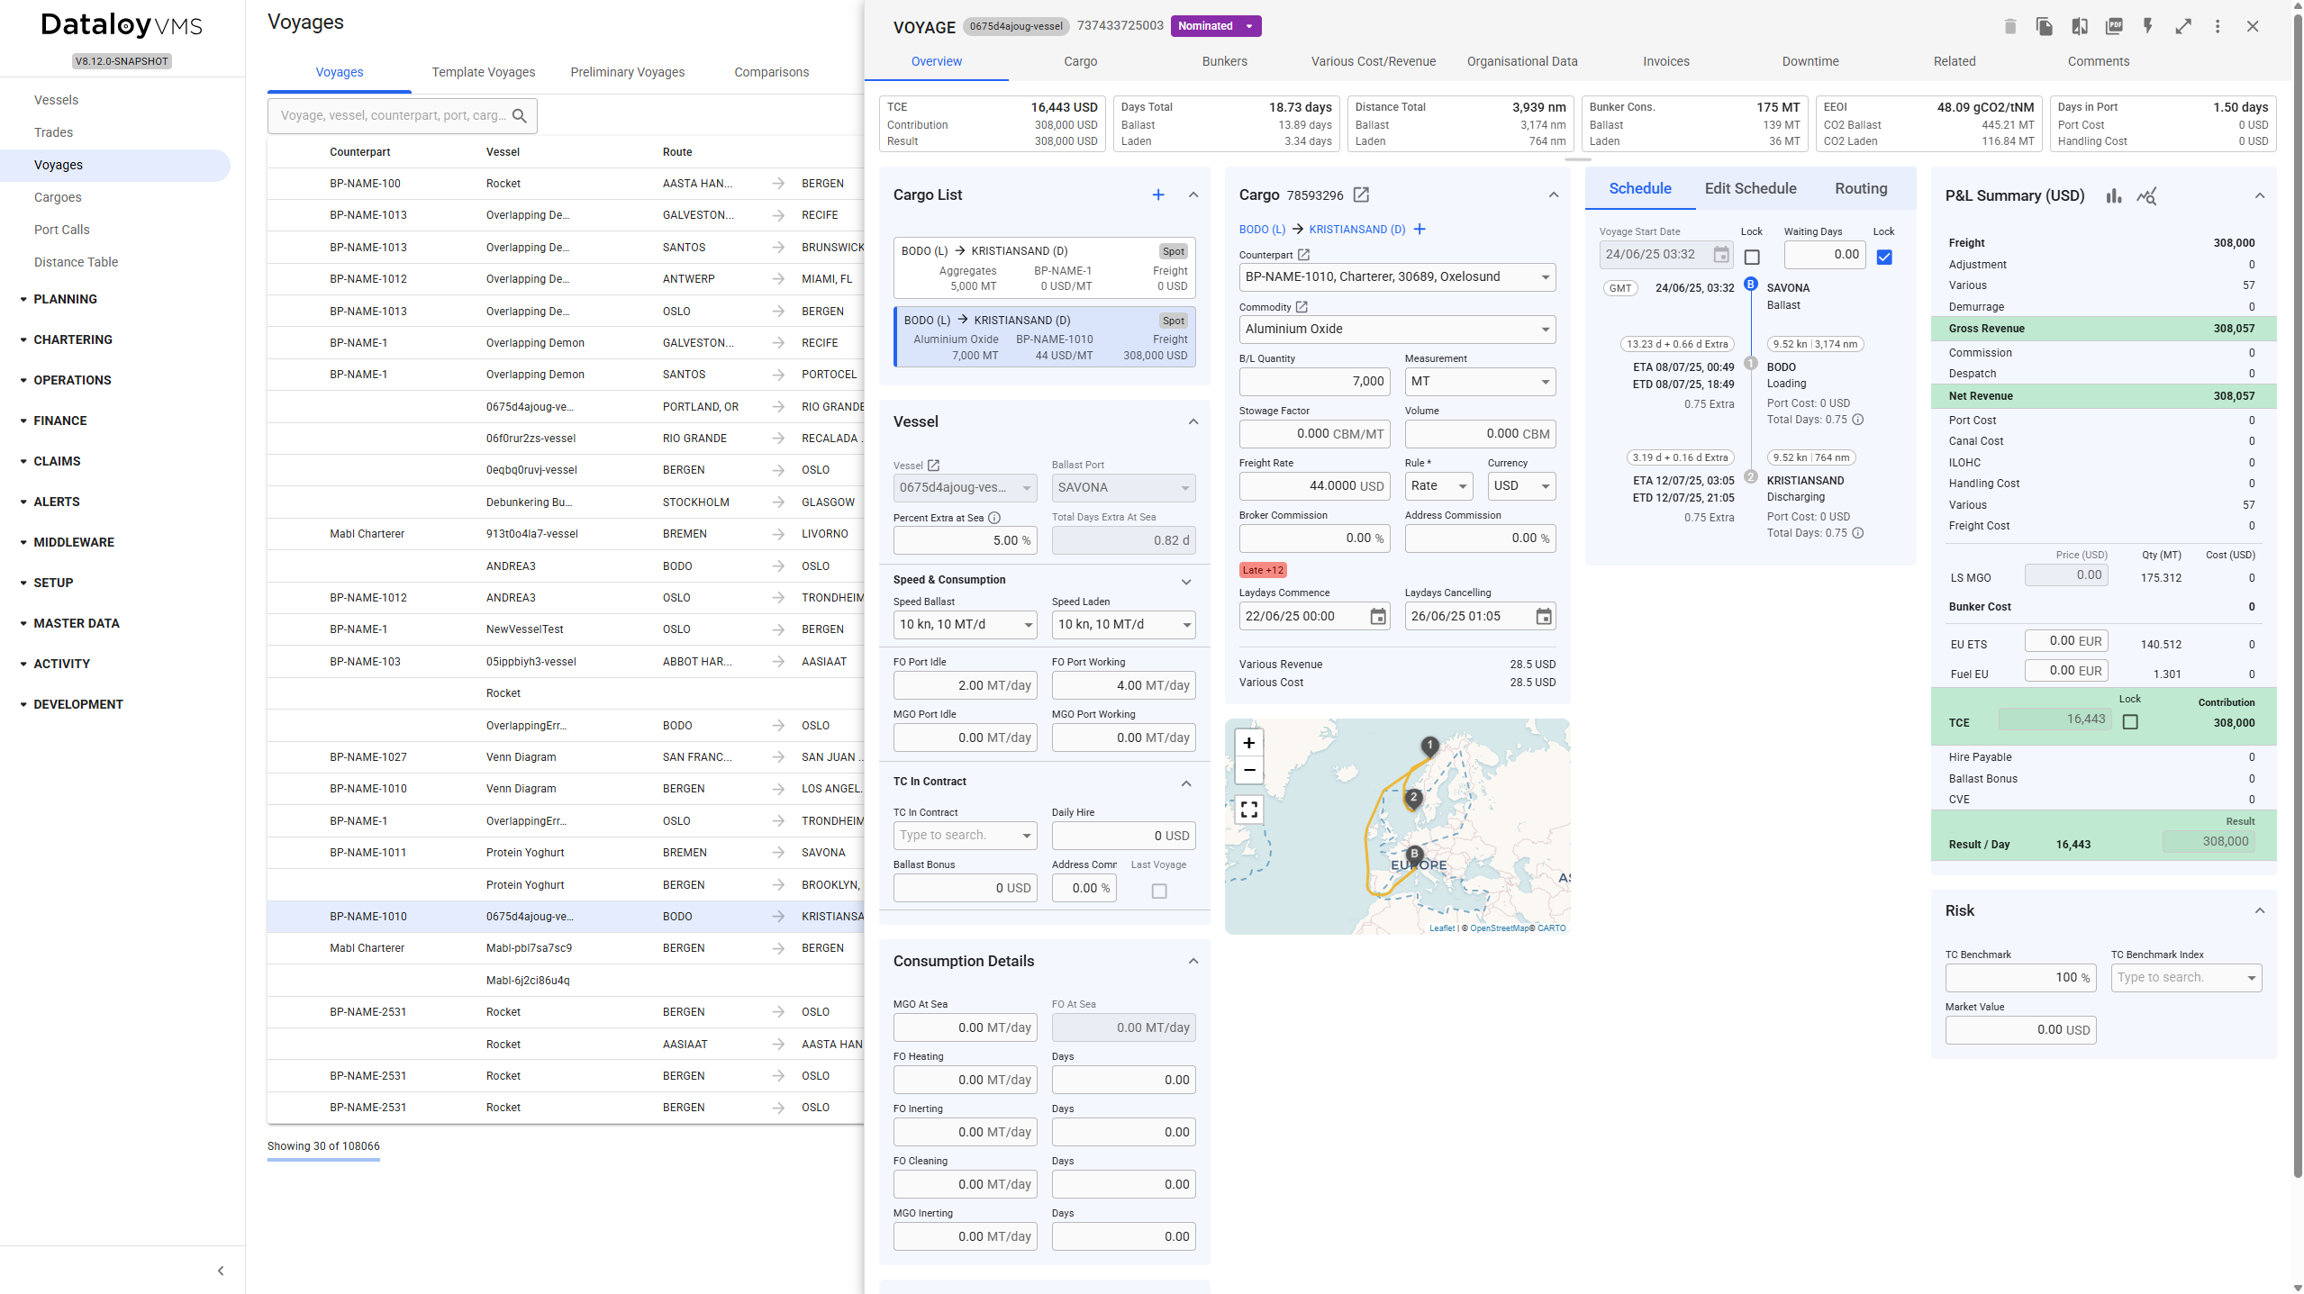
Starting with release 8.2, the voyage drawer's default view has been updated. The previous default view has been removed, and the expanded view is now the new default (see Figure 1).
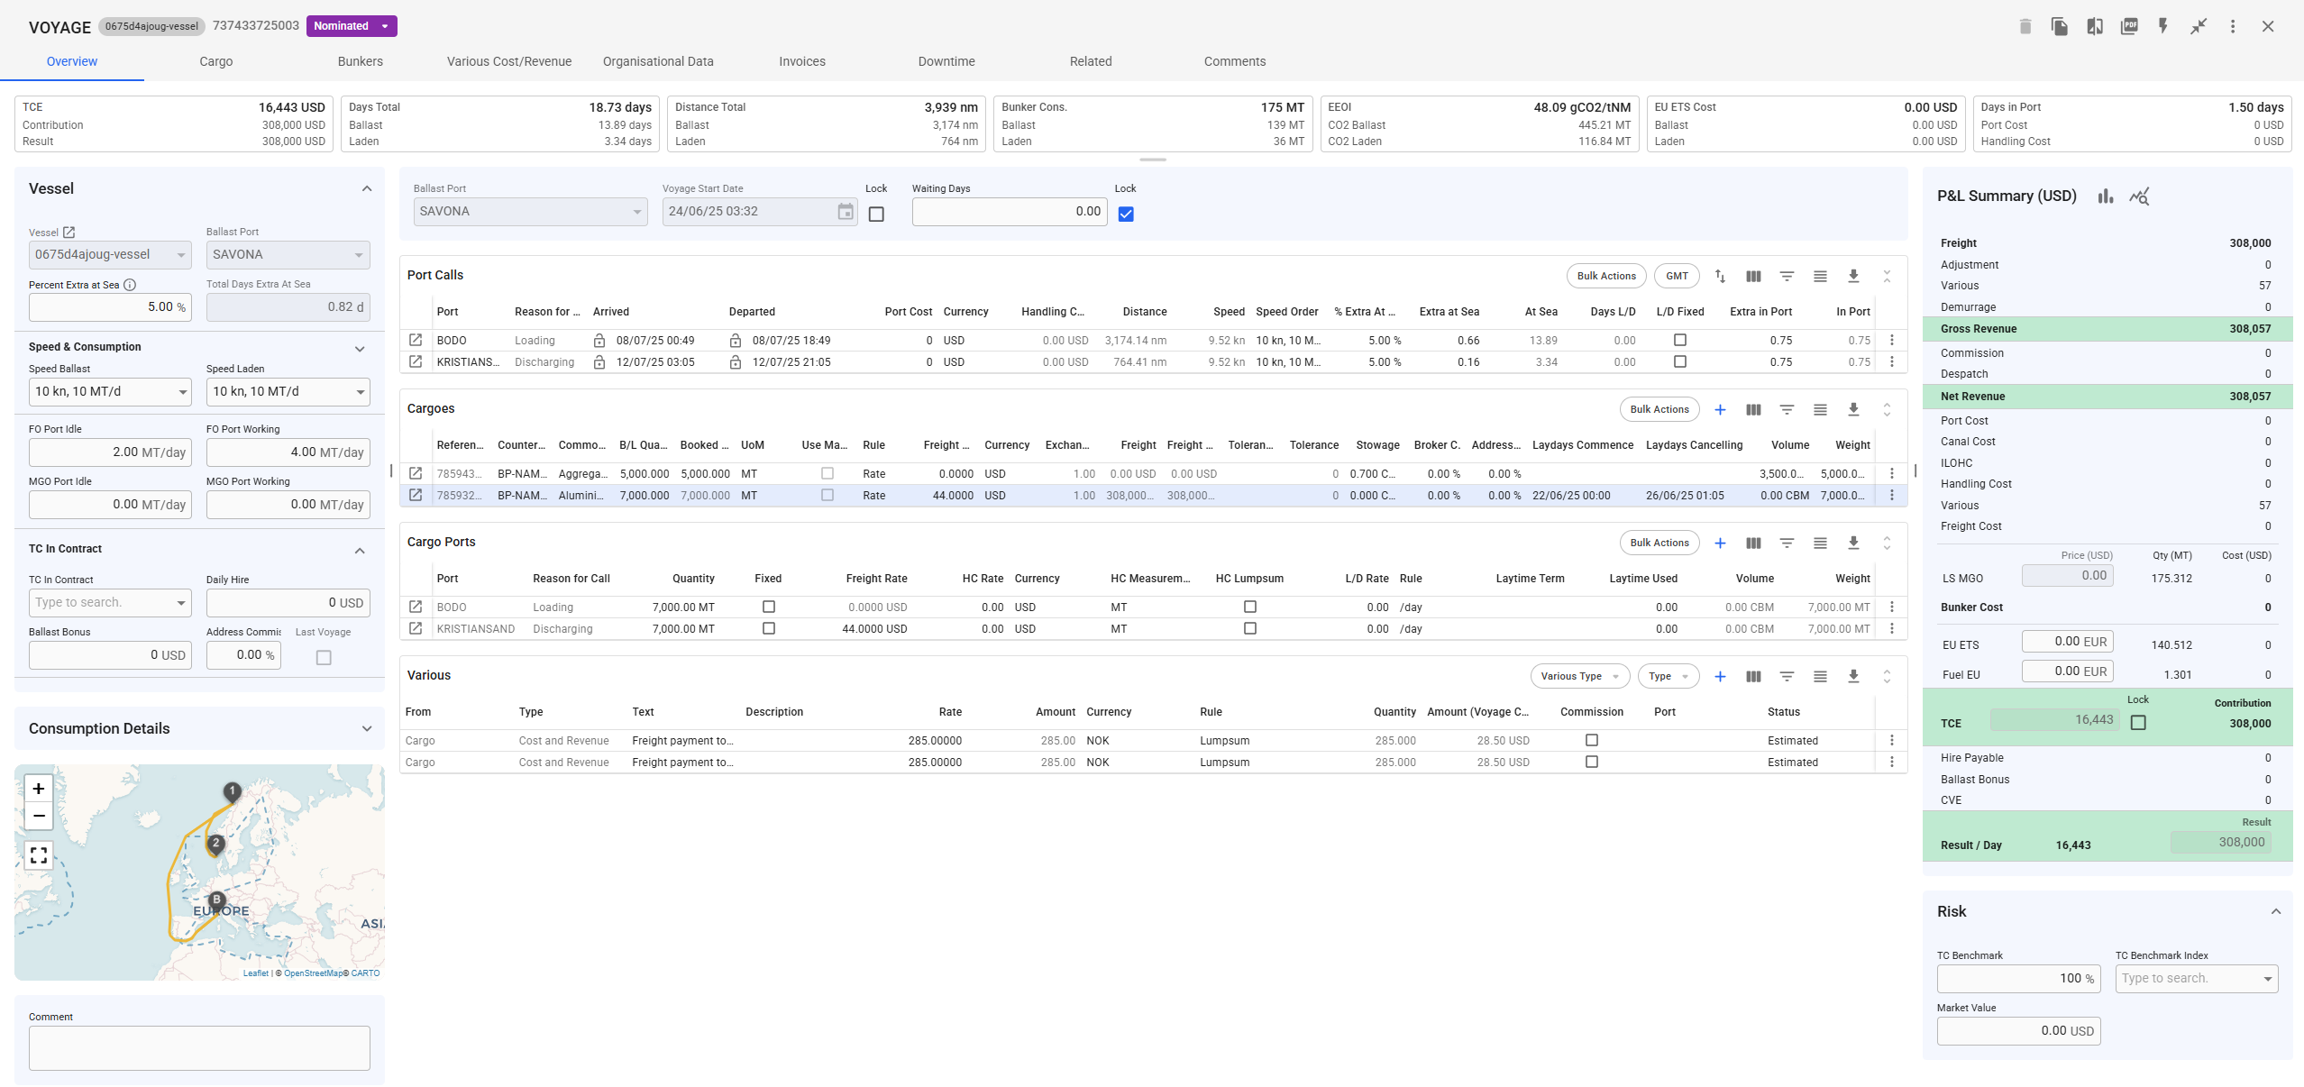
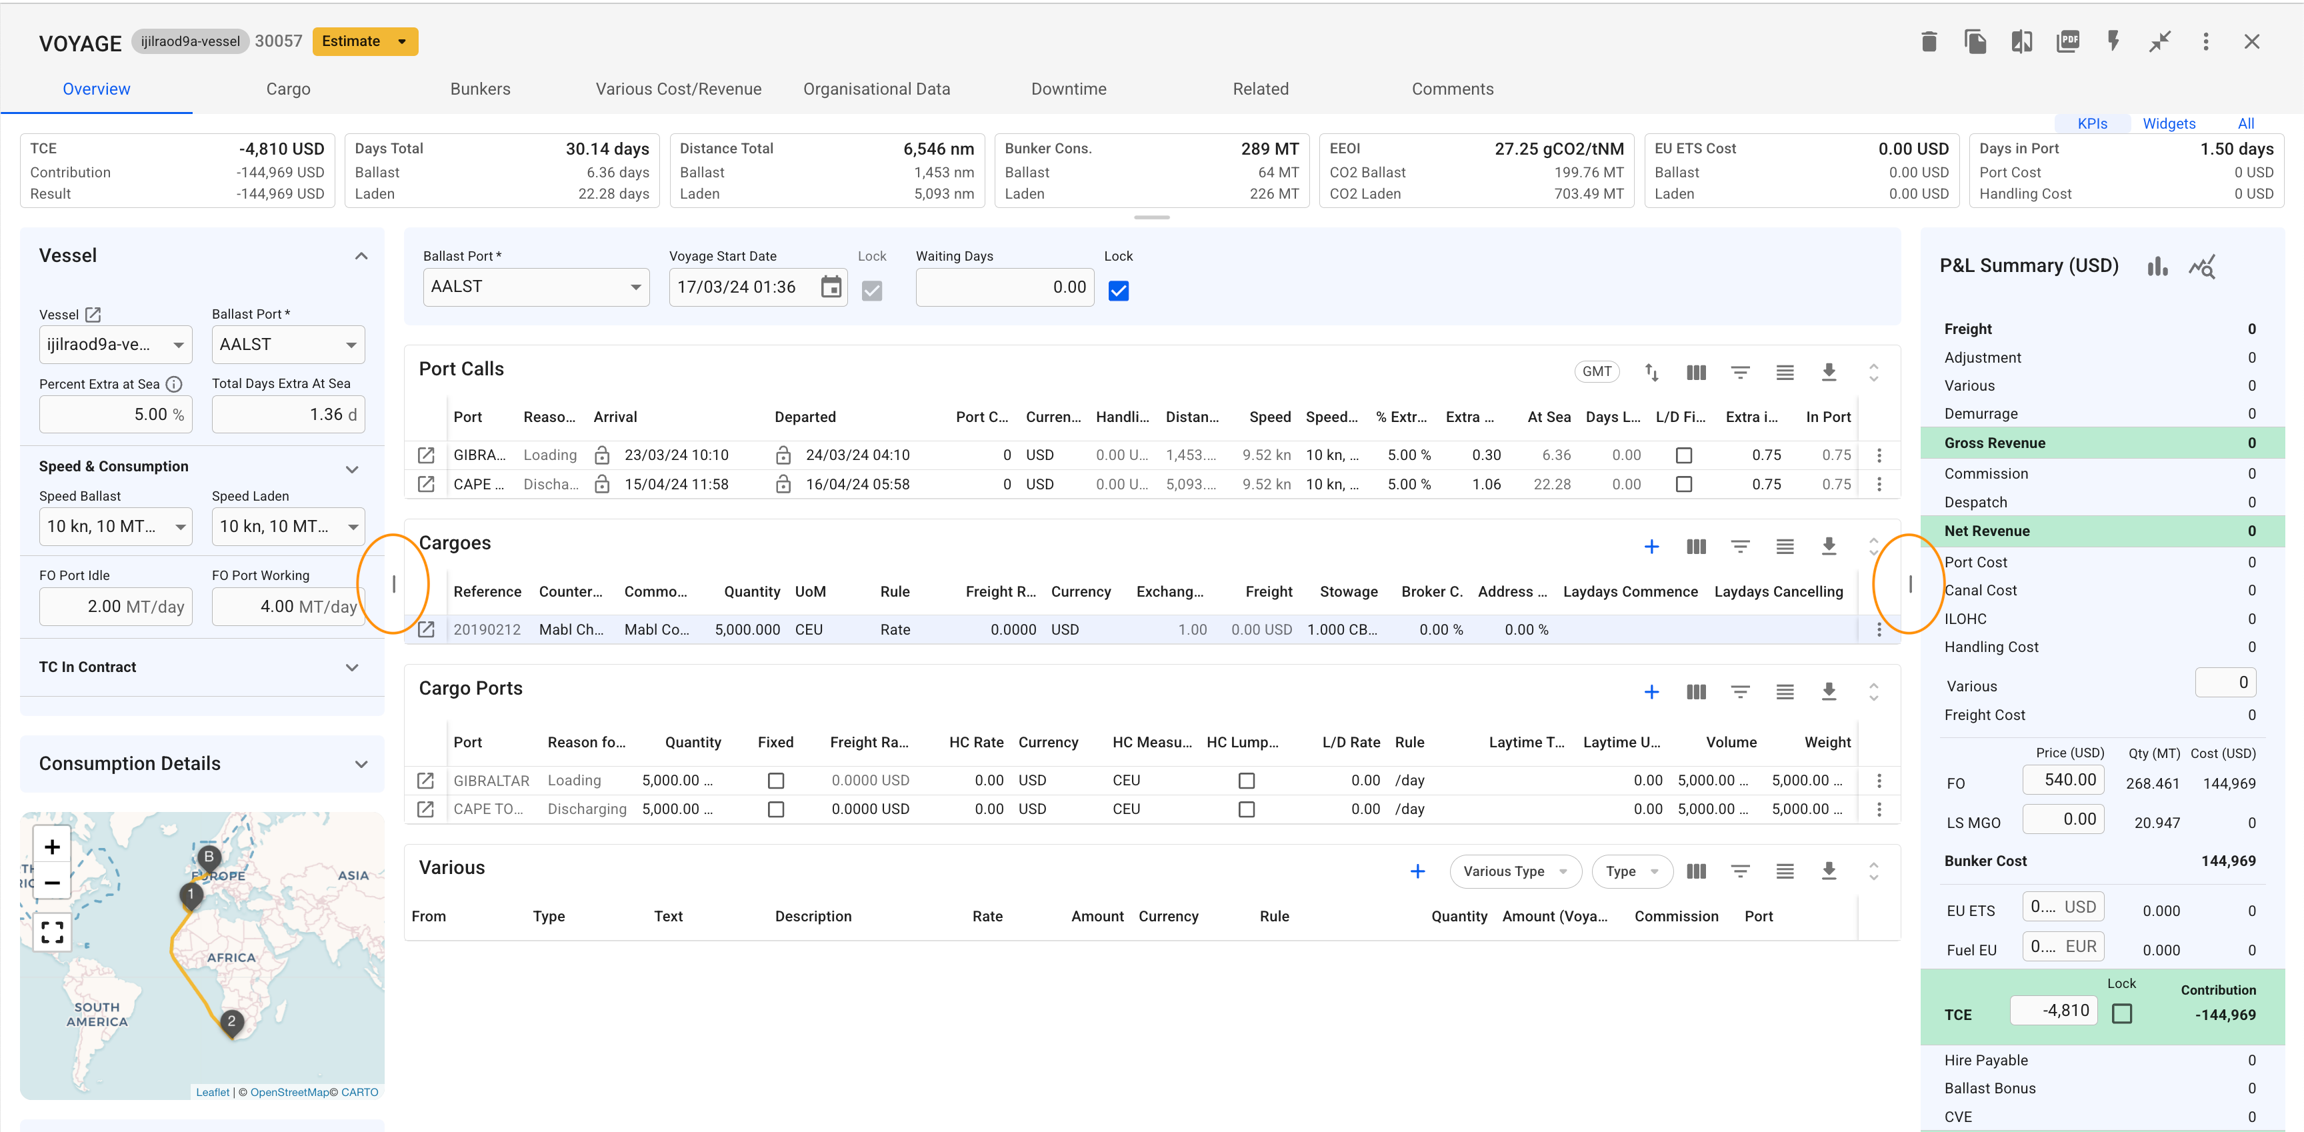
The expanded view has been replaced with a full-screen drawer, serving as a centralized hub for voyage drawer functions and introducing additional features. This view presents data in an editable grid format (see Figure 2) with customisable columns that enhance and extend the functionality of the previous default view.
For more details on the grid's functions and usage, go to the data grid page.
Figure 1: New default view
Figure 2: Full-screen drawer view
Creating, editing and deleting in the grid
Changes to the grid, such as editing fields, adding new rows, copying data, or deleting entries, are applied across the system in real time, ensuring data consistency. Updates made in the grid will automatically reflect in all related drawers and pages, and vice versa.
Main differences
The full-screen drawer is designed to make it easier to make modifications to the voyage. This was done by replacing the different collapsible sections (Figure 1) with corresponding grids (Figure 2).
The as well as the Vessel Section remains the same with the exception of an additional collapsible section for TC Out Contract.
The map has also been moved to the left side of the drawer, and when expanded will appear in the center of the drawer (see Figure 3).
A key addition to the drawer is the ability to display an Alternative Route tab, controlled by a system preference. This setting can be enabled via the. When activated, the routing tab appears next to the map, providing easy access to alternative route options (see Figure 4).
The Analysis and Results Chart retain their functionality from previous versions. However, they are now displayed in the center of the drawer when selected within the Profit & Loss Summary section.
The left- and rightmost sections can be collapsed by clicking the buttons inside column dividers, shown in Figure 6. Alternatively, the sections can be toggled using the keyboard shortcuts ALT/OPT + ← and ALT/OPT + →.
Sensitivity Analysis
With the Sensitivity Analysis tool you can run calculations on a chosen parameter to evaluate risk.
Click on a voyage in the list or board to open it in the drawer.
At the top right, click on Functions.
Select Voyage Sensitivity Analysis.
Select a voyage parameter which is then adjusted by the numerical variance for each calculation.
The chart shows all the calculated values for the voyage. There are 15 data points, with the current voyage displayed in the middle, with negative variance on the left side, and positive variance on the right side.
The value of the selected Voyage is specified with a blue vertical line. The figures you find in a small box above each point reflect the X-axis values for each point.
Hover the mouse over the chart to inspect the values of each calculation data point.
Moreover, you may find a table on the right from the Sensitivity Analysis chart. The table consists of the calculated values, placed in ascending order. The table may ease navigation among calculations.
Press the menu iconto download the chart as an image (SVG or PNG), or a text file (CSV) that can be imported into spreadsheet software.
Emission Settlement
Emission settlements for a voyage are viewable from the "Emission Settlement" tab in the voyage drawer. This tab, which is only visible after a voyage has been nominated, features one collapsible section per emission settlement type, or in other words, per emission regulation. In each section, the user is invited to add actual quantity and price data to keep their emission regulation costs per voyageaccurate.
For a nominated or higher voyage, the Profit & Loss Summary section in the Voyage's Overview tab will use the Actual values from this tab, otherwise the Estimated ones. These are also displayed under Analysis overview of the voyage.
Read below for the current emission regulations currently displayed in VMS. Both of these sections are collapsible.
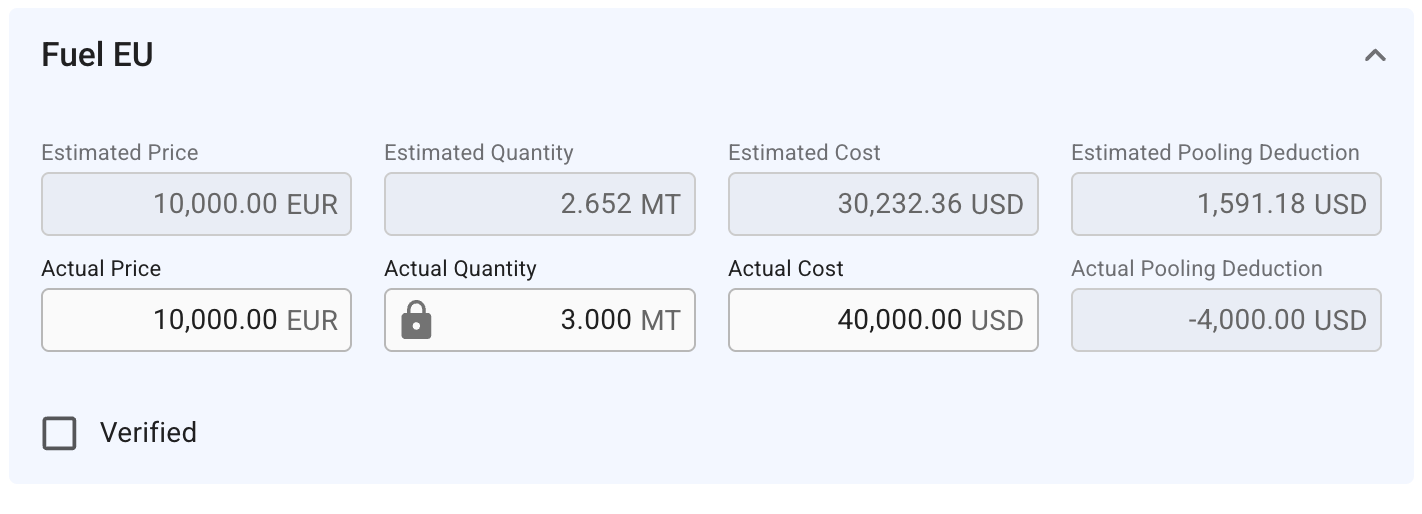
ETS EUA section
Left-most section of Emission Settlement tab
All the "Estimated" fields are using previous calculations for EU ETS. The "Actual" fields are calculated in similar ways, but only from Nominated or higher status. Actual Quantity is synched with the Estimated Quantity, until you lock it(it also automatically happen if you input a different value into the field). Actual Cost is calculated as (Actual Price in correct currency * Actual Quantity).
Read "Synched Features" paragraph below for more information.
Follows the same calculations as mentioned in the above paragraph. Additionally, you can here input the Actual Cost field however you like. This won't impact the Actual Price or Quantity, but it will impact the Actual Pooling Deduction field. This field is calculated as (Actual Price in correct currency * Actual Price) - Actual Cost. You can compare this value to the Estimated Pooling Deduction.
Clicking the lock icon in the Actual Quantity field de-synchronises the value from the Estimated Quantity value
Unlocking it will reset this field to the previous stored value
Checking the "Verified" checkbox locks the Actual Quantity, and disables the field for editing
Applies for both the emission regulations.
If you are curious to learn more about topics such as Fuel EU, Emission Pools, etc., here are some related links:
Voyages & Port Calls
In the "Voyages & Port Calls" section of the vessel drawer, you will find the most important information about a vessel and its voyages.
Vessel Details
The "Vessel Details" section shows some key data points about the vessel such as DWT, Cubic Capacity, Draft and more. Click Expandto show more details and contact information for the vessel.
This is a list of voyages on the opened vessel sorted by newest first. Clicking the icon will bring up a modal to customize which columns are visible. If there is an ongoing voyage in the list, it is indicated with a blue marker on the left side.
Below, you will find a list of either Port Calls or Bunkers, and a button to toggle between the two different views.
Overview
The voyage drawer is also split up in different sections; , , (the Performance Cargo), , and .
For a TC voyage, the drawer has thesection instead of the Cargo section.
On the left hand-side, we have the vessel name chip, which is clickable and will forward you to the linked . The number is the reference number of the voyage, and to the right we have the status. The statuses are within a dropdown menu which you can :
Maintain Voyages
The details of a voyage can be edited in the Voyages module.
When you have , click it and the details will show in a drawer or panel on the right hand side. Field values can be edited directly.
Tiles show the key values like TCE, Days Total, Distance Total, Bunker Consumption, EEOI, Days In Port, of the voyage.
APS TCE (Arrival Pilot Station Time Charter Equivalent) is a measure of operational voyage performance, expressed as net daily earnings over the productive portion of a voyage — from arrival at the first load port through departure from the last discharge port. Unlike full-voyage TCE, APS TCE excludes the preceding ballast leg, isolating the commercial performance of the cargo-carrying operation itself.
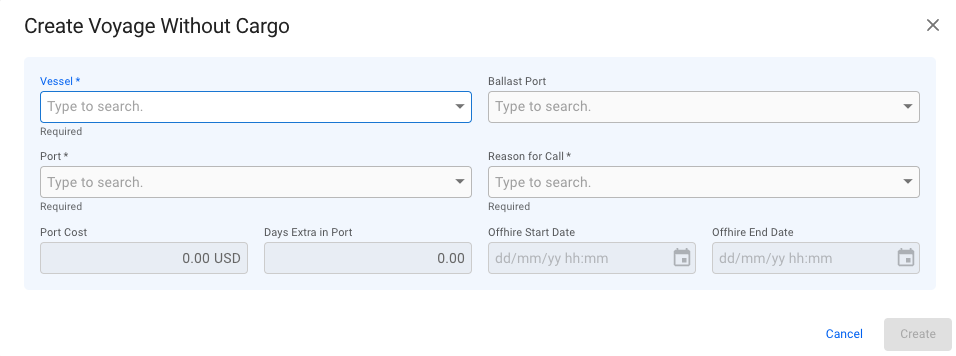
Create Voyage Without Cargo
There may be several reason for having a voyage without any cargo onboard the vessel. By using the Create Voyage Without Cargo option, you can for instance plan out repositioning of your vessels, or schedule dry docking.
Open the Voyages module from the menu on the left.
To change the order of port calls, simply hover over a port call to move it into place.
Hover Toolbar
Edit Port Call
Note that the port can only be changed if the Arrival-, Berthed-, and Departure Date are unfixed. If any of these dates are fixed, the port selector will only show available terminals on the currently selected port.
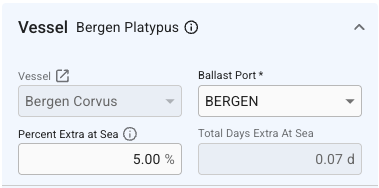
An additional percentage buffer applied to 'At Sea' calculations. Changes affect all Port Calls after the last arrival-fixed Port Call.
Total Days Extra At Sea
Additional time added to the voyage’s sea duration. Only editable when the voyage status is "Estimate".
Vessel
Speed defined at the vessel level
TC In contract
Speed defined in the TC In contract
Speed & Consumption
Speed Ballast
Speed Laden
Speed categories are organisation-scoped custom tags used to categorise different speed and consumption profiles. They are used for classification and selection only and do not affect calculation logic.
Categories and their definitions are configured by your organisation’s administrator and can be managed in the Master Data → module.
NOTE that both emission regulations are using EUR (Euro) as currency for calculating the Price, while the Cost is always in the voyage currency, so the appropriate Exchange Rate for EUR is used in this calculation
While in Port Call view, clicking on a voyage row will list all port calls of the selected voyage, as well as the port calls from the previous and next voyage, if they exist. The port calls from the previous and next voyage will be in a slightly lighter colour, such that it is possible to tell them apart. Clicking directly on the reference number of the voyage will open up the Voyage drawer.
Clicking on port calls in the list opens the corresponding port call's drawer where you can make can changes:
The Port Calls list will display up to 30 items, and includes a separate scrolling functionality. By hovering over each of the "headers" (such as Voyage, Port, Reason for Call, etc.), you can also see an sorting array which will make you able to sort that specific column in either an ascending (ASC) or descending (DESC) order.
The Bunkers view removes the list in favour of up to three collapsible sections for the voyages. Similarly to the Port Calls view, clicking on a voyage row in the voyages list will select/open up the corresponding collapsible section, and fetch the data for the previous and next voyage:
The top band of the section displays 4 columns; the reference number of the voyage, Opening Balance, Consumption and Closing Balance. Each of the latter three will show amount and price for up to 4 different bunker types, depending on which bunkers are actually being used by the vessel.
Expanding the collapsible section will give you a table overview of each port, with reason for call, distance, speed etc., as well as a detailed breakdown of the bunkers consumed. Only the bunkers actually used will be displayed here.
Filtering
The bunker section can be filtered by bunker category to get a better overview for each category.
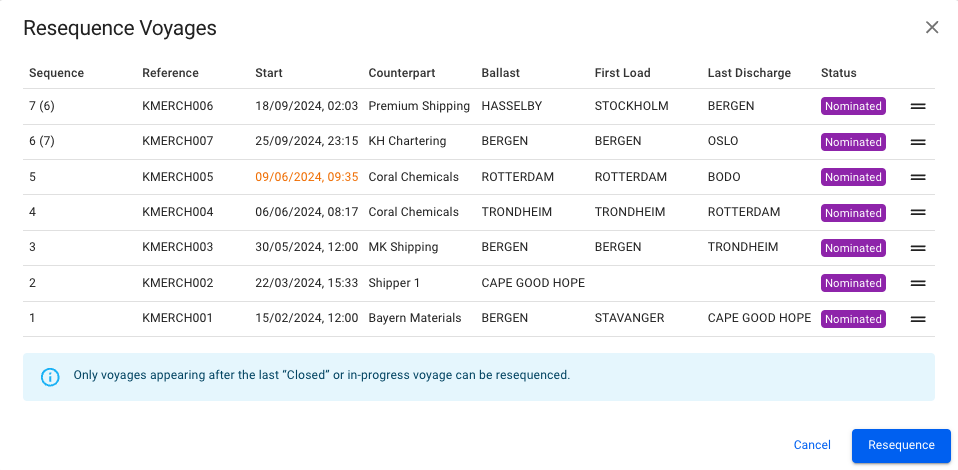
The resequence feature enables re-ordering the list of voyages assigned to a vessel. To utilize the feature, click the icon in the top right of the voyages list. This will bring up the Resequence Voyages modal.
The user can now drag and drop the voyages to re-order them into the desired order.For example, the screenshot below illustrates voyage 7, which is being dragged down. It is expected that the item will have replaced voyage 6 after release:
Any voyages that will have their sequence number changed, will have their previous old sequence number parenthesized.
Clicking the Resequence button will update the fleetplan.
Port calls can also be resequenced to a different position within the previous, current, or next voyage. To resequence a port call, click the resequence symbol in the top right corner of the port calls list. A popup modal will then show and the port call can be dragged and dropped in the desired position (see screenshot below). Note that only one port call can be moved at a time. Also, only port calls after the last Arrived, Berthed or Departed port call can be moved in the list:
Voyages
Port Calls
Collasped Vessel Details section
Expanded Vessel Details section
The ongoing voyage (5) is marked by the solid deep blue bar on the left, while the selected voyage (6) is highlighted in blue.
If the voyage has a trade connected to it, a new chip will appear between the vessel chip and voyage number. This chip displays the trade code and will forward you to the linked Trade drawer when clicked.
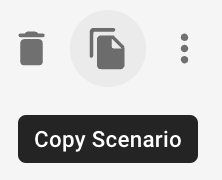
To the right hand-side, we have the button, copy button (to duplicate the selected voyage), the voyages button, print voyage button, the voyage button, the expand button, the secondary actions button and the close button. These are also called the primary actions:
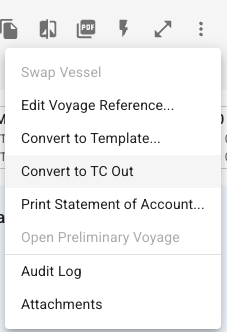
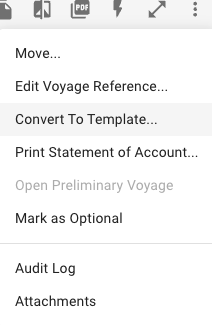
In this dropdown menu, you are able to do several actions:
Swap Vessel: you are able to swap the voyage onto another vessel. Read more .
Edit Voyage Reference: you are able to change the voyage reference number on the given voyage. Read more: .
Convert To Template: you are able to convert the voyage to a template. Here you have two different options to choose between (unless they are disabled).
Print Statement of Account: you are able to print out the SoA report of the given voyage.
Open Preliminary Voyage: Opens a new tab and brings you to the special preliminary voyage that is created when the voyage is nominated.
Mark as Optional: you are able to mark the voyage as optional, meaning you can set the statuses 'Not declared', 'Declared' or 'Forfeited' on the performance cargo of the voyage. Read more .
Audit Log: you are able to track every action inside, and regarding, this given voyage.
Attachment: you are able to upload/download the voyage attachments.
APS TCE = (Total Revenue − Total Costs) ÷ Duration
Where Duration is calculated from the vessel's arrival at the first load port to the end of the voyage (last discharge port), excluding any heading ballast legs.
What's included
Revenue: All voyage revenue (freight, demurrage, despatch, etc.)
Costs: All voyage-related costs (bunkers, port costs, canal dues, commissions, etc.)
Duration: Laden period only — ballast repositioning legs are excluded
Why it matters
By stripping out the ballast leg, APS TCE gives operators a clean view of how efficiently the vessel performed on the cargo portion of the voyage. This makes it useful for comparing performance across voyages with different ballast distances, and for evaluating how well commercial terms translated into actual daily earnings.
Conditional information:
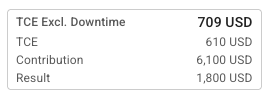
TCE Excluding Downtime (only shown when there is at least one offhire day)
Downtime/Offhire days (only shown when there is at least one offhire day)
Sections are used to show the most important information about a sub-item of the voyage. Some sections have an Openbutton to open the section's item in a new drawer.
Voyages on a time charter will have a "TC contract" section, while all other voyages will have a "Performance Cargo" section instead.
Vessel and ballast port can only be changed when the voyage status is "estimate" or "unallocated".
Edit estimates permissions
With the preference 'Share voyage' you can indicate if estimate voyages can be edited by anyone or only by the creator and administrators
If 'Share voyage' is set to true, estimate voyages and template voyages is editable by all users
A cargo has been selected. Most fields have been filled in and made uneditable.
Behaviour of the voyage modal when the optional preference SF_INTAKE_CALCULATION is enabled.
A vessel with 71,500 CBM cubic capacity and deadweight of 61,000 MT is selected, and stowage factor is being changed.
Edit opening balance
Add opening balance
Note that the button is only enabled if it is possible to add additional opening balances to the voyage.
TC In Contract Synchronization: Bunker Details and Initial Balances
In a TC In contract's first voyage, opening balances align with the delivery bunkers.
For nominated voyages or higher, modifying the opening balances affects the contract, and vice versa.
If a nominated voyage does not exist, adjustments to estimated voyages will not affect the contract. However, any contract modifications will update the opening balances of the estimated voyages once they are recalculated.
(Fig. 2) Appearance of the Bunkers module (Summary).
This tab contains the main vessel information, such a Vessel Description, Dimensions, Miscellaneous Capacities, Machinery, Contact Details, Cargo Capacity & Loadline Information
All of the mentioned fields are optional to add into.
Field
Description/Note
Find Voyages
Depending on your access permissionsthe list of voyages might not be visible.
The "Voyages" module can be located from the left side menu.
Column
Note
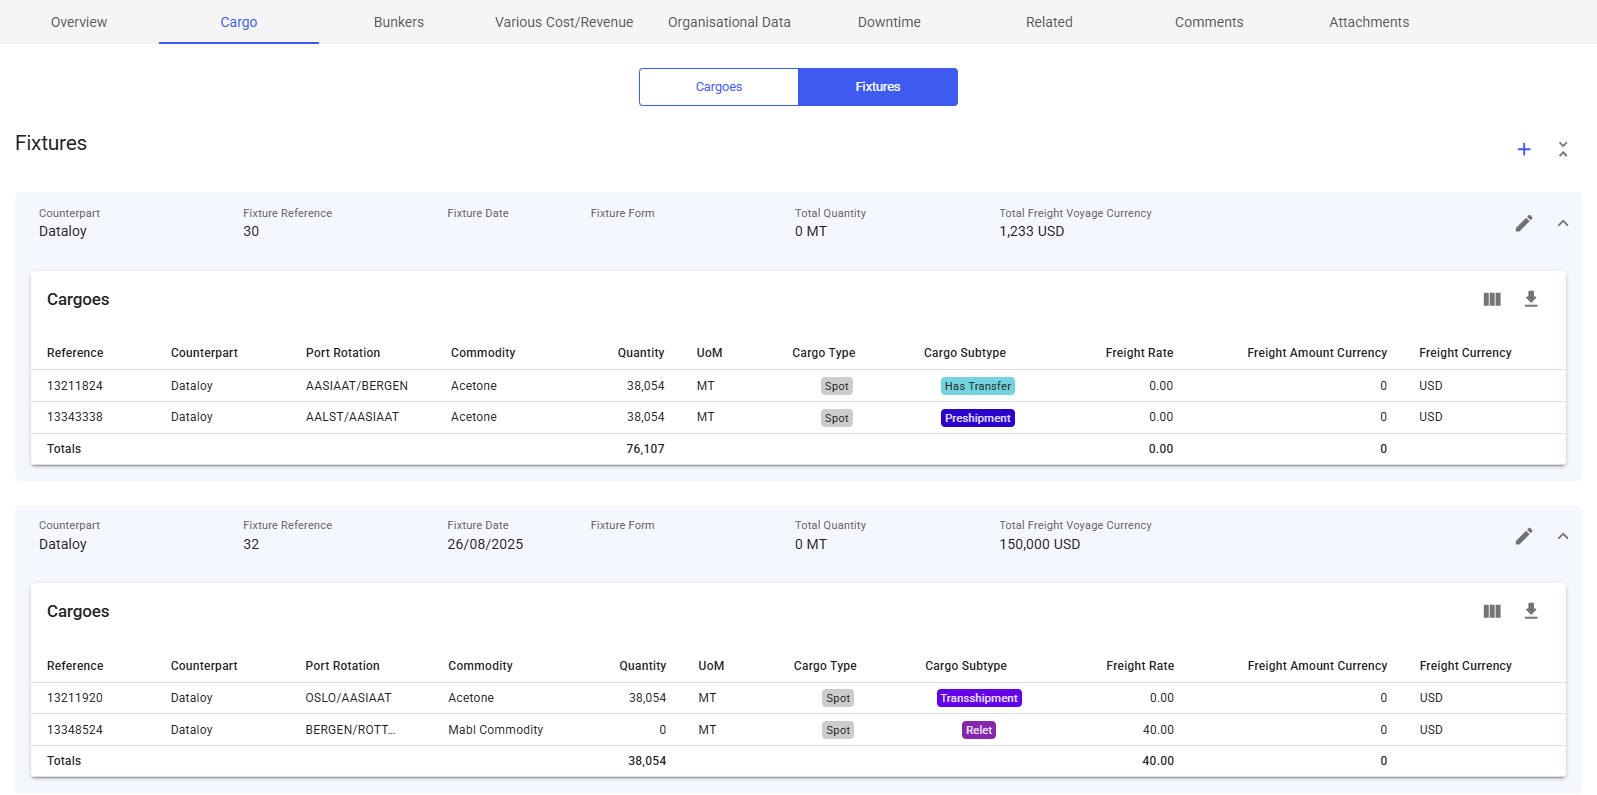
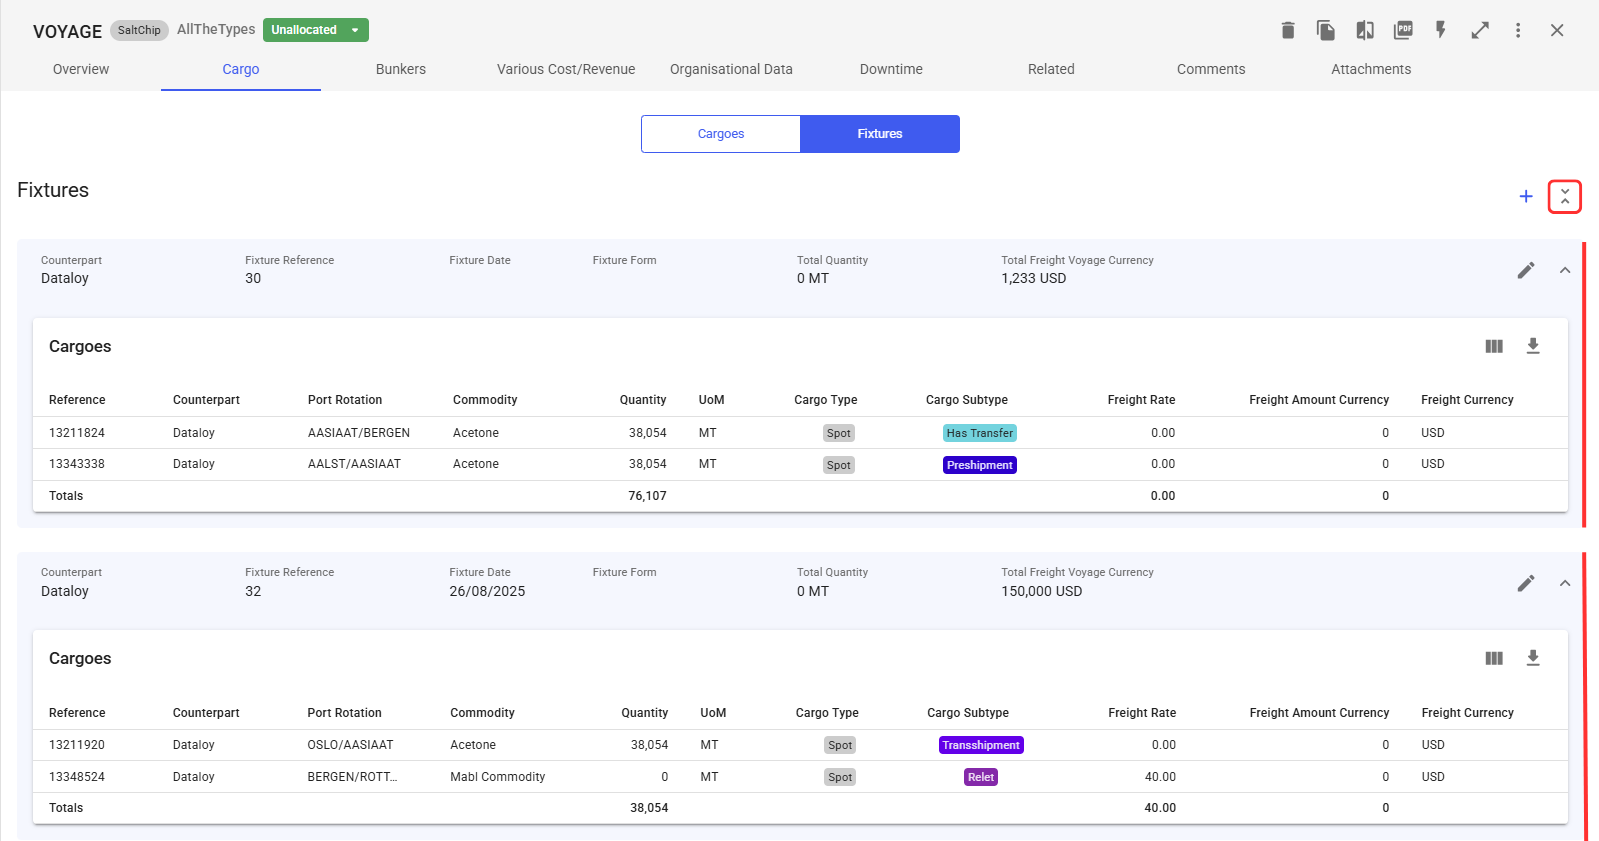
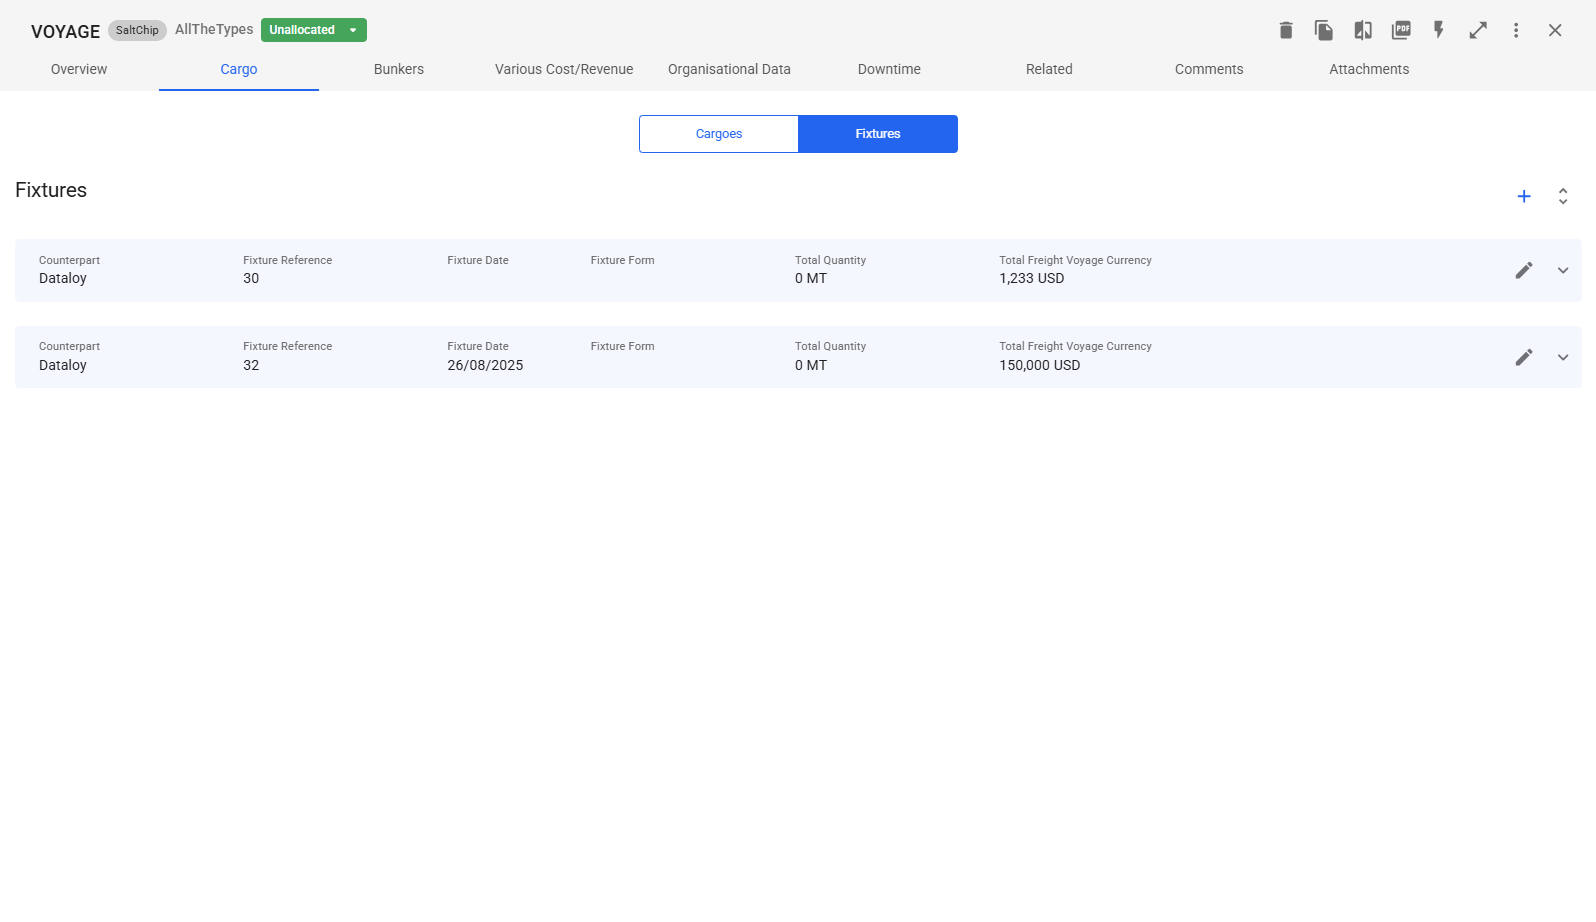
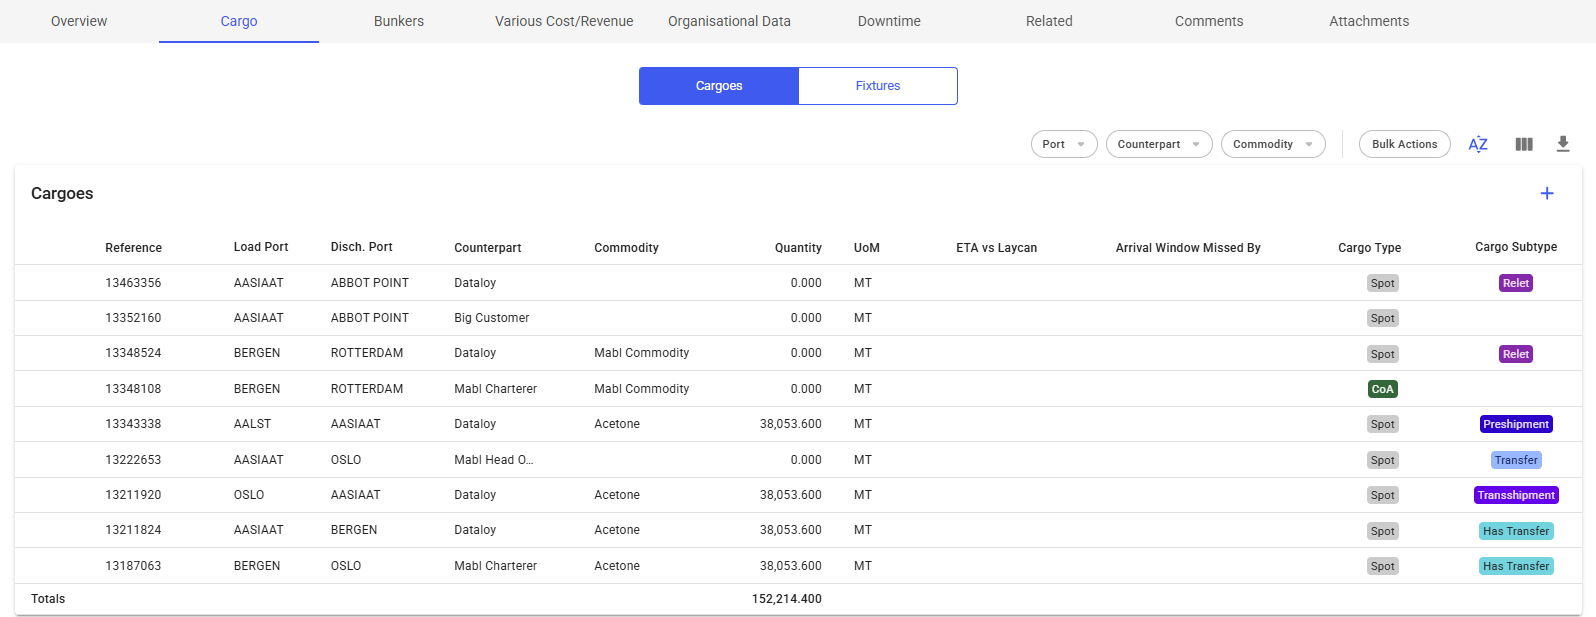
Cargo
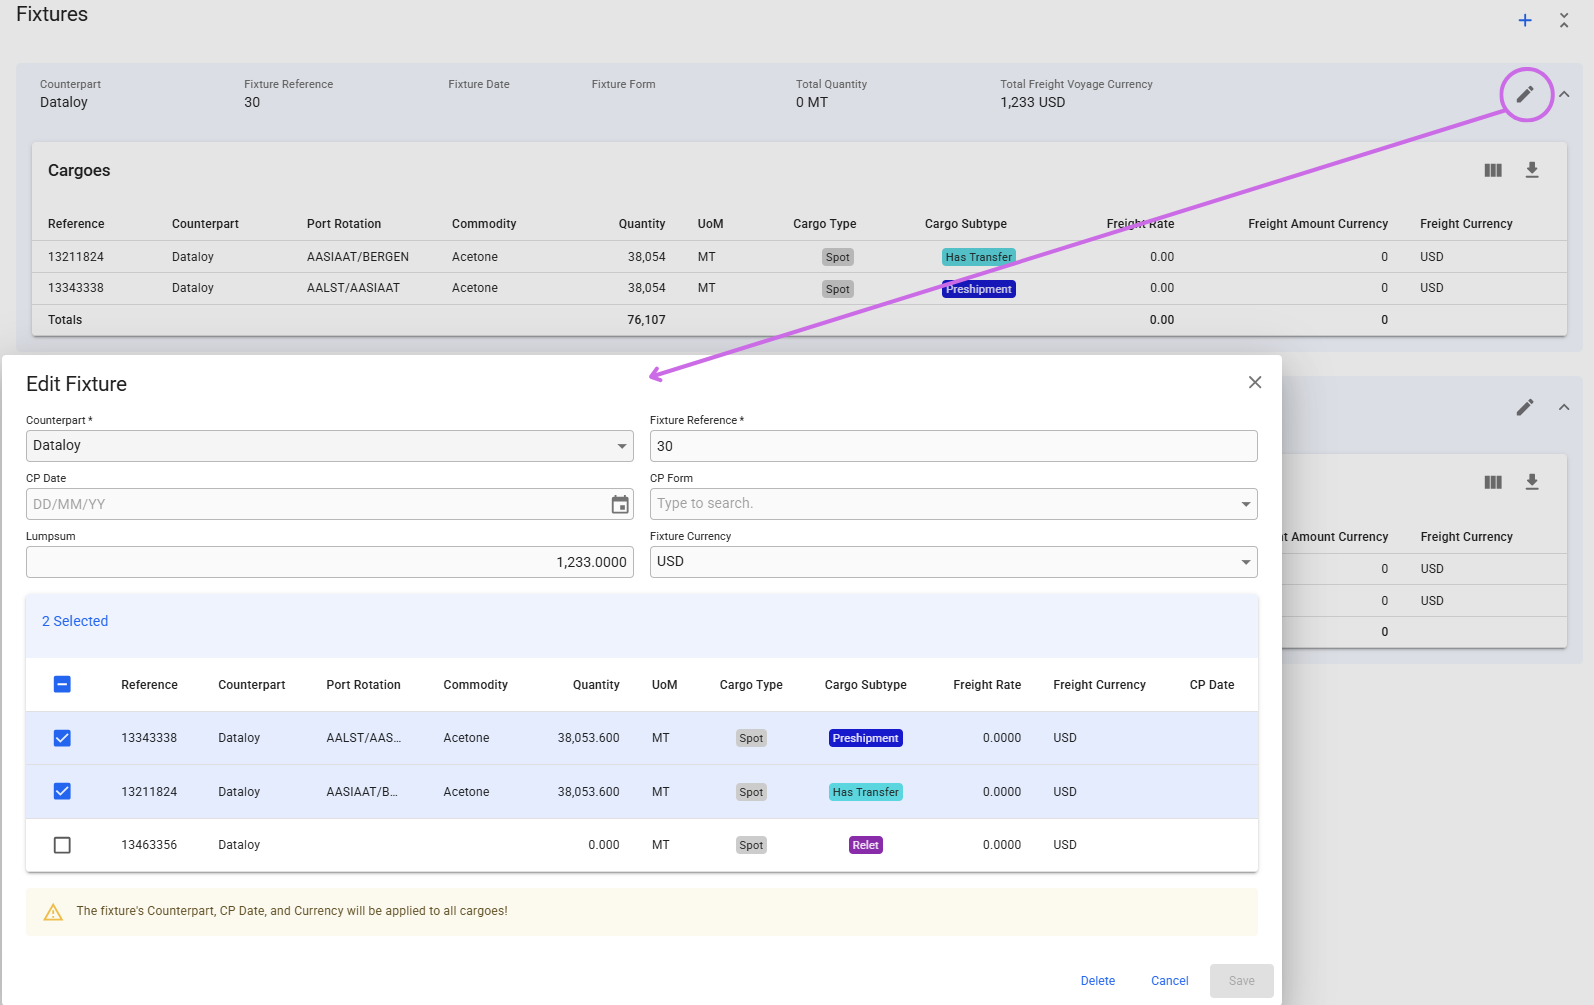
This tab shows a list of the cargoes and fixtures on the voyage.
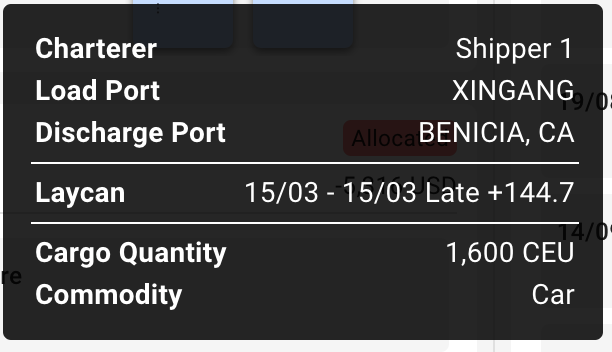
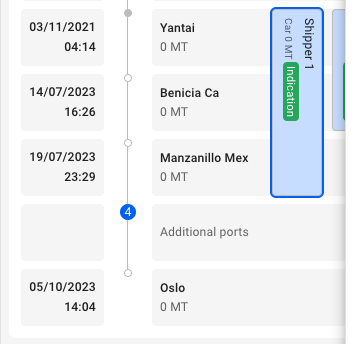
The Cargoes list shows a list of all cargoes on the voyage. The list can be filtered on Port (the list displays the first Load- and Discharge Cargo Port, but the filter works any Load- and Discharge ports on the Cargo), Charterer and Commodity by using the quick-filters in the top right.
On the row at the bottom of the list, you can see the Total Amount of cargo quantity on this Voyage:
Clicking the -icon will bring up a dropdown menu for choosing between creating a brand new Cargo, or a new Cargo from a CoA template.
By clicking the icon you can edit the columns shown in the list, rearrange the columns and even enable showing of some columns that are unchecked by default.
Clicking the icon will export the table to a spreadsheet-format, which can be opened in e.g. Excel or Numbers.
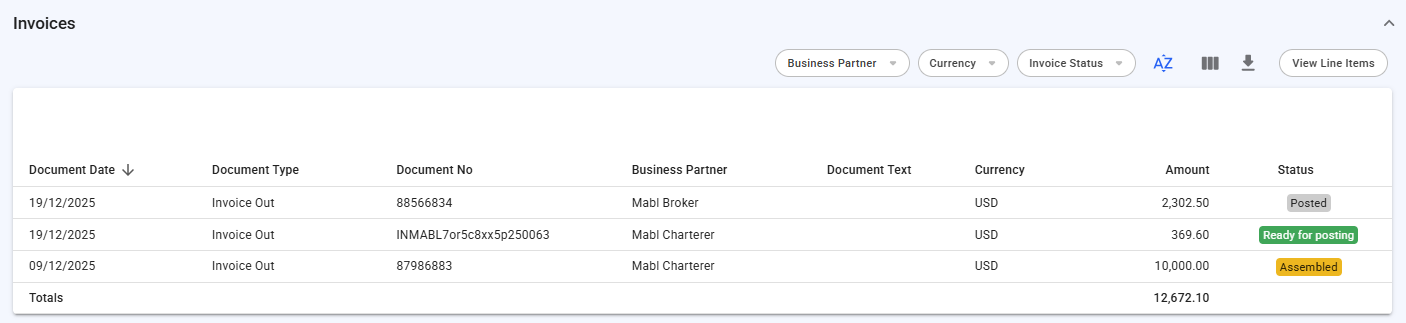
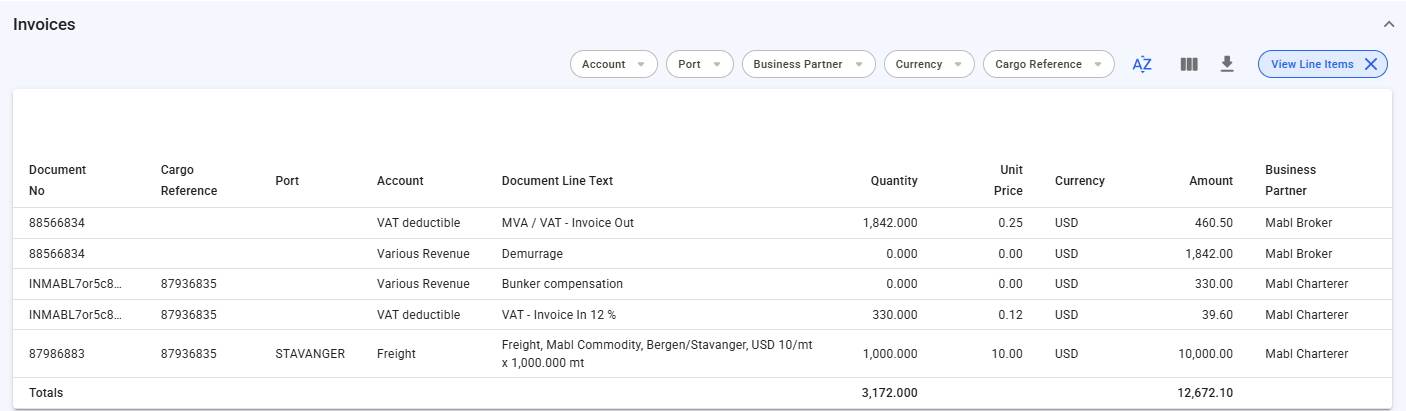
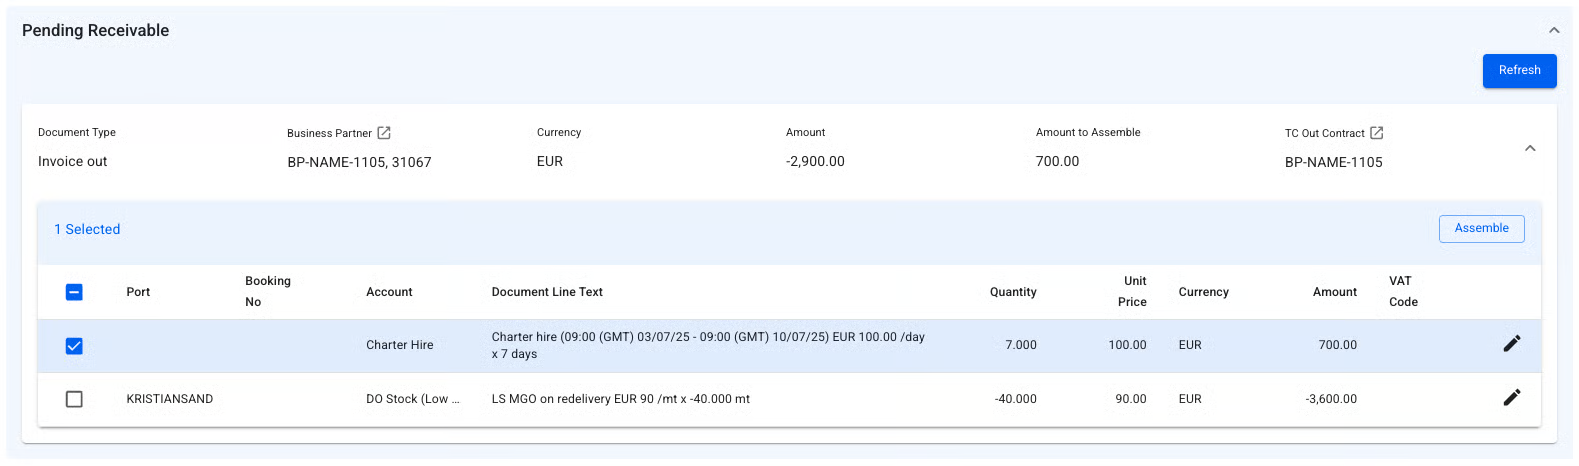
Invoices
In the "Invoices" tab in the voyage drawer, you can efficiently see and manage the Pending Receivable/Payable document lines, as well as the Invoices connected to the voyage. The tab is only visible to voyages that do not have status "Estimate".
In the top right, you will find two buttons for printing the Owner and Charterer Statement. Below them, in the middle of the drawer, you will find a two or three-way toggle-button that allows you to switch between the receivable, payable and hire payable invoices (only if the vessel is on a TC In). Switching between these options will change both which pending document lines are displayed and the assembled invoices.
This section show you a list of all document lines that have not yet been assembled. Clicking on any of them allows you to edit some of the fields. Selecting one or more document lines will allow you to assemble them into a Document:
From this view, you can also open up the linked Business Partner and/or the linked TC Out Contract (if a TC Out voyage).
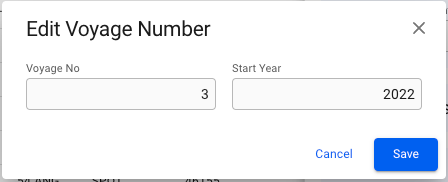
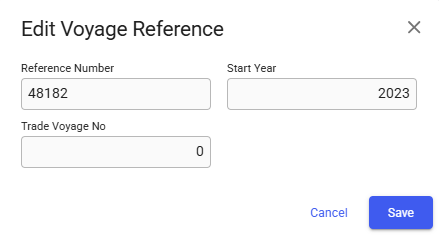
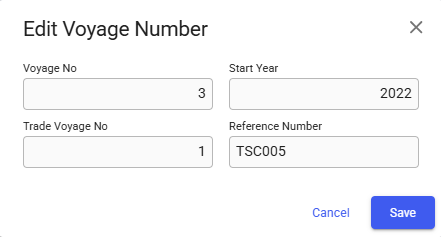
Change Voyage Reference Number/Voyage Number and Voyage Starting Year
From the voyage drawer actions it is possible to change the Voyage Reference Number or Voyage Number, depending on the voyage status.
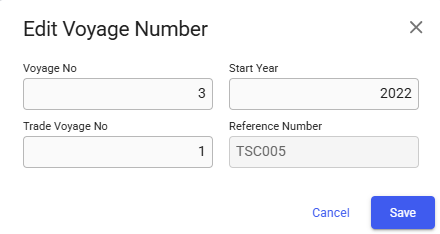
When voyage status is Estimate, Unallocated or Allocated, it is possible to change the Voyage Reference Number. It is also possible to change the Trade Voyage Number if the voyage is connected to a trade, however this number will be automatically set when the voyage is nominated, erasing any previously set value.
When voyage status is Nominated, Operational, Operationally Closed, Invoiced or Closed, it is possible to change the Voyage Number. If the voyage is connected to a trade it is also possible to change the Trade Voyage Number and view the Voyage Reference Number. The Voyage Reference Number can be changed if the Voyage Variant Number for the system is set to 9, else it will only be for information. Setting the voyage status to Estimate or Allocated from Nominated will remove the Trade Voyage Number.
Clicking
Delete Voyages
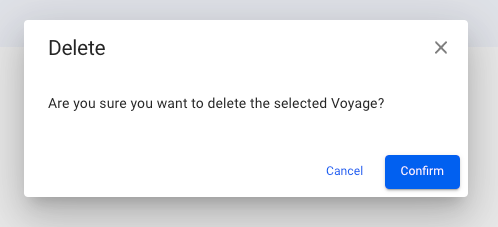
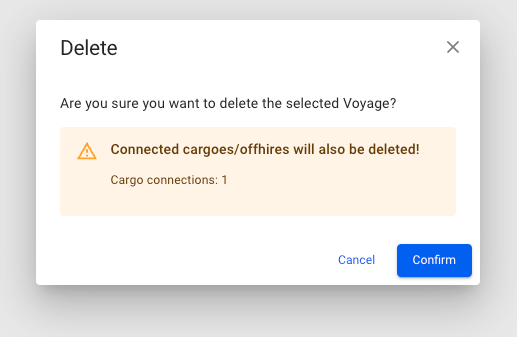
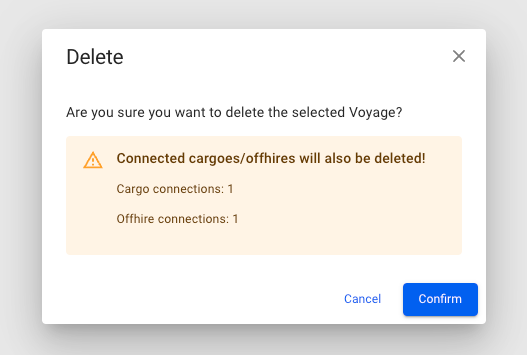
Only voyages of status "Estimate" and "Unallocated" can be deleted. Otherwise you must change the status before you can delete.
Find a voyage (i.e through the Voyages page).
Click to open the voyage you want to delete.
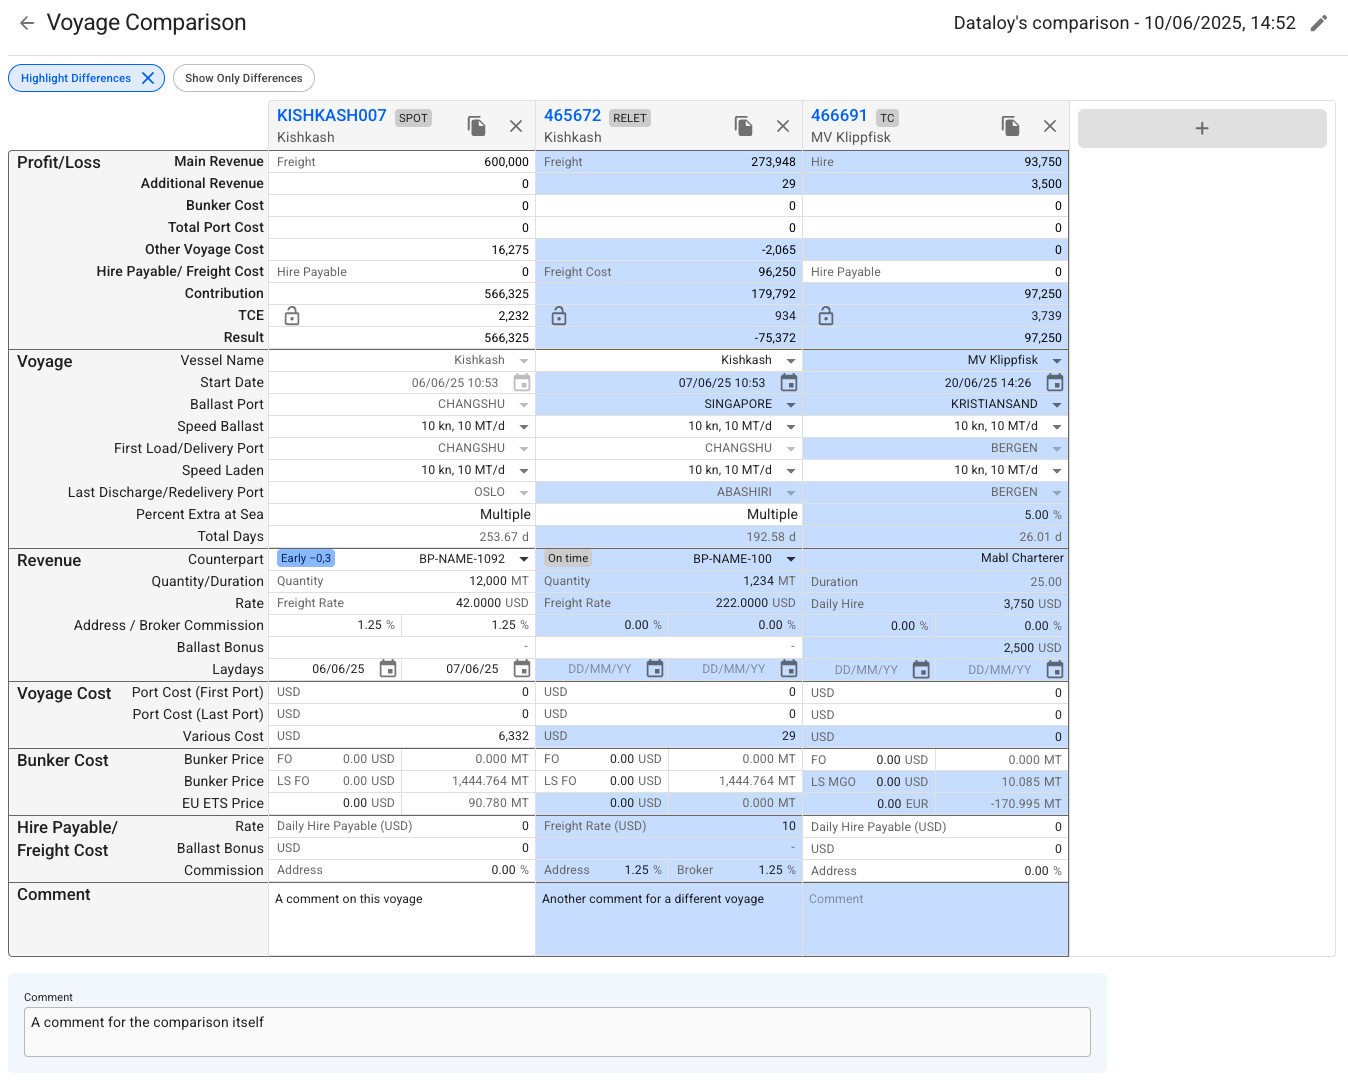
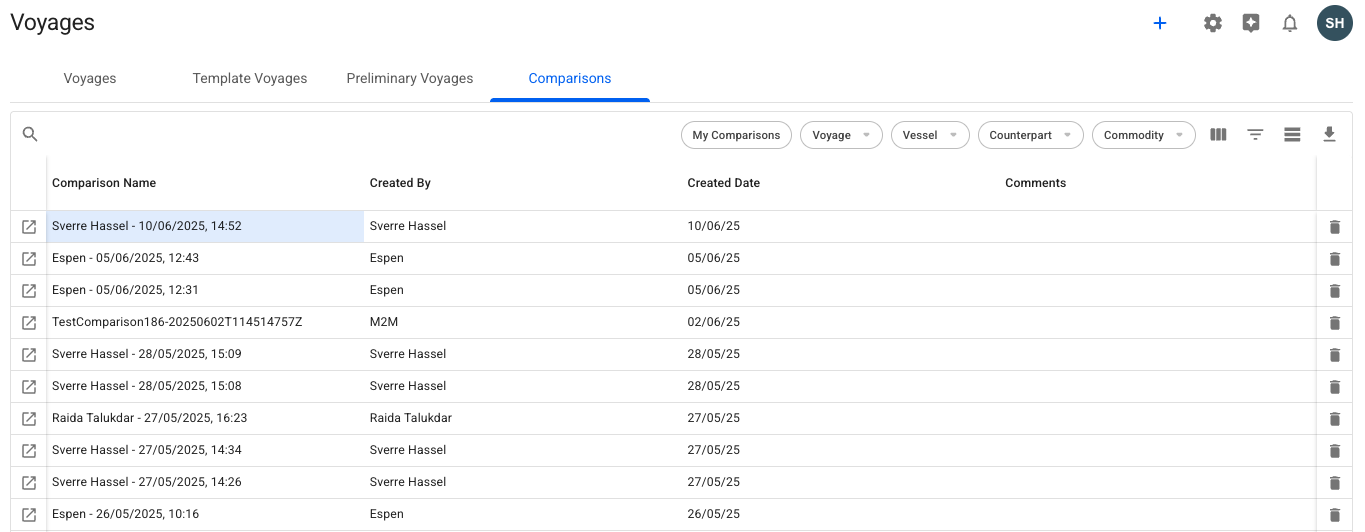
Voyage Comparisons
A functionality to compare voyages' values to each other to get the best overview.
A list of all voyage comparisons can be found under the Comparisons-tab in the Voyages module. The list allows you to search and filter.
The Find comparison button can be found as a primary action in the Voyage drawer:
This will open up the comparisons list, with the voyage pre-selected as a filter. Any comparison that includes the voyage, will be shown.
Click the icon in the top right to create a new comparison. This will bring up a window, allowing you to set a name, add a comment and choose a voyage as the base of the comparison.
Copying an Existing Scenario
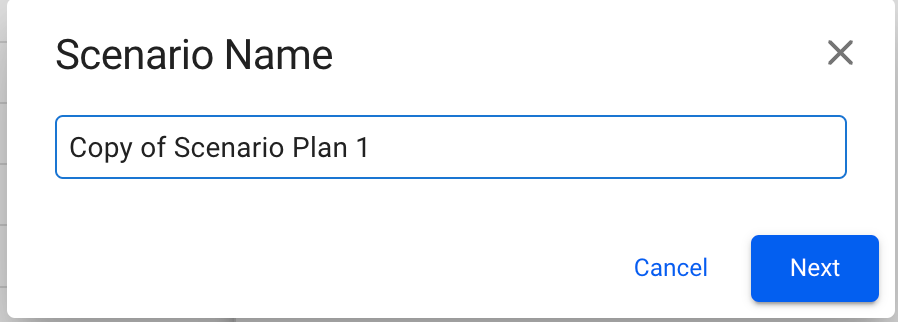
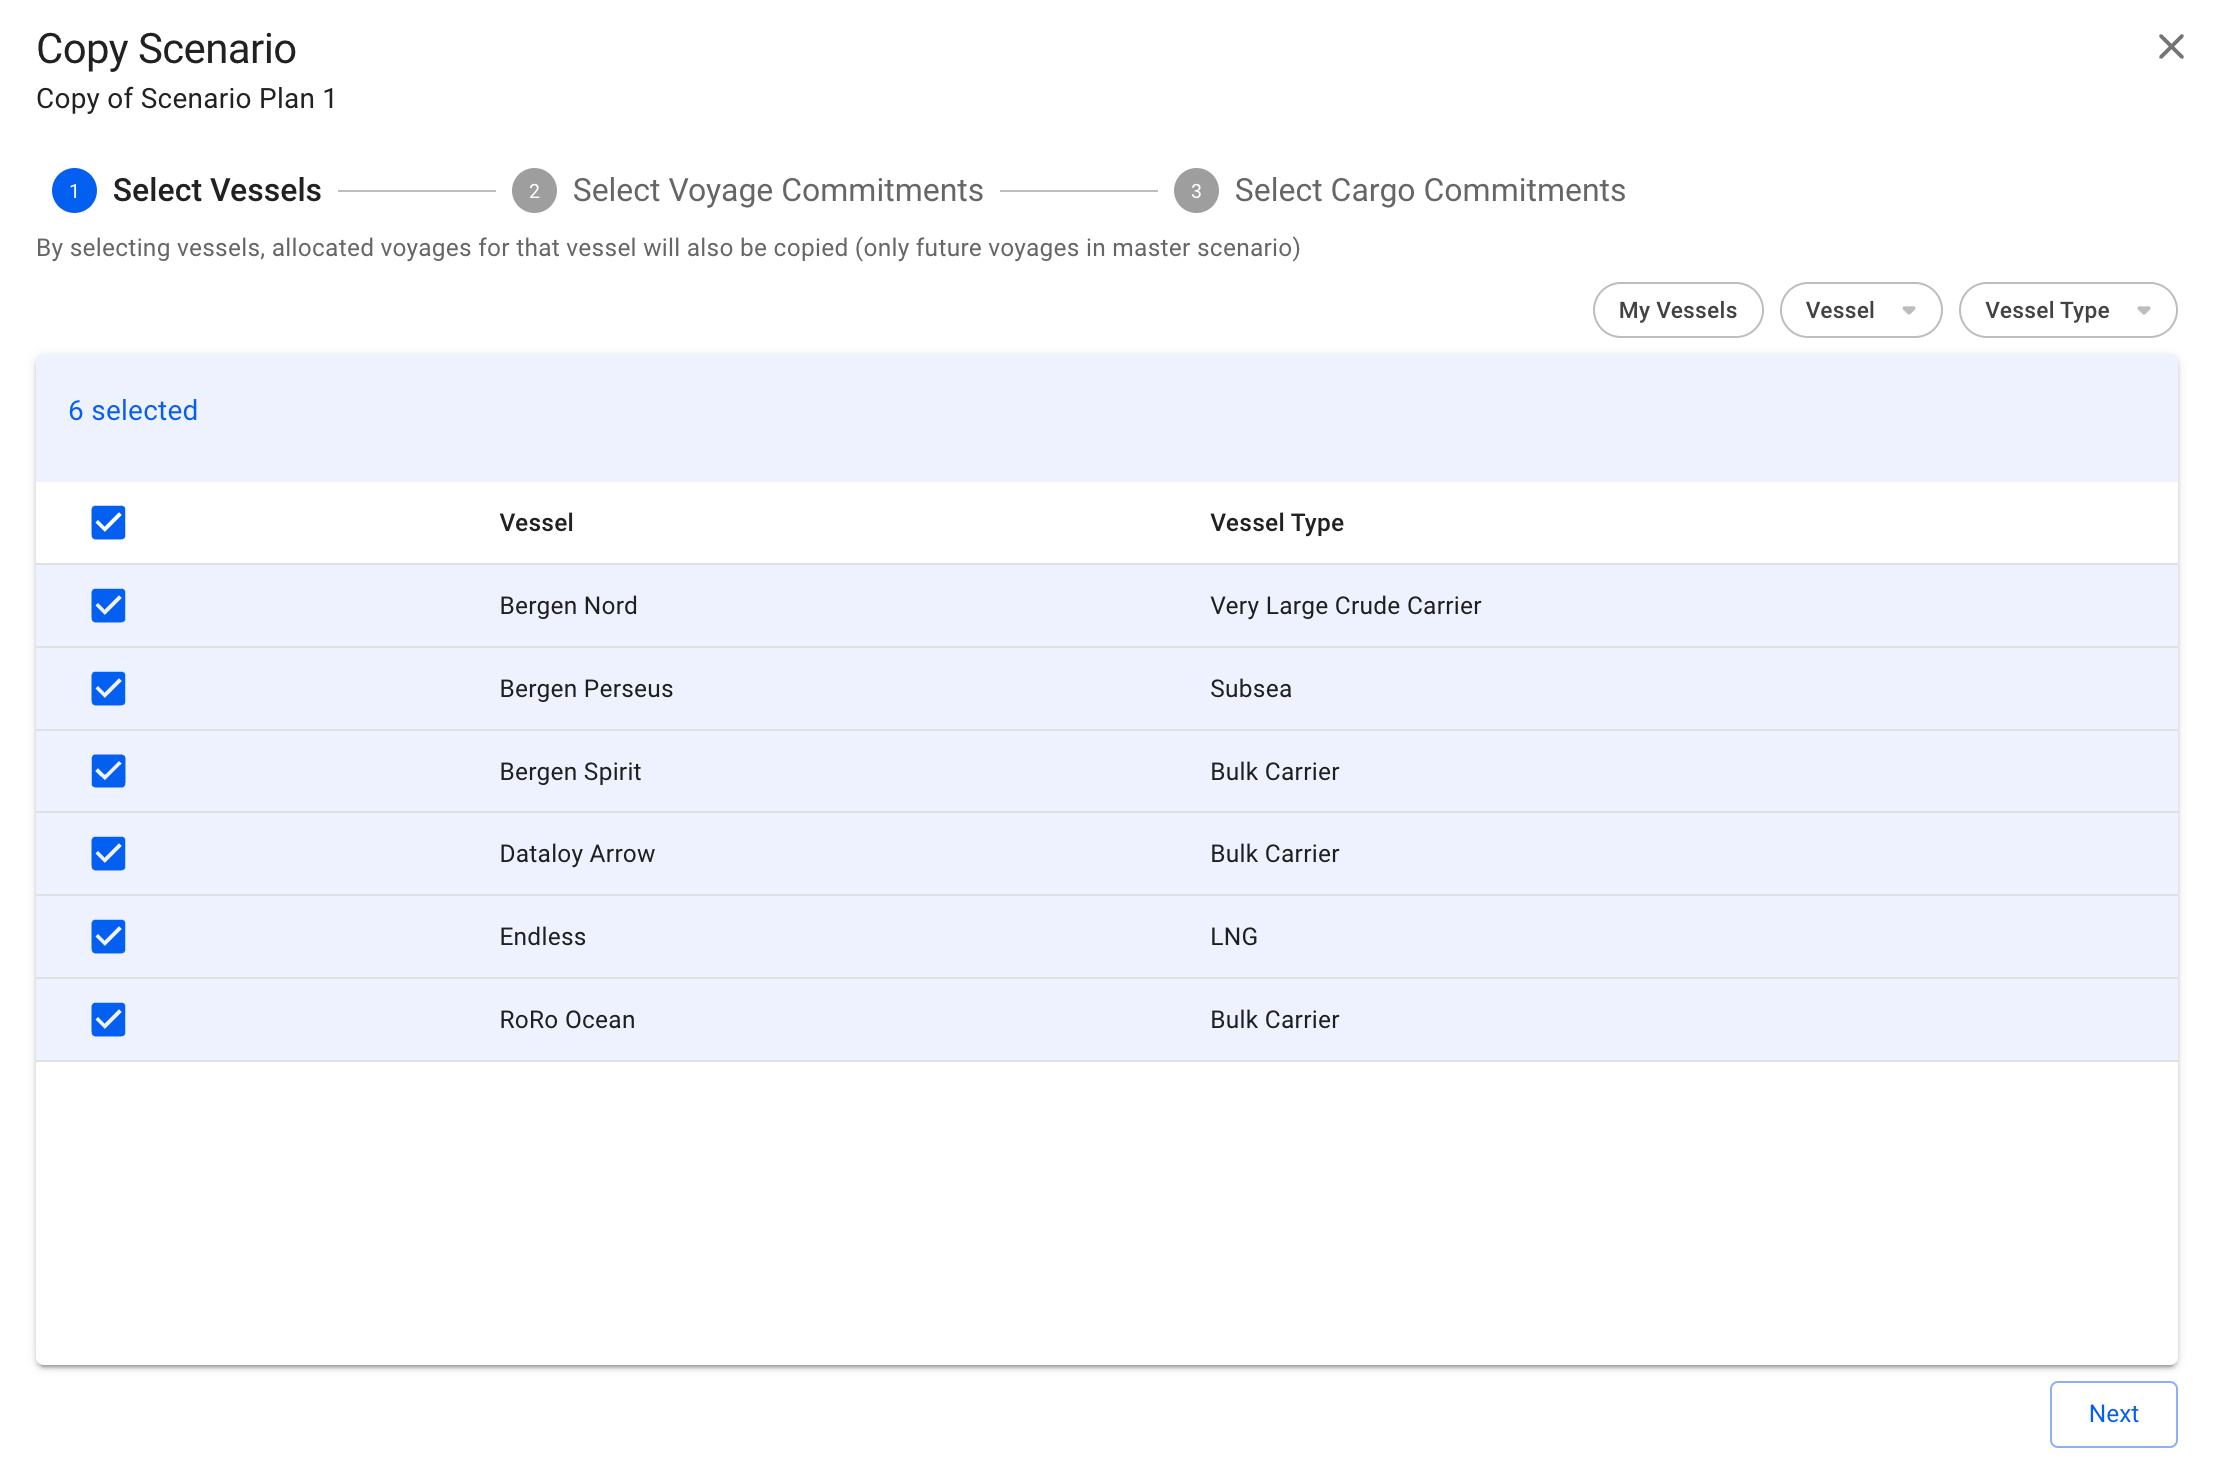
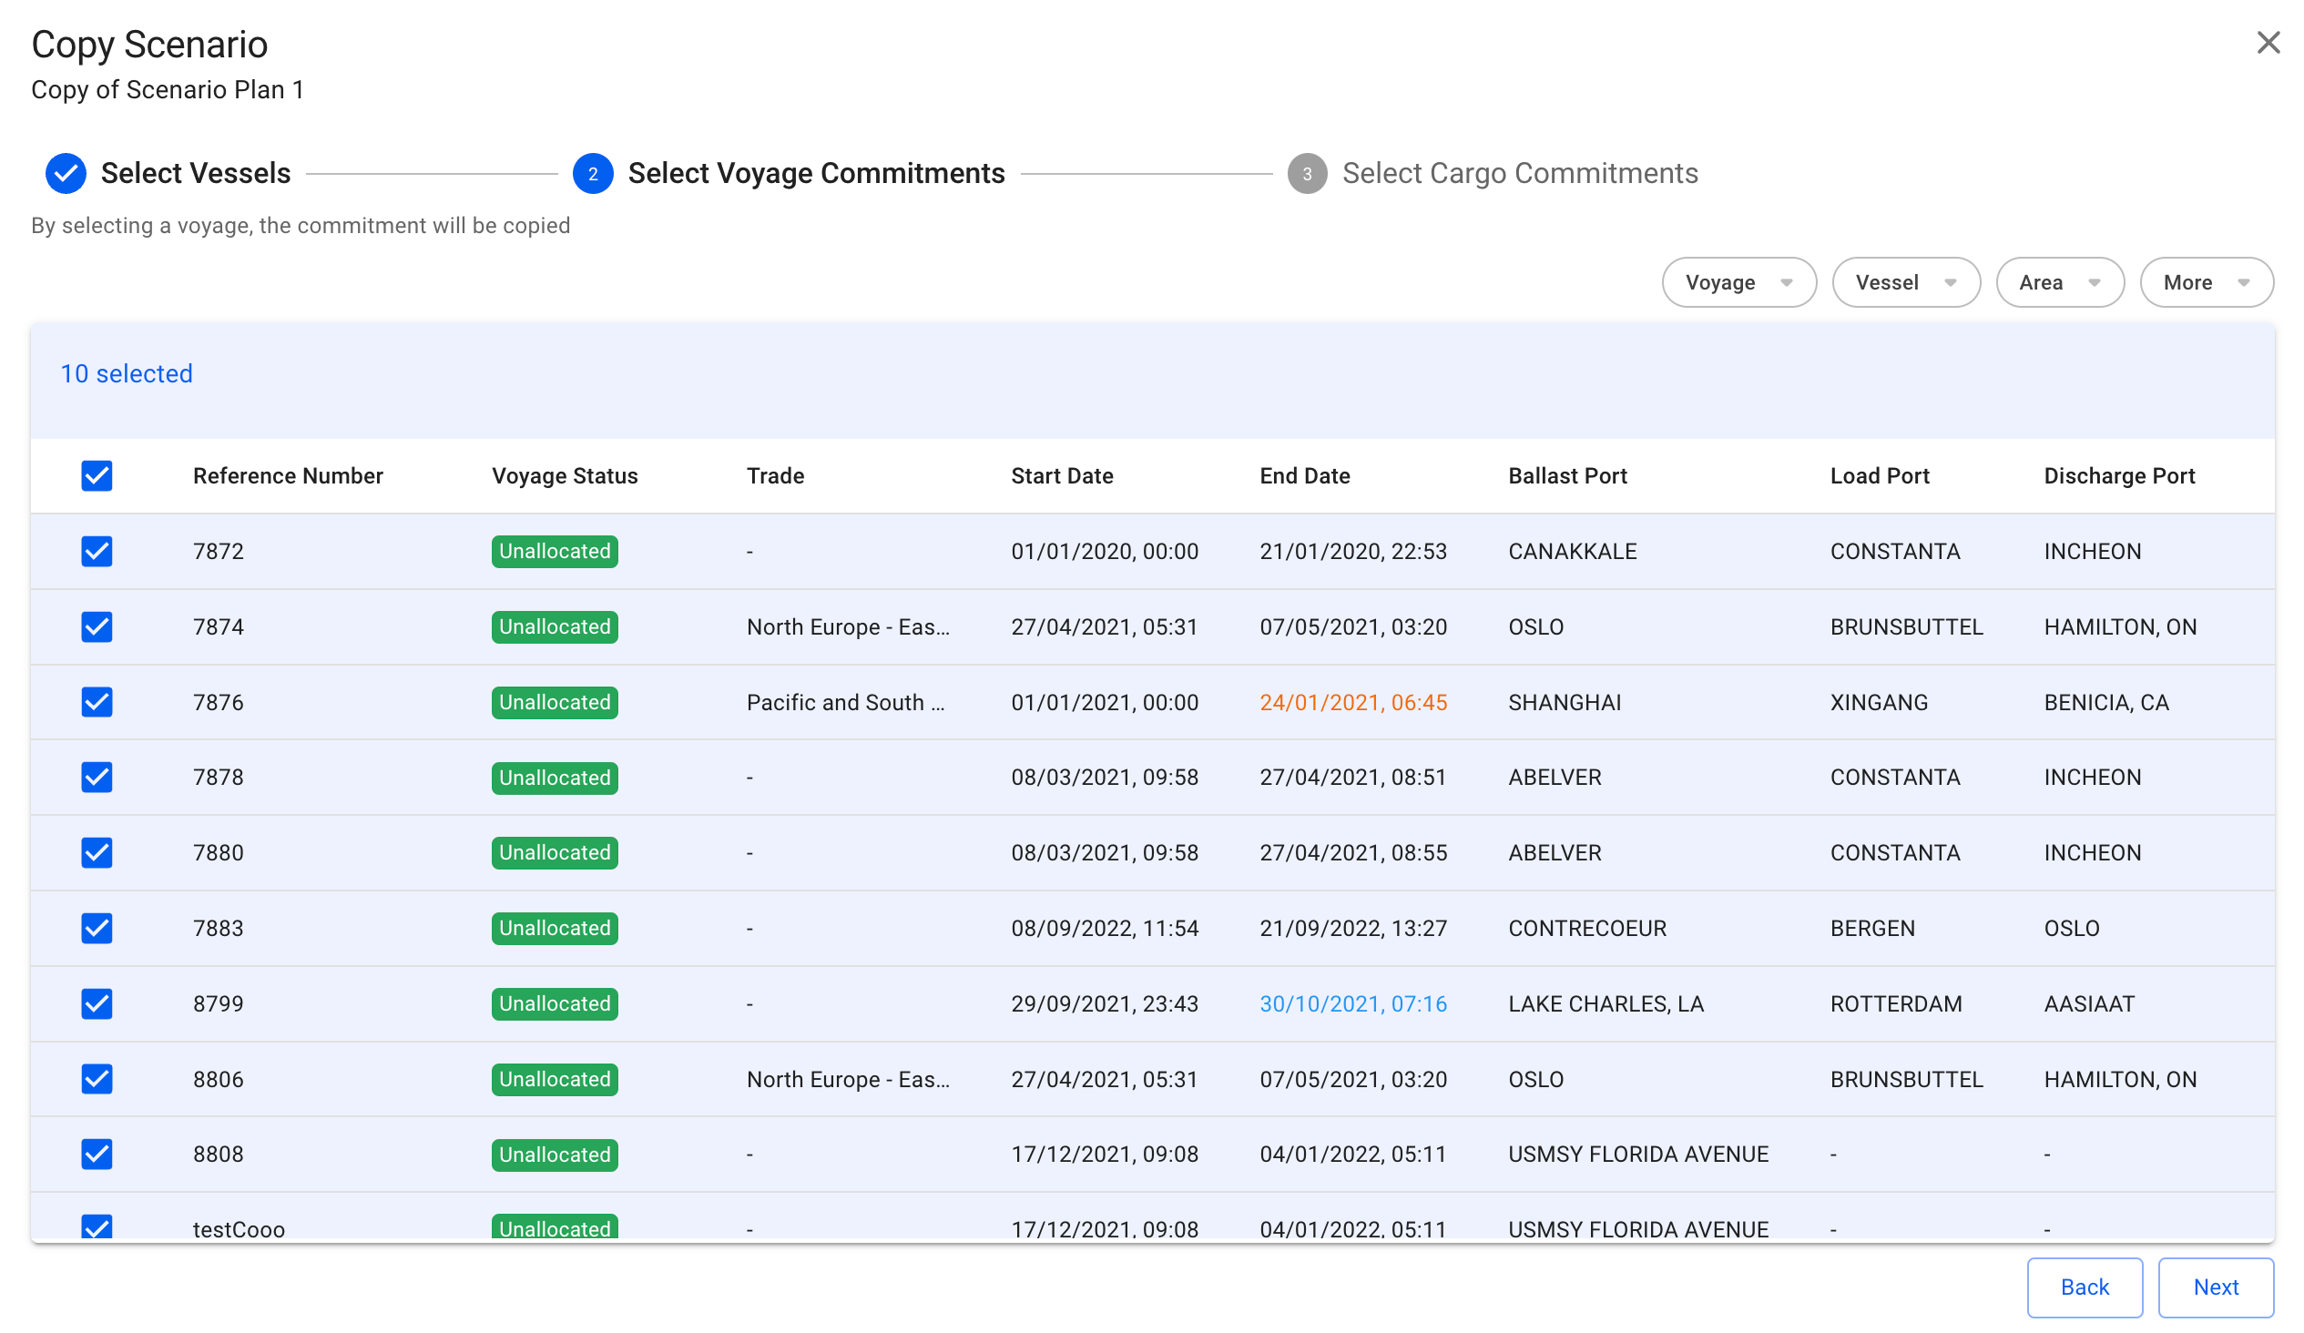
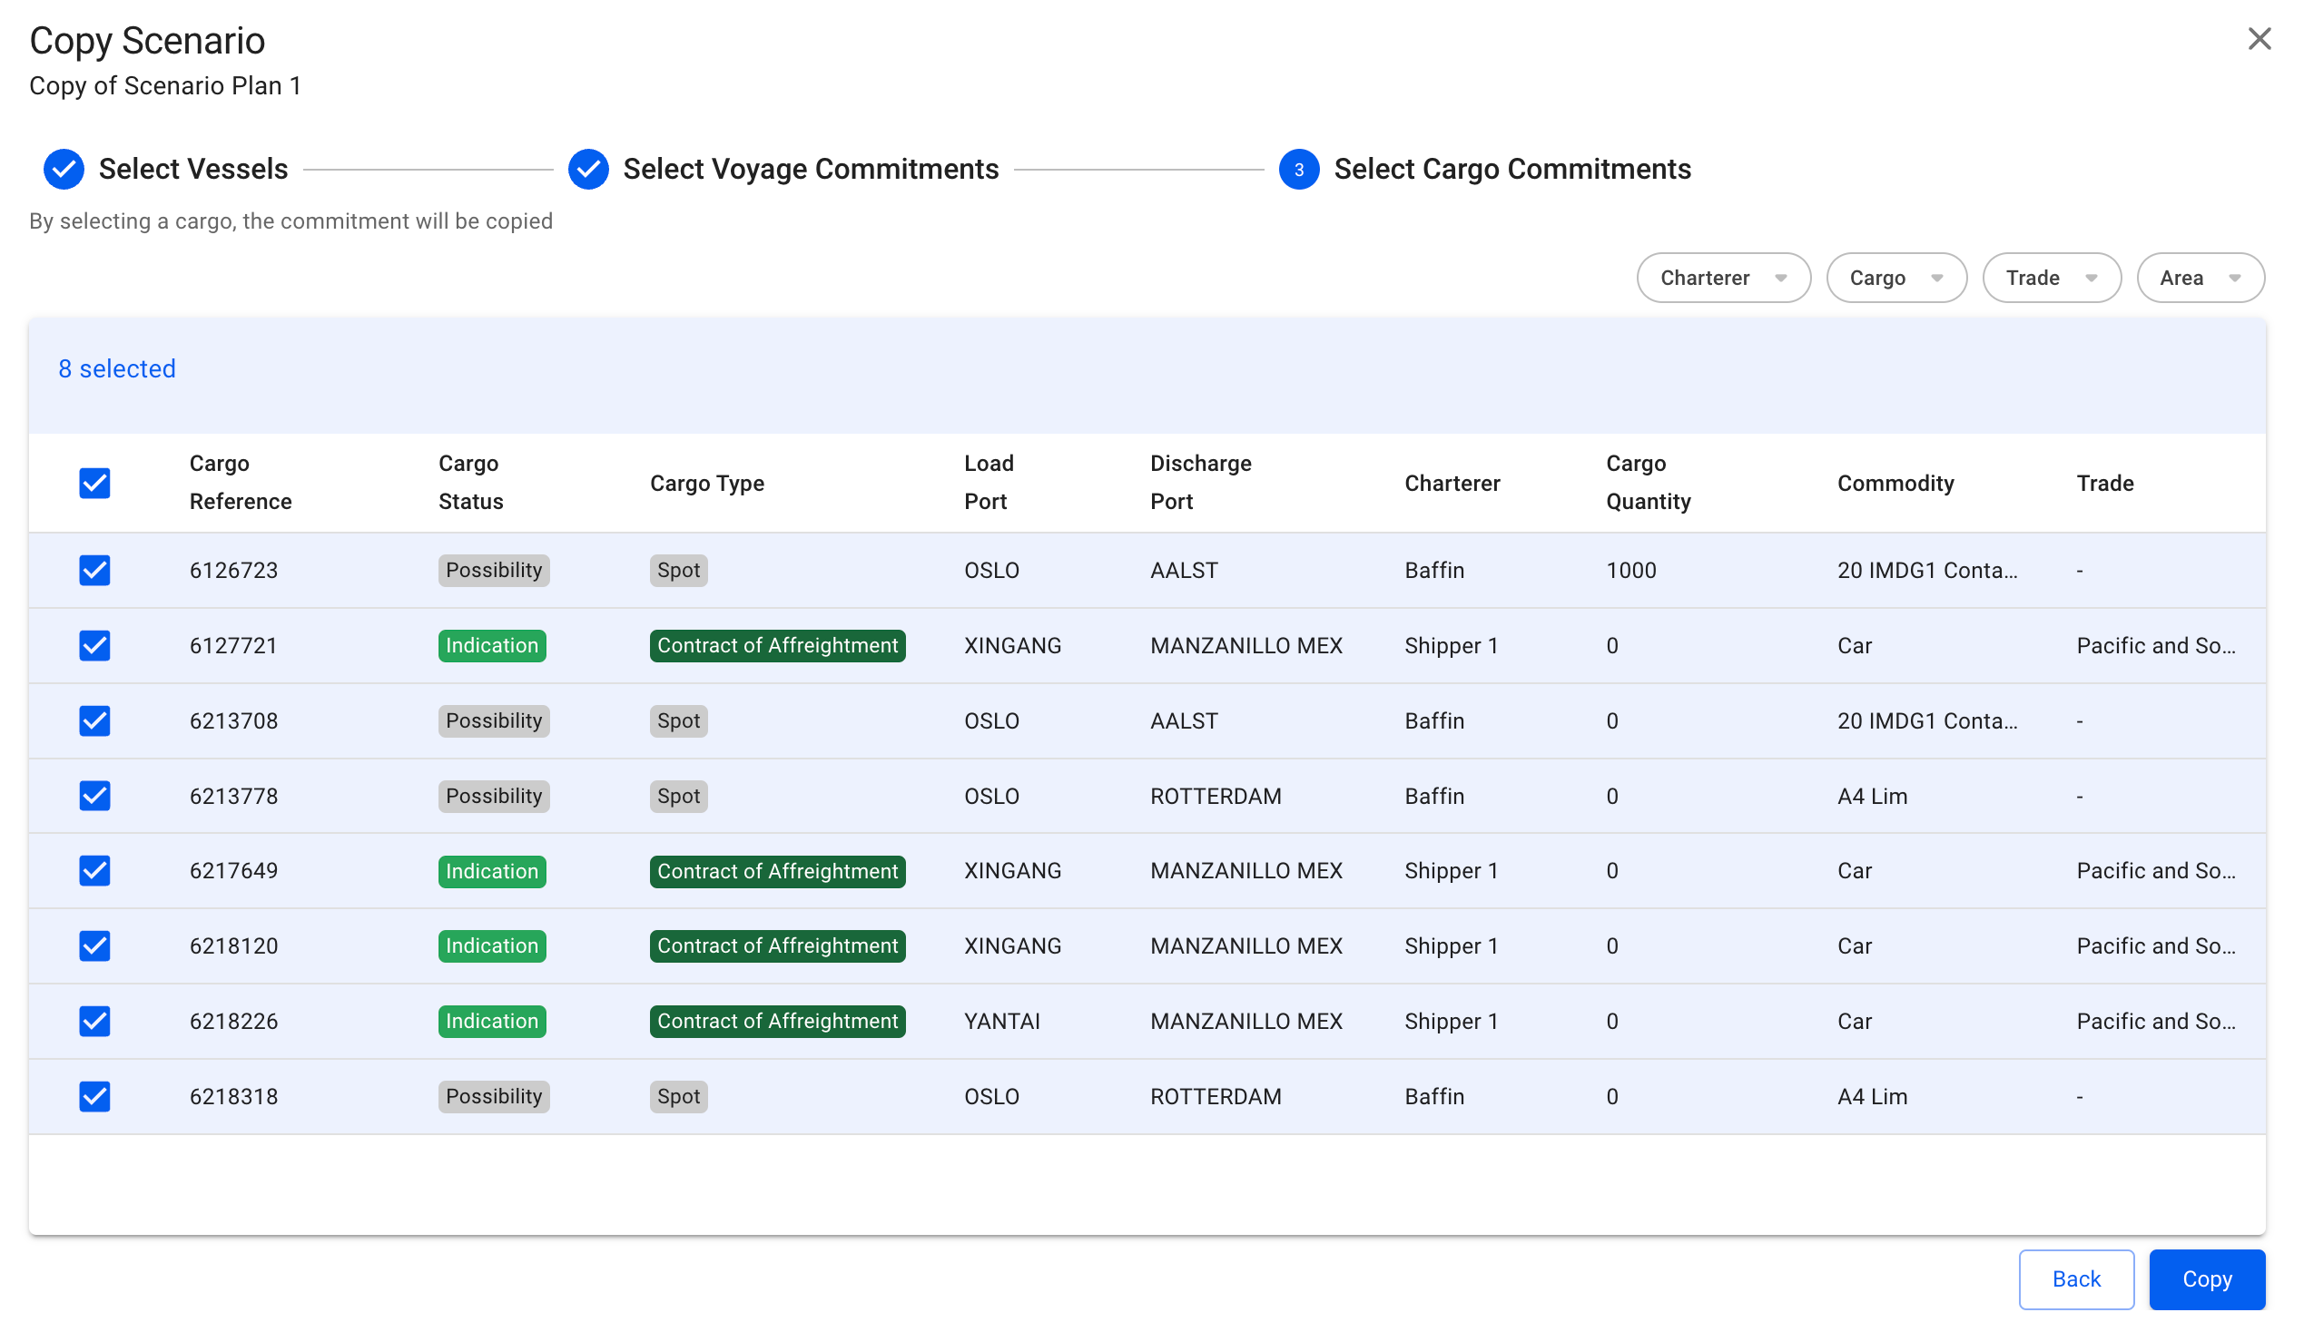
The most common way to create a new scenario is to copy an existing one. The copy action opens a three-step modal to select which vessels, template voyages, and Budget Voyage Starts to carry across. The copy gets a new name; all other data is independent of the source. Changes to the copy do not affect the original.
This is the recommended approach for creating variants (for example, copying a base case and adjusting freight rates to produce a high case).The Budgets module is located in the menu under Planning.
A budget consist of:
Senario (e.g. "2026 Budget")
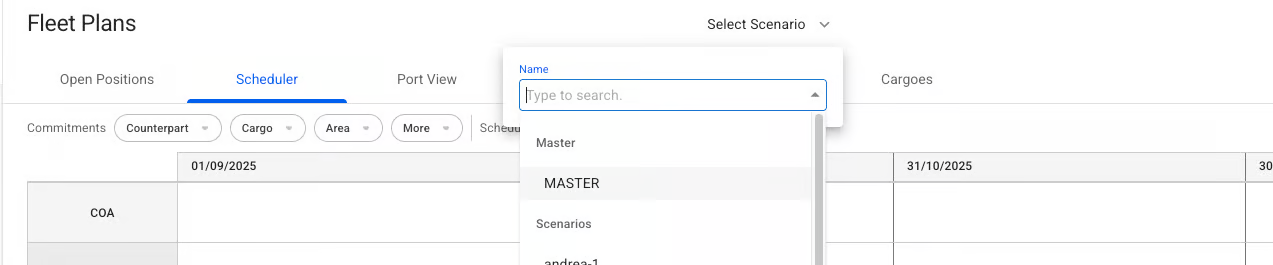
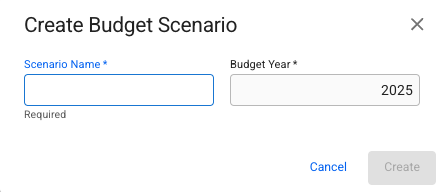
Scenarios
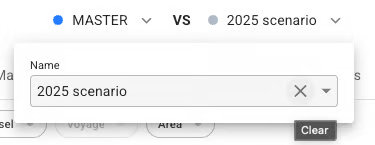
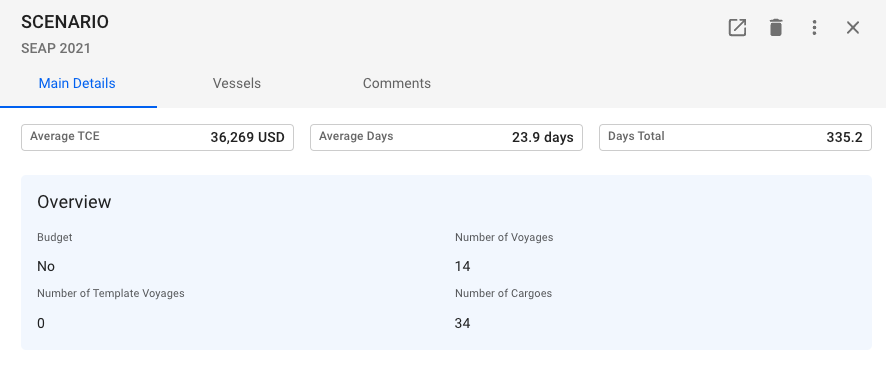
This is a list of all scenarios, including budgets, in the system. The MASTER scenario is marked in capital letters and cannot be edited.
By clicking on a scenario, a drawer will open where you can create a copy or change the scenario name (in the Secondary Actions dropdown), as well as view information about its voyages, cargos, and vessels.
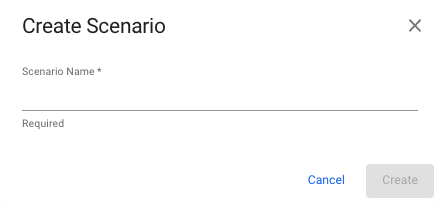
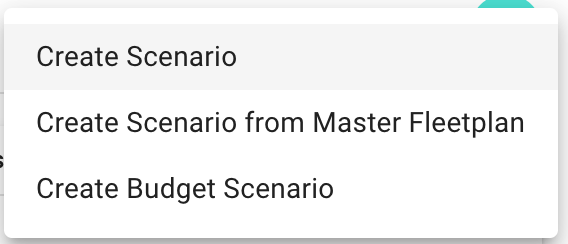
To create a new scenario follow the step-by-step guide: .
Template Voyages (full voyages)
Budgeted Voyages ("planning placeholder" containing voyage start and laycan dates.
All levels are copied.
Vessel
Yes
Ballast Port
No
Create Voyage Without Cargo Modal
If a vessel is selected, updating Stowage Factor will calculate the maximum amount of cargo the vessel can carry, restricted by vessel deadweight and cubic capacity.
If 'Share voyage' is set to false, estimate voyages and template voyages is editable only by the creator and administrators
TCE Excl. Downtime
TCE is calculated as: Contribution divided by Total Days of the VoyageTCE Excl. Downtime is: Contribution divided by (Total Days of the Voyage - Total Days Offhire)
'TCE Excluding Offhire' will display the TC Equivalent using the remaining total days after excluding/subtracting the days offhire. As a result of dividing by a smaller number, it will always be a higher number than regular TCE.
Sections
Change of vessel and ballast port
First two tiles when voyage has offhire
Field
Description/Note
Field
Description/Note
Field
Description/Note
Field
Description/Note
Field
Description/Note
For each Draft, DWT and Immersion, you can add/edit for Summer, Winter, Design, Fresh, Tropical, Tropical Fresh and Unit.
Vessel Type
Vessel Description
There are several options available for you to narrow down what you see in the list view, as well as the ability to toggle which columns are displayed (with the setup).
For sorting, look for the arrow to the right of the column headers. For filtering, you can use the quick filters provided above the Voyage List, or look for the -icon, also to the right of the column headers.
You should also be able to search the whole list, by using the Search Bar functionality provided at the top of the list:
In this particular list, you are able to search for a voyage's reference no., a vessel, a counterpart or charterer, a port name, a cargo reference or trade. The list will update accordingly.
Counterpart
Available Columns
Adding fixtures can be done in the Cargo tab of the Voyage Drawer by selecting the Fixtures button and clicking the create icon above the list.
The tab allows you to create, edit and delete any fixtures on the voyage.
Counterpart (*)
Which cargoes to connect to the fixture (based on which Counterpart is chosen)
Disabled after connected to a fixture
(*) - required fields
Click on each tab below to read more about the different features:
You can see the Total Amount of all number fields, such as Cargo Quantity, Freight Rate and Freight Amount Currency, at the bottom of each table.
See the expanded/collapsed features below.
By clicking at the Create icon, you will be able to create a fixture containing cargoes of the same Counterpart.
The Cargoes list at the bottom is empty by default until you have chosen a Counterpart.
Selecting a Counterpart will show all cargoes connected to the Counterpart, allowing you to select the ones you want within the fixture.
One fixture is equivalent to the blue area that wraps around the cargoes within it, and containing fields in the section header. Here is a list of them:
Counterpart
Fixture Reference
Fixture Date
Fixture Form
The fixtures list has a separate button to collapse/expand the cargo list of all the fixtures with one click as shown below:
You can also collapse/expand each fixture by clicking on the blue header, or the arrow at the right-most.
Cargoes
Cargoes List
If a TC In Contract attached, you can open it from the Hire Payable view.
The invoice-section shows a list of all assembled invoices, or their line items. When in the toggle-button is set to Receivable or Payable, only the invoices connected to the voyage are shown. However, when set to Hire Payable, all invoices associated with the TC In contract are displayed, and an additional column for Voyage Reference is added that indicates the voyage(s) billed within each invoice.
Clicking on an invoice will open a , showing more details and allowing you to print them.
In the top right corner of the section, you will find a "View Line Items" button. Clicking it will change between displaying the assembled documents and their data, and displaying each individual document line. This may be useful if you are looking for a specific item, but don't know in which document it was assembled. The line items list has filters specific to this mode. Clicking one of the document lines will open the Document it belongs to in a new drawer.
Use the filters to quickly narrow down your selection. Depending on whether you are in Receivable, Payable or Pending Payable mode, as well as Document or Line Items view, the available filters change.
Document view
Document Lines view
Pending section
Changing between these will change which pending items are displayed, as well as assembled documents.
A document line has been selected, and the Assemble button appears
Edit Voyage Reference...
or
Edit Voyage Number...
in the options meny opens a dialog box where the current values can be modified. In addition, the dialog box contains a field for changing the Voyage Start Year.
Estimate voyage
Nominated voyage
At the upper right corner of the panel, click Delete.
Click Confirm to delete the voyage.
Voyages can be connected to Cargoes and/or Offhires, as well as scheduled voyages if the voyage is a template.
When attempting to delete a template voyage that has scheduled voyages either at the Nominated or later stages, an error message will show instead.
The delete-voyage modal will look differently depending on whether it has connected entities:
Figure 1: Bunker delivery details on TC In Contract
Figure 2: Bunker breakdown on voyage when opening balance is synchronized with TC In contract details
Change Voyage Status
From the Voyage drawer it is possible to change the status of the voyage by using the status chip next to the reference no at the top of the drawer.
When changing status from estimate to Allocate, no modal will show. The same also happens from Estimate to Unallocated. You can check out the different requirements and validations below.
When changing status from Estimate to Nominated, the following modal will show:
If it's a TC voyage with missing Laycan on the TC, you will have to fill in the Laycan as well. Otherwise, you will get information at the bottom of the modal saying which cargoes does not have Laycans added, but you will be able to nominate.
Fleet Plans Actions
In FAS the date filter will filter voyages and cargoes in all of the boards more efficiently. There are filtering shortcuts for Next Week, Next 2 Weeks, Next Month, Next 3 Months, Next Year and Next Two Years (meaning the past 2 weeks plus selected). The default is set at 'Next 3 Months'. It is also possible to manually select the date range.
All voyages and allocated cargoes are filtered with respect to thevoyage's end date date. The unallocated cargoes in their respective Cargo Commitmentscolumn, are filtered with respect to the cargo's laycan from- and to- dates.
For a scenario != MASTER, the date filter is also clearable. Meaning, you can clear the filtering of the selected date range, resulting in the list showing for all results instead, regardless of cargo's laycan dates and the voyage's end date.
TC Voyages
A TC Voyage will not have a Cargo Section on the Overview Tab like normal Voyages, but instead have a Time Charter Contract Section displaying the Time Charter Contract. In this section you can edit the most important fields on a Time Charter directly through the Voyage Drawer or click the -icon to Open the Time Charter Contract Drawer.
The Delivery Port and Redelivery Port fields display the port from the associated Port Call. When you enter a new port, the Port Call and TC Contract will be updated accordingly. Click the -icon to Open Port Call Drawer.
Both Duration and Rate fields will be disabled if there exists more than one Duration on the Tc contract, or a Duration has multiple Rates.
FAS Cargoes List
The Cargoes tab can be found in the module. It contains a list of all unallocated cargoes and cargoes allocated voyages who's vessels are scheduled. Each cargo can be found within a , including the MASTER scenario.
With the below mentioned features combined, in FAS Cargoes, a Scheduler can now create an Annual Load Plan in the MASTER scenario, and then copy it into a new scenario, to save the plan. This plan can then be tailored within this specific scenario, consistent of various columns and rows of cargoes, that are filtered and/or sorted, within a chosen time period.
Clicking on a cargo opens the and gives access to additional information and actions.
Port View Board
The Port View board gives the user an overview of the scheduled port calls in a particular port or terminal. This makes it easy to identify any overlapping or close port calls which may cause operational issues.
To get started, select a port or terminal from the selector:
While in this board view, the timeline can also be set to display a single week at a time, in order to get a very fine-grained view:
Otherwise, you have the quick filters; Vessel, Voyage and Reason for Call.
On each port call bar, you will find the following information:
FAS Voyages List
The Voyages tab can be found in the Fleet Plans module. It contains a list of all voyages that can be found within a . This includes voyages of statuses: unallcoated, allocated, estimated and nominated.
The following voyage information can viewed from the list:
Clicking on a voyage opens the and gives access to additional information and actions.
You can read more about the actions here: .
Create Budget Scenario
A new budget scenario is created from the Scenario module under Planning. Select Create Budget Scenario from the Create dropdown and enter a name and budget year. The new scenario starts empty; template voyages and occurrences are added afterwards.
Fleet Plans
The Fleet Plans module allows you to allocate voyages and cargoes in MASTER and different scenarios, without actually making any changes to your MASTER Fleet Plan.
At the top center of the screen, you can select a scenario of type 'Master' or 'Scenarios':
To select a different scenario than MASTER, scroll down in the above list to find all scenarios, except . The MASTER scenario is pinned to the top of the selector for easy accessibility.
To create a new scenario follow the step-by-step guide: .
From version 8.17, you will be able to select a comparing
Find Scenario
Navigate to the 'Scenarios' menu group to the left under the "Planning" module to find the list of scenarios. Here we have a list of all existing scenario, except for the MASTER scenario (which you cannot edit). The list contains these columns:
Here, you can easily navigate through the scenario named, number of vessels and voyages in the scenario and the type of scenario, and click on the desired scenario to open the drawer.
This list of scenarios includes both the types budget and non-budget scenarios. To effectively list the desired type of scenarios, you can filter the list based on the type you want to see, with the quick filter 'Type' found above the list:
Create Scenario
There are four possibilities to create a scenario:
create from scratch
create from MASTER fleetplan
Depth
Air Draft
Int'l GRT
Int'l NRT
Panama Net
Suez Net
Constant Reduction
Stern Thruster
Shaft Generator
Mobile Phone
Email
Telex
Gear
Holds/Hatches
Grabs Onboard
DWT (Summer)
Deadweight in the summer
Built
Yard
Flag
IMO No.
Owner
Owner of the vessel (type Business Partner), available from v7.7
The selector is also limited to the existing Counterparts on the voyage cargoes.
You are not able to create until you have selected a Counterpart and at least one cargo from the list at the bottom.
Note that these features act a bit different than on the Edit Fixture Modal!
Edit Fixture Modal
Clicking the Edit icon will open up the Edit Fixture modal, where you can change fields and select more or de-select cargoes.
The cargoes list at the bottom has pre-selected cargoes of the Counterpart you want to edit, by default. All cargoes connected to the Counterpart selected will show up in the list, along with the pre-selected ones. This gives you the opportunity to either add more cargoes to, or remove from, the selected fixture.
Another feature is that you can override the Counterpart. Then this change will reflect on all the selected cargoes. The Counterpart selector is not limited this time around.
You will also be able to edit the Fixture Reference in this modal, which is a running number by default.
Total Quantity
sum of the cargoes' weight on a fixture
Total Freight Voyage Currency
sum of the cargoes' freight, plus the fixture lumpsum, on a fixture
the currency is for now always shown in Voyage Currency
The invoicing list of the voyage/TC In, displaying the documents.
The invoicing list of the voyage, displaying the document lines for the invoices.
Cargo/Voyage Reference
As you can see, Company and Business Unit field is required. By default, what is selected on the voyage will display here, but you are free to change it. You can also add Responsible Charterer, Responsible Operator and Responsible Accountant, but these are not required.
The same also happens when changing from Allocated to Nominated.
You can check out the different requirements and validations below.
There are also other "forward" status transitions, like:
Nominated -> Operational
Operational -> Operationally Closed
Operationally Closed -> Invoiced
Operationally Closed -> Closed
Invoiced -> Closed
When changing to these statuses, no modal will show.
When changing status from Allocated to Unallocated, the following modal will show:
Unallocate Voyage Modal
You will be given the option to select a new Vessel and/or Ballast Port to change to, but not required for unallocating.
The same also happens when changing from Nominated to Estimate.
When changing to these statuses, no modal will show.
There are also other "backward" status transitions, like:
Operational -> Nominated
Operationally Closed -> Operational
Invoiced -> Operationally Closed
Closed -> Invoiced
Required Values Must Be Set:
For each cargo: charterer
For each cargo: commodity
-> This can be seen for most "forward" status transitions.
Vessel code must be changed from its default assigned value. Open Vessel "Internal Data" to set a new code.
-> This can be seen for most "forward" status transitions.
Warning
The ballast port on this voyage does not match the open position of this vessel. Do you want to <status> the voyage with the start date locked?
-> This can be seen for most "forward" status transitions.
In the Voyage drawer, in the left-most P&L Summary section, you have this Analysis button:
Analysis button to open up Analysis View
This is only enabled after Estimate status. In this Analysis view, you can display the voyage snapshots created, above the tables:
Top of the Analysis View section, voyage snapshots marked
From version 8.15, all forward transitions between 'Estimate' to 'Nominated' statuses gets a new voyage snapshot created. It will be in the format as shown in the above marked text, e.g. for transition Estimate -> Unallocated, it shows the text "Estimate/Unallocated" along with the created date and time (which is when you did the transition).
By default, you will be displayed the latest snapshot created as selected, but when opening the dropdown menu, the snapshots are listed in an ascending order, which you are free to choose from. Selecting a snapshot will automatically display the corresponding values in the below analysis tables:
Voyage Snapshot dropdown menu
In the above example, you can e.g. see two instances starting with "Estimate", meaning there has been a backward transition before that last instance, but we don't create snapshots for those.
You can also have multiple instances of the same transition, which then usually occurs at different dates and/or times.
We still create 'Preliminary' snapshots from when a voyage is set to 'Nominated' status, which remains if the status becomes higher (e.g. 'Operational'). This will both be displayed as default selected snapshot and is in the dropdown menu. Whenever the status changes away from Nominated (or higher) status, the Preliminary instance will disappear from the dropdown (while the other snapshots created will stay), as this is strictly only for Nominated and above statuses.
The Daily Snapshots are still in order as is and is created every day, as usual. In System Settings, you can still specify the daily "Voyage Snapshot Creation Time" in GMT. This still applies for statuses that are not 'Estimate', 'Unallocated', 'Allocated' or 'Closed'.
You can open a Voyage Snapshot drawer by clicking the icon in front of the snapshot text. The statuses are "Closed" and "Snapshot" if a transition snapshot, or "Closed" and "Preliminary" if Nominated (or higher) snapshot.
Alternatively, in a Nominated (or higher) voyage, you can in the Overview tab click on in top-right drawer, to select "Open Preliminary Voyage' secondary action.
You can manually create a snapshot by clicking the below button:
Create a Snapshot Voyage
You cannot create a snapshot when the voyage has status 'Estimate', 'Unallocated', 'Allocated' or 'Closed'.
"Forward" Status Transitions:
From Estimate to Allocated
From Estimate or Allocated to Nominated
Nominate Voyage Modal
The nominating process will also change the booking status of all of the cargoes on the voyage to 'Clean Fix'.
Other
Some customers sometimes prefers other names of the mentioned statuses.
E.g. "Operationally Closed" can be called "Sailed" or "Demurrage Checked".
"Backward" Status Transitions:
From Nominated to Allocated
From Allocated to Unallocated
From Unallocated to Estimate
Other
Different Requirements and Validations:
Missing Fields
Update the Vessel Code
Change of Ballast Port
Through the API, there are some forward- and backward transitions that are not possible to set directly, e.g. NOM -> SCU, it has to be NOM -> SCH, then NOM -> SCU.
Status Transition Snapshots
Preliminary
Daily Snapshots
Open Snapshot Drawer
Create a Snapshot
Read more about Status Transitions .
On the
Open Positions
and
Cargo Management
boards, specifically, you will be able to use the
toggle
functionality:
Toggle Functionality
By turning the toggle off, you will be able to hide the Voyage Commitments, or Cargo Commitments, making the allocated sections for voyages and cargoes the full view.
Meanwhile, in the Scheduler board, you have two hide functionalities:
Hide Functionalities
By clicking on, for instance, the "Hide Commitments" toggle, you will hide the whole Commitments section, making the Schedule section the full view. And opposite action for "Hide Schedule" (you are also able to hide both sections, then you will get an "empty" full view).
The Calculate Profit/Loss checkbox is only available while the Voyage still has status Estimate, and will toggle calculation of profit/loss based on bunkers.
Cargo List's filters, sorting and header sorting can be read here: .
In this Cargoes List, specifically in FAS, you have the option to select and customise your columns of choosing. Keep in mind that the standard ones cannot be removed, but can be be "hidden". This option gives you the possibility to, amongst many, add in additional columns of your desire and re-order the columns, as you go.
Also in this lit, specifically, you can export the viewed list into an Excel sheet. By clicking on the export icon, you will be given a modal with various options, before exporting. You can read more about it here: Export to Excel Sheet.
In the Type column, you will immediately be able to detect whether a scenario is of type budget or a non-budget (' - '):
Scenario Type Column
Scenarios List
Scenario Types
Scenarios List Table Headers
Scenario Type filter, with the 'Budget' type selected in this case
Read about the new Comparing Scenarios functionality !
copy existing scenario
create a budget scenario
In the scenario list you have a icon on the top left to create a new scenario. You can create a scenario from scratch, from the MASTER fleetplan or create a budget scenario. You can also copy an existing scenario.
Create Scenario Dropdown
When creating a scenario from scratch you enter a scenario name and click create.
Create Scenario Modal
When using the MASTER fleetplan to create a scenario, all voyages in the master fleetplan and their allocation are copied. Thus, unallocated voyages will be unallocated in the scenario and allocated voyages will be allocated to the same vessel. The first position of each vessel in the scenario schedule is defined by the start of the first voyage on the vessel.
The new scenario is called Master Fleetplan Scenario with a date and time stamp of the creation.
To copy a scenario open its drawer in the scenario list. Select the action copy in the drawer to create a copy of the scenario.
Plain delete modal with no alerts due there not being any connected offhires or cargoes.
Alert showing that an offhire is connected and will be deleted.
Alert showing that an cargo is connected and will be deleted.
Alert showing that an offhire and a cargo is connected and will be deleted.
Maintain Scenarios
To change an existing scenario, navigate to the 'Scenarios' menu group to the left, and open the Scenario drawer by clicking on the list row of choosing. Learn more about finding a scenario!
Actions
You have the following actions in the drawer:
View in Open Positions Board
Delete
Copy
Edit Scenario Name
View Audit Log
To access and upload attachments
Here you have an overview of Average TCE, Average Days and Days Total of the whole scenario. The overview sections also contains information about whether the scenario is a budget, the number of voyages, template voyages and cargoes of the selected scenario:
Vessels in the selected scenario can be managed from the list in the Vessels tab. Clicking on a vessel will lead to the vessels' drawer.
Open the Scenario module in the Planning section.
Select a scenario and navigate to the Vessels tab.
Click Add in the top right corner of the vessels list.
Maintain Voyage Comparisons
Voyage comparison overview
The comparison page presents a table of the voyages, with values being segmented into groups. The name of the comparison is displayed at the very top, alongside a button to edit the name.
In the top left of the comparison window, you will find two buttons; Highlight Differences and Show Only Differences. By default, Highlight Differences is turned on.
Table header
The table column header shows the voyage reference number, the vessel and a chip telling you what kind of voyage it is.
Clicking the copy icon will create a copy of the voyage, and add it to the comparison. Clicking on the remove icon will remove the voyage from the comparison. To open up the voyage drawer of any of the voyages in the comparison, click on the blue voyage reference.
Add new voyages to the comparison by using the big grey button in the right-most column. This will open a dropdown, allowing you to add an existing voyage in the system, or create a brand new one.
To the left, rows are grouped into the following categories: Profit/Loss, Voyage, Revenue, Voyage Cost, Bunker Cost, Hire Payable/Freight Cost and Comment.
The Bunker Cost group will display the two primary bunkers
At the bottom of the comparison screen, there is a comment section for the comparison as a whole.
Certain values in the comparison rows are composed of several different numbers. Depending on the type of the voyage, this may be different. Hovering over a row will display a tooltip showing each individual number.
Several rows contain split fields, each displaying different data points. An example of this is the Address and Broker commission row. In this case, the left-most cell will contain the first value (Address commission), and the right-most will contain the last (Broker commission).
Contextual rows displays values that changed based on the context. In these cases, the cell includes a small label to the left, informing you of the source. An example of this is the Main Revenue row. For spot and relet voyages, the main revenue will be the freight. For a TC voyage, the main revenue will be hire.
You can make changes to the voyage directly from the comparison tool, by clicking into a cell and editing the value. This will cause a re-calculation of the voyage, and the changes will immediately be reflected. Cells which are not possible to edit are greyed out.
Alternatively, you can open the full voyage drawer by clicking the voyage reference and making your changes there.
Scheduler Board Actions
Actions
The Action Bar
You can choose between the quick filters specified for 'Commitments' or the 'Schedule'. They will be filtered separately in each of their respective sections of the board:
Quick Filters in the Action Bar
While on Comparing Scenario mode
When selecting a comparing scenario, the Commitments filters along with the Voyage filter under Schedule will be disabled.
The period selector allowsyou to choose the time period of your liking, to easily display the voyages of that timeframe:
The quick filters decides the of the voyages, while the period selectors allows that the board will display.
It is possible to drag and drop the bars to unallocate or allocate a voyage. A scheduled voyage can be unallocated by dropping it into the commitments area. A commitment voyages can be allocated by dropping it onto an empty vessel row, or behind another allocated voyage.
Each of the voyage bars now have a new light grey border, and when you hover, it will be marked with a darker one to clearly indicate which one you are hovering over. The picture above illustrates the Commitment Bars, but the same applies to the Schedule Bars as well.
When selecting one of these bars, a blue and thicker border will display along with opening the Voyage drawer:
The blue border will stay active on the board until you do another action. The picture above illustrates the Commitment Bars, but the same applies to the Schedule Bars as well.
This border also displays and stays active when creating a new voyage and with the use of drag & drop of the bars.
Budgets
Budgets
The Budgets module supports annual voyage planning. Rather than working with fixed voyages, budget planners build a view of the fleet's expected activity for a given year: which trades the vessels will run, how often, at what freight and cost levels, and what the resulting P&L looks like in aggregate. This planned view is kept separate from the operational voyage record and can be revised or branched into multiple versions without touching live data.
The module is found under Planning in the main menu.
Note: Access requires the Budget Viewer or Administrator role.
What the Budgets Module Contains
A budget is built from a small number of building blocks:
Building block
Purpose
Template voyages and their occurrences are only accessible from the Budgets module. They are not visible in the main voyage lists used by operations.
A budget scenario is the container for one version of the plan. Having multiple scenarios makes it straightforward to maintain several sets of assumptions in parallel and switch between them for comparison.
Common uses for multiple scenarios include:
Comparing a conservative and an optimistic freight rate outlook for the same year.
Keeping an original approved budget alongside a revised mid-year forecast.
Creating a working draft for next year while the current year's budget remains intact.
Each scenario has a Scenario Name and a Budget Year, and the combination must be unique. The display name in VMS follows the format "Budget Year Scenario Name", for example "2027 Base Case".
The active scenario is selected from the scenario selector at the top of the Budgets module. Switching scenarios refreshes all tabs to show that version's data.
Speed & Consumption
Open the Vessels module in the core menu in the top left corner.
Find your selected vessel.
Access Speed and Consumption data from the top tab menu. This page provides tools for precise vessel consumption configuration:
Scheduler & Comparing Scheduler Board
After selecting a scenario (and a comparing scenario), the scheduler board gives users an overview of the voyages that needs to be scheduled. It shows unallocated, allocated and nominated voyages. The allocated and nominated voyages can be viewed on the bottom half of the board, Schedule, while the unallocated voyages can be viewed on the top half, Commitments.
The board is interpreted similar to a Gantt schema, with the column headers being dates and the row headers being COA and SPOT for the Commitments section and vessel names for the Schedule section. The red vertical line indicates today's date.
Commitment bars can found in the Commitments area and contain information about an unallocated voyage including Charterer, Laycan datesandCommodity. The ballast port and first loading port of a voyage can be found to the left of the bar, and the last discharging port to the right. The laycan period can also be viewed on top of each bar (see picture in Scheduler Bars below).
Open Positions Board Actions
In the Open Positions Board you can drag and drop voyages to allocate or unallocate them, move them between vessels and change their order on a vessel.
Click any voyage card to open the and access additional information and actions.
You have a large variety of filters available on the board. Filtering for Voyage Commitments (left-most column) and Allocated Voyages (rest of the columns) is separate. Filtering is persisted when navigating between the boards as well as when navigating to different menu items.
Each of the unallocated voyage cards now have a new light grey border, and when you hover, it will be marked with a darker one to clearly indicate which one you are hovering over.
When selecting
Bunker prices, exchange rates, various costs and revenues, and cargo ports that feed into the budget P&L calculations. These are listed for easy Bulk Editing in the dedicated tabs of the Budgets module.
Budget Scenario
A named version of the budget typically for a given year. All other data lives inside a scenario. Multiple scenarios can exist for the same year.
Template Voyages
The recurring voyage/trade definitions that make up the budget. Each template voyage represents one type of voyage the vessel is expected to run, with its route, cargo, and cost and revenue assumptions.
Budgeted Voyages
Lightweight records that place planned occurrences of a template voyage onto the budget timeline. A Budgeted Voyage holds a start date and laycan; all trade details are inherited from the template.
Versioning with Budget Scenarios
Only users with the roles Budget Viewer or Administrator have access to the Budgets module.
Supporting data
Select/Deselect vessels in the Select Vessels dialog.
Click Confirm.
You cannot use Delete or Edit Scenario Name for the MASTER scenario, since this is the on-going plan connected to all other VMS functionalities.
Deleting a scenario removes it from the database. There is no recycle bin or a way to retrieve a deleted scenario.
Main Details tab
Vessels tab
Add / Remove Vessel
Read about the new Comparing Scenarios functionality here!
Main Details Section of Scenario Drawer
Define the consumption of boilers and generators for main and auxiliary engines.
Override the default consumption for a bunker category during ballast or laden passages.
Identify the default ballast and laden speed and consumption.
Specify the bunker categories used by the vessel.
Figure 2. Ballast and Laden passages
The top two cards display the Ballast and Laden speeds (see Figure 2) along with their corresponding fuel consumption for the selected vessel. These cards also allow specifying different consumption values for any bunker category. This configuration is used as the default for all voyages of the vessel, but it can be adjusted for each voyage in the Voyage module.
A new passage configuration can be added by clicking the + icon. The added options will also be available in the Voyage module for all voyages of the vessel.
For example, the vessel shown in Figure 1 has the following configuration:
There are three Ballast consumption options for this vessel:
ECO: 24 MT/day at 11 knots for any bunker category
WTR: 27 MT/day at 12 knots for any bunker category
FULL: 27 MT/day at 12 knots for any bunker category (selected)
For the FULL speed category, the consumption for the LS MGO bunker category is 23 MT/day at the same speed. Figure 3 illustrates how the Ballast Passage speed and consumption are configured in the create modal.
Figure 3. Ballast Passage Speed configuration
There are three Laden consumption options for this vessel:
ECO: 9.5 knots at 25.8 MT/day for any bunker category
WTR: 9.5 knots at 27.5 MT/day for any bunker category
FULL: 11 knots at 27.5 MT/day for any bunker category (selected)
Figure 4. Boilers and Generators
These sections specify the default parameters for extra consumption in port or at sea passages by FO and MGO. The defined consumption will be used for voyages created with this vessel but can be overridden for each voyage in the voyage module.
Field Name
Description
Additional notes
FO Port Idle (boiler)
Voyage FO Port Idle = generator FO Port Idle + boiler FO Port Idle. For the main engine bunker category, estimates idle consumption between ARR–BRT, extra days, and UBRT–DEP as duration × FO Port Idle.
Also used to calculate BRT–UBRT interval consumption for not loading, discharging, or ship-to-ship port calls.
FO Port Working/Discharging (boiler)
Voyage FO Port Working/Discharging = generator FO Port Working/Discharging + boiler FO Port Working/Discharging. For the main engine bunker category, calculates working consumption per cargo port (for tankers: discharging ports only) as loading days × FO working/discharging.
“Discharging” applies only to tanker discharging cargo ports. For other vessel types, “Working” applies to all cargo ports.
Used for the BRT–UBRT loading interval only when loading, discharging, or ship-to-ship port calls.
Figure 5. Bunker Categories
You can customize the default bunker categories used by the vessel and determine the order in which they are applied.
For example, for an Open Loop vessel it may be allowed to use FO, FO LS, and LS MGO in North America. If the vessel has no specific configuration, Dataloy will prioritize FO as the default option. However, this can be changed by defining Vessel Bunker Categories and assigning LS MGO priority 1 and FO priority 2*. In this case, Dataloy VMS will compare the bunker categories allowed in the area with the vessel’s configured categories and select the highest-priority match - in this scenario, LS MGO. If the vessel is configured without a bunker category allowed in a specific area, the first-priority bunker category defined for that area will be used.
The bunker category priorities can be adjusted using the “Re-sequence” function located in the top-right corner of the Bunker Categories section.
Figure 6. Air Emissions
Allows you to specify emission factors for bunker categories, including Carbon Dioxide, Nitrogen Oxide, Particulate Matter, Sulfur Oxide, and Carbon Monoxide. These factors will be used in emission calculations for all voyages of the vessel.
How to locate vessel Speed & Consumption information?
Overview
Example of vessel configuration
Ballast and Laden Passage Speed
Speed categories allow users to define custom tags (such as ECO, WTR, and FULL) to categorise different speed and consumption profiles. They are used for classification and selection only and do not affect calculation logic.
The available categories and their definitions are configured by your organisation’s administrator and can be managed in the Master Data → Speed Categories module.
Boilers and Generators overview
Bunker Categories
Important notice: Changes to vessel bunker categories will affect allopen voyages for that vessel. If the selected vessel categories do not align with the consumption data on existing voyages, both consumption categories and emission calculations may change. Modify vessel bunker categories carefully and consider the voyages that may be affected by the update. Close any voyages that you do not want to be affected by this change.
Air Emissions
When hovering over a commitment bar, a tooltip will pop up with additional information about the voyage. See tooltip picture under 'Scheduler Bars' section.
Scheduler bars can be found in the Schedule section and contain information about either allocated or nominated voyages, containing Reference No, Voyage Status, first Load Port and last discharge port. If the Laycan dates have been set, a Laycan indicator can also be viewed on a schedule bar. A timeline of the ballast and port calls can be viewed on top of each bar:
Schedule Bar
When hovering over a scheduler bar, a tooltip will pop up with additional information about the voyage:
Schedule Bar Tooltip
New update(s) to the tooltip:
Voyage Status chip has been added to top-right tooltip
Extra dividers around Laycan dates
TCE has been added in-between Commodity Class and Quantity
After selecting a comparing scenario, you will be displayed doubled vessel rows in which the two scenarios selected contains some scheduled voyages each; the dark blue scheduled voyages belongs to the first selected scenario, while the darkgrey scheduled voyages to the second selected scenario (i.e. the comparing scenario):
Comparing of 'MASTER' scenario versus '2025 scenario' scenario
Otherwise, it will show one row per vessel. Moreover, you can select which vessels and/or areas to filter on. You can at any point go back to the original Scheduler view by removing the comparing scenario (clicking 'X' in the second selector), in which case, the Commitments section will reappear:
Remove the comparing scenario
By hovering over each of the scheduled voyages, you will get a similar tooltip as mentioned above under "Scheduler Bars'.
Remember to read here regarding selecting a scenario and a comparing scenario!
Commitment Bars
Tooltip
Commitment Bar
Scheduler Bars
Tooltip
More additional information on the voyage and its cargos are displayed in the voyage drawer. This can accessed by clicking on a commitment- or schedule bar.
Comparing Scheduler Bars
Click to read more about .
Click to learn more about the unique or.
one of these cards, a blue border and thicker border will display along with opening the
Voyage drawe
r:
Selecting an unallocated voyage
We have here as well now added a new light grey border, and when you hover over it, here too it will be marked with a darker one to clearly indicate:
Hovering Over An Allocated Voyage
When selecting one of the allocated voyages here too, the same type of blue border will display: along with opening the Voyage drawer as well:
Selecting An Allocated Voyage
Now when you hover over a Vessel Open Position card, it displays a darker grey tone on its border:
Vessel Open Position Card in Hover State
When you select the card, the border becomes the same blue active border as previously mentioned, along with opening the Vessel Open Position drawer:
Vessel Open Position Card in Active State
This border will stay active until you do another action on the board.
At the top right of the board, click on Settingsto open the settings window.
You can select the number of columns to show in the board either by moving the slider or by typing in a number.
You can select the number of ports to show in the port call timeline either by moving the slider or by typing in a number. The ballast, first loading and last discharging ports are always visible.
The column grouping decides which column a card should go into. The default setting is to group by vessel, but you can also select load area or discharge area. The area groupings depends on the selected area report under account preferences.
The row grouping setting decides how the cards are grouped vertically. By default there is no row grouping. You can also select to group by month or week.
Actions
Filtering
You can read more about the actions here: Voyage Actions.
For both the unallocated and allocated voyages, the blue active border will stay active on the board until you do another action.
This border also displays and stays active when creating a new voyage, and with the use of drag & drop of the allocated cargoes and/or the unallocated voyages.
Vessel Open Position Cards
These highlights are also visible on the and the as well.
Settings
Number of Columns
Number of Displayed Ports
Column Grouping
Row Grouping
Other general actions, you can see:
Categories
Comparison comment
Tooltips
Split fields and contextual rows
Editing the voyages
Table header for a comparison with three different voyages, and a button to add new voyages to the comparison.
For Spot voyages, "Other Voyage Costs" is defined as the sum of Despatch, Handling Cost, ILOHC and Various Cost.
A split field displaying a 1.25% address commission (left), and a 1.25% broker commission (right).
A contextual row, displaying a different number in the cell for each column. In the left-most column, a spot voyage showing freight. In the right-most column, a TC voyage showing hire.
Drag & Drop
You can read more about the actions here: Voyage Actions.
Inside a chosen scenario, you will be able to create newvoyages based on the vessels available. Next to each of the vessel names, there is a icon. In each of these, you can create a new voyage based on that vessel.
You can read more here to learn about the different types of voyages to create: Create New Voyages.
Main Actions:
Scenarios:
Actions that are only available for MASTER, and not in a specific scenario, are marked with "(only MASTER)" below.
Drag & Drop Features:
In Open Positions Board: to allocate or unallocate a voyage, you can drag and drop the different voyage cards between the VoyageCommitments column (the unallocated voyages) and the different vessels displayed.
In Scheduler Board: to allocate or unallocate a voyage, you can drag and drop the different voyage bars between the COA and SPOT row (the unallocated voyages) and the different rows of vessels displayed. s
In Cargo Management board: to allocate or unallocate a voyage, you can drag and drop the different voyage cards between the different vessels displayed.
In the secondary actions menu (3 dots), it's possible:
To edit a Voyage Reference
To nominate a voyage, or cancel its nomination (only MASTER)
To allocate or unallocate a voyage (only MASTER)
You can filterunallocated voyages based on Voyage, Vessel, Trade and More.
More containing Commodity, Charterer, Trade, Commodity Class and Cargo Type.
You can filter the allocated voyages based on Voyage, Vessel, Area and More.
You can filterunallocated voyages based on Charterer, Cargo, Trade and Area.
More containing Vessel name, Vessel Type, Trade and Business Unit.
You can filterSchedule voyages based on Vessel, Voyage and Area.
You can filter the voyages based on My Voyages, Vessel, Reference Number, Voyage Status, Ballast, Load Port, Discharge Port and Trade.
You can sort the voyages based on Ballast Port, Charterer, Commodity, Reference Number, Trade, Vessel, Voyage Status and Created Date.
You can use the master to filter through larger date periods.
Capacity Plan
The capacity plan gives you a monthly overview if your fleet is over- or underbooked with cargoes. For each months and each trade, we compare the available cargoes to the capacity in your fleet which is serving that trade.
You can navigate between the current month and future months at the top of the dashboard. You can also filter to restrict the view to a particular set of trades.
The are three summary cards at the top displaying information on all trades selected in the filter:
Free capacity: Total deadweight - total weight
Copy Scenarios
Inside a scenario drawer, you have a primary action for copying a scenario:
Then, a 3-stepper modal will show up and give you access to define what vessels, voyages and cargoes of that specific scenario you want to copy over to the "new" scenario. Firstly, you will be given the option to choose a name for the copied scenario:
By default, the "Copy of original scenario name" will be added at the input, until you decide for another name. Each of the scenario names should be unique to avoid duplicates in the system (there is a validation check for this when typing). Moreover, you can step through the modal to specify further:
FO Tank Cleaning
Adds main engine bunker category cleaning consumption at BRT as cleaning days × FO tank cleaning.
Added only to the first loading port call.
Cleaning days are set at the voyage level.
FO Cargo Heating
Adds main engine bunker category heating consumption at BRT as heating days × FO Cargo Heating.
Added only to the first loading port call.
Heating days are set at the voyage level.
Loading Consumption
For the auxiliary engine bunker category, estimates working consumption for each loading cargo port as loading days × loading consumption.
Calculated only for cargo ports where “Calculate Working Consumption” is enabled.
Available only when the voyage vessel type is “Tanker.”
FO Port Idle (generator)
Voyage FO Port Idle = generator FO Port Idle + boiler FO Port Idle. For the main engine bunker category, estimates idle consumption between ARR–BRT, extra days, and UBRT–DEP as duration × FO Port Idle.
Also used to calculate BRT–UBRT interval consumption for not loading, discharging, or ship-to-ship port calls.
FO Port Working/Discharging (generator)
Voyage FO Port Working/Discharging = generator FO Port Working/Discharging + boiler FO Port Working/Discharging. For the main engine bunker category, calculates working consumption per cargo port (for tankers: discharging ports only) as loading days × FO working/discharging.
“Discharging” applies only to tanker discharging cargo ports. For other vessel types, “Working” applies to all cargo ports.
Used for the BRT–UBRT loading interval only when loading, discharging, or ship-to-ship port calls.
FO At Sea
Additional consumption added to the main engine at-sea voyage consumption.
Used together with the selected speed’s consumption.
FO Inerting
Adds main engine bunker category inerting consumption at BRT as inerting days × FO Inerting.
Not available on TC In.
Added only to the first loading port call.
Inerting days are set at the voyage level.
MGO Port Idle
For the auxiliary engine bunker category, calculates idle consumption between ARR–BRT, extra days, and UBRT–DEP as duration × MGO Port Idle.
Also used to calculate BRT–UBRT interval consumption for not loading, discharging, or ship-to-ship port calls.
MGO Port Working/Discharging
For the auxiliary engine bunker category, calculates working consumption per cargo port (for tankers: discharging ports only) as loading days × MGO working/discharging.
“Discharging” applies only to tanker discharging cargo ports. For other vessel types, “Working” applies to all cargo ports.
Used for the BRT–UBRT loading interval only when loading, discharging, or ship-to-ship port calls.
MGO at Sea
Additional auxiliary engine consumption at sea. Example: when burning FO + LS MGO at sea, FO is the primary consumption outside ECA, and LS MGO is added using this field and the at-sea distance.
Used together with the selected speed’s consumption.
MGO Inerting
Adds auxiliary engine bunker category inerting consumption at BRT as inerting days × MGO Inerting.
Not available on TC In.
Added only to the first loading port call.
Inerting days are set at the voyage level.
Figure 1. Vessel speed and consumption configuration
Deadweight: Total deadweight of vessels loading in the selected month
Weight: Total weight of cargoes with laydays commencement in the selected month.
For free capacity and weight, we distinguish between total values and fixed values. The latter takes only cargoes into account which have status "Clean Fix".
Category
Status
Not Fixed
Indication
Firm Offer
Working
On Subject
Fixed
Clean Fix
Summary
Description
Values
Free Capacity
Remaining deadweight tonnage
summing all vessels and cargoes
Total: Deadweight - total weight
Fixed: Deadweight - fixed weight
Deadweight
An expandable panel is shown for each trade, with totals for that trade. There are two lists inside the panel, one for cargoes by charterer and one for vessels.
In each trade panel there is a list of total cargo weight and volume grouped by charterer. Only cargoes where laydays commencement lies in the selected month are counted.
All "fixed" charterer cargo totals are listed first, while "not fixed" entries come second and are indicated in grey.
Column
Description
Charterer
Name of the charterer
Weight (MT)
Total cargo weight in metric tons
In each trade panel there is a list of vessels. For each voyage in the master fleetplan, the vessel that voyage is allocated to is listed if the following two criteria are met:
The voyage is marked with this trade or its performance cargo belongs to the trade.
The voyage has arrival date in the first load port within the selected month.
Column
Description
Vessel
Name of vessel
DWT
Deadweight of the vessel
Overview
Trade panels
Cargoes by charterer
Vessels
A list of pre-selected vessels of the original scenario that you want to copy from will show. You will have the option to un-check unwanted vessels for the "new" scenario as well. The list contains of vessels, which includes their allocated voyages and cargoes, from the selected scenario, and is sectioned by the vessel itself and its vessel type.
You can filter by:
My Vessels
Vessel
Vessel Type
When copying the MASTER scenario, only the future allocated voyages with their cargoes for the specified vessels are copied
The checked vessels are persisted throughout the modal
You are able to click the "Next" button even if you have selected zero vessels
Step 2 of the Copy Scenario Modal
A list of pre-selected voyage commitments of the original scenario that you want to copy from will show. You will have the option to un-check unwanted voyages for the "new" scenario here too. The list contains of all the unallocated voyages, which includes their cargoes (both non-template), from the selected scenario. It's sectioned by reference number, voyage status, trade, start- and end dates, ballast-, load- and discharge ports.
You can filter by:
Voyage
Reference Number
Voyage Status
Vessel
Name
Type
Area
Loading
Discharging
More
Commodity
Charterer
The checked voyages are persisted throughout the modal
You are able to click both the "Back" and "Next" buttons even if you have selected zero voyages
Step 3 of the Copy Scenario Modal
A list of pre-selected cargo commitments of the original scenario that you want to copy from will show. You will have the option to un-check unwanted cargoes for the "new" scenario here as well. The list contains of all the unallocated cargoes (non-template) from the selected scenario, and is sectioned by cargo reference, cargo status, cargo type, load- and discharge ports, charterer, cargo quantity, commodity and trade.
You can filter by:
Charterer
Cargo
Commodity
Commodity Class
Cargo Type
Trade
Area
Loading
Discharging
The checked cargoes are persisted throughout the modal
You are able to click both the "Back" at any time
You are able to click the "Copy" button if you have selected at least one item, whether it's a vessel, voyage or a cargo
Customise Columns Action Icon
All of the table lists in the Copy Scenario modal also have thecustomise columns feature, that have now been added to most of the lists in VMS.
The Cargo Management Board displays all allocated voyages and the cargos allocated to them. It also shows the unallocated cargos in Cargo Commitments column. For details on the Vessel Open Positions, voyage cards and board settings, see Open Positions Board.
Board Layout
The Cargo Management Board displays all cargos belonging to the selected scenario. In the left-most column, we display the unallocated cargos (Cargo Commitments column), which are cargos that have not yet been allocated to a voyage. The other columns display voyage cards with the cargoes allocated to them.
Unallocated Cargos
Unallocated Cargo Card
Each cargo contains the fields:
Reference
Fields
The right side of the Cargo Management Board contains all the allocated voyagesand their cargos. On the right side of a voyage card, the cargo cards allocated (or dragged) to the voyage are displayed. Each cargo displays the Charterer, Gross Weight and Cargo Status, while illustrating graphically the Load Ports and Discharge Ports. These cargos can be moved by dragging and dropping between the voyages of the same Trade:
The Additional ports icon indicates how many more ports are "hidden" on the voyage. You can use the tool to adjust them accordingly.
The Cargo Cards also has indication lines to help you interpret the Laydays and Arrival Windows for each cargo, graphically.
Laydays: indication line at the top of the cargo.
Arrival Window: indication line at the bottom of the cargo.
Color indicator:
if early: blue
if late: red
if on time: normal / no color
By hovering over a cargo card or on a port call row, a tooltip can be viewed. Fields in the tooltip that contain no data are hidden:
Note: for TC voyages, the 'First Load Port' and 'Last Dis. Port' is replaced with 'Delivery Port' and 'Redelivery Port'.
The following fields are available within the cargo card- and port call tooltips:
Arrival Window From and To dates and Missed By Label
Quantity and Measurement Unit
Commodity
Quantity Option Terms (%)
Quantity Option
Comment (Field Comment in the Cargo Drawer)
1
Charterer
2
Cargo Reference
3
Cargo Booking Status
4
Trade
Charterer
Quantity Loaded
Load and Discharge Ports
Quantity in Transit
Cargoes on the Voyage Card
With this newer design of the cargos on the voyage card, you will be able to graphically see at what ports a cargo has its Load- and Discharge ports. You can easily track all the Port Call rows of the cargo by looking at the vertical span of the specific cargo (the blue area). It is also possible to scroll to the right to see all the cargoes allocated on the same Port Calls. If the ports are "hidden", they will display as shown above.
The board has two main areas- unallocated voyages (Voyage Commitments) on the left, and allocated voyages on the right.
Each element in the board represents either a voyage (unallocated), a voyage with cargo(s) (allocated), a vessel, a vessel open position card or a last port call card.
Vessel Open Position Card
Vessel Open Position Card
We call the yellow card on the vessel columns the vessel open position card. It displays the start of the schedule of each ship that is displayed on the board. You can click on the card to open the vessel open position drawer. For any scenario that is not the MASTER, you can edit the port and date of the vessel open position. This changes where your ship starts in the scenario and reschedules the consecutive voyages.
Voyage Card
Unallocated Voyage Card
In the Voyage Commitments column, the left-most column of the board, we have a list of Unallocated Voyages with a new design:
Reference
Fields
Header
Reference
Fields
Port Call Timeline
The Allocated Voyages Card also contains a detailed timeline:
On the left side of the Voyage Card, all the arrival times are listed. The date and time listed for the Ballast Port is the voyage start date. On the right side of the timeline, the port names are listed, including the Ballast Port. The total cargo gross weight on board after the port call is listed under the port name.
Number of Displayed Ports
It is possible to change how many ports are listed at a time by using the settings. The minimum amount of ports that can be displayed is 3, the Ballast Port, the first load port and the last discharge port of a voyage. The number in the blue circle indicates how many ports are hidden.
For each vessel we have a card with information about when it is next available. This can be found after the last voyage in a vessel's schedule.
Reference
Fields
Cargo Management Board Actions
Open Cargo Drawer
It is possible to access the cargo drawer by clicking on any allocated voyage in any of the boards/lists in FAS (or outside), and then opening the 'Cargo' tab. Also, in the Cargo Management Board, you can access the cargo drawer by clicking on a cargo commitments to the left, or directly on an allocated cargo on the right (on the allocated voyages).
Creating a Cargo
Inside a chosen scenario, you will be able to create newcargoes in FAS based on allocated or unallocated voyages.
Create Unallocated cargoes
In the Cargo Management Board, next to the Cargo Commitment title, there is a icon. Here, you can find all the different types of cargoes to create, and their modals. Follow the same steps as to create a new cargo. The new cargo will be placed in this Cargo Commitments column based on the given Laydays. If not given, then they will be placed at the bottom of the list.
On any allocated voyage in FAS (or ), you can find the 'Cargo' tab at the top of the voyage drawer. Above the cargo list, there is a icon there. Also here, you can of cargoes, and display their modals. But- there is a new design here as well:
Please click on the picture to get better view of the details. The key details are the same as earlier described , but as you can see- there is some difference in the Timeline component this time. On a voyage, we have port calls. These will be matched with the new cargo ports of the cargo you want to create. The CP/PC row marked with 'NEW' contains the new cargo ports that are added from the fields on the left-most section, meaning port calls 'Trondheim' and 'Stavanger' didn't exist before, but are now added. At the same time, we know that 'Bergen' and 'Oslo' port calls existed from before, so if you want to add a cargo port 'Oslo', it will now be directly linked to the port call (and the 'NEW' icon is not displayed). Read more about the drag and drop features and the new Create Cargo Port modal down below.
Cargo Commitments Column
Each of the unallocated cargo cards now have a new light grey border, and when you hover, it will be marked with a darker one to clearly indicate which one you are hovering over.
When selecting one of these cards, a blue border and thicker border will display along with opening the Cargo drawer:
Allocated Cargoes
Along with displaying the cargo tooltips, we now get a darker shadow on the cargo when hovering over it:
When selecting one of the allocated cargoes, a blue border will display here as well, along with opening the Cargo drawer:
On the allocated cargoes mentioned above, you will have drag and drop options on both sides of time timeline. On the left side, you will be able to drag a cargo port to match with a corresponding port call, but they both have to have the same reason for call. On the right side, you will be able to drag the whole CP/PC row to change the order in these ports on the voyage. The same features are implemented in the new Create Cargo Port modal:
Read about the new Create Cargo Port modal for unallocated cargoes .
In Open Positions Board: to allocate or unallocate a voyage, you can drag and drop the different voyage cards between the VoyageCommitments column (the unallocated voyages) and the different vessels displayed.
In Scheduler Board: to allocate or unallocate a voyage, you can drag and drop the different voyage bars between the COA and SPOT rows (the unallocated voyages) and the different rows of vessels displayed.
In the secondary actions menu (3 dots), it's possible:
To unallocate a cargo (unless it's already unallocated)
To allocate a cargo
To delete a cargo
You can filterunallocated cargoes based on Charterer, Cargo, Trade and Area.
You can filter the allocated voyages based on Voyage, Vessel, Area and More.
More containing Commodity, Charterer, Trade, Commodity Class and Cargo Type.
You can filter the cargoes based on Cargo Reference, Counterpart, Commodity, Vessel, Voyage Reference and Cargo Status. This are placed above the list.
You can sort the cargoes based on Created Date, Cargo Reference, Counterpart, Commodity and Cargo Status, by click on this icon: .
You can also header sort on the cargoes based on all the headers of the list, by click on the arrows: .
Fields on the Unallocated Card, with the Performance Cargo
Fields on the Allocated Voyage Card header, with the Performance Cargo
Port Call Timeline
Last Port Call Card
Charterer
Voyage Reference
Port
In Cargo Management board: to allocate or unallocate a cargo, you can drag and drop the different cargo cards between CargoCommitments column (the unallocated cargoes) and the different allocated voyages displayed.
To relet a cargo
To tranship a cargo
To preship a cargo
To transfer a cargo
To edit Cargo Reference
To connect to CoA
To view the Audit Log
To access or upload voyage Attachments
You can use the master FAS date filter to filter through larger date periods.
You can use the settingsbutton to adjust your view of the voyages.
You can use the master FAS date filter to filter through larger date periods.
Create Allocated cargos
Main Actions
Highlights For The Cargoes
The Active State
For both the unallocated and allocated cargoes, the blue active border will stay active on the board until you do another action.
This border also displays and stays active when creating a new cargo, and with the use of drag & drop of the cargoes.
These cargo highlights are also now combined with the new voyage highlights on this board as well.
Drag & Drop Features in the Timeline
Drag & Drop Features On the Boards
From the Cargo Drawer
The actions applies to both MASTER scenario and other scenarios.