Users
Create Users
Open the Users module in the Setup section.
Click Create New User
 in the top right corner.
Fill in all required fields listed below in the Create New User window.
Click Create.
Required fields
Field
Description
User Code
A short identifier used for logging in
User Name
The user's name that is displayed in the system
Password
Password used for logging in
Email address for notifications
Security Groups
Restricts access to modules and the API
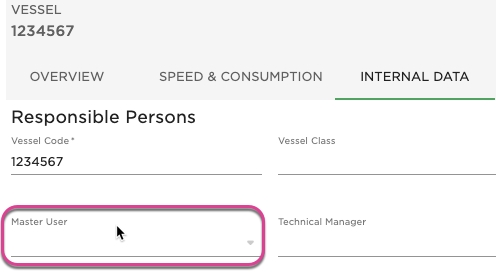
Create a Vessel Master user
As of version Release 5.3 it is possible to introduce crew onboard to the VMS and create an efficient, "one time entry" work process in the system.
The functionality with establishing a master role involves giving them access to only their relevant port calls. In order to establish this filter for the user we need to link their credentials to their particular vessel.
Pre requisite for below is that vessel has been created, user for the vessel has been created with security role "Vessel" (only this security role) and internal data tab should be enabled.
Step 1: Access vessel master data screen and insert vessel user in the "Master User" field as indicated below. This action will link the vessel to the user so that Crew only see their relevant port calls in the VMS
Maintain Users
When you have located a user, click it and the details will show in a panel (so called "drawer") on the right hand side. Details can be maintained directly in the fields.
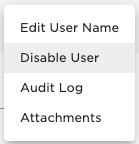
By clicking the secondary actions icon additional actions may be possible.
Edit User Name
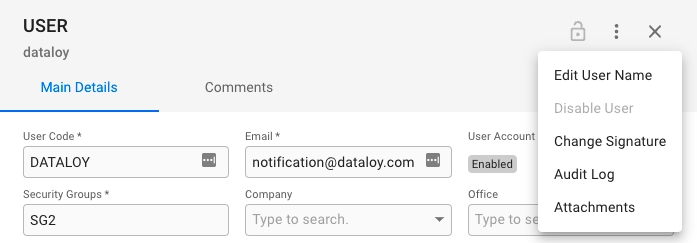
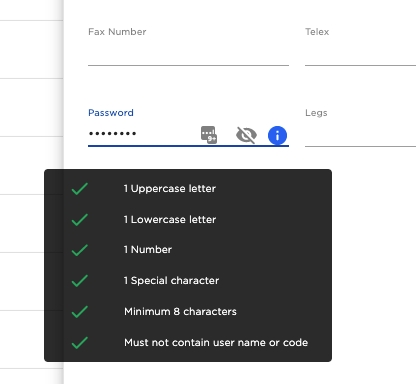
Change User Passwords
Find the user to change password. Locate the password input field and fill in the new password.
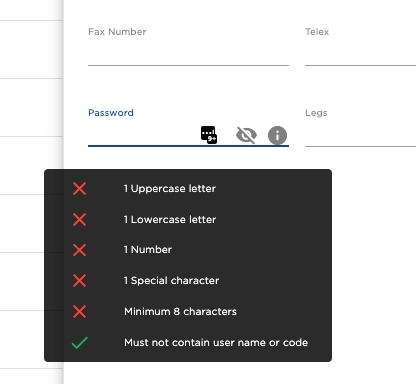
When all the verifications are met, press enter or click outside of the input field to submit, the password will be changed if no notifications are displaying otherwise.
Find Users
Depending on your access permissions the list of users might not be visible.
The "Users" module can be located from the menu under Setup.
There are several sorting and filtering options available for you to narrow down what you include in the list view.
Disable Users
Find the user to disable.
Open the actions menu
 and click Disable User. This will prevent the user account from logging in.
The user can be found again by filtering on Disabled users in the list.
Multi-Factor Authentication (MFA)
Dataloy offers two types of MFA for our customers.
MFA by integrating with the customer's Active Directory (AD) server.
Guardian Multi-Factor Authentication (MFA)
For customers with OAuth 2.0 authentication, in Dataloy VMS, MFA can be set up with Auth0's Guardian app. This is an intuitive MFA solution that is easy to set up and use.
If you are uncertain if your VMS is set up with OAuth 2.0 authentication, please let us know, and we can check it for you. Send an email to support@dataloy.com
Dataloy will enable MFA on the installation/environment level forcing all users to log in using MFA in the environment it is configured for.
Once activated and configured, the users will be sent a "push-notification" that must be approved in the app. Simply click the "Allow" button, and you are securely logged in.
Setting up the Guardian app for the first time:
Log in using the system's "web" login screen.
(The URL for this will be provided in case you use the Java version of the VMS)
Follow the instructions on the screen to install and configure the app.
You will scan the QR code shown on the screen with the app, so camera permissions on the phone must be permitted.
When finishing the set-up, a "push-notification" will be sent to your phone.
Click "Allow" to securely complete the configuration.
Log in to the application:
The Java-based version of the VMS:
Log out of the web-based version, as the configuration is now complete.
Start the system and log into the application as you normally do.
Click "Allow" when asked on your phone, and you are securely logged in to the Java-based VMS.
The web-based version of the VMS:
You are already logged in and can continue your work.
Find Security Roles
Depending on your access permissions the list of Security Roles might not be visible.
Open the Roles module in the Setup section
There are several sorting and filtering options available for you to narrow down what you include in the list view.
Create Security Role
Open the Roles module in the Setup section
Click Create Security Role
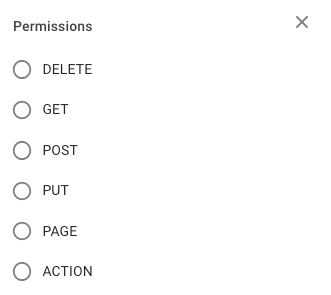
in the top right corner.Fill in the security role name, and select the wanted permissions from the tree.
Click Create.
Within the modal you can find quick filters to easier navigate the tree.
Maintain Security Roles
When you have located a Security Role, click it and the details will show in a drawer on the right hand side. Details can be maintained directly in the fields/tree.
By clicking the primary action icon
 it is possible to make a copy of the selected security role, a
modal will open where you enter the name of the copy.
it is possible to make a copy of the selected security role, a
modal will open where you enter the name of the copy.
By clicking the secondary actions icon (icon = 3 dots) additional actions may be possible.
Edit Security Role Name
Delete Security Role
Security Group Aliases
In the Aliases Tab you can set Aliases to easily synchronise Security Groups and Business Units
To reach the Aliases Tab open a security group drawer and go to to the 2nd tab.

Here you will see a list of the Aliases created and if you have admin permissions you will be able to create more by clicking on the + symbol.
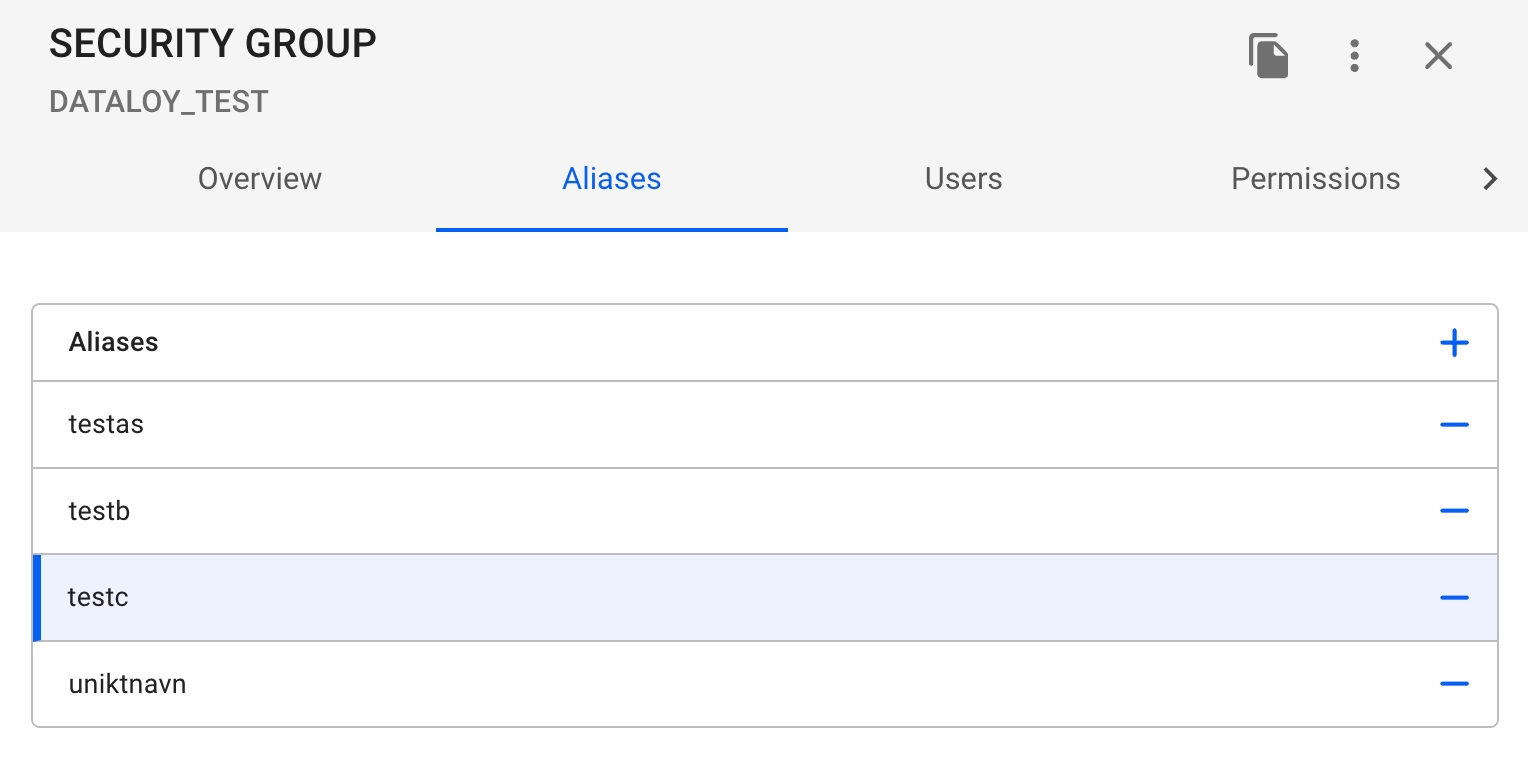
Once an Alias is created you will be able to assign Business Units to it using the drop down menu for each Alias when you click on the "Business Unit" input field.
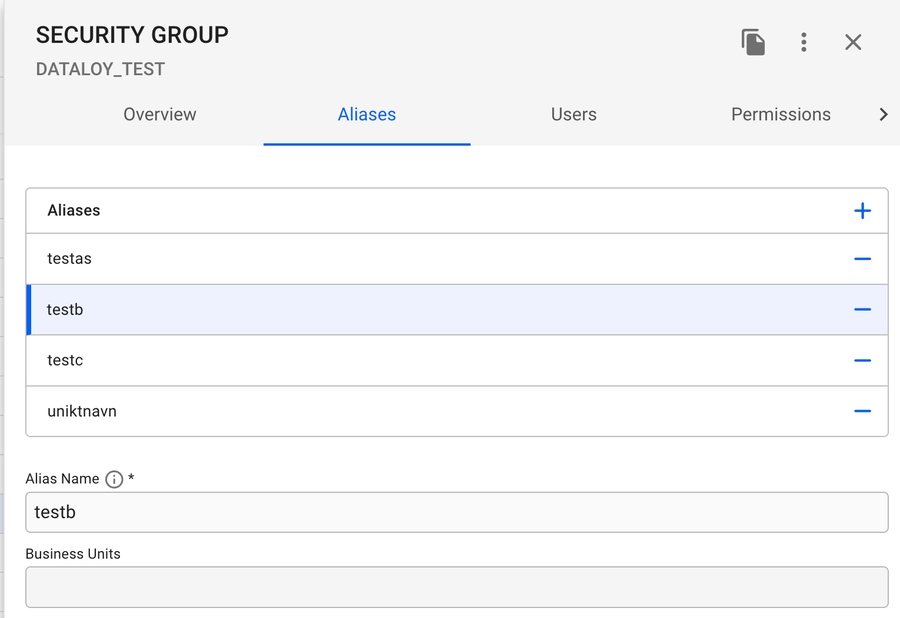
Once selected a drop down menu with all the existing business units will open where you can select one or many business units.
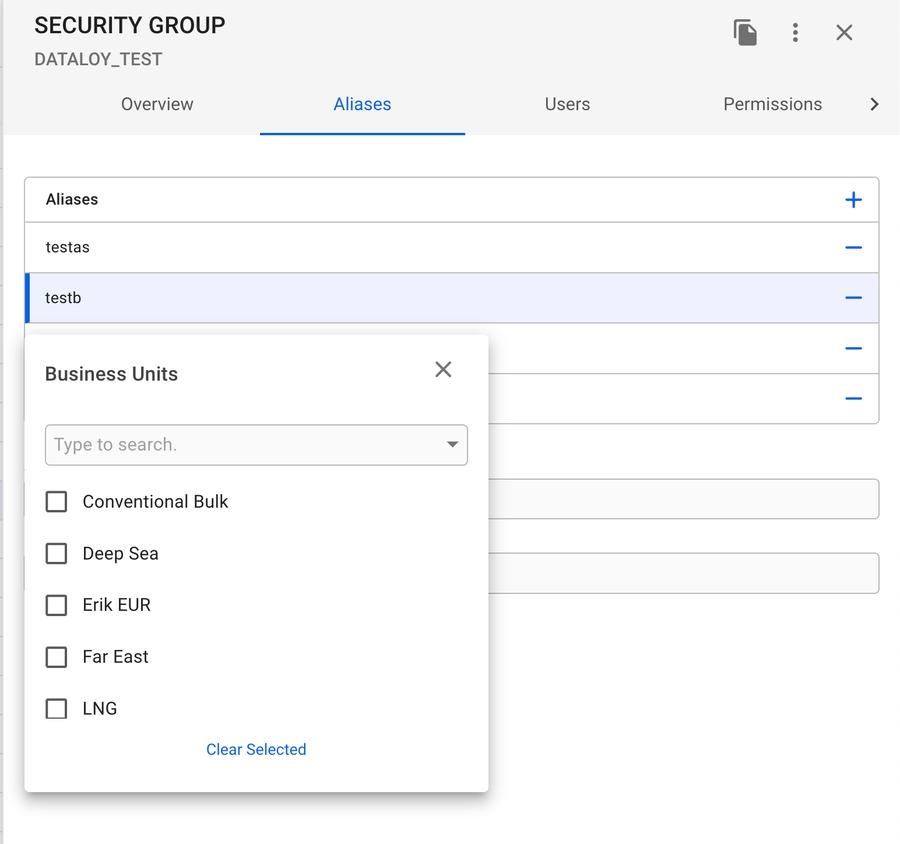
Once selected the business units will appear each time this Alias is selected
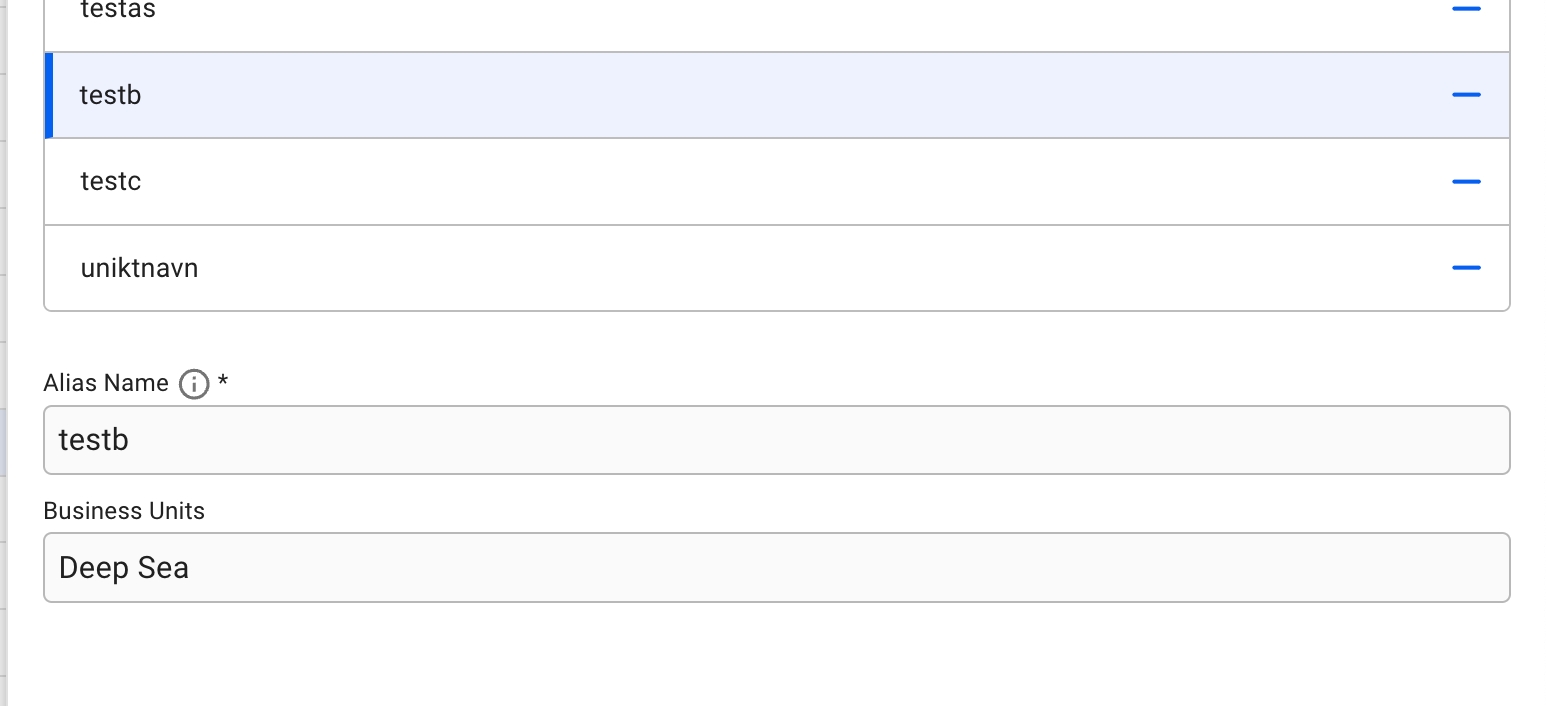
Now each time this security group is assigned to a user (both new and existing) the business units attached to the Alias for this security group will be assigned to that user. Please note the user must log out and log back in for the change to take effect in their browser.
Find Security Groups
Depending on your access permissions the list of Security Groups might not be visible.
Open the Security Groups module in the Setup section.
There are several sorting and filtering options available to narrow down what you include in the list view.
Create Security Group
1) Open the Security Groups module in the Setup section.
2) Click Create Security Group  in the top right corner.
3) Fill in the security group name, and select the wanted roles from the tree.
4) Click Create.
Maintain Security Groups
When you have located a Security Group, click it and the details will appear in a drawer on the right hand side. Details can be maintained directly in the tree.
By clicking the icon
 , it is possible to create a copy of the selected security group, a modal will open where you enter the name of the copy.
 By clicking the secondary actions icon
 , the following actions will be possible,
 Edit Security Group Name
Delete Security Group
System Settings
The System Settings module is available to all users with Administrator role under Setup -> System Settings, or directly through the gear icon ![]() in the top right corner of the screen.
in the top right corner of the screen.
You can then navigate to these tabs:
GeneralInvoicing PreferencesGeneral
Overview
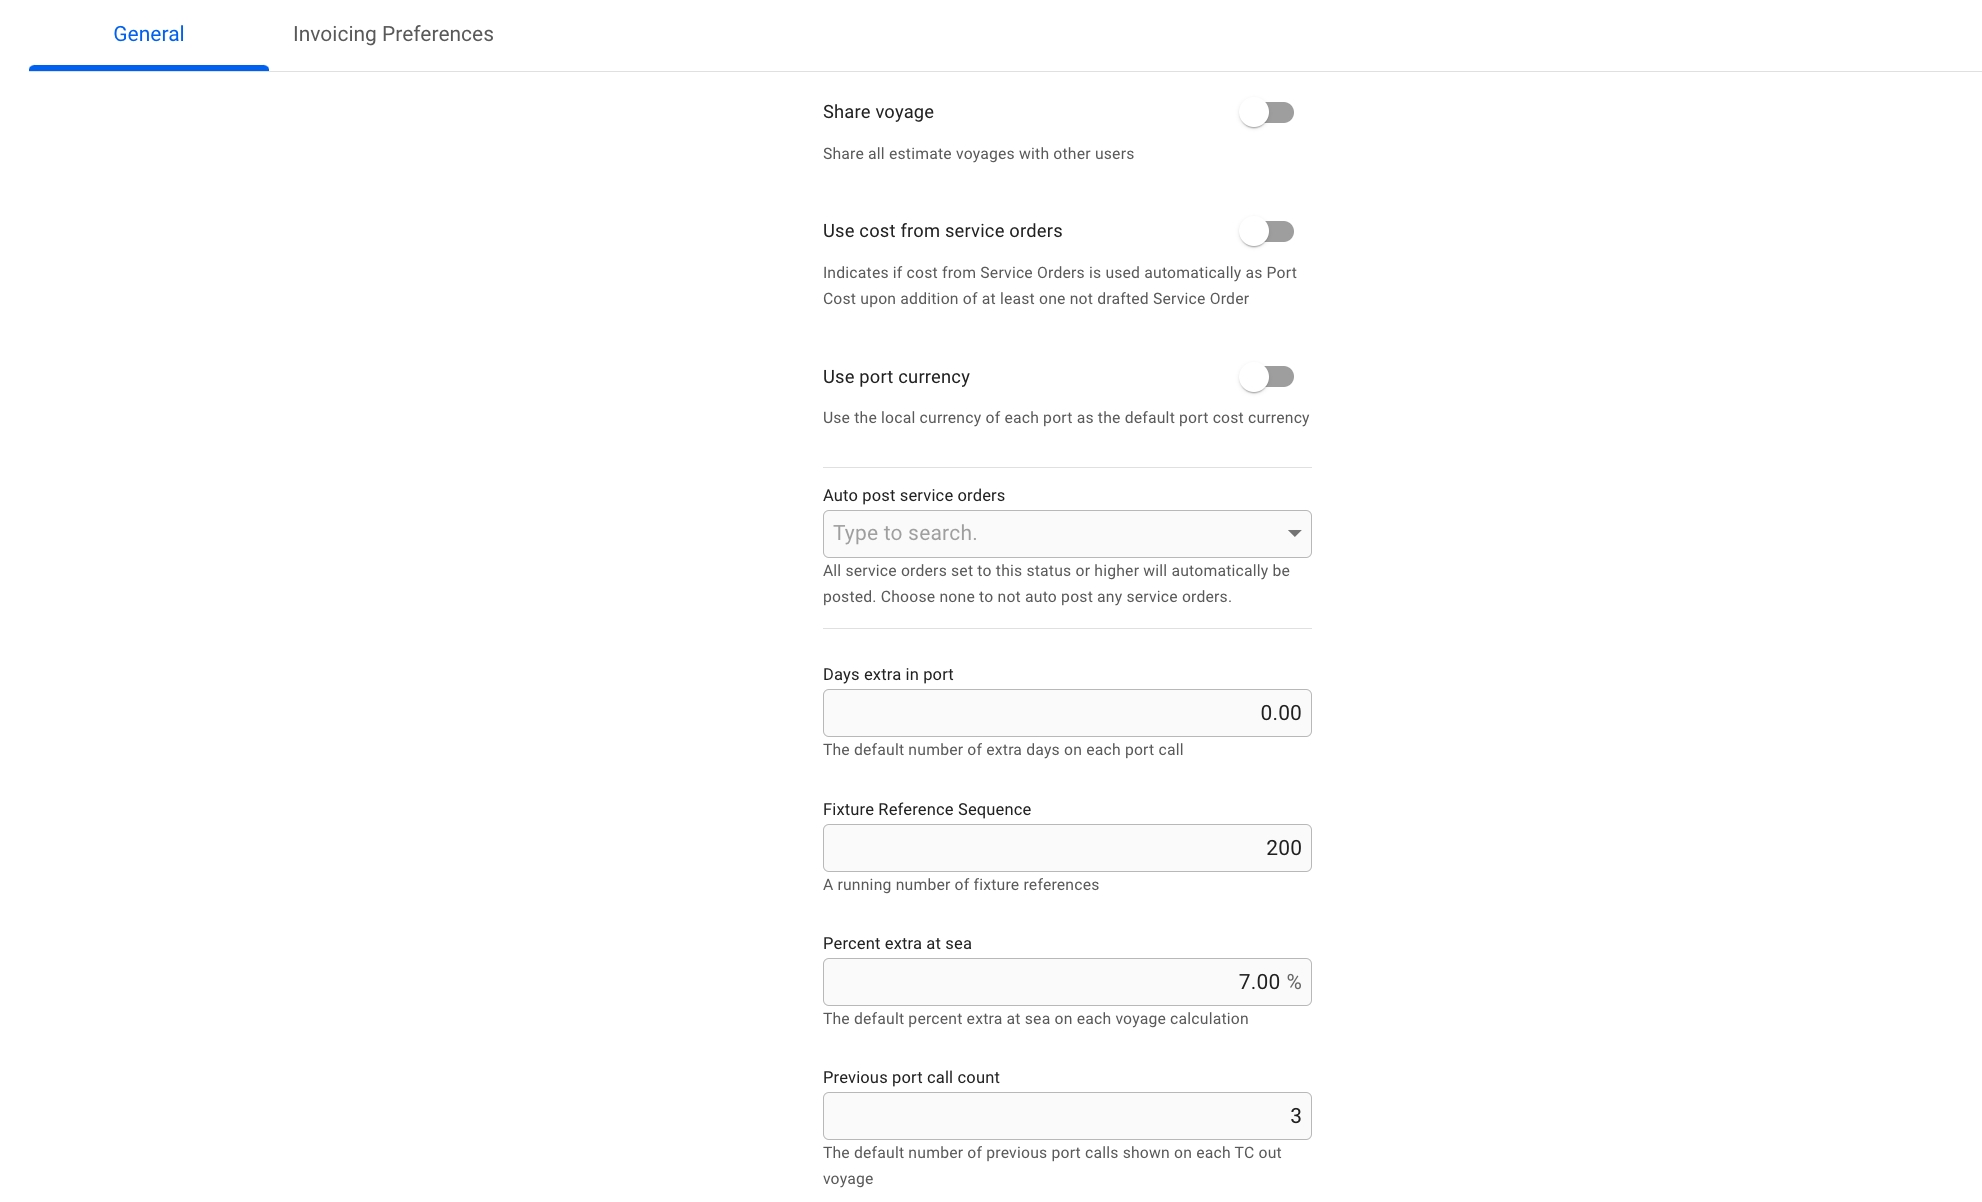
The settings on this page enable administrators to customize default behavior in VMS, e.g. Days extra in port controls the number of extra days automatically added to new port calls. Note that these system settings are applied globally to the environment, which means any change alters the functionality for all users (click for better view):
Breakdown of the available settings
Share Voyage
When the setting is enabled, all estimate voyages may be edited by other users than the creator.
Use cost from service orders
Allows automating the process of filling in port costs. If the option is enabled, the port cost will match the total amount among service orders linked to a port call.
Use new invoice template
Allows you to choose between printing documents using the new invoice template, or the old one.
Use port currency
Automatically sets the port cost currency to the local value. For example, a port call in Bergen will have the currency NOK.
Auto post service orders - a group of settings
The system enforces automatic posting of documents that are created from a service order. For instance, if a service order contains multiple lines and the status of the service order changes to the specified status*, the related document lines will be combined into a posted document. This setting eliminates the need to manually select the service order document lines, assemble them into a document, and then post the document.
*Service order status - indicates the base status for enabling the auto-posting functionality. If a service order is changed to this status or higher, auto-posting will create documents for the existing linked document lines, and future lines.
Default payment term - specifies the default payment term used for auto-posted documents. Required for auto-posting to work.
Default baseline term - specifies the default baseline term used for auto-posted documents. Required for auto-posting to work.
Days extra in port
This setting is used to specify the default number of days extra in port for each new port call.
Fixture reference sequence
A running number used to generate the next fixture reference. Should only contain integer numbers.
Percent extra at sea
Allows defining a value used to set percent extra at sea for each leg in the system.
Previous port call count
Identifies the number of previous port call shown on each TC out voyage.
Invoicing Preferences
In this page, you will find settings related to the invoicing and invoice printout. Below the settings, you can find a section for setting up labels and paths for the different "Selectable Fields" sections; a feature of the new invoice template.
The preferences for the old invoice template which are company dependent and the option to display the company name under the logo, for both templates, can be found on the CompanyInvoicing Preferences tab page.
General invoice settings
Use new invoice template
System will generate invoice PDFs using the new invoice template. This setting is required to be turned on in order to use the Selectable Fields feature.
Settings affecting the new template
Display Total Amount in writing on invoice
Adds a line underneath the invoice total spelling out the currency and amount with words.
Print cargo external reference
Will add the external reference of the Cargo as a new line below the freight line on the invoice
EU Tax Automation
Display an extra sentence on the invoice with Tax / Reverse charge information
Settings affecting both templates
Show Contact Person on Invoice
Displays the person that assembled the invoice in the top right section
Aggregate Commission on Hire Invoice
Aggregate commission line items on hire invoices into a single line
Selectable Fields
In Selectable Fields Below Header section, can choose up to 8 pairs of labels and object paths, while up to 4 pairs in Selectable Fields Below Document Lines section. The position of the labels and object paths are fixed, and can be referenced in the small preview picture in the blue area to the left. You can also read more about the invoice PDF itself here.
If neither label nor object path is filled in, nothing will be printed in that position.
If a value cannot be fetched from the object path, nothing will be printed in that position
If no label is set, but a value can be fetched from the object path, only the fetched value will be printed in that position

Labels
Labels are fixed values for a given position that you can choose yourself, used to describe the value fetched from the object path.
Object paths
Object Paths are paths that describe the Dataloy API data-model, leading from object to object and terminating in a value. The object path starts from the Document object.
For instance, if you want to find and print the name of the vessel for a given document, you would do as follows. A Document have one or more DocumentLines. A DocumentLine is connected to a Voyage, which is connected to a Vessel. A Vessel has a VesselName. The final object path will thus be documentLines.voyage.vessel.vesselName.
To assist with setting up the object path, the Select Field modal is used.
The Select Field Modal
You can open this modal by clicking on the input field itself (which is non-editable), or click on this icon:
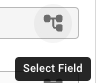
Both options will open up this modal:

Below the title, you can see the word document, which represents the root object of the modal. Meaning, you can search for anything inside the document object, or select one of the fields when scrolling up and down. You will quickly see that each sub-object will open up a new list of new objects again, e.g. Account will open up the possibility to choose Account Code, Account Desc, etc. You can also search on the objects within document > account, or scroll. Most of the valuable data is likely under document > documentLines.
You can also clear the the input field by clicking on this icon:
The icon is not visible until you have chosen a path first.
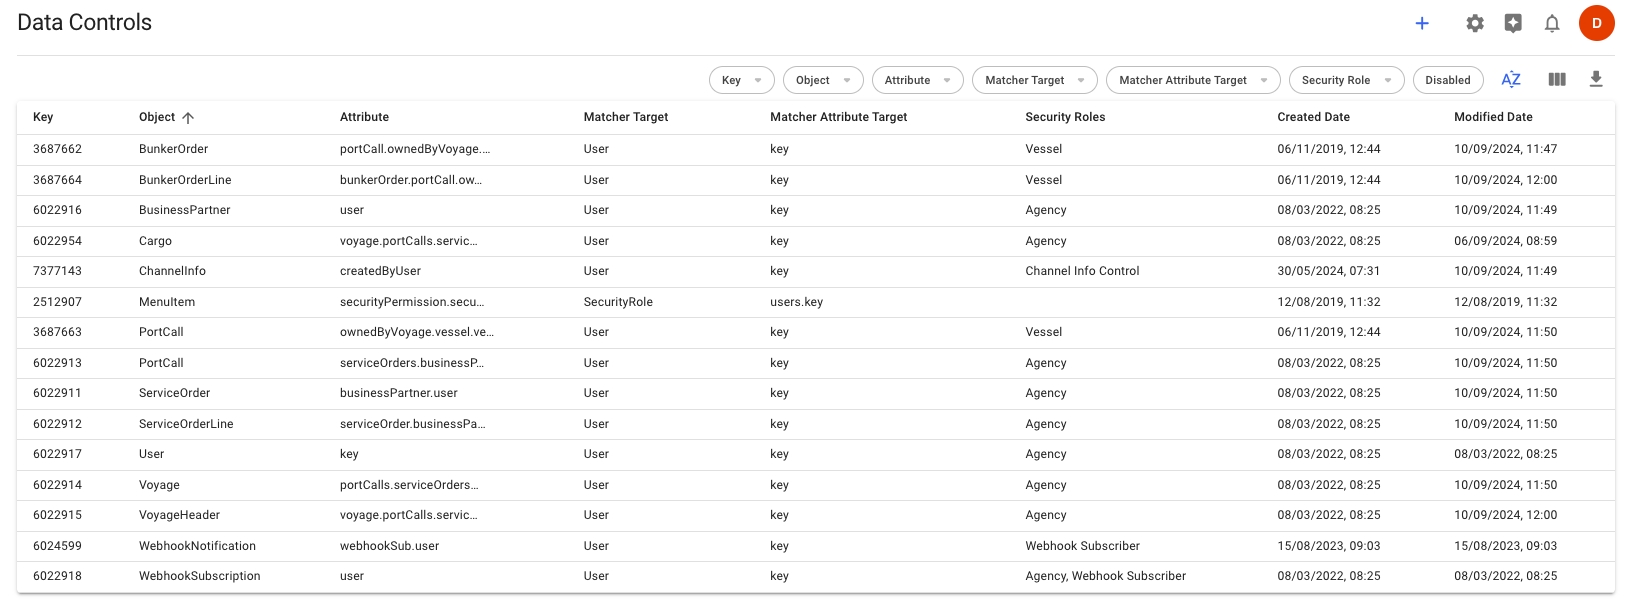
Data Control
Data Controls Module User Documentation
WARNING: The Data Controls module is a powerful feature that significantly impacts data access within the system. Ensure you fully understand its functionality and potential consequences before making any changes. Improper configuration may result in unintended data access or restrictions.
Test new Data Controls thoroughly in a non-production environment before implementing them in the live system.
Overview
The Data Controls module is an administrative tool used for creating and editing Data Controls. These controls manage user access to specific data within the system, such as limiting access to voyages connected with the user's business units.
Accessing the Module
Upon opening the Data Controls module, administrators will see a list of existing Data Controls.
Creating a New Data Control
To create a new Data Control:
Click the plus (+) button above the list of Data Controls.
A modal will appear with the following fields:
Object: The Dataloy object to which the access control will be applied.
Attribute: The attribute name that links the Dataloy object with the target object.
Matcher Target: Defines the Dataloy object to be used as the target object.
Matcher Attribute Target: Specifies the attribute in the matcher target object to be used against the attribute of the object.
Security Roles: A list of Security Roles to which the Data Control will be applied. If none are selected, the Data Control will apply to all users.
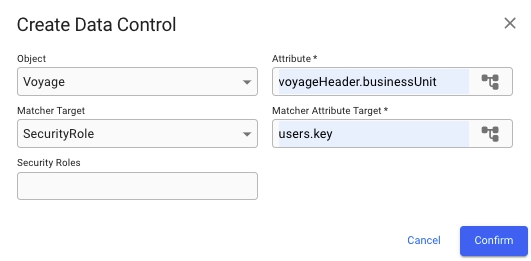
Fill in the required information and click "Confirm" to save the new Data Control.
Editing a Data Control
To edit an existing Data Control:
Click on the desired Data Control in the list.
A drawer will open, displaying the current settings for the selected Data Control.

Make the necessary changes in the "Overview" tab.
Examples
Here are some examples of how Data Controls can be used:
Vessel Master Access Control:
Object: Voyage
Attribute: voyageHeader.vesselCodes.masterUser
Matcher Target: User
Matcher Attribute Target: key
Data Control Role Values: MASTER_ONLINE_VESSEL
In this example, users with the "MASTER_ONLINE_VESSEL" security role will only be able to access voyages where the voyage's master user matches their user key.
Business Unit Access Control:
Object: Voyage
Attribute: voyageHeader.businessUnit
Matcher Target: User
Matcher Attribute Target: businessUnits
Data Control Role Values: BUSINESS_UNIT_MANAGER
This control would restrict users with the "BUSINESS_UNIT_MANAGER" role to only access voyages associated with their assigned business units.
Widgets
Widgets in the VMS are dynamic components that seamlessly integrate with the system drawers. They provide real-time or updated information without opening dedicated applications or navigating multiple screens. By leveraging external APIs or data from the VMS itself, widgets offer you quick access to relevant information at a glance.
One of the key features of widgets is their flexibility in terms of customisation and the possibility to perform complex data extractions. The appearance and behaviour of widgets are highly customisable, including adjusting parameters such as font size, colour, layout, and content display.
Creating a Widget
To create a widget, go to Setup -> Widgets, and at the top right, click Create -> Create Widget.
Contexts
In the "Contexts" step, choose a primary object type, like "Vessel". This object will be the source when querying data later. Contexts determine where widgets can be used. A widget can't be shown in a drawer without the context that links the widget's object type to the object in that location.
If a widget displays information about a vessel in the "voyage-drawer" context, the "object path" linking the voyage to the vessel would be vessel. This allows the widget to access vessel data in the voyage drawer.
Fields
Field names are displayed as column headers in a widget list, with values in rows. List field styles are fixed. In a widget card, field names act as labels followed by their values. Widget fields control how information is shown, either on a card or a list. You can customise the styles or use the defaults.
Field value data types
Ensuring that the "Value Data Type" matches the type of value in the data source is crucial for accurately displaying values.
date
Date-time formatted according to user locale
double
Decimal numbers
integer
Normal integers without decimals
link
URLs or email addresses become clickable links. Field name is used as label in card
string
Strings without formatting
Creating a widget data source
To create a widget data source, go to Setup -> Widgets, and at the top right, click Create -> Create Widget Data Source.
Data source information
A link to the "home page URL" address will be shown on the widget card. This is for reference only and doesn't affect data retrieval.
The "Widget" field connects the data source to a widget, and once selected cannot be changed unless the Widget is deleted.
Data source URL
The base URL and HTTP method form the starting point of the request's URL, with the parameterised URL template appended to it.
Authentication
Widget data sources support various authentication methods, including username/password and token-based systems like OAuth 2.0.
Parameters
After setting up the connection to the data source, you can customise data retrieval by adding parameters. These can be dynamically taken from the widget object or set as static values. Depending on your data source and request type, you can include these parameters in the URL path, request body, or HTTP headers. This flexibility allows for precise data fetching, fitting various scenarios and data source setups.
To create a dynamic filter value, enter a "Variable Name" and select an "Object Path". If the parameter type is set to "URL Parameter" or "Request Body", insert the variable placeholder into the template using the syntax {{variableName}}. When the widget loads, the placeholder will be replaced with the real value from the main object.
Field mapping
To populate your widgets with data from your source, use a JSONPath expression for each field that matches the desired data. Separate multiple JSONPaths with a semicolon (;) to combine results with a space.
To display multiple rows in a list widget, ensure the JSONPath result from your source is an array.
Examples
The JSONPath syntax supports powerful filtering and functions. For a more comprehensive understanding and examples of how JSONPath expressions are written, refer to the detailed examples in the official documentation.
In this example, the data source response is structured with multiple objects of the same keys, so to create the necessary values for list-type fields we only need to access all objects with the wildcard operator * before accessing the key.
Data source JSON response
$..fruit
"Apple", "Banana", "Grapes"
$..size
"Large", "Medium", "Small"
$..color
"Red", "Yellow", "Purple"
In this example data source response the names of the fruits are in the keys, not a property value, so to get all the names of the fruits, we can use the keys() function.
Data source JSON response
$.sizes.keys()
"Apple", "Banana", "Grapes"
$.sizes.*
"Large", "Medium", "Small"
$.colors.*
"Red", "Yellow", "Purple"