Loading...
Loading...
Loading...
Loading...
Loading...
Loading...
Loading...
Loading...
Loading...
Loading...
Loading...
Loading...
Loading...
Loading...
Loading...
Loading...
Loading...
Loading...
Loading...
Loading...
Loading...
Loading...
Loading...
Loading...
Loading...
Loading...
Loading...
Loading...
Loading...
Loading...
Loading...
Loading...
Loading...
Loading...
Loading...
Loading...
Loading...
Loading...
Loading...
Loading...
Loading...
Loading...
Loading...
Loading...
Loading...
Loading...
Loading...
Loading...
Loading...
Loading...
Loading...
Loading...
Loading...
Loading...
Loading...
Loading...
Loading...
Loading...
Loading...
Loading...
Loading...
Loading...
Loading...
Loading...
Loading...
Loading...
Loading...
Loading...
Loading...
Loading...
Loading...
Loading...
Loading...
Loading...
Loading...
Loading...
Loading...
Loading...
Loading...
Loading...
Loading...
Loading...
Loading...
Loading...
Loading...
Loading...
Loading...
Loading...
Loading...
Loading...
Loading...
Loading...
Loading...
Loading...
Loading...
Loading...
Loading...
Loading...
Loading...
Find answers to your questions...
Welcome to the main source of information on the Dataloy product suite.
In the vessel drawer on the top right side there is a small map displaying the vessels last known position. This position is retrieved from AIS-positions for vessels which are subscribing to this feature, for vessels which are not subscribing the latest position is retrieved from the latest position report entered in the system. In addition to this you can now view the route from Dataloy Distance Table from previous port to next port displayed in the same map. The route is the green line in the map.
Layout:
The Voyages module contains of a large list of different types of voyages; unallocated, estimate, allocated, nominated, etc. In this list, you can filter the voyages based on several key endpoints to effectively view the required information on your screen. There is a sort icon to the far right, with different options for sorting the list as well. You can read more here: Sorting and Filtering Lists.
Below you can click to read how to create different types of voyages:
Create Voyage ChartererCreate Time Charter OutCreate Voyage From TemplateFrom the "Various Cost/Revenue" tab in the voyage drawer, you can view various cost/revenue from the voyage, cargoes on the voyage and Offhires on the voyage.
If there are either existing various cost/revenue on the Voyage's Cargoes or Offhires there will appear a filter on the top-right of the list where you can select which other types of various cost/revenue you want to be displayed in the list.
Variouses can also be filtered by the Currency filter on the top-right of the list .
The Searchbar can be used to search for Variouses in the list containing the entered search-text in the Description or/and Various Text.
You are able to keep in control of all your organisations inserted cargoes using the cargo module in VMS.
Create New CargoesMaintain CargoesFind CargoesLayout:
The Cargoes module is divided into the Allocated cargoes and the Unallocated cargoes. In each tab, you can filter the cargoes based on several key endpoints to effectively view the required information on your screen. There is a sort icon to the far right, with different options for sorting the list as well. You can read more here: Sorting and Filtering Lists.
Below you can click to read how to create different types of cargoes:
Create CargoCreate Cargo From CoA TemplateCreate Cargo on TC VoyagesThe webVMS contains all cargoes created in your system. To access this list you should navigate in the menu to the "Cargoes" link. This will open up your list of cargos.
There are several sorting and filtering options available for you to narrow down what you include in the list view.
Open the Vessels module in the Core menu in the top left corner.
Find your selected vessel.
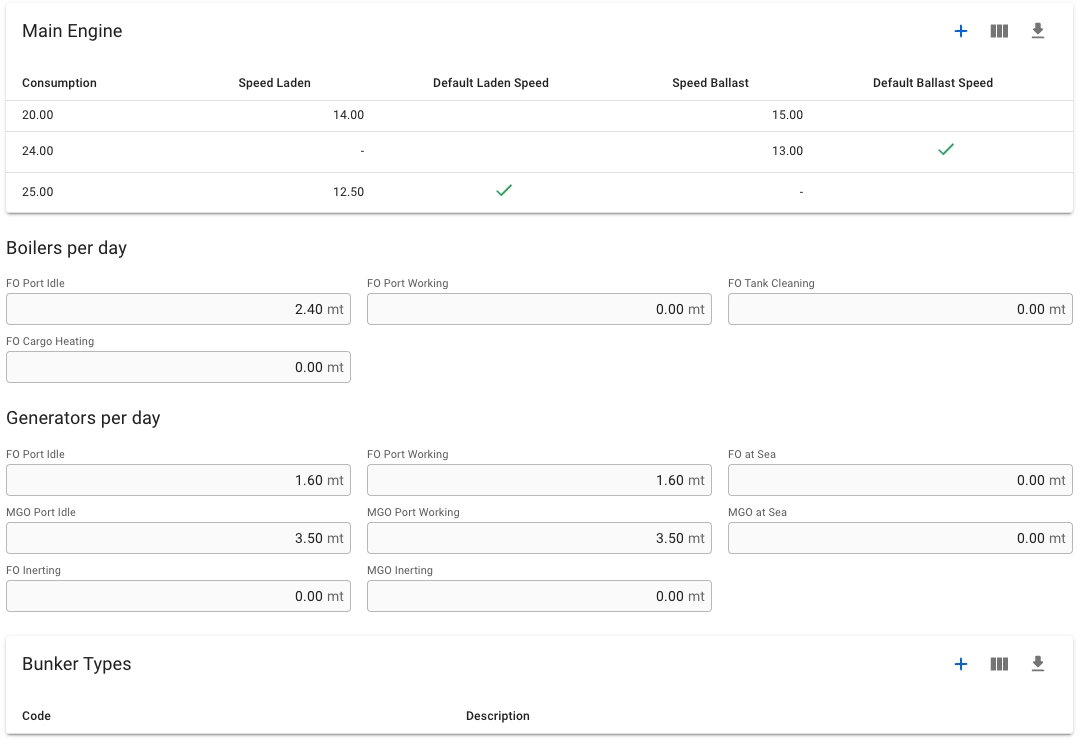
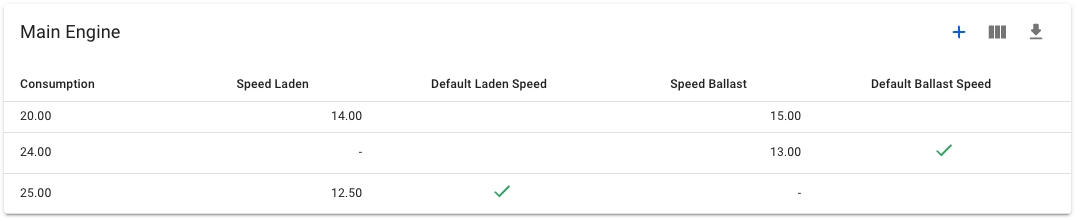
Vessel "Speed and Consumption" data can be accessed in the top tab menu. Details can be maintained directly in the fields or from the table actions.
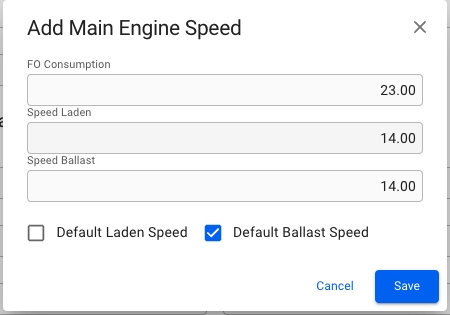
To add a Main Engine Speed to a vessel, navigate to the Speed and Consumption section of the Vessel drawer.
In the Main Engine table, click Add Main Engine Speed and fill in the fields.
You can add multiple speed and consumption data, for example one speed order for full speed and one for eco speed.
An entry to the speed and consumption list may be the default laden and default ballast speed, but the Vessel may only have one of each.
To add a Bunker Type to a vessel, navigate to the Speed and Consumption section of the Vessel drawer.
In the Bunker Types table in the bottom of the drawer, click Add Bunker Type and fill in the fields.
To delete a bunker type, simply click on it in the Bunker Types list, and click the Delete button.
Open the Vessels module in the Master Data section.
Open the vessel drawer
Vessel "AIS Data and Weather Report" data can be accessed in the top tab menu.
For the tab to be enabled an AIS position has to be available.
How to enable or disable AIS-subscription
You can enable or disable the subscription to AIS-positions for a vessel.
Open the Vessels module in the Master Data section.
Open the vessel drawer
If the vessel has an IMO-number, click on the icon in the top right.
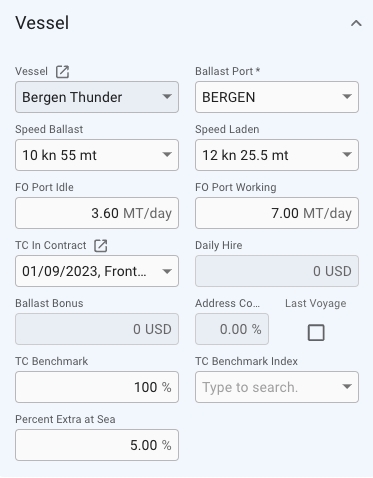
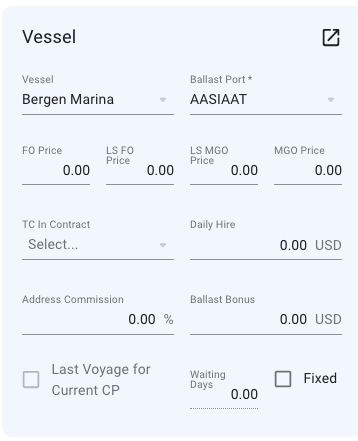
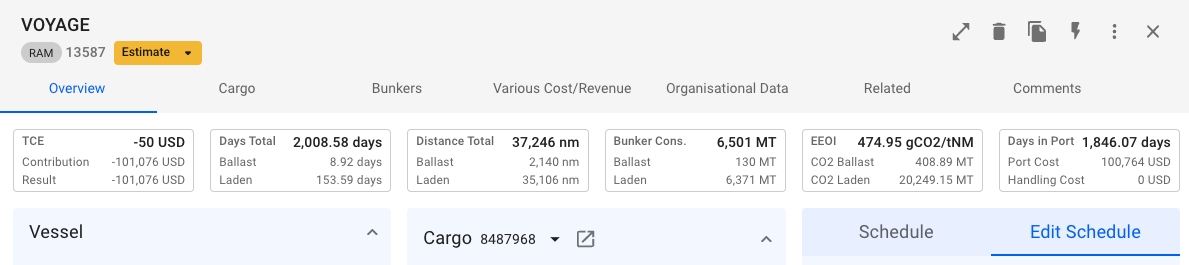
The Vessel section will display some useful information about the vessel that is currently connected to the voyage. You can click on the icon to open up the vessel drawer if you seek more information on the vessel.
Speed Laden: Showing the speed for laden port calls if all port calls have the same speed. If port calls has different speeds this field will be disabled and the text will be: Multiple. Changing this value will update speed for all laden port calls.
Speed Ballast: Showing the speed for ballast port calls if all port calls have the same speed. If port calls has different speeds this field will be disabled and the text will be: Multiple. Changing this value will update speed for all ballast port calls.
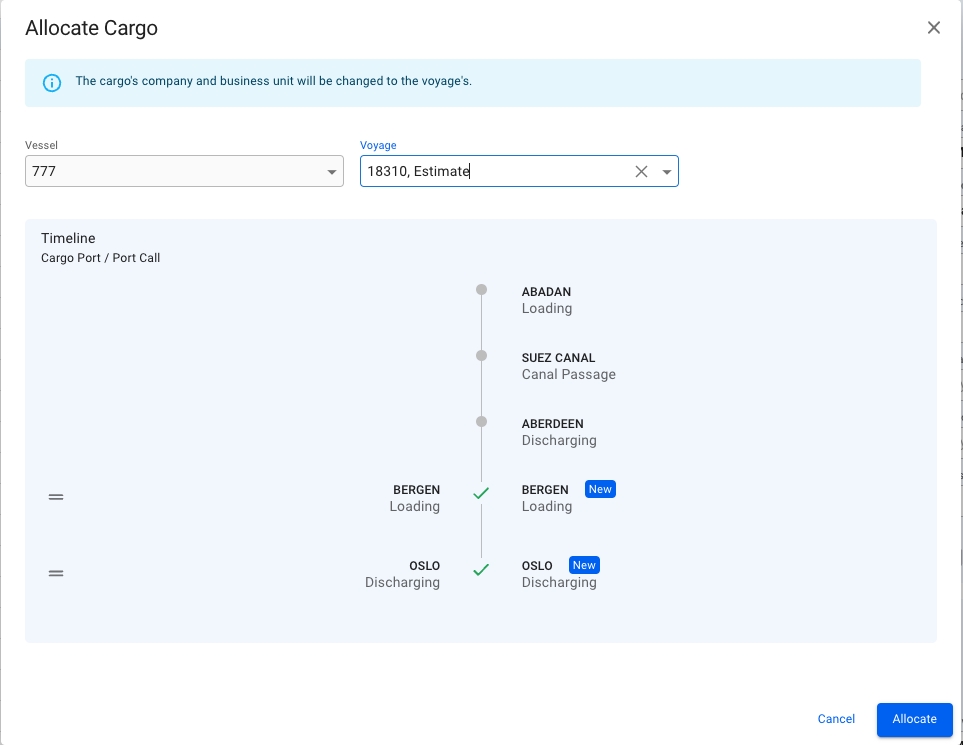
Changing vessel in this section will change the voyage's and the connected cargoes' company and business unit to the selected vessel's.
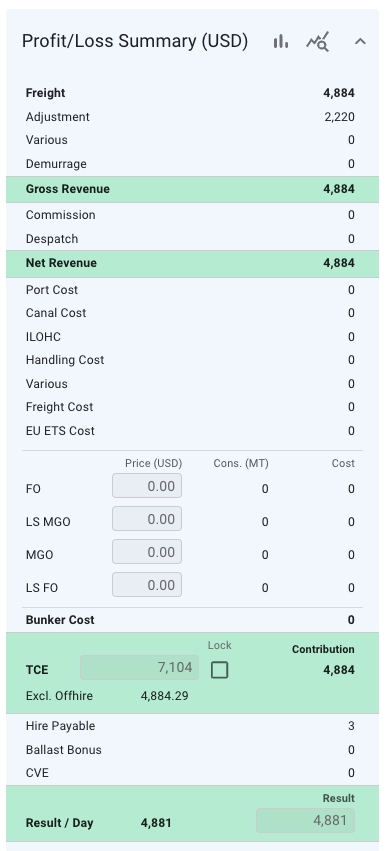
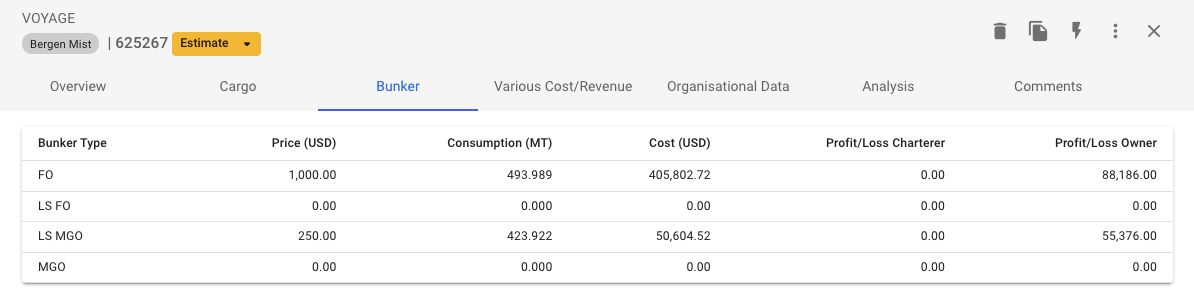
The summary section displays all cost/revenue items, including fuel consumption and price, related to either cargo, voyage, or port call. This breakdown displays different figures for Voyage Charter and Time Charter estimates.
When the voyage drawer is open, selecting Open Full Screenexpands the panel and shows an additional section/panel summarising the profit/loss for this voyage.
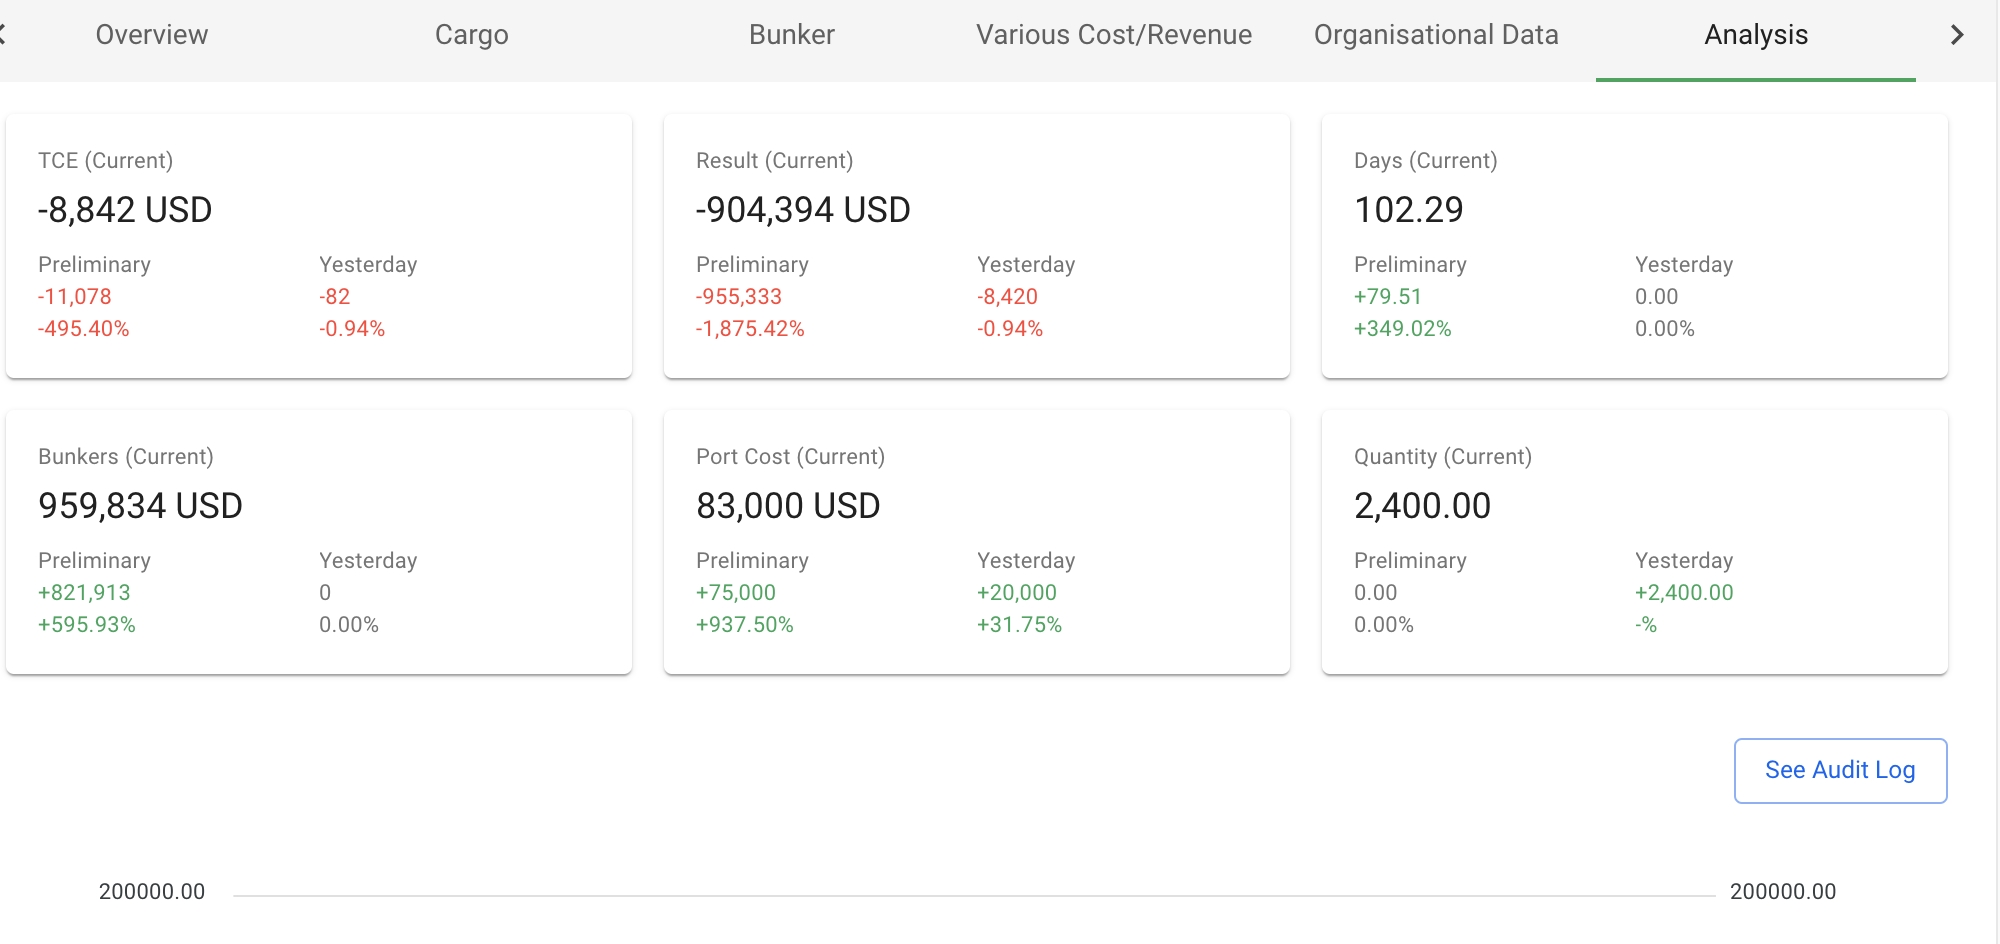
To show the analysis section, click Analysisat the top of the panel. To show an overview bar chart, click Result Chartat the top of the panel.
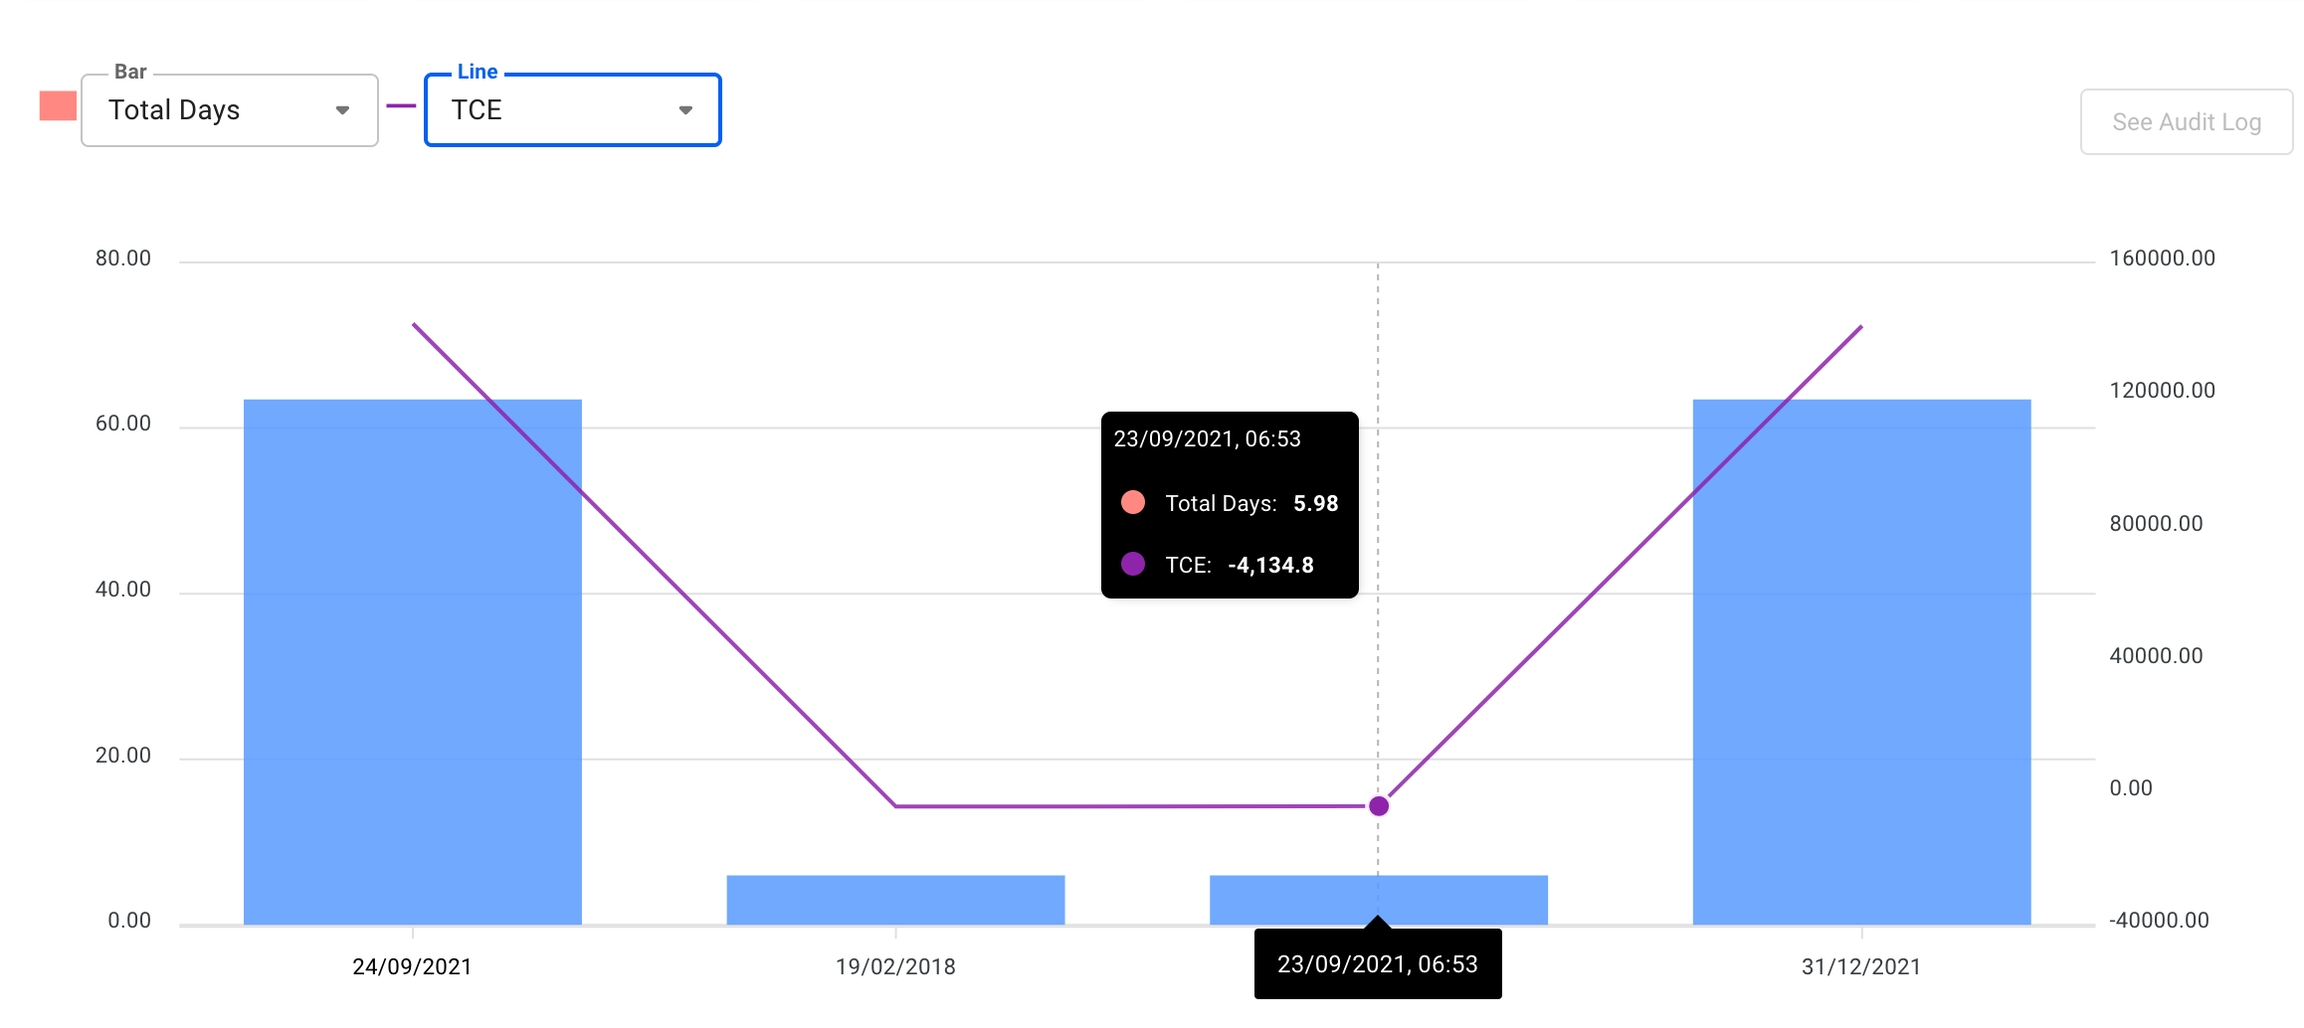
When in a voyage drawer the analysis tab is available in the tab section. In this tab you will be presented with a graph to give you a visual view of the development of key values in the selected voyage.
The graph that is displayed represents the total days for the columns, and the TCE for the line. These values can be changed in the dropdown fields on the top left. The timeline shown will be from the preliminary snapshot is taken to the current date. If the voyage is closed, the last value will be the last time the voyage was changed instead of todays date.
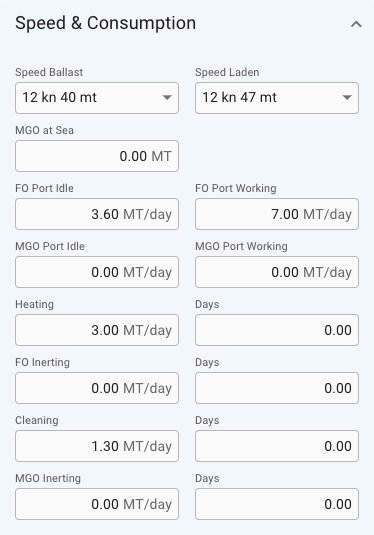
In the Speed and Consumption section in the voyage drawer you can update the various fields for consumption for a voyage. This section can be found in the Overview-tab in the voyage drawer.
In order to expand the section to see and edit the fields, click expandon the far right of the top right summary cards.
Once the expand icon is clicked the fields will be displayed like this example:
Note that if the field for Speed Laden or Speed Ballast is changed in the vessel section it will also affect the corresponding field in this section as well, and vice versa.
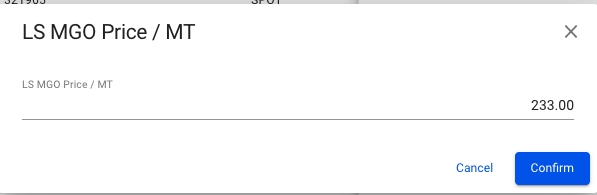
Bunker prices can be changed from the Overview/Bunker tabs.
Click a row to edit bunker price
Edit the price for each bunker type in the modal
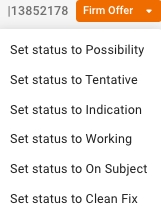
From the voyage drawer it is possible to change the status of the voyage by using the status chip next to the reference no at the top of the drawer.
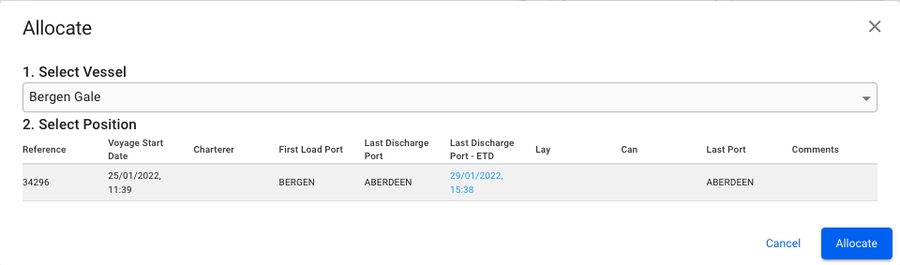
From Estimate to Allocate:
When changing status from estimate to Allocate, the following modal will show, where you have to select the vessel, and if you want, you can manually change the position. It will by default be put last.
From Estimate to Nominated:
When changing status from Estimate to Nominated, the following modal will show. If it is a TC voyage with missing laycan on the TC, you will have to fill in the layCan as well.
In the voyage drawer at the vessel section you will find a checkbox for setting "Last Voyage for Current CP". This checkbox is disabled when there is no TC In Contract registered.
From the "Related" tab in the voyage drawer, you can view, add and edit laytime calculations. Expand the collapsible section titled Laytime Calculation and click the Create button to add a laytime calculation for the opened voyage.
Long TC Voyages, Schedule, and the functionality.
To recognize Long TC Voyages in the system, look for two key indicators: the Voyage Type labeled as (TC) and information in the schedule section. An example of a Long TC Voyage is shown in the screenshot below:
The blue rectangle represents Port Calls that occurred before the current Voyage.
"See All Port" is a link that, when clicked, opens a new browser tab displaying all Port Calls associated with the selected Voyage.
"Show More" is a link that allows you to add up to 5 additional Port Calls per click on the current Voyage's schedule. These added Port Calls will remain visible throughout the system unless the voyage is reopened.
To maintain the cargo click the cargo in the list. The selected cargo will be opened in a cargo drawer where you can edit fields, copy cargo, create a pdf from the booking and so forth. Click the cargo drawer page here to see more details.
At the top of the drawer you can find a drop down with available statuses for a cargo, which will open by clicking the current status.
The cargo status is a helper for you to understand where in the process you are. All statuses apart from Clean Fix are the same in the sense that they do not change the functionality of the system. When you set the cargo status to Clean Fix, the cargo quantity field in the cargo drawer now changes to be the B/L quantity. So when changing the cargo quantity on a "Clean Fix" cargo, it only changes the B/L quantity, not the booked quantity.
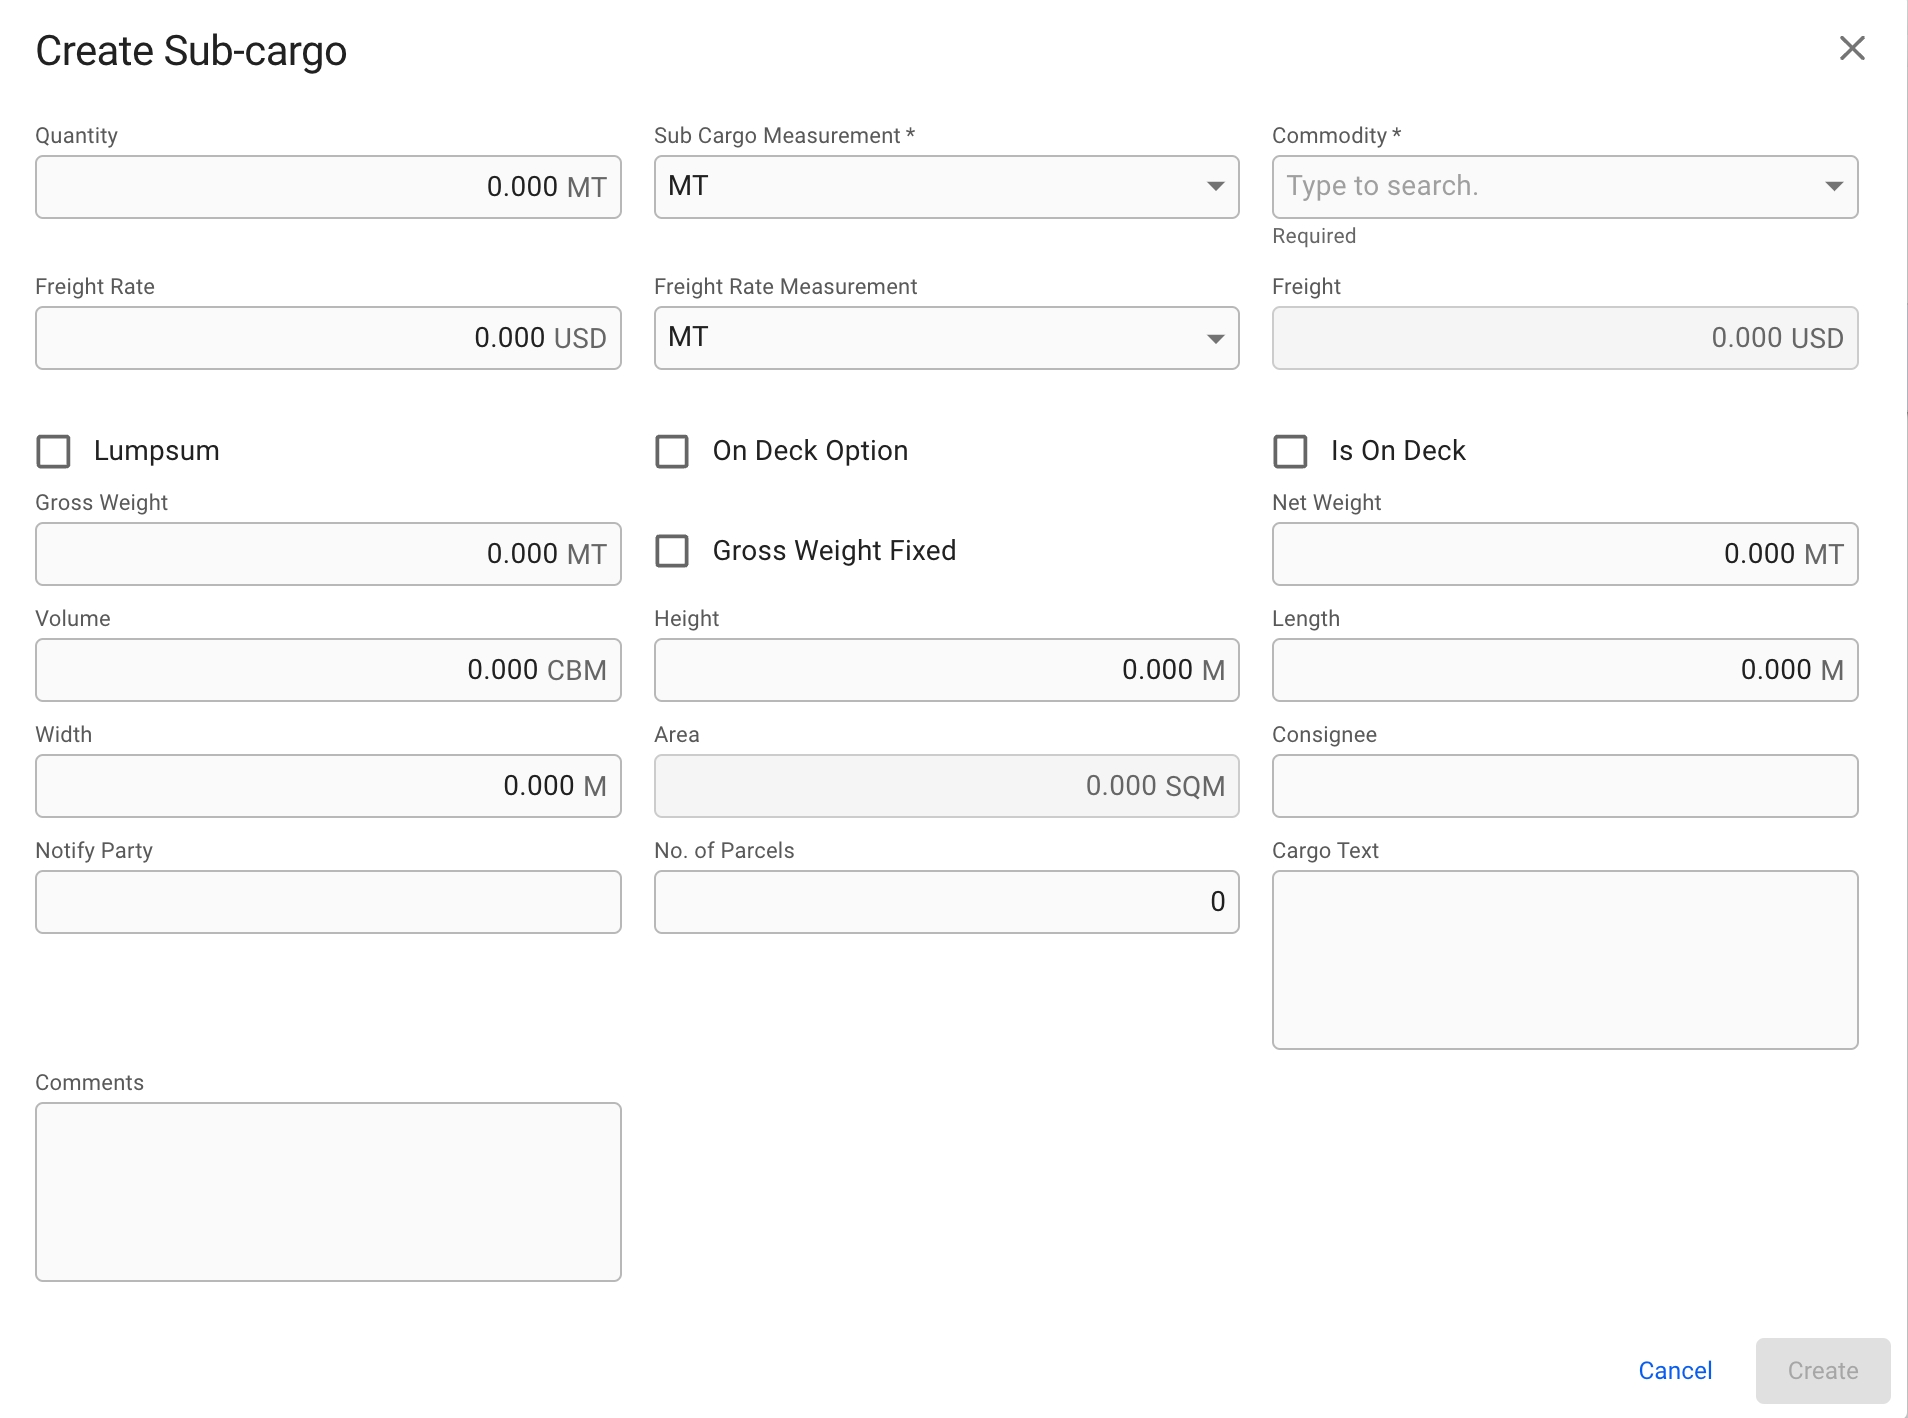
In the Sub-cargoes tab you may enter sub-cargoes
By clicking the blue plus icon in the top right corner you can create sub-cargoes.
Once clicked the below modal will appear:
Once the required fields are filled in the create button will be activated and you may create the sub-cargo. The modal for editing a sub-cargo is identical.
In the Payment Terms tab you can enter the payment details as per above fields.
Click a cargo in the Cargoes module list.
When the drawer opens, find the "Commissions" tab and open it.
Click the icon to open a dialog to enter values, where "Broker" is mandatory.
To edit the details after creation, click the line in the table and the same dialog will open.
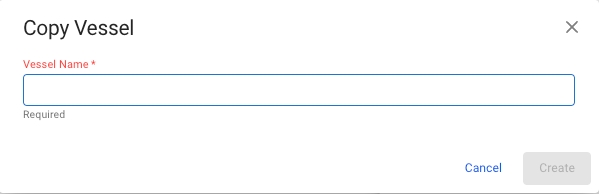
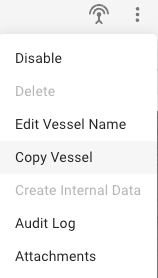
To copy any vessel, open the Vessel drawer and click the More button in the top right to bring up the menu.
Clicking Copy Vessel will open a Copy Vessel modal where you are prompted to enter a new name for the new copy.
When you click Create, the data from the original Vessel will be copied over to the new Vessel, with a few exceptions.
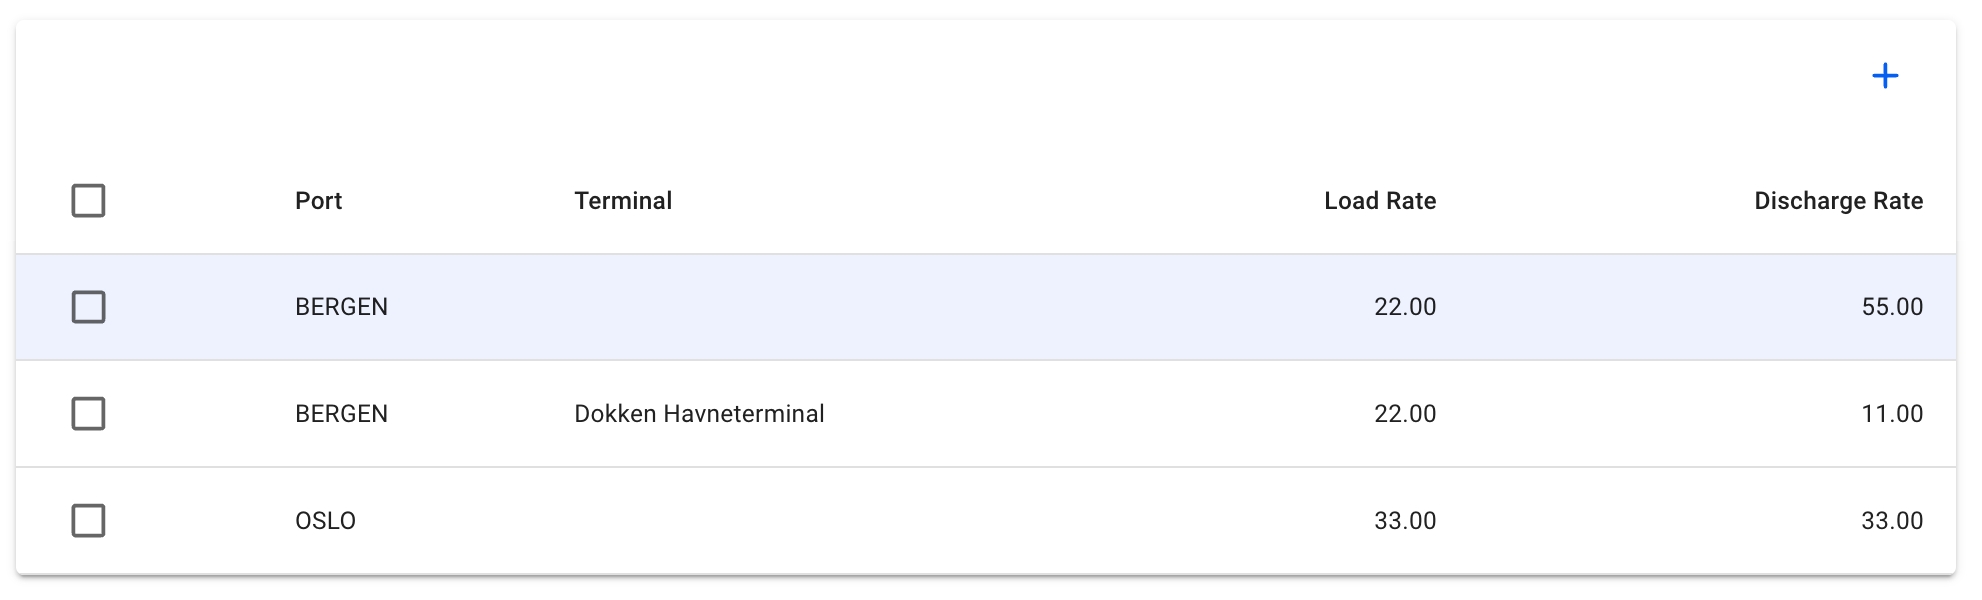
The Load and Discharge rates section is an an overview of the load and discharge rates applicable for ports and terminals. It must not be mixed with the vessels' max load and discharge rates.
Open the Vessels module.
Open the vessel drawer
Vessel "Load & Discharge Rates" data can be accessed in the top tab menu. Details can be maintained directly from the table actions.
Open the Vessels module in the Master Data section.
Open the Vessel drawer
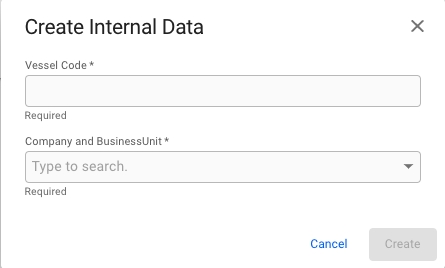
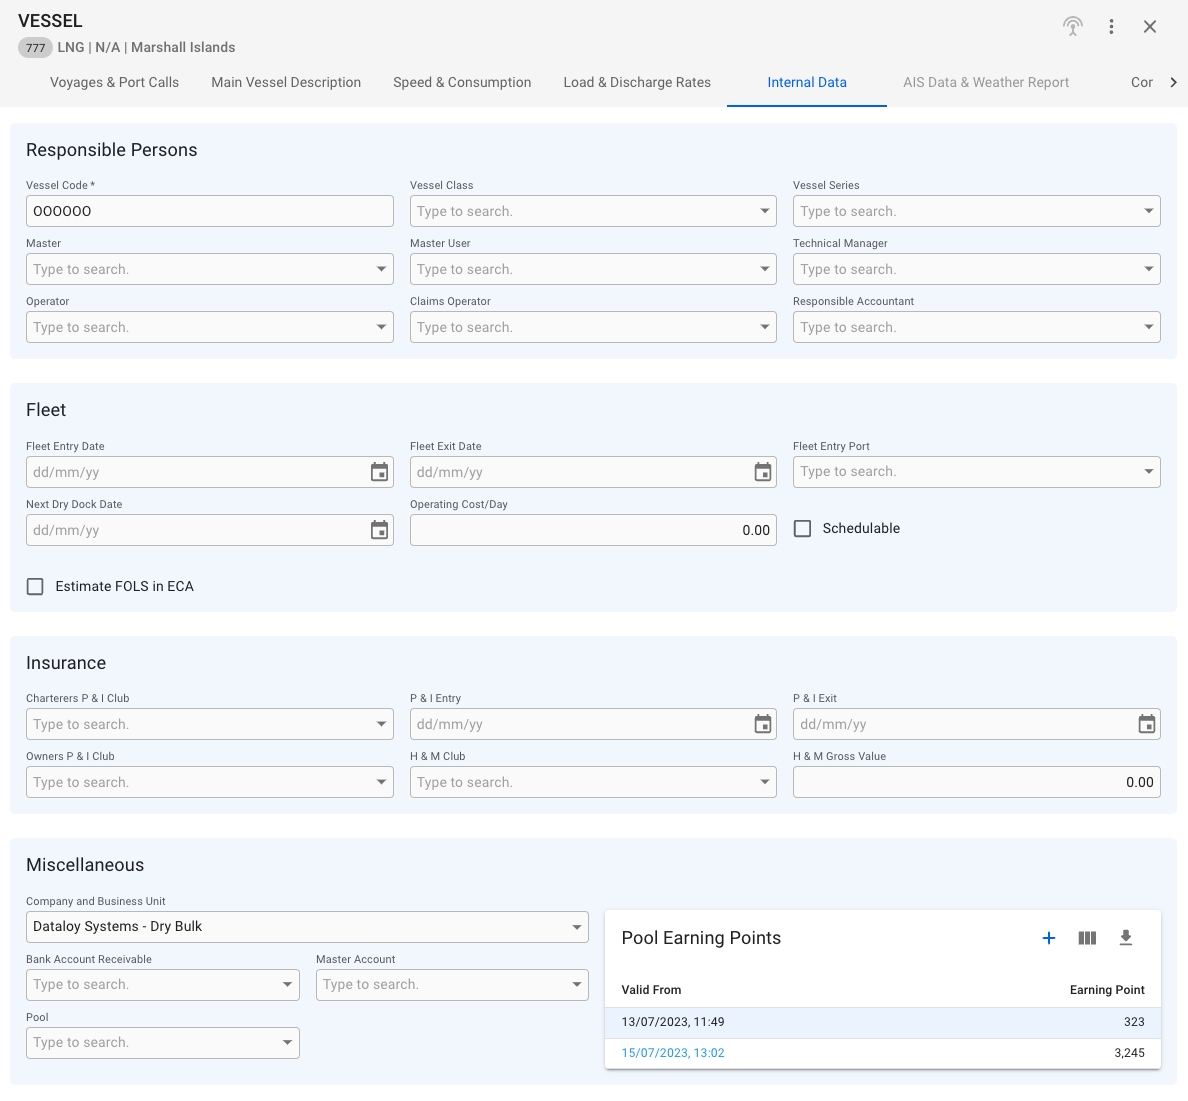
Vessel "Internal Data" can be accessed in the top tab menu.
For "old" vessels that you have in the system that has a minimum of one commenced voyage, the internal data should already be established. For new vessels or vessels without commenced voyages, open the action menuin the top right and choose "Create Internal Data" as indicated below.
Visible on Spot and CoA voyages
The cargo section allows you to directly change some of the fields of the performance cargo from the voyage drawer without having to open the cargo drawer, if you are looking for more fields however, you will need to open the cargo drawer ( clicking the icon will open the cargo's drawer)
Days Extra In Port: Showing the average days extra in port for load and discharge port. Only enabled when days extra in port is the same for all port calls with the same reason for call. When updating, all port calls with the same reason for call will be updated. Days extra in port can also be updated when editing a port call.
Visible on TC voyages
This small section gives you the most important details of the TC Out contract, as well as the option to change them. Click the icon to open the full TC contract drawer.
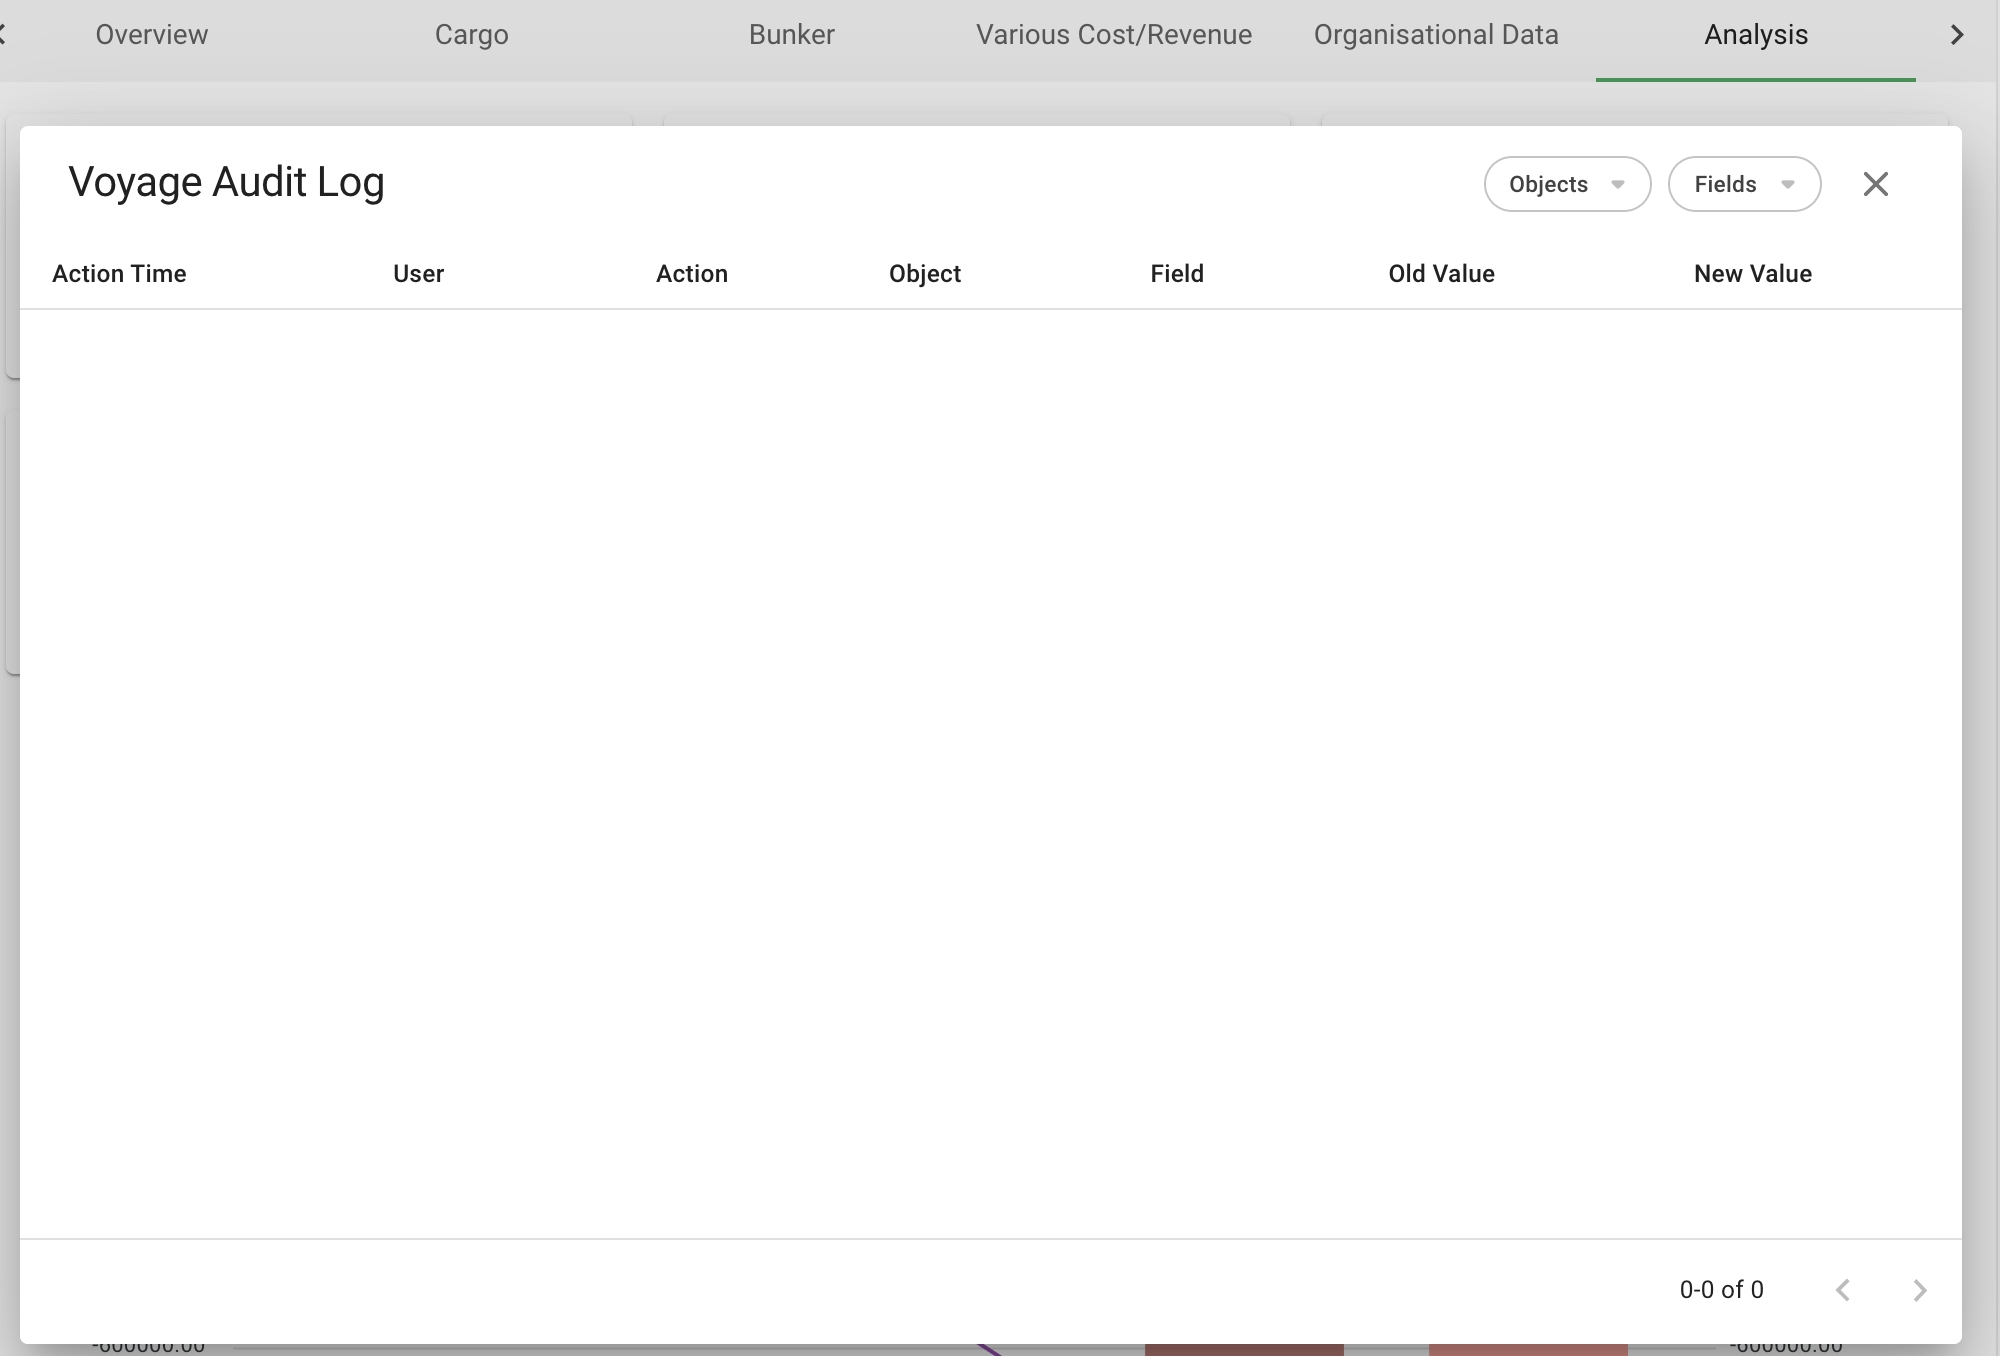
When you are in the analysis tab and you select a snapshot from the analysis chart the See Audit Log will be activated, and you may click this button to see the audit logs from the previous snapshot to the selected snapshot. This button is not activated for the first (Preliminary snapshot) as this has no previous snapshot to compare with.
The audit log in the analysis section will show audit logs between the selected Snapshot and the previous snapshot.
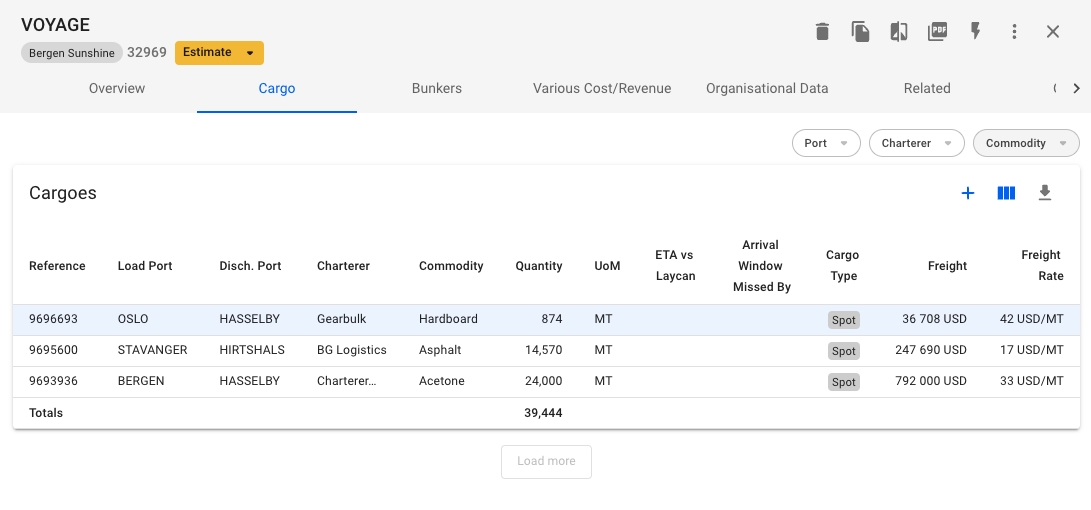
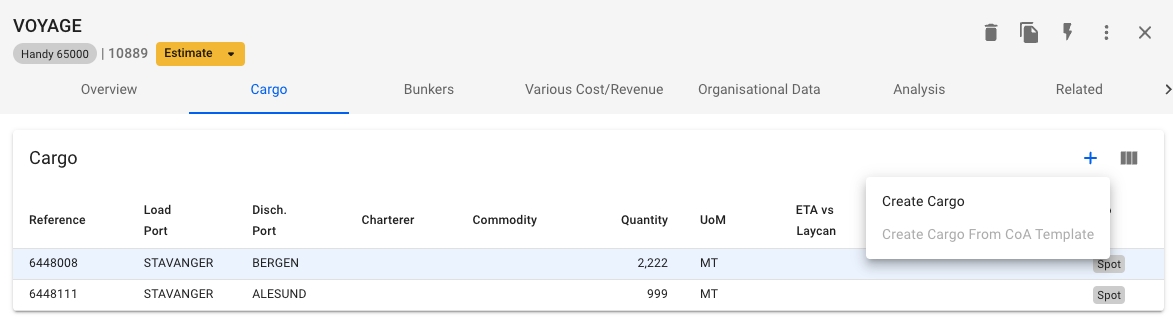
This tab shows a list of the cargoes connected to the voyage
The list can be filtered on Port (the list displays the first load and discharge CargoPort, but the filter works any load and discharge ports on the Cargo), Charterer and Commodity by using the quick-filters in the top right.
In a row at the bottom of the list, you can see the total amount of cargo quantity on this Voyage.
Clicking the icon will bring up a dropdown menu for choosing between creating a brand new Cargo, or a new Cargo from a CoA template.
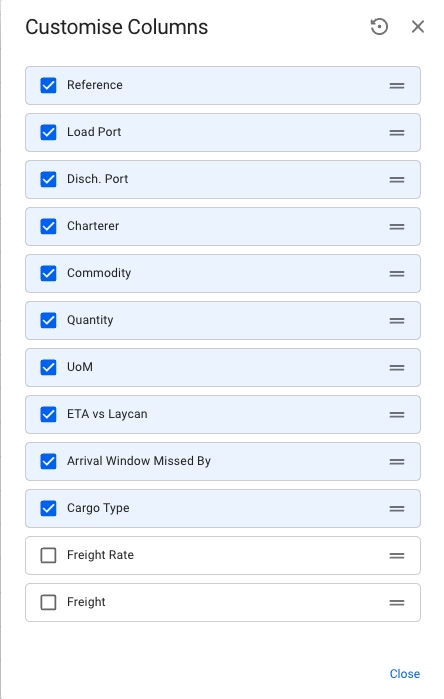
By clicking the icon you can edit the columns shown in the list, rearrange the columns and even enable showing of some columns that are unchecked by default.
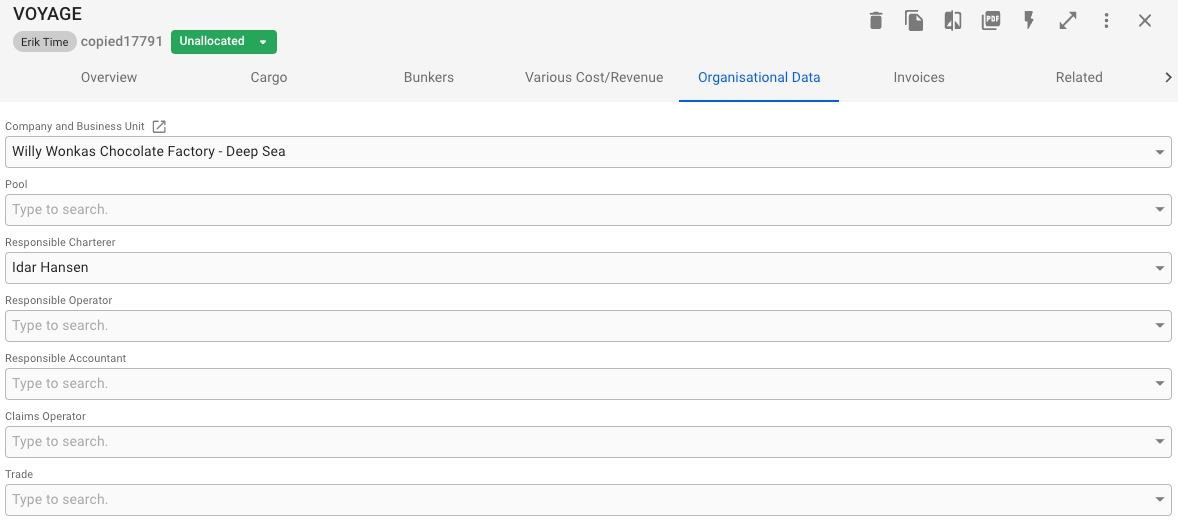
Information about the tab "Organisational data"
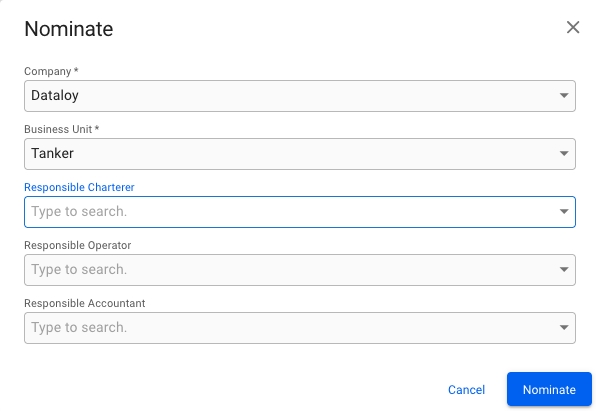
In the Organisational data tab in the voyage drawer you can edit the following information:
Company and Business Unit
Pool
Responsible Charterer
From the "Related" tab in the voyage drawer, you can view the voyage related information Offhire, Laytime Calculation, and Bunker Transaction. Expand a section by clicking the arrow on the top right of each section to view a list of information. Click on an item in the list to go to the the corresponding drawer and view more information about the specific item.
Expand the section and click the pluss-sign to the top right of the list to create new item for the voyage.
More details about creating Offhires: .
More details about creating
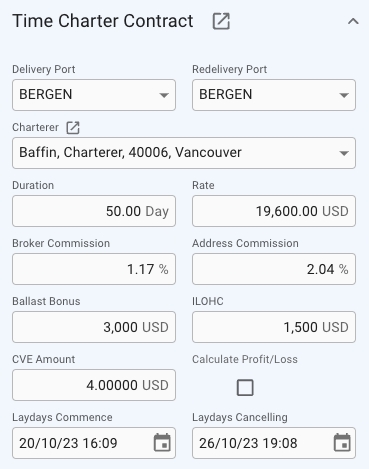
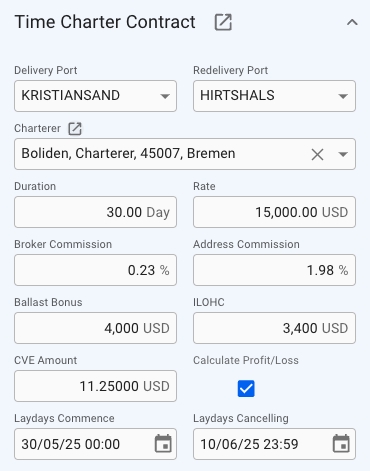
A TC Voyage will not have a Cargo Section on the Overview Tab like normal Voyages, but instead have a Time Charter Contract Section displaying the Time Charter Contract. In this section you can edit the most important fields on a Time Charter directly through the Voyage Drawer or click the -icon to Open the Time Charter Contract Drawer
Both Duration and Rate fields will be disabled if there exists more than one Duration on the Tc contract, or a Duration has multiple Rates.
The Calculate Profit/Loss checkbox is only available while the Voyage still has status Estimate, and will toggle calculation of profit/loss based on bunkers.
The VMS provides powerful voyage tools for risk assessment and estimations on cargo capacity on port calls.
These tools are available from Voyages or PlanningFleet Plans
Click on a voyage in the voyages list or board to open it in the drawer.
At the top right, click on Functions.
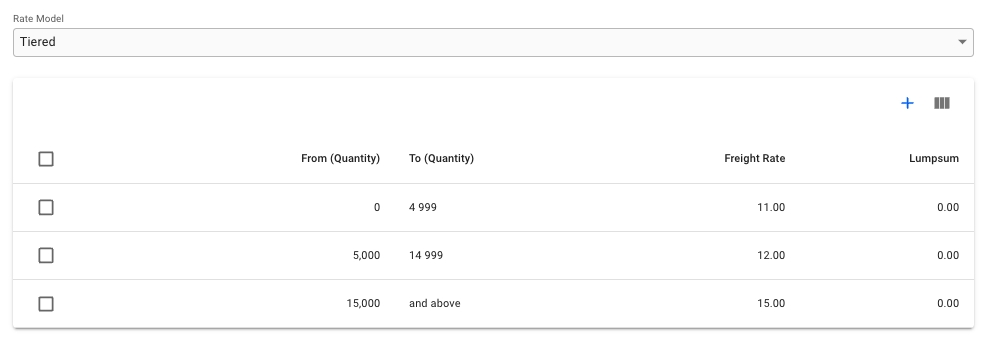
In the Freight Rate Tiers tab, you can create, edit and delete different freight rate tiers for the cargo. It is also possible to choose between a tiered and a volume rate model.
Tiered: In tiered pricing, the per-unit freight rates are assigned to quantity-based ranges (tiers). When calculating the total freight, quantities are purchased from successive tiers, starting from the lowest. Example: In the below example, a cargo of 8000MT would have a freight rate of 11 USD for the first 4999MT and a freight rate of USD 12 for the remaining 3001MT. The freight rate will show as a weighted average on the cargo.
Volume: Here too, the freight rate is quantity-based. However, the per-unit freight rate is dependent on the range within which the total quantity falls. So, under this model, you would define the quantity ranges and the per-unit freight rate for each. Example: In the below example, a cargo of 8000MT would have a freight rate of 12 USD for the entire quantity.
If a cargo has one or more tiers in this section, the Freight Rate and Rule field in the
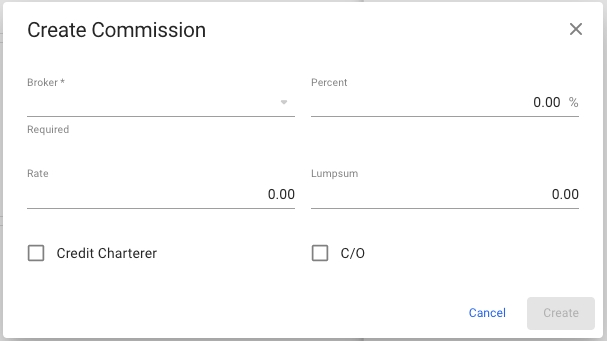
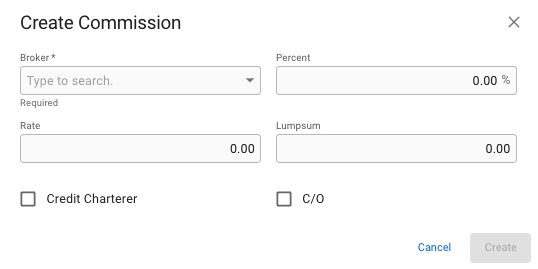
In the Commissions tab you can create new commissions by clicking the blue plus icon in the top right corner.
Once clicked the below modal will appear:
Once the required fields are filled in the create button will be activated and you can create the new Commission, which then will appear in the table in the Commissions tab.
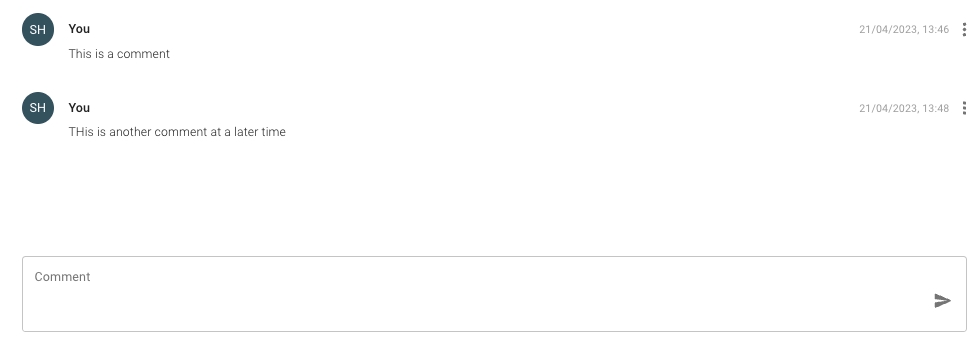
In the comments tab there is a list of previous comments made, and at the bottom you can add new comments.
When a cargo has been connected to a Contract of Affreightment (CoA), a secondary action called 'Remove CoA' will be enabled which will allow you to revert the connection and disconnect the cargo from the CoA. If the Cargo does not have any CoAs connected, the Remove CoA button will be greyed out and disabled. The Secondary Action menu is opened by clicking the triple-dot icon in the upper right of the Cargo Drawer
Clicking the 'Remove CoA' button will instantly disconnect the CoA link from the Cargo.
A list of sub-cargoes can be found under Cargoes menu item as a tab at the top of the page.
The list contains sub-cargoes from allocated and unallocated cargoes.
To edit a a sub-cargo, click an item in the list to see a dialog window open.
It is possible to change the instructed speed for each port call. This is a choice limited to the vessels speed and consumption combinations only depending on the leg being in ballast or laden.
The dropdown shows both the speed and consumption
Each speed will only affect the port call (leg) in question.
To add a speed for a vessel see the .
Template cargoes are currently handled in module.
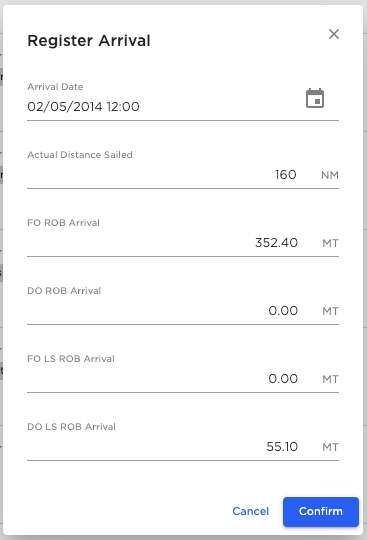
To register an arrival in a Port, open the drawer for the given Port Call by clicking it in the list. Then click the icon at the top of the drawer and select "Register Arrival". A dialog will open and allow you to enter the arrival details.
Specialty role: Vessel User: If you are a user onboard a vessel, the list will be showing only port calls related to that vessel.
Bunker stocks is a detailed representation of bunkers usage for each voyage. In this list you will find consumption, purchases and sells of bunkers on board for each port call.
The Bunker Stock list can be found in the Voyage drawer under the tab called Bunkers.
Each list starts with the opening balance of the stock. The opening balances displays the balance of the bunker stocks at the beginning of the voyage and are generated based on the previous fixed voyage. When creating voyage estimates the opening balances are generated based on the last fixed voyage on the vessel.
Opening balances can be updated on voyages with status Estimate or Unallocated to be able to do quick calculations. Once a voyage i fixed the opening balance will be recalculated based on the previous fixed voyage and will no longer be editable.
Opening balances are also editable on voyages where the voyage start date is fixed.
To edit an opening balance on voyages where this is enabled,
click on the opening balance row and a modal with the editable values will appear
edit the values
click Confirm to save your changes
It is possible to add additional opening balances for each bunker category on voyages that have the status Estimate or Unallocated and for voyages where the start date of the voyage is fixed.
To add an opening balance:
in bunker stocks list click on the Add Opening Balance button located above the bunker stock list for a given bunker category
enter the values
click Confirm to save the opening balance
The new opening balance will be added after the last existing opening balance in the list.
Voyages and Port Calls will not be copied to the new Vessel.
IMO Number will not be copied to the new Vessel.
The internal data of the copied vessel will be given default values for some fields like company, business unit, vessel code and vessel class.
The vessel code will be set to the unique key value for the Vessel, used by the API.
Pool and Pool Earning Points will not be copied to the new Vessel.
In the table, click Add icon and fill in the fields
Click on a row to edit and use the modal to make changes.
Use the checkboxes to select the rows to delete. Click Delete iconand confirm.
Vessels created after version 6.27 will have Internal Data generated automatically.
Vessels copied after version 6.29 will have Internal Data generated automatically.
When the above 'Create Internal Data' is created, it will be possible to access the below Internal Data page:
Miscellaneous:
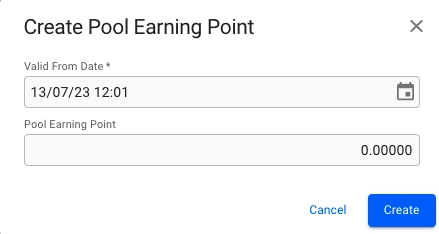
Here, you can set fields like Company and Business Unit, Bank Account Receivable, Master Account and Pool, as well as the Pool Earning Points. In this table, you are able to create, edit and delete a Pool Earning Point:
Create/edit modal for Pool Earning Point.
Note, If the status of the Voyage is closed, it is not possible to make any updates or changes to that particular Voyage.
Click expandto open detailed charts for the numbers in the summary.
The "result" chart is a waterfall chart for costs and revenue on the voyage. Hover the mouse over the bars to see further details behind the calculation.
The "days" chart has a timeline chart for the port calls on the voyage and a table of the total days on the voyage.
The port calls timeline shows the days at sea and days in port. It also shows the names of the ports above the bars. Hover the mouse over each bar to see more information.
Here you may add organisational data to your voyage.
Note, The Company and Business Unit fields depend on each other. If one of the details is set, you may see linked items that correlate to the former attribute when selecting the second field. Moreover, if you proceed with an element not linked to the former attribute, the first field will be cleared.
* For example, there is Company A, which has a link to Business Unit A. When creating Voyage's organisational data, after selecting Company A and expanding the Business Unit, you will get a list of options. The list will contain all the Business Units, but Business Unit A will be marked as linked to the selected Company. Next, if linked Business Unit A is chosen, you will end up with Company A and Business unit A. Otherwise, if the selected Business Unit is not linked to the preferred Company, the Company field will get cleared, and you may observe a list of Companies related to the selected Business Unit.
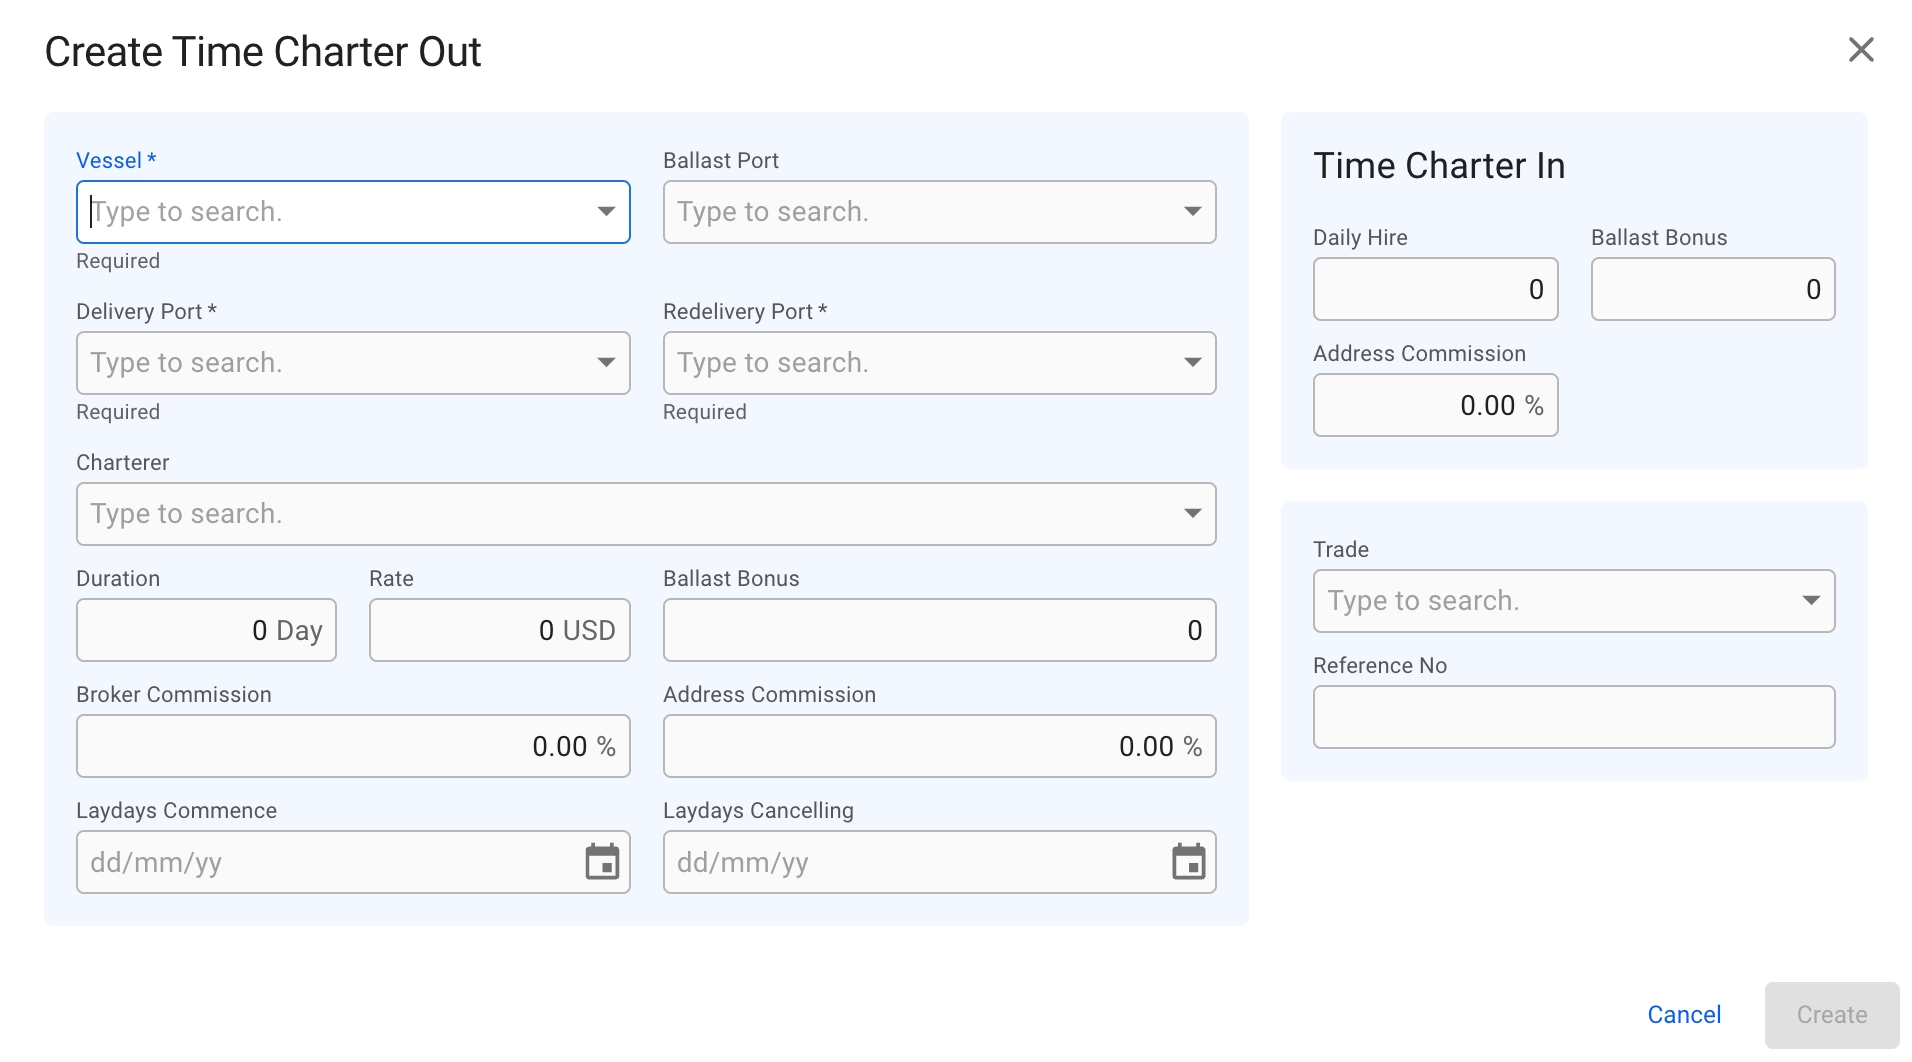
Select Create Time Charter Out.
In the modal, you can fill in the required fields and add any additional information about the new TC voyage.
After you have filled in, you can click Create.
Vessel
Delivery Port
Redelivery Port
After choosing a vessel, you will now be able to choose a Ballast Port.
The modal is now draggable, making it easier to see the information "behind" the modal. Hover over the title or the top of the modal to activate it.
In the top right corner, click Create .
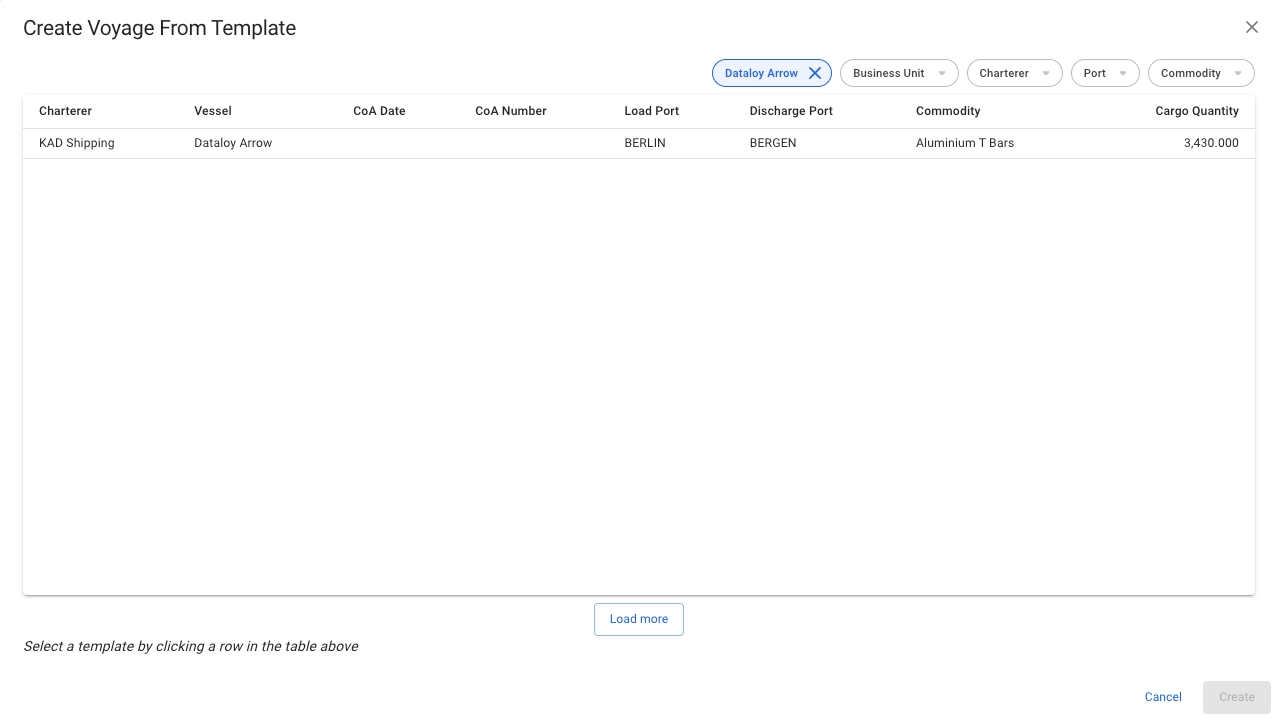
Select Create Voyage From Template.
In the modal, select a CoA template voyage to create the new voyage. The fields that are pre-filled are the ones that were filled in when creating the CoA template itself, which the new voyage will inherit, as well as Company and Business Unit.
Click Create.
The modal is now draggable, making it easier to see the information "behind" the modal. Hover over the title or the top of the modal to activate it.
Looks and works quite similar to Create Cargo From CoA Template.
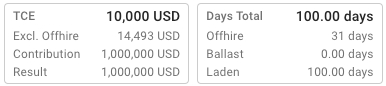
Tiles show the key values like TCE, Days Total, Distance Total, Bunker Consumption, EEOI, Days In Port, of the voyage.
Conditional information:
TCE Excluding Offhire (only shown when there is at least one offhire day)
Offhire days (only shown when there is at least one offhire day)
Sections are used to show the most important information about a sub-item of the voyage. Some sections have an Openbutton to open the section's item in a new drawer.
Voyages on a time charter will have a "TC contract" section, while all other voyages will have a "Performance Cargo" section instead.
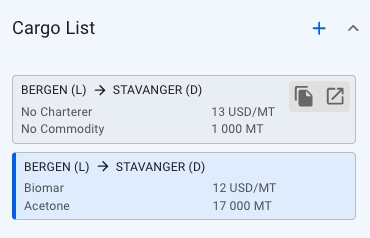
To the left, a list of cargos are presented as small cards, showing you some select details about the cargo. This is meant to be a quick overview, to be able to differentiate between the different cargos. Clicking on a cargo will select it, and the Cargo-section to the right will update. The currently selected cargo is marked by a blue line on the left side of the card. Hovering over a cargo card will bring up the option to copy it, or open the cargo drawer. While a cargo drawer is open, you may click on any part of the card to open the cargo drawer for that cargo.
Responsible Operator
Responsible Accountant
Claims Operator
Trade
To edit any field in the tab, click into the field and start typing. Then select the desired option. Field will automatically save when you click outside or use tab key to exit the field.
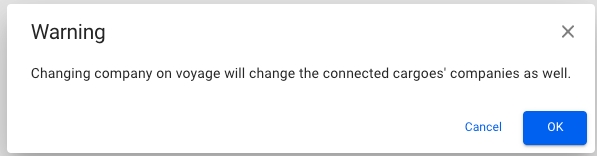
Company and Business Unit field is mandatory if the voyage status is NOT Estimate or Unallocated. When editing company and/or business unit, you will get a warning that alerts the user that the connected cargoes will also have their companies and business units changed.
When clicking the OK button, the company and/or business unit will be changed for the voyage and all the connected cargoes.
Time Charter Contracts and its subpages
In the top right corner, click Create .
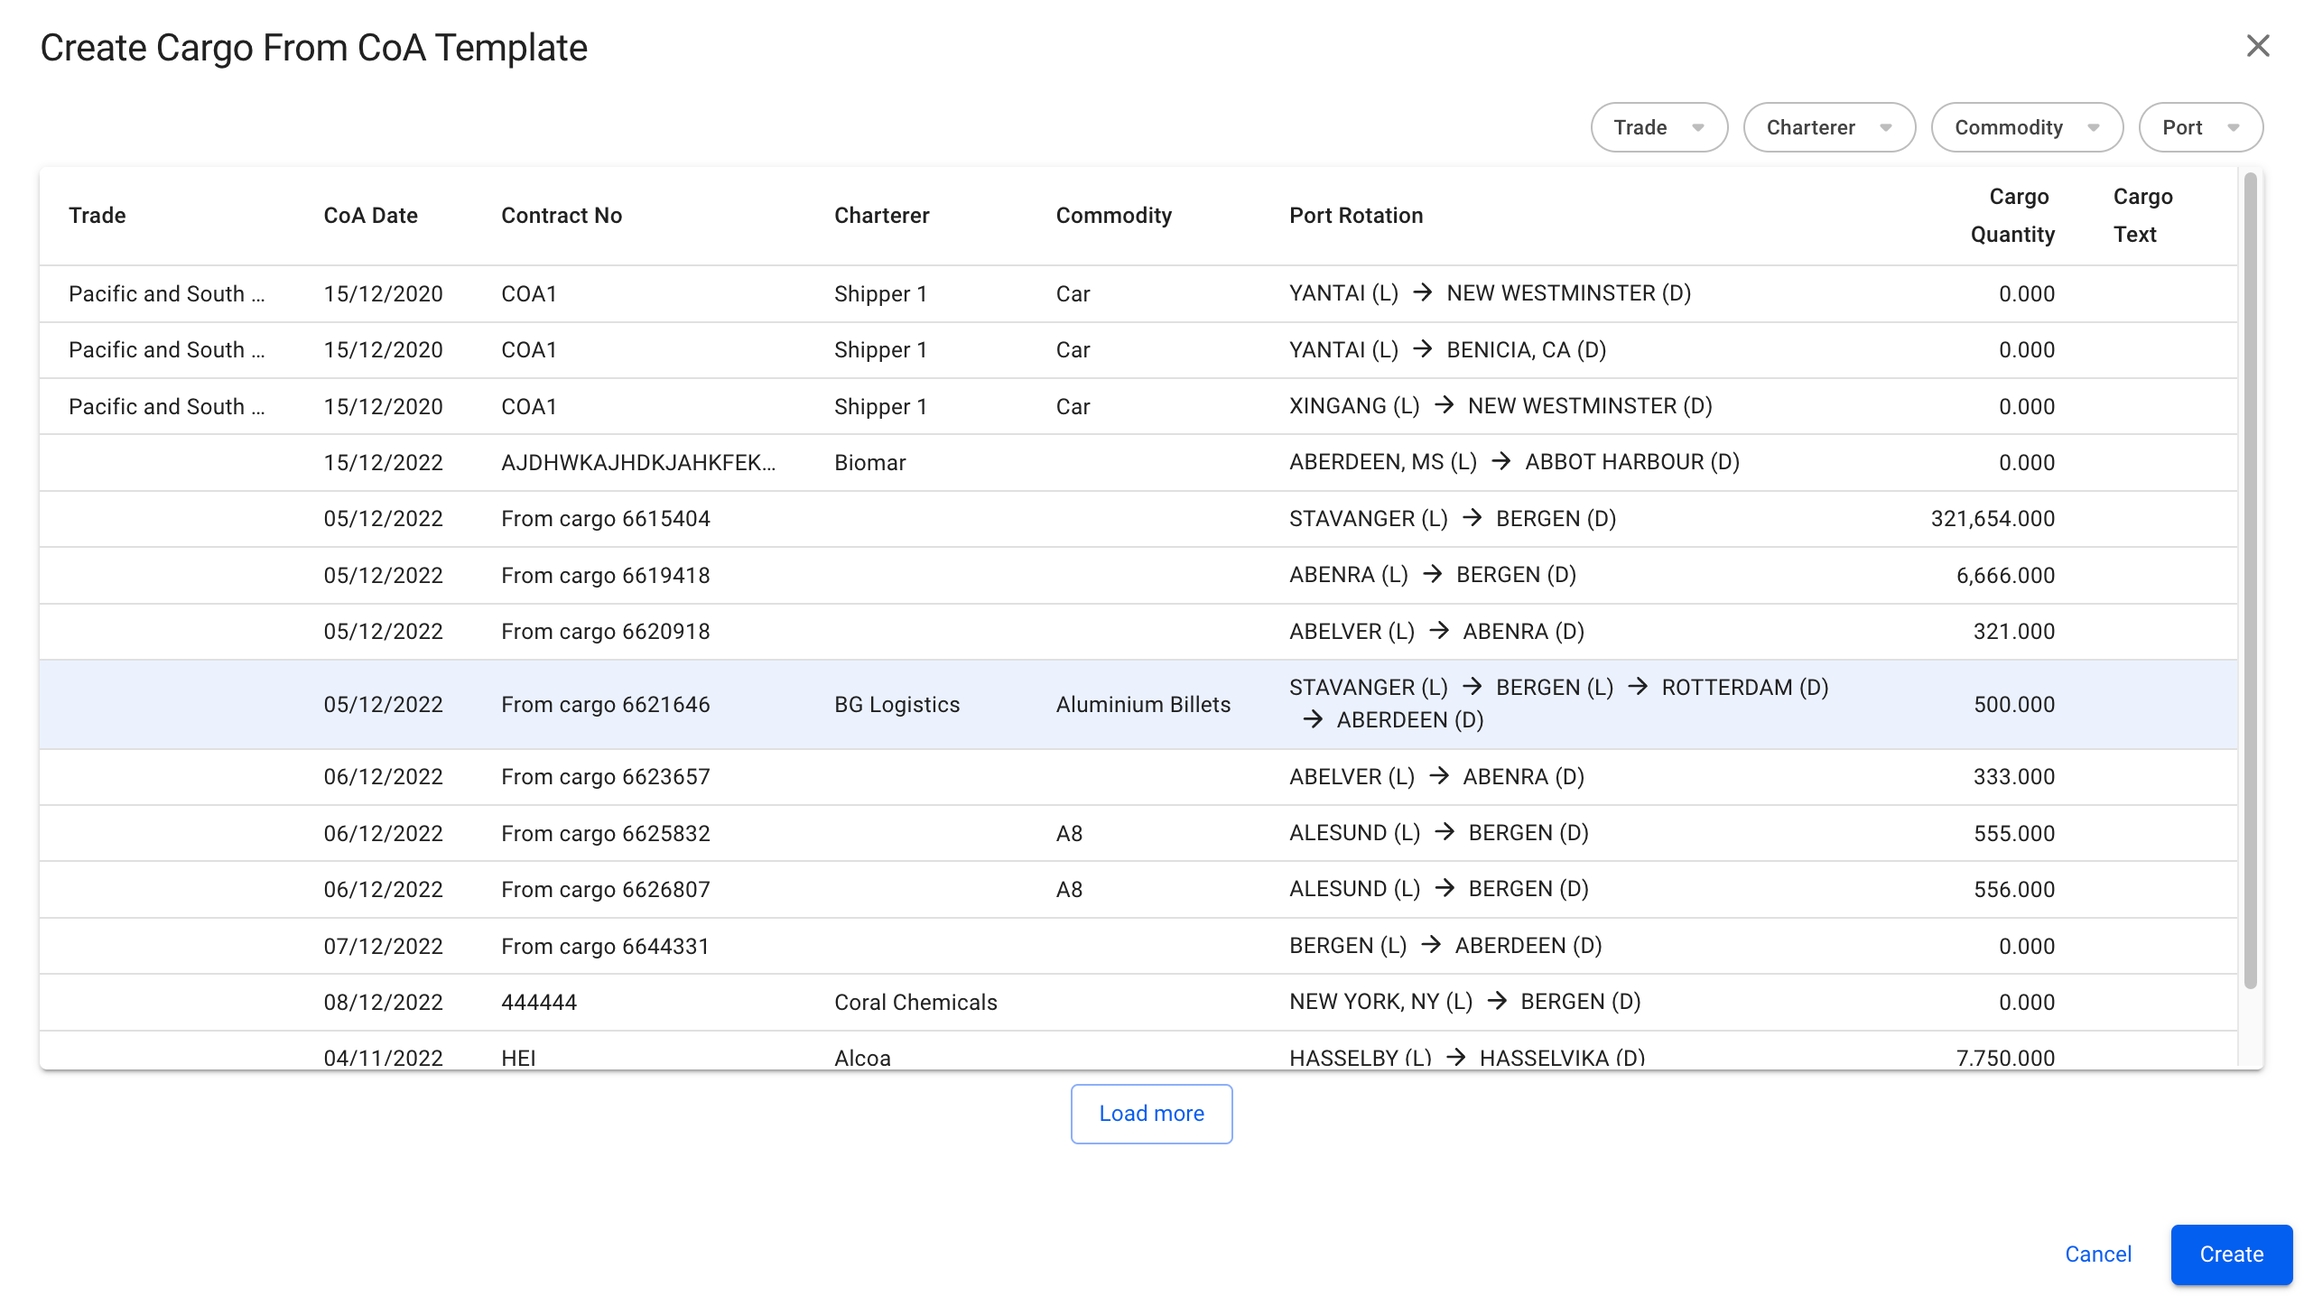
Select Create New Cargo From CoA Template.
In the modal, select a CoA template to create the new cargo. The fields that are pre-filled are the ones that were filled in when creating the CoA itself, which the new cargo will inherit.
Click Create.
The modal is now draggable, making it easier to see the information "behind" the modal. Hover over the title or the top of the modal to activate it.
Looks and works quite similar to Create Voyage From Template.
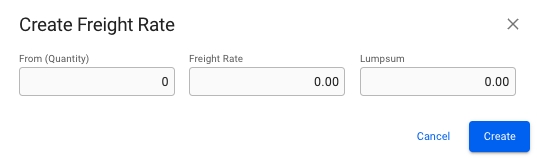
RuleRateTo add another tier, click the icon in the top right of the list. This will bring up the modal to create a new tier. Enter the quantity from which this tier will be valid.
To delete one or more tiers, click on the checkbox mark on the left side of the list. Doing so will bring up the button to delete the tiers. Clicking on the button will bring up a confirmation modal.

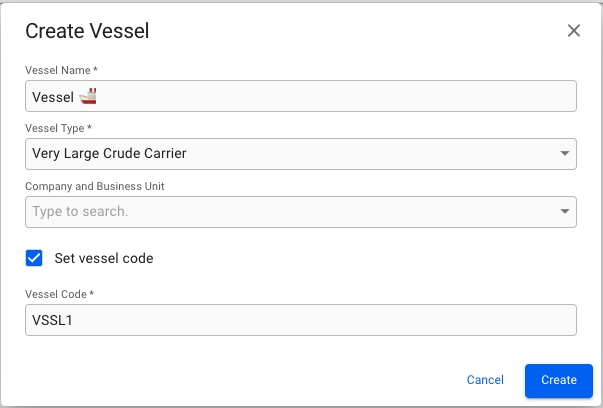
Open the Vessels module in the Core menu in the top left corner.
Click Create Vessel in the top right corner.
Fill in all required fields listed below in the Create Vessel window.
Required fields:
Vessel Name
Vessel Type
Vessel Code*
*The Vessel Code field is only visible and required if you have ticked off the "Set vessel code" checkbox. If the checkbox is not ticked off, a Vessel Code will automatically be generated for you.
In the "Voyages & Port Calls" section of the vessel drawer, you will find the most important information about a vessel and its voyages.
The "Vessel Details" section shows data about the vessel such as DWT summer/tropical and draft. Click Expandto show contact information for the vessel.
This is a list of voyages on the opened vessel sorted by newest first. Clicking the icon will bring up a modal to customize which columns are visible. If there is an ongoing voyage in the list, it is indicated with a blue marker on the left side, and it's Port Calls are shown in the list below.
When clicking the reference number of the voyage, the voyage drawer will open. If the voyage does not have a reference number, a text value displaying 'Missing' will show instead. This is also clickable and will open the selected voyage.
Clicking on the voyages, except from the voyage Ref. No, will list all port calls of the selected voyage, as well as the next and previous voyage below. The next and the previous voyages' port calls will be a lighter text color to make them separable. Clicking on port calls in the list opens the corresponding port call's drawer where you can make changes.
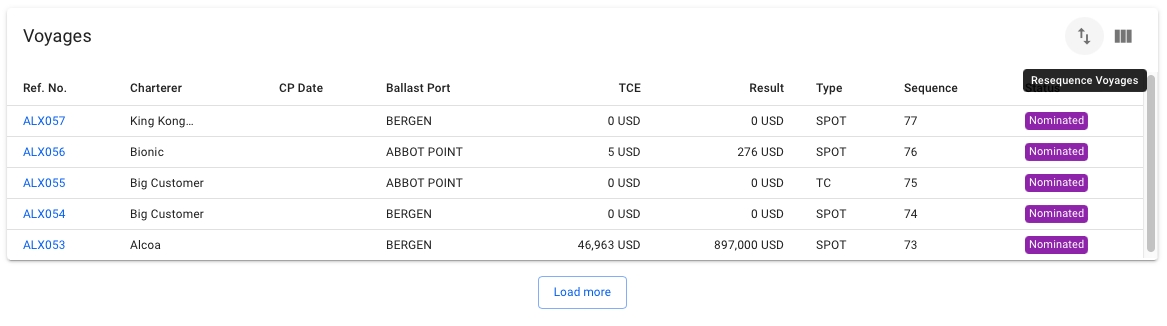
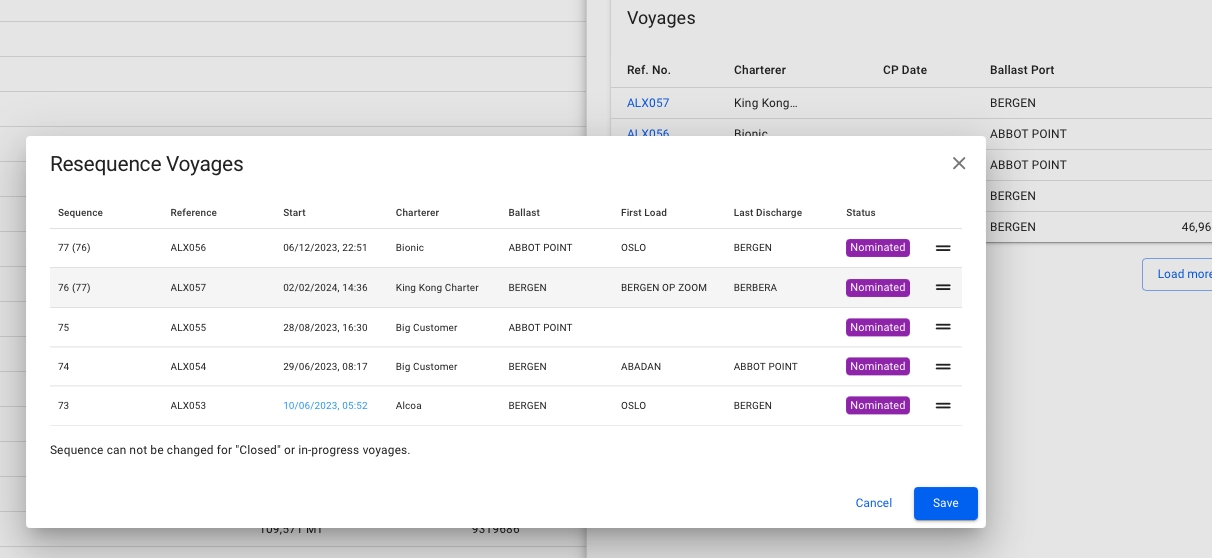
The re-sequence feature enables reordering the list of voyages assigned to a vessel (see Figure 1). To utilize the feature, click Vessels, select the one that requires reordering, and click the Two-way arrow icon in the newly appeared window on the right.
The user can now drag and drop the voyages to re-order them in the desired order. For example, Figure 2 illustrates Item 77, which is being dragged down. It is expected that the item will have replaced Item 76 after release.
Next, the result after the aforementioned release is presented in Figure 3.
Any voyages that will have their sequence number changed, will have their previous old sequence number parenthesized.
The Save button updates Fleet Plan Voyages and saves the new appearance of the Voyage List.
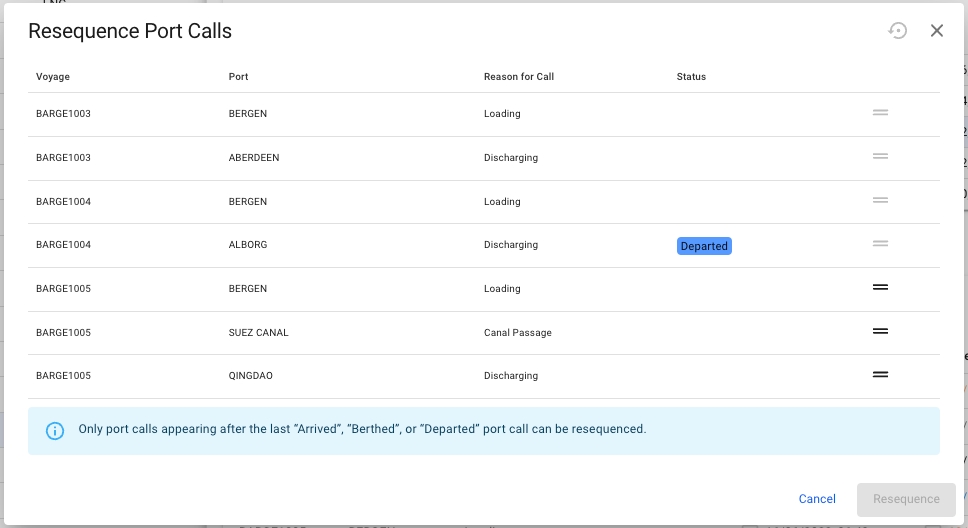
Port calls can also be resequenced to a different position within the previous, current, or next voyage. To resequence a port call, click the resequence symbol in the top right corner of the port calls list. A popup modal will then show and the port call can be dragged and dropped in the desired position (Figure 4). Note that only one port call can be moved at a time. Also, only port calls after the last Arrived, Berthed or Departed port call can be moved in the list.
Open the Voyages module from the menu on the left.
On the top right corner, click the icon.
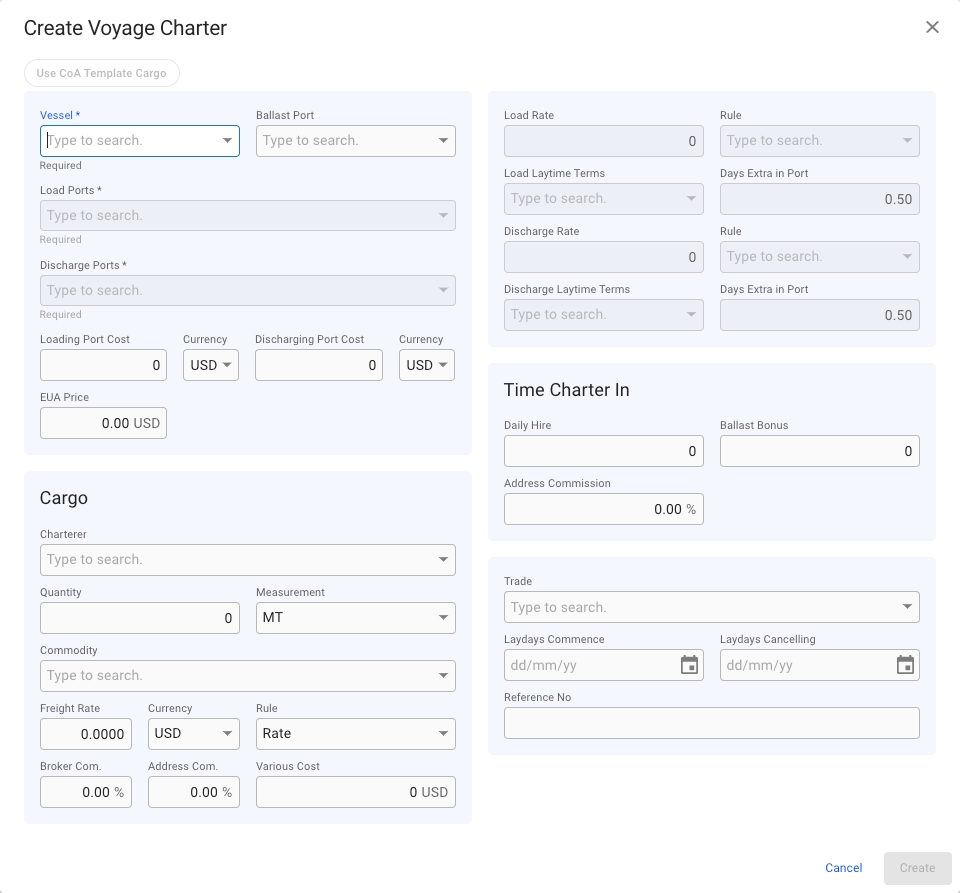
Select Create Voyage Charterer.
In this modal, you can have two options:
a. you can fill in the required fields and add any additional information about the new voyage
b. you can choose a vessel, and afterwards click the Use CoA Template Cargo button, which will link to the same modal as described here: . Using a CoA Template will give the voyage and the cargo the same Company and Business Unit as the CoA.
After you have filled in or chosen a CoA Template for the cargo information, you can click Create.
Vessel
Load Ports
Discharge Ports
After choosing a vessel, you will now be able to choose a Ballast Port.
The modal is now draggable, making it easier to see the information "behind" the modal. Hover over the title or the top of the modal to activate it.
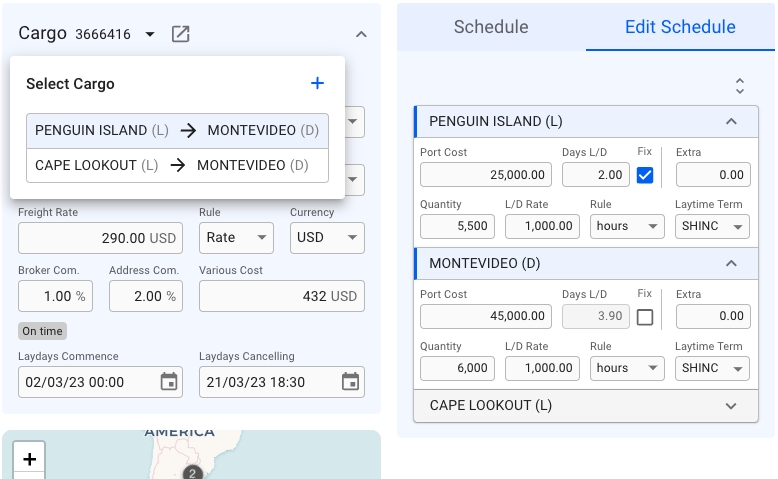
The "Schedule" section in the Voyage drawer shows three different sub-sections:
Schedule: a timeline of port calls on a voyage, where the left side shows ETA and ETD time- and dates, as well as Days Extra and Waiting Days, and the right side shows the port calls, their reason for calls, Port Costs and Total Days. You can create, rearrange, delete and edit port calls directly from this screen.
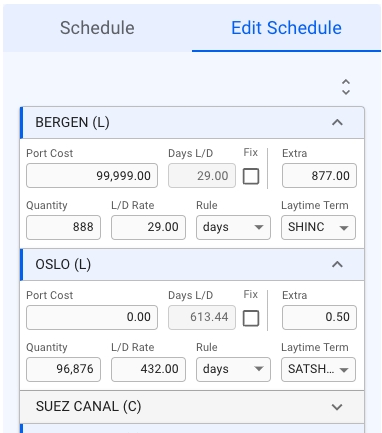
Edit Schedule: a list of all the port calls of the voyage, with their respective reason for calls. You can open/close the collapsable items to find the port call's Port Cost, Days L/D, Fix and Extra. You can also find the cargo port's Quantity, L/D Rate, Rule, Laytime Term, HC Rate, Currency, Measurement and HC Lumpsum. All of these fields are editable. The cargo highlighted in blue in the Cargo List section will also have its port calls highlighted correspondingly in the Edit Schedule section.
Routing: TBA.
When hovering the mouse over a port call in the schedule, a toolbar in the upper right will appear.
To insert a port call before or after the port call you are editing, click the Create Newbutton and select Before or After. A window to create a new port call then opens.
To edit a port call, click the Editbutton.
To delete a port call, click the Deletebutton.
Within the Schedule section, you will find a checkbox for locking the update of voyage start date and Waiting Days. This checkbox is not visible while the voyage has status Estimate or Unallocated:
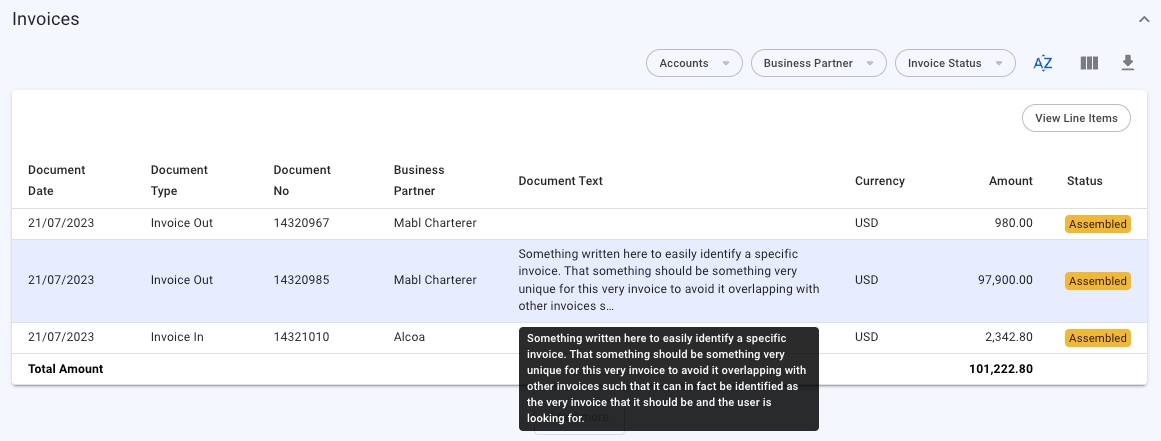
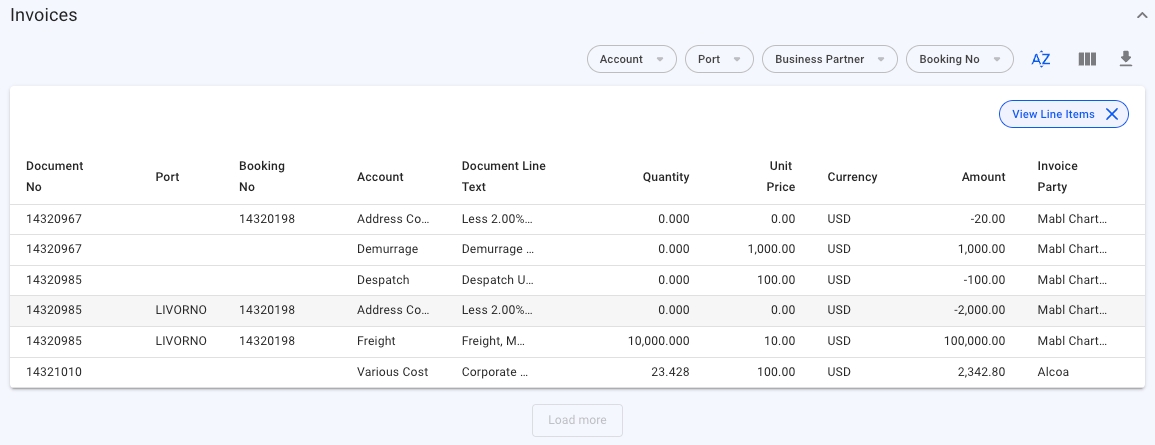
In the "Invoices" tab in the voyage drawer, you can quickly see and manage the Pending Receivable/Payable document lines, as well as the Invoices connected to the voyage. The tab is only visible to voyages that do not have status "Estimate".
The sections show you a list of all document lines that have not yet been assembled. Clicking on any of them allows you to edit certain parameters. Selecting one or more document lines will allow you to assemble them.
The invoice-section shows a list of all assembled invoices connected to the voyage. There er multiple filters to allow you to quickly and efficiently find the invoice you are looking for. Clicking on an invoice will open a document drawer, showing more details.
At the top right of the section below the filters you can click a button that says 'View Line Items' which will swap out the documents in the list with the document lines of the documents on the voyage. This list has document line-specific columns, however clicking one of the document lines will open it's corresponding *Document* drawer.
In addition to separate columns, this document line list also has adjustments to its filters at the top of the section as well. The document line list has filters for Account, Port, Business Partner(Invoice Party) and Booking Number as shown in the picture above.
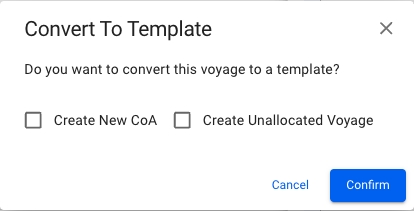
A voyage can be converted to voyage template if certain requirements are met, these are listed below:
Can be converted to template:
Estimate Voyages
Unallocated Voyages
Cannot be converted to template:
Template Voyages
Allocated Voyages
Nominated Voyages
Operational Voyages
Operationally Closed Voyages
Closed Voyages
Invoiced Voyages
The voyage's type (TC, SPOT, COA) does not matter in regards to whether you're allowed to convert or not.
In order to convert a voyage to a template voyage one must open a voyage's drawer and click the secondary action menu in the top-right and select the "Convert to Template...' action.
After selecting the action you will get a confirmation popup modal which allows you to select to 'Create New CoA' and 'Create Unallocated Voyage' when converting to template. When clicking the 'Confirm' button, you will be brought to the template voyage's drawer.
Both optional buttons will be available.
None of the optional buttons will be available.
Both optional buttons will be available and the 'Create New CoA' button will be selected by default. If un-selecting this button, the template voyage will continue to use the old CoA instead of creating a new.
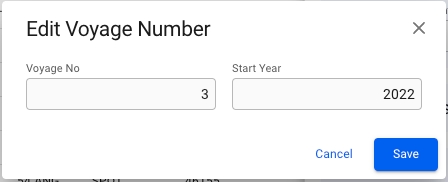
From the voyage drawer actions it is possible to change the Voyage Reference Number or Voyage Number, depending on the voyage status.
When voyage status is Estimate, Unallocated or Allocated, it is possible to change the Voyage Reference Number.
When voyage status is Nominated, Operational, Operationally Closed, Invoiced or Closed, it is possible to change the Voyage Number.
Clicking Edit Voyage Reference... or Edit Voyage Number... in the options meny opens a dialog box where the current values can be modified. In addition, the dialog box contains a field for changing the Voyage Start Year.
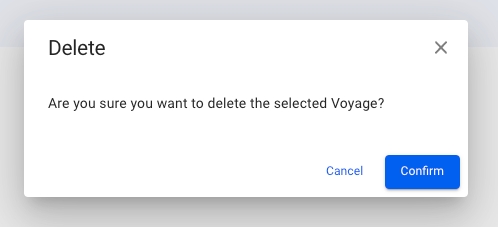
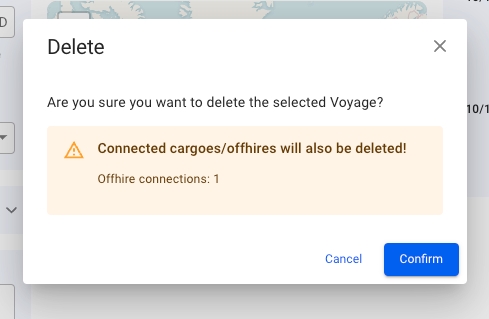
Only voyages of status "Estimate" and "Unallocated" can be deleted. Otherwise you must change the status before you can delete.
Find a voyage (i.e through the Voyages page).
Click to open the voyage you want to delete.
At the upper right corner of the panel, click Delete.
Click Confirm to delete the voyage.
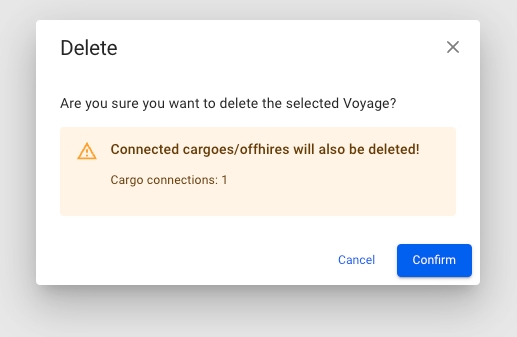
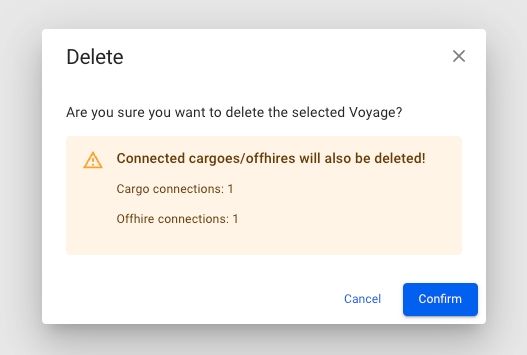
Voyages can be connected to Cargoes and/or Offhires, as well as scheduled voyages if the voyage is a template.
When attempting to delete a template voyage that has scheduled voyages either at the Nominated or later stages, an error message will show instead.
The delete-voyage modal will look differently depending on whether it has connected entities:
No connections:
Only Offhire connection:
Only Cargo connection:
Offhires and Cargoes:
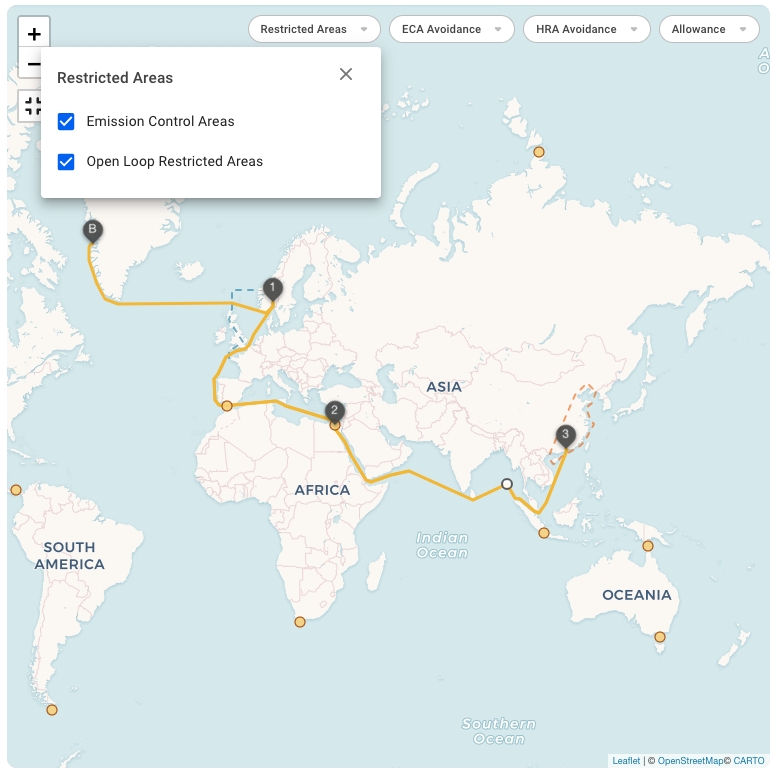
The voyage map shows the voyage schedule, including alternative routing pointsthat can be added to the schedule between port calls. More routing points will be revealed as you zoom in on the map.
Click on a routing pointto show information about the point in a popup, including name, position, and GMT offset. When a routing point is clicked it will also be possible to add the routing point to the voyage route. When clicking 'Add to route', a pop-up will appear where you have to choose between which port calls the routing point shall be added.
Routing points that are on the voyage can be removed. When clicked, a button will become available 'Remove from voyage route'. When this is clicked, a confirmation box will appear. When confirmed, the routing point will be removed from the voyage.
The interactive Voyage Map features several restricted areas:
Emission Control Areas
Open Loop Restricted Areas
Restricted Areas are visible on the map and depicted by Blue or Red dashed lines (See Figure 1).
The leftmost dropdown filter allows changing the settings to include the particular group of Restricted Areas in the map or not.
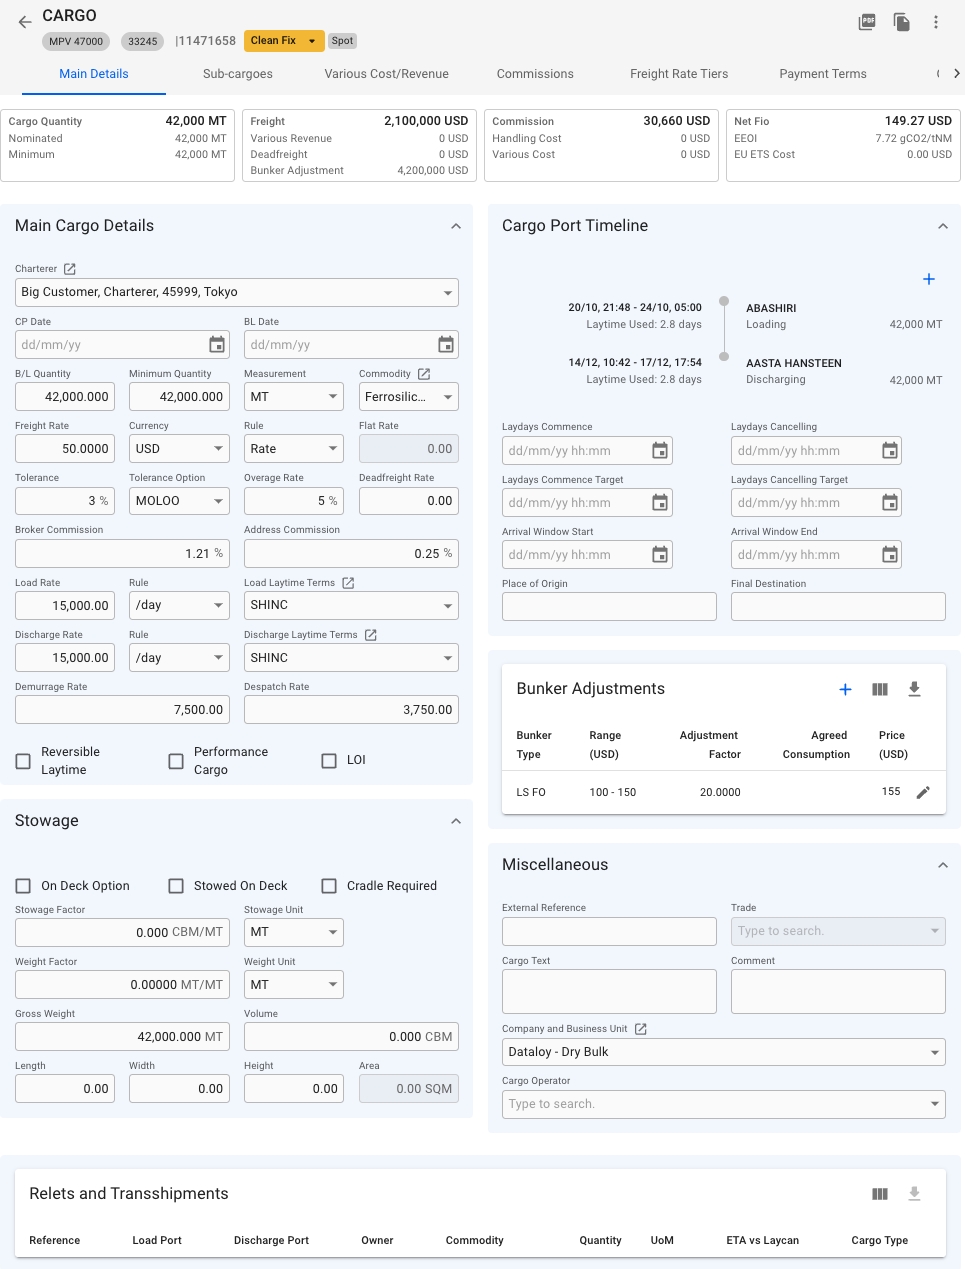
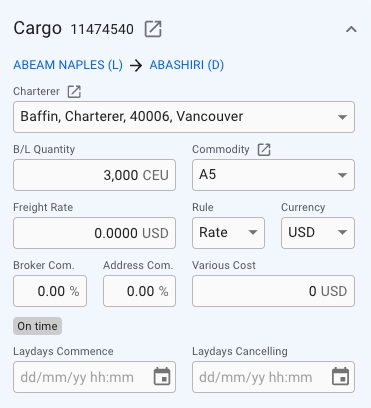
When you open the cargo drawer this is the top section of the drawer.
By clicking the various tabs you get the relevant information about the cargo. Check out the next pages for information about the different tabs.
On the left side you will see the cargo reference, status of the cargo, and if it is a spot or CoA cargo.
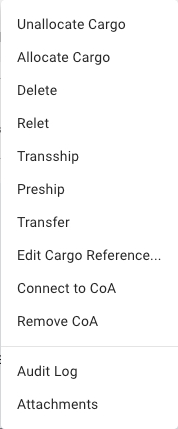
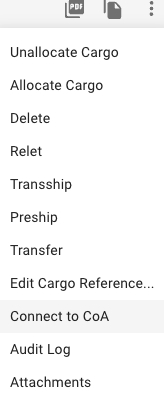
On the right side you have primary actions; PDF and copy. The three dots is a dropdown with secondary actions for the drawer. If you click the three dots you will be presented with the below view as a drop down:
You can allocate/unallocate the cargo.
You can delete a cargo.
You can arrange Tranship, Preship or the cargo.
You can also and when connected.
And finally you have the option to view the audit log or append attachments to the cargo.
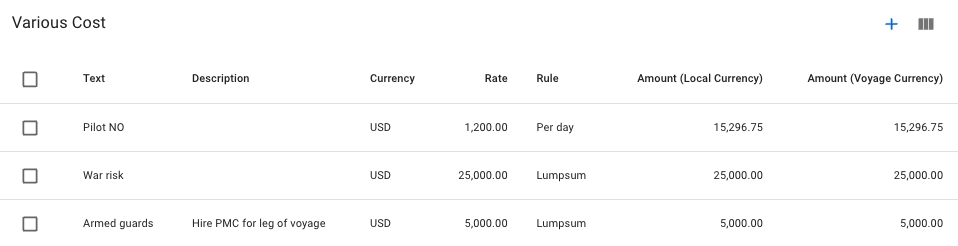
In the various Cost/Revenue Tab there will be two tables. One table for various cost and one for various revenue.
To add a Various Cost click the blue plus icon in the top right corner. Once clicked the below modal will appear.
Once the required fields are filled in the create button will be activated and you can create the Various Cost.
To add a Various Revenue click the blue icon in the top right corner. Once clicked the below modal will appear:
Once the required fields are filled in the create button will be activated and you can create the Various Revenue.
To delete either a Various Cost or a Various Revenue select the item from the table by clicking the checkbox on the far left side.
Once one or more items are selected you can click the trashcan to delete the selected item(s).
A cargo transfer is a type of transshipment where a cargo transported on two voyages. The cargo is transported on the first voyage to one port and then further transported on a second voyage to its final port.
You start with a cargo with a load and discharge port which represents the first part of the cargoes journey (on the first voyage). From a system perspective, the action "transfer" creates a new cargo for the second part of the journey (on the second voyage).
The original cargo will receive cargo type "Has Transfer", and the new cargo will receive cargo type "Transfer."
The following fields are synchronised:
cargo quantity and measurement unit
commodity
discharge rate + terms of has transfer cargo = load rate + terms of transfer cargo
Transfer cargoes are listed at the bottom of the cargo drawer under "Relets and Transshipments".
Open a cargo drawer.
At the top right in the cargo drawer, click Moreand select Transfer.
Fill in the form fields:
The discharge port of the original cargo will be the load port of the transfer cargo.
A relet can be defined as the act of sub-chartering a cargo to other owners to transport. A relet always covers the entire voyage of a relet cargo.
Relets are listed at the bottom of the cargo drawer under "Relets and Transhipments".
Open the Cargoes module in the Core section.
Click a cargo in the list to open it in a drawer.
At the top right in the drawer, click Moreand select Relet.
Fill in the "Owner" field and click Confirm.
A copy holding most of the same data of the cargo to be relet will be created in the system .
that was relet.
Find the relet listed under "Relets and Transhipments" in the cargo drawer and click to open it.
At the top right in the drawer, click Moreand select Delete.
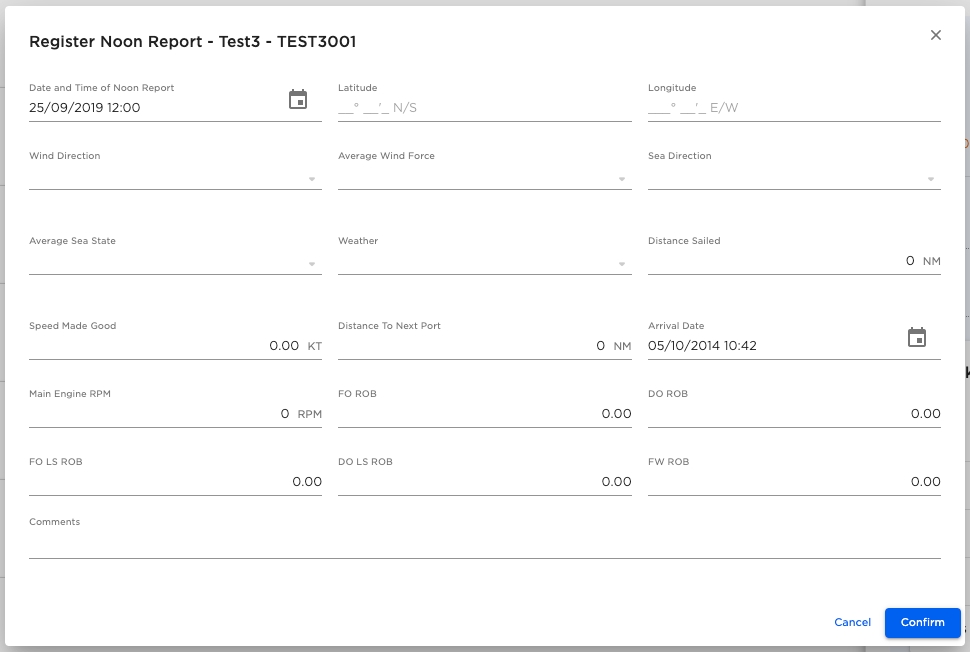
To register a Noon Report, open the drawer for the given Port Call by clicking it in the list. Then click the icon at the top of the drawer and select "Register Noon Report". A dialog will open and allow you to enter the details.
To view bunker orders on a Port Call, open the drawer for the given Port Call by clicking it in the list. When inside the drawer click the "Bunker Orders" tab, which will display registered bunker orders in a table.
By clicking a row in the bunker order table, a new drawer view will open with additional bunker order information like in Maintain Bunker Orders.
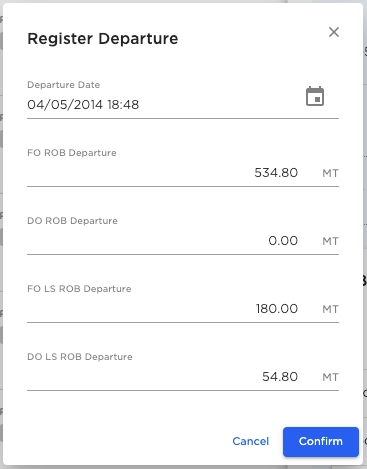
To register a departure in a Port, open the drawer for the given Port Call by clicking it in the list. Then click the icon at the top of the drawer and select "Register Departure". A dialog will open and allow you to enter the departure details.


Depending on your access permissions the list of Vessels might not be visible.
Open the Vessels module in the Core Menu list on the top left corner.
There are several options available for you to narrow down what you include in the list view, including a "My Vessels" filter that shows all the vessels of which the logged-in user is set as one of the following:
Master User
Responsible Accountant
A functionality to compare voyages' values to each other to get the best overview.
The comparison button can be found as a primary action in the Voyage drawer:
This will open a new page where you will be able to see a overview of the voyages to compare, copy the voyages you want to compare and/or open the Voyage drawer of the voyages:
For the initial release version of this tool, you'll be able to see and modify details on your vessel, cargo and voyage. Some fields may be greyed out, for the same reasons you might not be able to modify them in the voyage or cargo drawer normally.
In the top left you will find two buttons; Highlight Differences and Show Only Differences, which will enable or disable the respective features. By default, Highlight Differences is turned on.
The top header shows the voyage reference number, and a button to copy and remove the voyage from the comparison. Clicking on the voyage reference will open the voyage drawer. From here, you can make all the changes you are used to, and the comparison will update accordingly.
A section in a Voyage drawer that visualizes the schedule and port-call-related information.
The Voyage schedule visualization may be found on the right-hand side of a voyage drawer.
This section is highly customizable: e.g., you may change the voyage start date, lock it, edit the Voyage's speed, update the port call sequence, and much more!
The Schedule Timeline is a fully interactive module. Each port represents a draggable block - if you reorder the blocks, you will update the port call sequence on the opened voyage correspondingly:
Next, each Port Call block is clickable, and it brings up a drawer.
The small ovals inside of each Port Call block includes a piece of related information: Days at Sea + Extra Days at Sea
Voyage drawer
The Voyage Edit Schedule segment may be found on the right-hand side of the Overview tab in a Voyage Drawer.
The edit schedule tab includes a complete list of for all the Voyage's cargo.
There are three core elements involved: Selected Port Calls, Selected Cargo, and the rest.
Selected Port Calls: these objects are highlighted by the blue background and a small blue line on the left of the Port Call port (see figure 2). The selected port calls display data for the respective selected Cargo.
A section in a Voyage drawer found in the third tab of the Schedule module
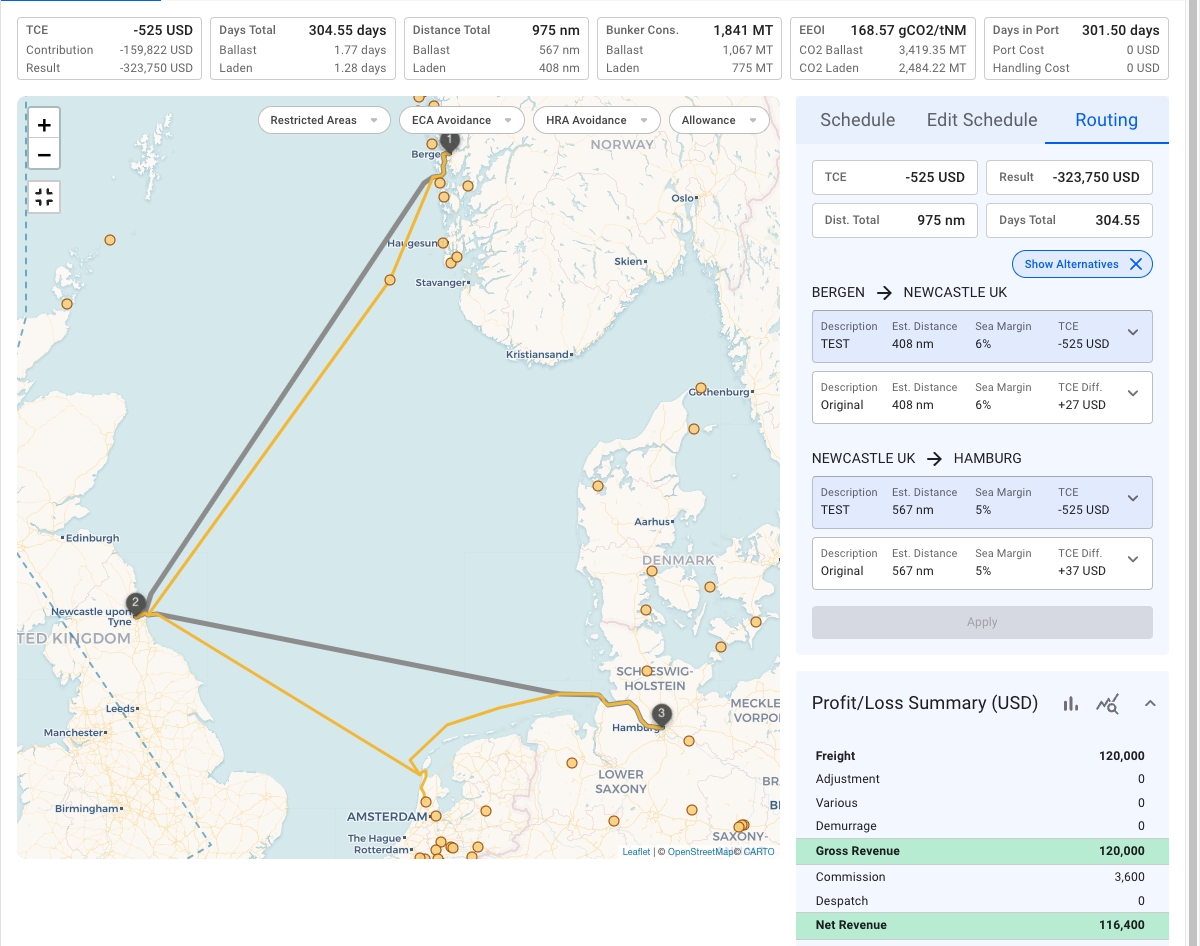
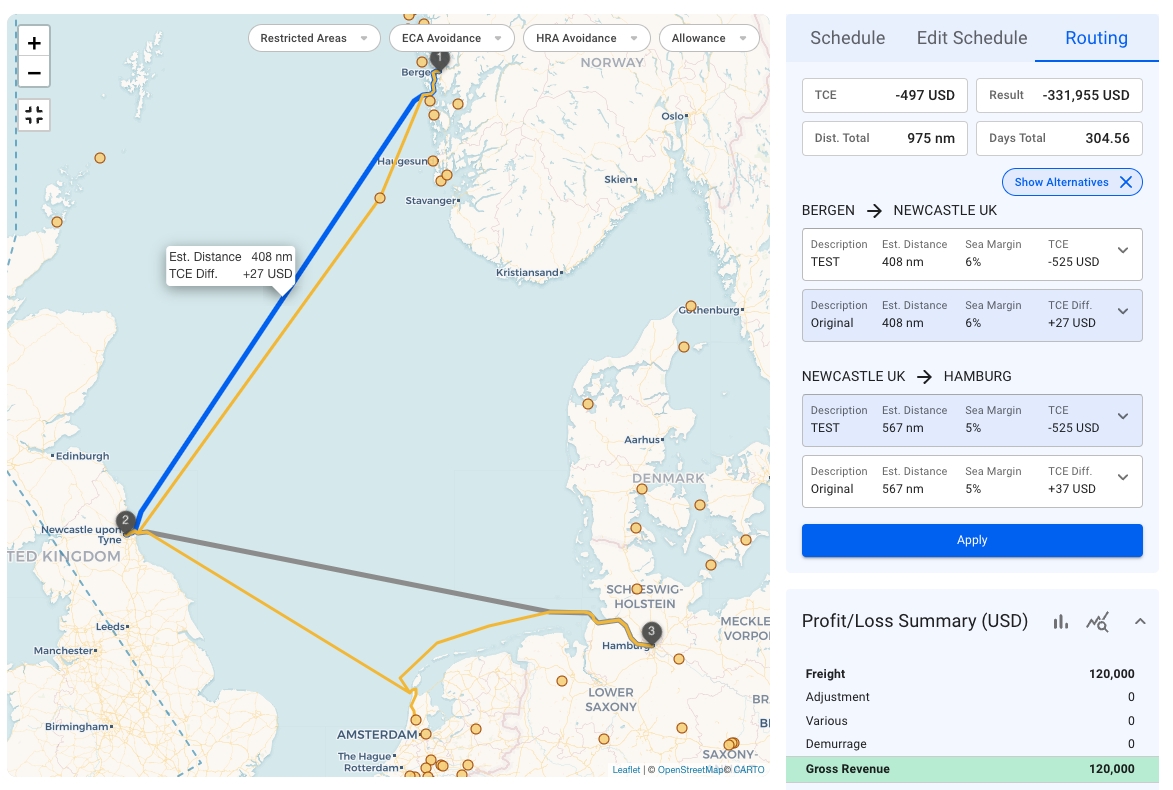
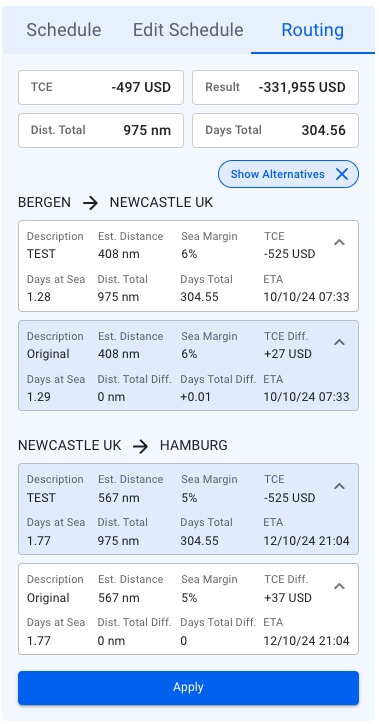
The 'Routing' tab allows comparing different routes regarding essential information such as Voyage TCE, Voyage Result, total distance, total days, etc.
See the screenshot below (Image 1) for an example:
A voyage going from Bergen to Hamburg through Newcastle is displayed. The routing tab illustrates an alternative route for each leg on the mentioned voyage. As presented in the screenshot, there is a key difference between the routes:
TCE Difference: the TCE difference indicator shows the difference between the alternative route TCE and the currently selected route TCE. So, for the leg, Bergen -> Newcastle, the current TCE is -525 USD. On the other hand, selecting the alternative route will result in +27 USD, which is -497 USD of TCE total (See Image 2).
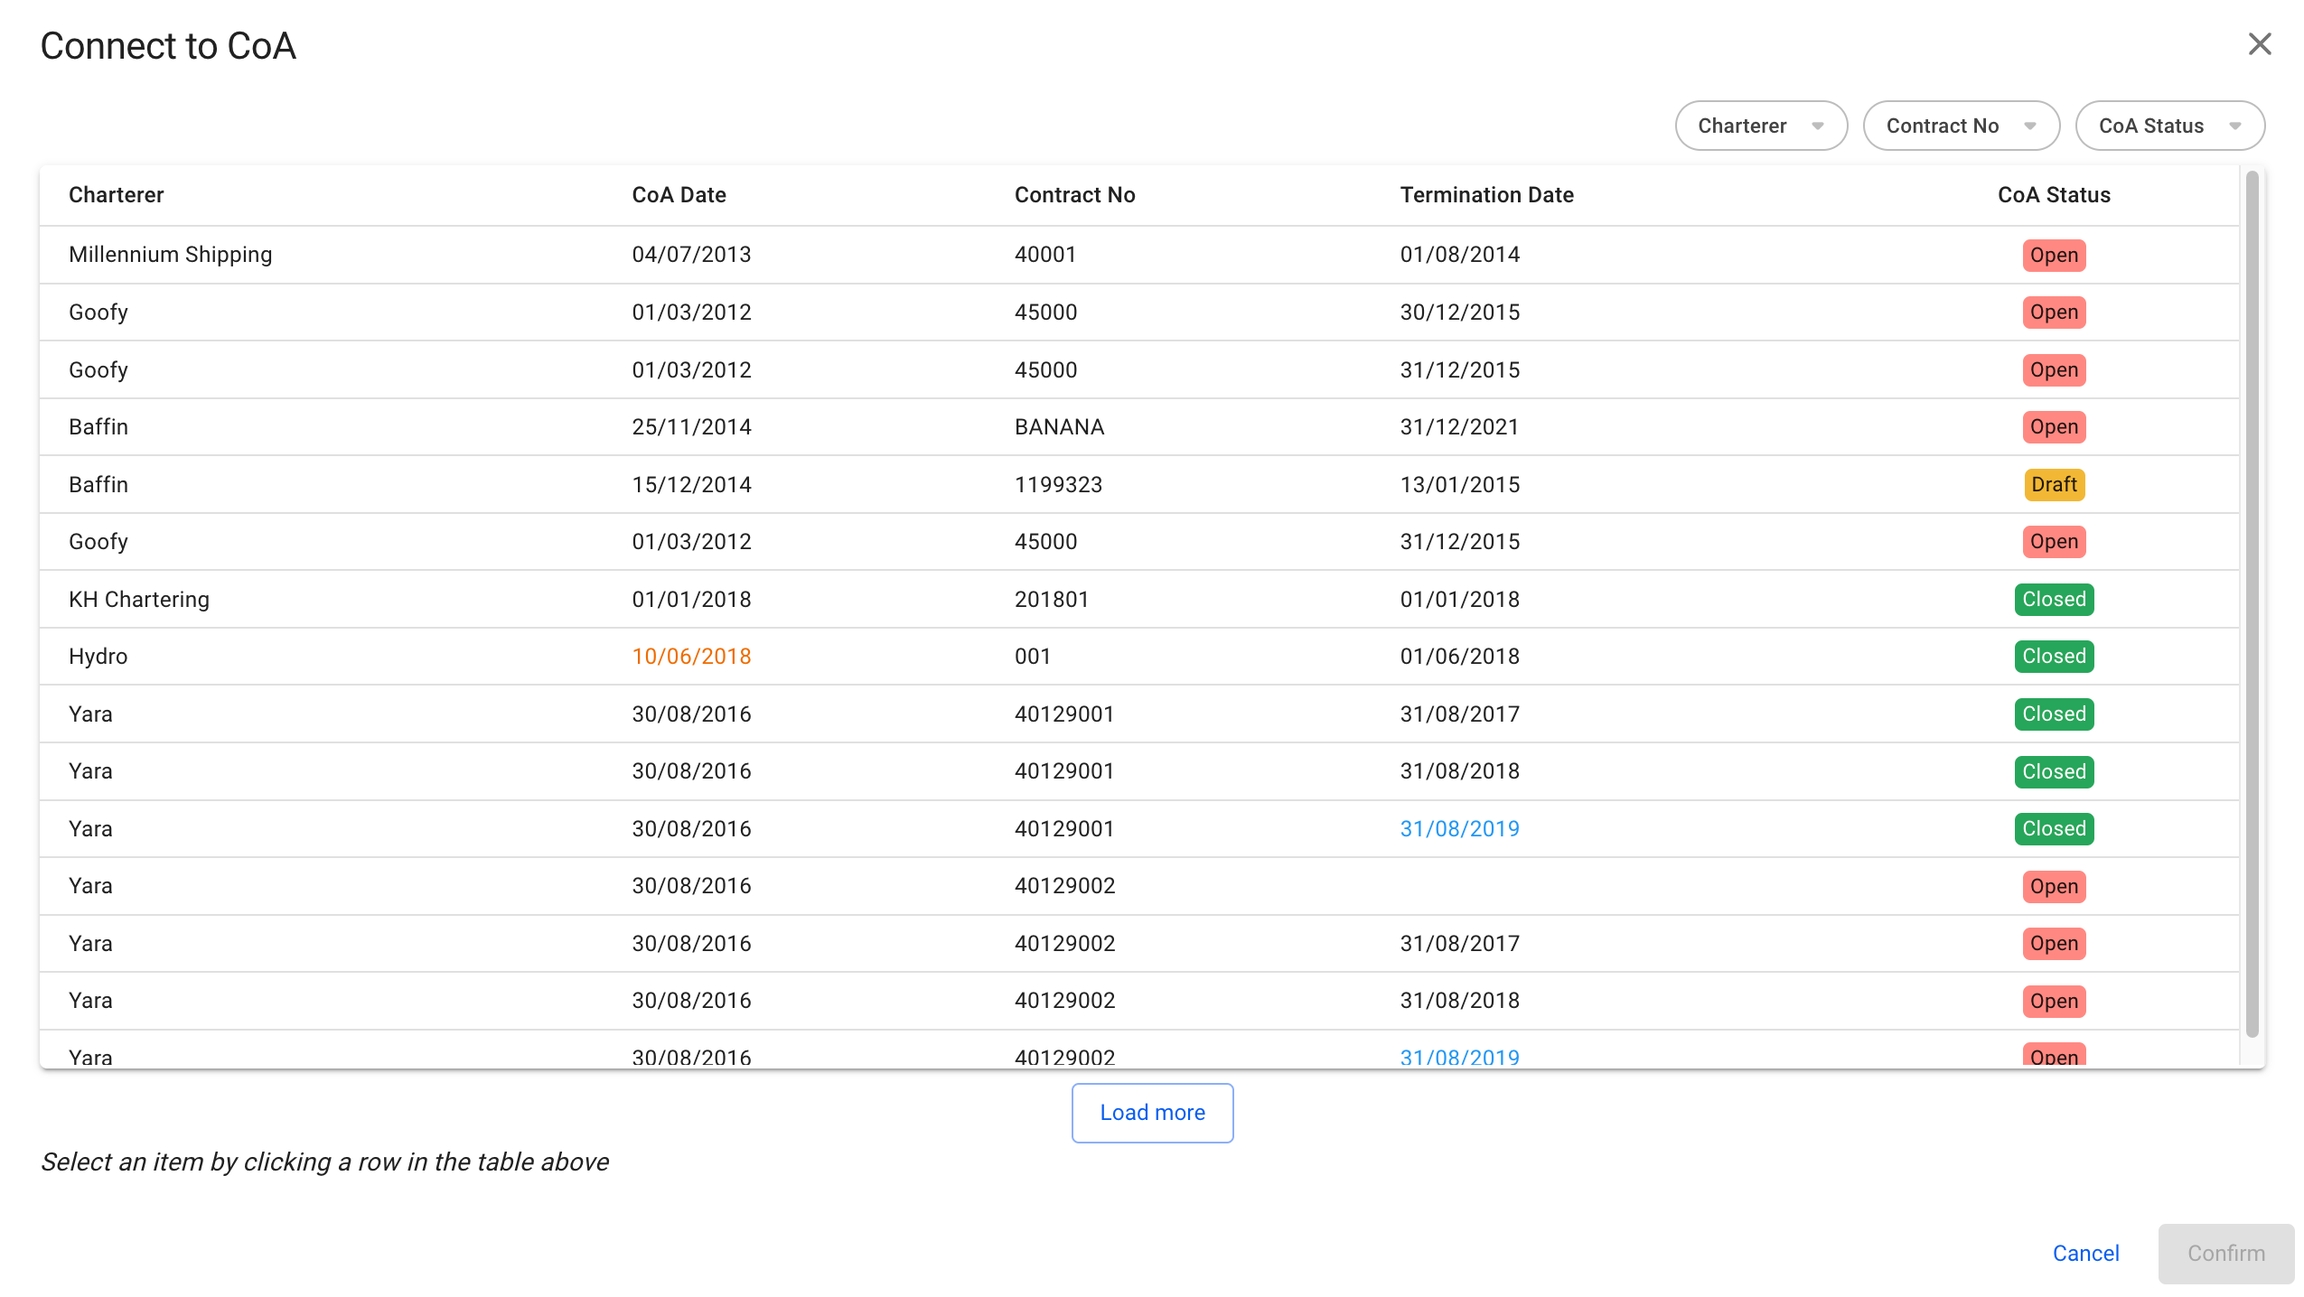
If you click the Connect to CoA button in the secondary actions menu on in a Cargo Drawer,
you will open the Connect to CoA modal:
In this modal you choose which CoA Line you want to connect the Cargo to and click Confirm to connect it. Doing so will update the Company and Business Unit of the Cargo to be the same as the Company and Business Unit of the CoA.
When you have connected the cargo to a CoA Line, you will see a chip at the top of the Cargo Drawer that says Contract of Affreightment as well as which CoA Line you've connected it to (40129002 in this example).
The CoA number chip (40129002) is a clickable chip that will open up the drawer of the CoA.
A transshipment is the shipment of cargo to an intermediate destination, then by a different vessel to another destination. It is a type of created from a cargo booking from a particular discharge port at the end of an original booking.
A preshipment is another type of relet created from a cargo booking. It is the shipment of cargo from a location to that cargo's load port in an existing cargo booking. This includes the transfer to the vessel transporting from the load port.
Transshipments and preshipments are listed at the bottom of the cargo drawer under "Relets and Transshipments".
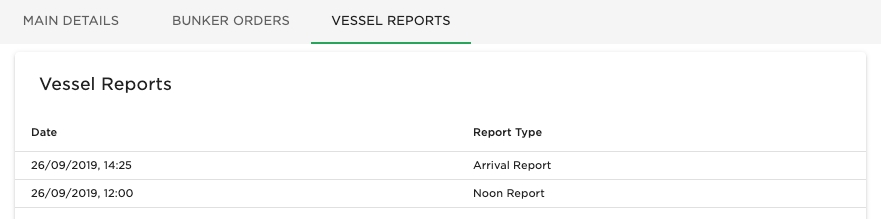
With below it is possible to keep track of incoming vessel reports.
To view Vessel Reports, open the drawer for the given Port Call by clicking it in the list. Then click the tab "Vessel Reports" at the top of the drawer and a list with registered reports will be displayed.
To view a given report, click the wanted report in the list and a new drawer will open with further details.
Note: if you want to keep track of incoming reports from multiple vessels or a fleet then check out
Click a cargo in the Cargoes module list.
When the drawer opens, open the action menuin the top right.
Click the Allocate Cargo button to open a dialog for allocation.
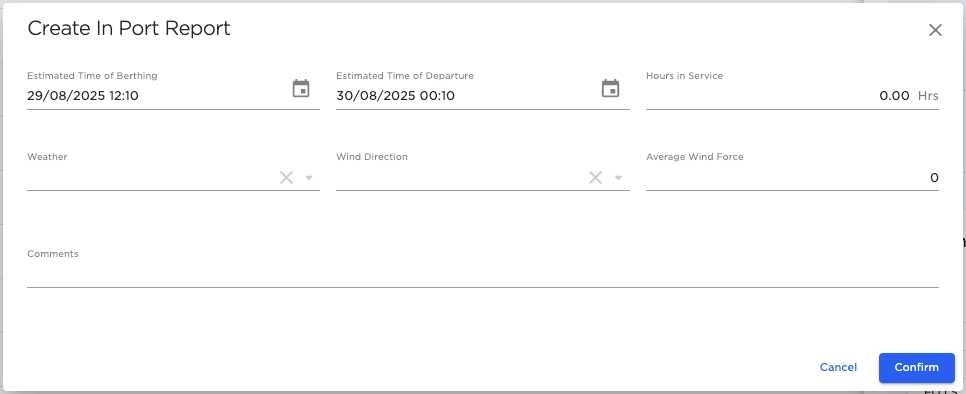
To register a In Port Report, open the drawer for the given Port Call by clicking it in the list. Then click the icon at the top of the drawer and select "Register In Port Report". A dialog will open and allow you to enter the details.
The Port Log allows you to record all during a port call. The events are specific to a cargo and gives important information in a Laytime Statement about what has occurred and when.
To access the Port Log go to the CorePort Calls module and click a port call to open the drawer to find the "Port Log" tab at the top.
The event table lists all applicable events for the port call. Events are either on Cargo Port or Port Call (PC) level. The columns in the table are event names, port call event dates and cargo event dates (one per cargo registered on that port call). The column header for cargo shows charterer name, cargo reference number and quantity.
Operator
Claims Operator
You can also Customise the columns of the Vessels list to add, reorder or hide columns. The columns Operator, Built, and Schedulable are hidden by default.
On top of the list, you may find three tabs: Operative, Archived, and Map. The two first tabs illustrate pre-sorted data based on the fleet exit date parameter. The Map includes an interactive map with the current vessels' location.
Moreover, filters found on the same line as the tabs, apply to both tables. If you switch between tabs, the filters will remain the same, facilitating navigation.
A click on the Operative tab will load a table, that contains only operable vessels. In other words, the vessels whose fleet exit date is either not set, or set in the future.
On the other hand, the Archived tab presents vessels whose fleet exit date is older than the current date (fleet exit date was in the past).


To change the order of port calls, click and drag the Movebutton to move the port call into place.
Final discharge port of the transfer.
Second vessel to transport the cargo.
Second voyage to transport the cargo.
Click Transfer.
To the right of the rightmost voyage, you'll find a big grey button that when clicked, opens a dropdown menu. Here you can add an existing voyage to the comparison, or create a brand new one.
The Vessel section of the comparison allows you to choose and edit many values that can change your result. Want to see how another vessel would perform on a given voyage? How much difference will different speed orders or bunker prices make? Make a change, and see how it affects your result and TCE.
The Cargo section displays information about one cargo at a time. In the event your voyage has multiple cargos, click on the Reference dropdown to see and select another cargo.
The Cargo Ports row shows you the first load and discharge port for the cargo. If you have a longer schedule, hover over the row to see the entire schedule as a tooltip.
Changing any of the fields here behaves as if they were changed from the Cargo drawer. For instance, setting a high freight rate will automatically update the rule to Lumpsum, and the calculations are being carried out as such.
In the Voyage section, you are only able to set the start date of the voyage. Like the Cargo Ports row in the Cargo section, the Schedule row only shows two ports. Hovering your mouse over the row will bring up a tooltip showing the entire voyage schedule.
Voyage Comparison Feature Overview - Watch the Video Here


Moreover, the Port Call blocks include a small functions tooltip that provides the following actions on the voyage schedule sequence: show Port Cost history overview, create new Port Call to the current schedule, edit the selected Port Call, or delete the Port Call.
To edit a port call in the schedule, click the pencil icon in the functions tooltip. A popup modal then shows where main details of the port call can be changed.
Note that the port can only be changed if the Arrival-, Berthed-, and Departure Date are unfixed. If any of these dates are fixed, the port selector will only show available terminals on the currently selected port.
Selected Cargo: the currently selected cargo can be chosen inside the select cargo modal, which can be invoked by clicking the expand cargo button (triangle facing down inside the left section, see figure 3). The selected cargo will be the subject of the Edit Schedule list. The Port Calls contained in the list correspond to the selected cargo, and the related values change dynamically if another cargo is chosen.
The rest: the rest can be considered all the grey options inside the list. These options are also expandable and can be edited, but they don't belong to the selected cargo and, thus, are not the focused elements (e.g., SUEZ CANAL Port call in Figure 2).
Each list item is interactive and can be collapsed or expanded. When the selected cargo is changed, the corresponding cargo ports expand and get visually highlighted, the corresponding values are updated.
Moreover, the collapse button can expand Port Calls related to the selected Cargo, Expand all Port Calls, or Collapse all. The button may be found on the right over the first PortCall (see figure 3).
Next to the Port Call port name, there is a Reason For Call specified inside of parentheses - L means Loading, D - discharging, and C - canal passage.
Estimated Distance: illustrates the estimated distance for each leg, original and alternative.
Sea Margin: shows the sea margin.
The map is also interactive and helps to visualize the alternative route, providing crucial data.
It is also possible to compare the routes in more detail! For instance, take a look at the screenshot below:
Clicking the top-right arrow in each container expands the detailed information.
The apply button proceeds with the changes and saves the selected route for the current voyage.
Note: The alternative routes may be created manually or must be coming from a third party, such as weather-based routes, etc.
You cannot create a cargo if there are no load- or discharge port calls on the voyage
Even when we have the delivery/redelivery port calls
You need to create at least one loading- and discharging port calls on the voyage schedule (unique values)
You can only create cargoes with cargo ports based on the port calls in the voyage schedule
The port selectors on the upper-left side of the modal are restricted to only display these cargo ports (also with its attached terminals)
The following actions are disabled from the secondary drawer actions:
Unallocate Cargo
Allocoate Cargo
Relet
Transship
Preship
Transfer
In the FAS Cargo Management board, these following actions are disabled:
Dragging an unallocated cargo to a TC voyage
Dragging an allocated cargo on a TC voyage to Commitments
Dragging an allocated cargo from one TC voyage to another voyage (TC or not)
one cargo port - when loading/discharging one cargo
more than one cargo port - when loading/discharging more than one cargo
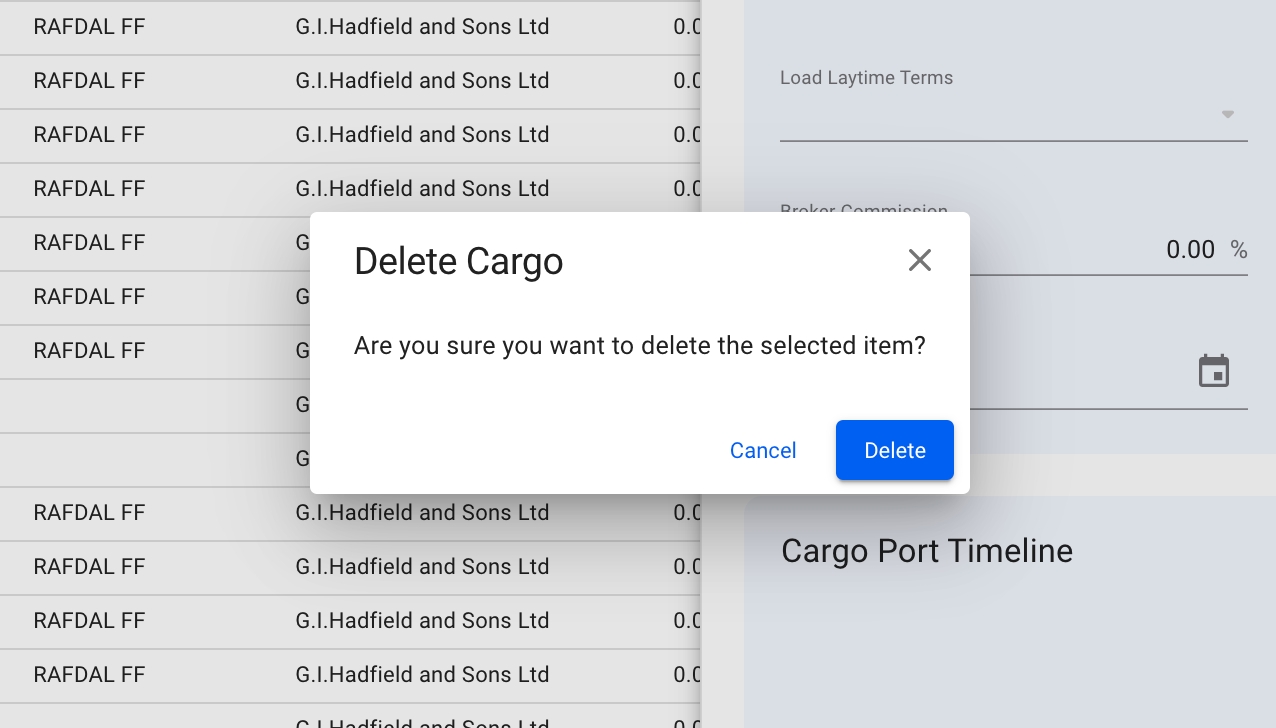
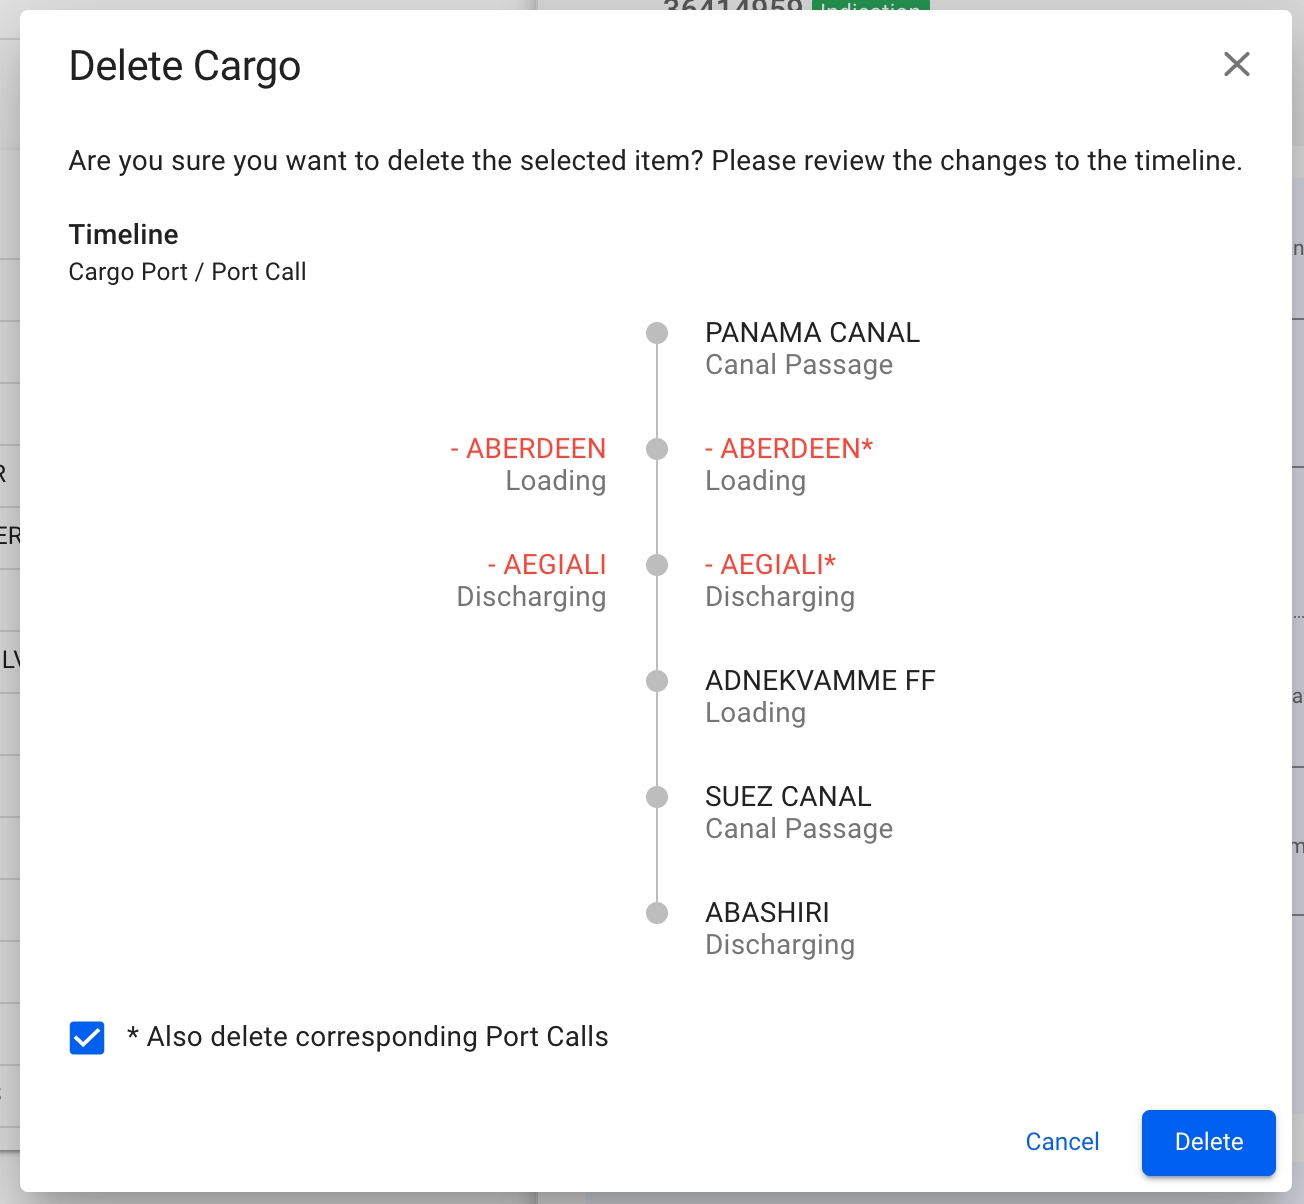
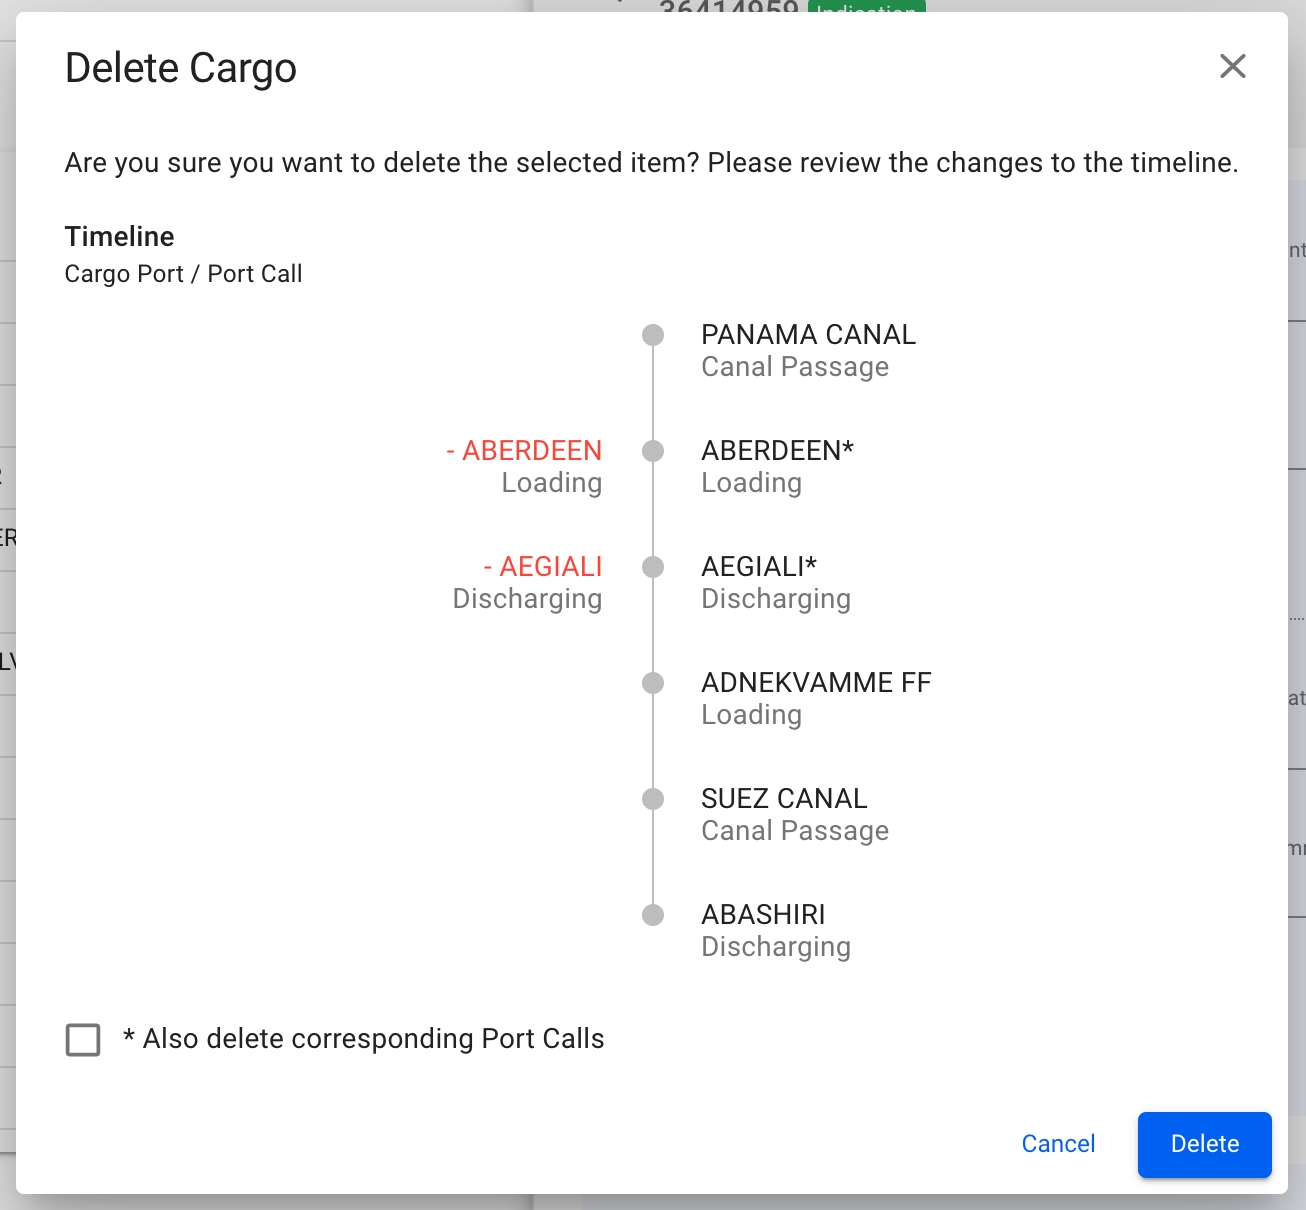
When deleting a cargo the link between the cargo ports and port calls will define what options you will see in the delete cargo window.
1️⃣ When deleting a cargo which has cargo ports linked to a port calls which are linked to some other cargos cargo ports you will get a simple confirmation message before cargo is deleted as per below
2️⃣ When deleting a cargo which has cargo ports linked to port calls which are not linked to any other cargoes cargo port you will get option to also delete the linked port calls. This makes it easier to keep your schedule clean and correct.
When ticking the checkbox the port calls marked in red will also be deleted from the schedule.
In the Port Call drawer, you can look through the different tabs below to display all the relevant information:
More detailed information in each of the tabs you can find under in the Port Calls section. Ex. "View Service Orders on Port Calls" for more information about Service Orders in each Port Call.
Open the Cargoes module in the Core section.
Click a cargo in the list to open it in a drawer.
At the top right in the cargo drawer, click Moreand select Transship or Preship.
Fill in the fields listed below.
Click Confirm to relet the cargo.
Field
Description
Owner
Owner of the vessel to transship the cargo.
From Port
A discharge port in the cargo booking.
To Port
The final destination.
Field
Description
Owner
Owner of the vessel to preship the cargo.
From Port
The originating port.
To Port
A load port in the cargo booking.
Click Allocate to allocate the cargo and create any new necessary port calls on the voyage.
To register a date for an event, click on a cell in the table and press Save in the appearing window. Dates can be cleared by opening the event date window again and pressing backspace to delete the date in the input field.


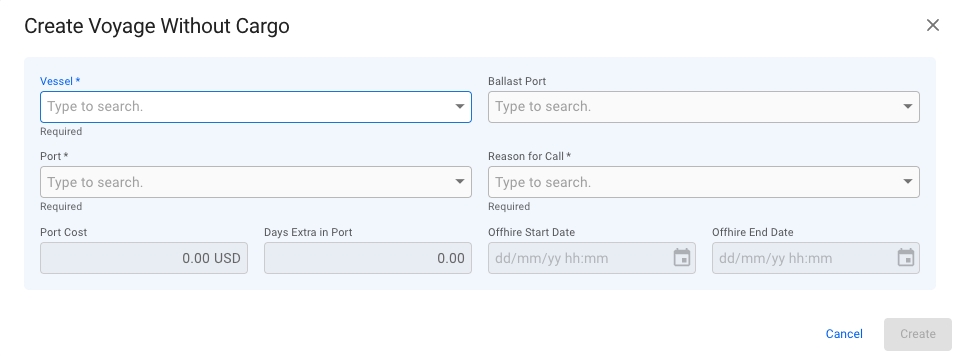
There may be several reason for having a voyage without any cargo onboard the vessel. By using the Create Voyage Without Cargo option, you can for instance plan out repositioning of your vessels, or schedule dry docking.
Open the Voyages module from the menu on the left.
On the top right corner, click the icon.
Select Create Voyage Without Cargo.
After you have filled in the required information, you can click Create.
Depending on your access permissions the list of voyages might not be visible.
The "Voyages" module can be located from the left side menu.
There are several sorting and filtering options available for you to narrow down what you see in the list view, as well as the ability to toggle which columns are displayed.
Charterer
Shows the Charterer of the Performance Cargo or TC
Vessel
The voyage drawer is also split up in different sections; Vessel, Cargo List, Cargo (the Performance Cargo), Schedule, Speed & Consumption and Profit/Loss Summary.
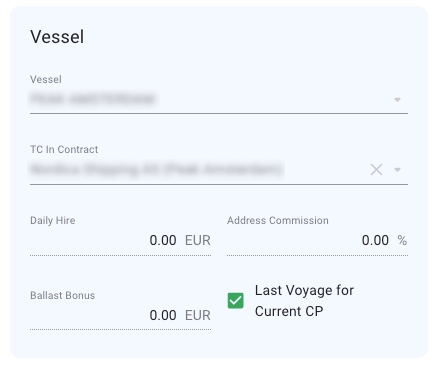
For a TC voyage, the drawer has the Time Charter Contract section instead of the Cargo section.
On the left hand-side, we have the vessel name chip, which is clickable and will forward you to the linked . The number is the reference number of the voyage, and to the left we have the status. The statuses are within a dropdown menu which you can change yourself:
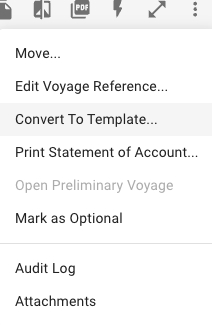
To the right hand-side, we have the button, copy button (to duplicate the selected voyage), the voyages button, print voyage button, the voyage button, the expand button, the secondary actions button and the close button. These are also called the primary actions:
In this dropdown menu, you are able to do several actions:
Move: you are able to move the voyage onto another voyage by changing the selected vessel, also known as allocating the voyage.
Edit Voyage Reference: you are able to change the voyage reference number on the given voyage. Read more: .
Convert To Template: you are able to convert the voyage to a template. Here you have two different options to choose between (unless they are disabled).
Print Statement of Account: you are able to print out the SoA report of the given voyage.
Open Preliminary Voyage: Opens a new tab and brings you to the special preliminary voyage that is created when the voyage is nominated.
Mark as Optional: you are able to mark the voyage as optional, meaning you can set the statuses 'Not declared', 'Declared' or 'Forfeited' on the performance cargo of the voyage. Read more .
Audit Log: you are able to track every action inside, and regarding, this given voyage.
Attachment: you are able to upload/download the voyage attachments.
With the Sensitivity Analysis tool you can run calculations on a chosen parameter to evaluate risk.
Click on a voyage in the list or board to open it in the drawer.
At the top right, click on Functions.
Select Voyage Sensitivity Analysis.
Select a voyage parameter which is then adjusted by the numerical variance for each calculation.
The chart shows all the calculated values for the voyage. There are 15 data points, with the current voyage displayed in the middle, with negative variance on the left side, and positive variance on the right side.
The value of the selected Voyage is specified with a blue vertical line. The figures you find in a small box above each point reflect the X-axis values for each point.
Hover the mouse over the chart to inspect the values of each calculation data point.
Moreover, you may find a table on the right from the Sensitivity Analysis chart. The table consists of the calculated values, placed in ascending order. The table may ease navigation among calculations.
Press the menu iconto download the chart as an image (SVG or PNG), or a text file (CSV) that can be imported into spreadsheet software.
Open the Cargoes module from the menu on the left.
In the top right corner, click Create .
Select Create New Cargo.
In the modal, you can fill in the required fields and add any additional information about the new cargo.
Click Create.
Load Port
Discharge Port
Charterer
Commodity
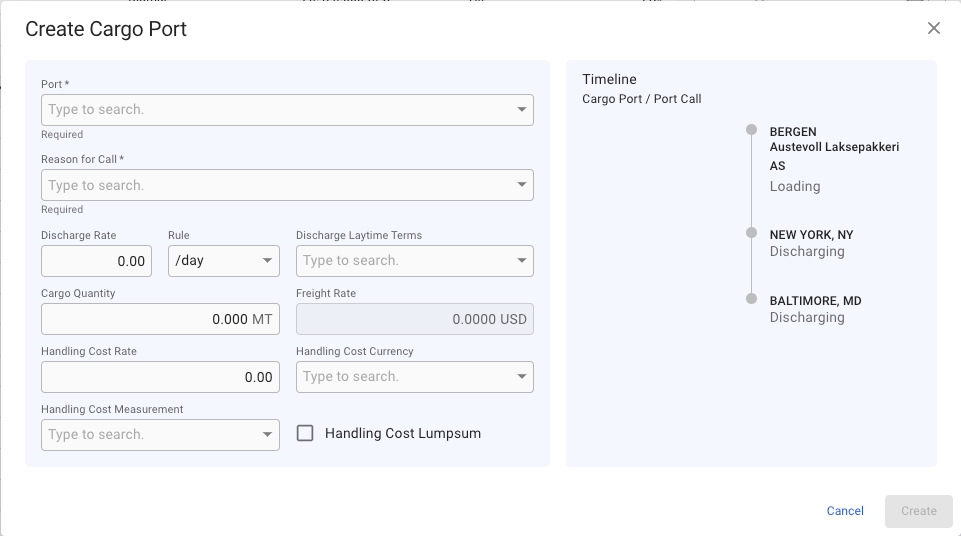
The new Create Cargo modal has a new design to increase the productivity while creating a cargo, is more user-friendly and has more useful features altogether. Click on the picture below to get a better view of the details:
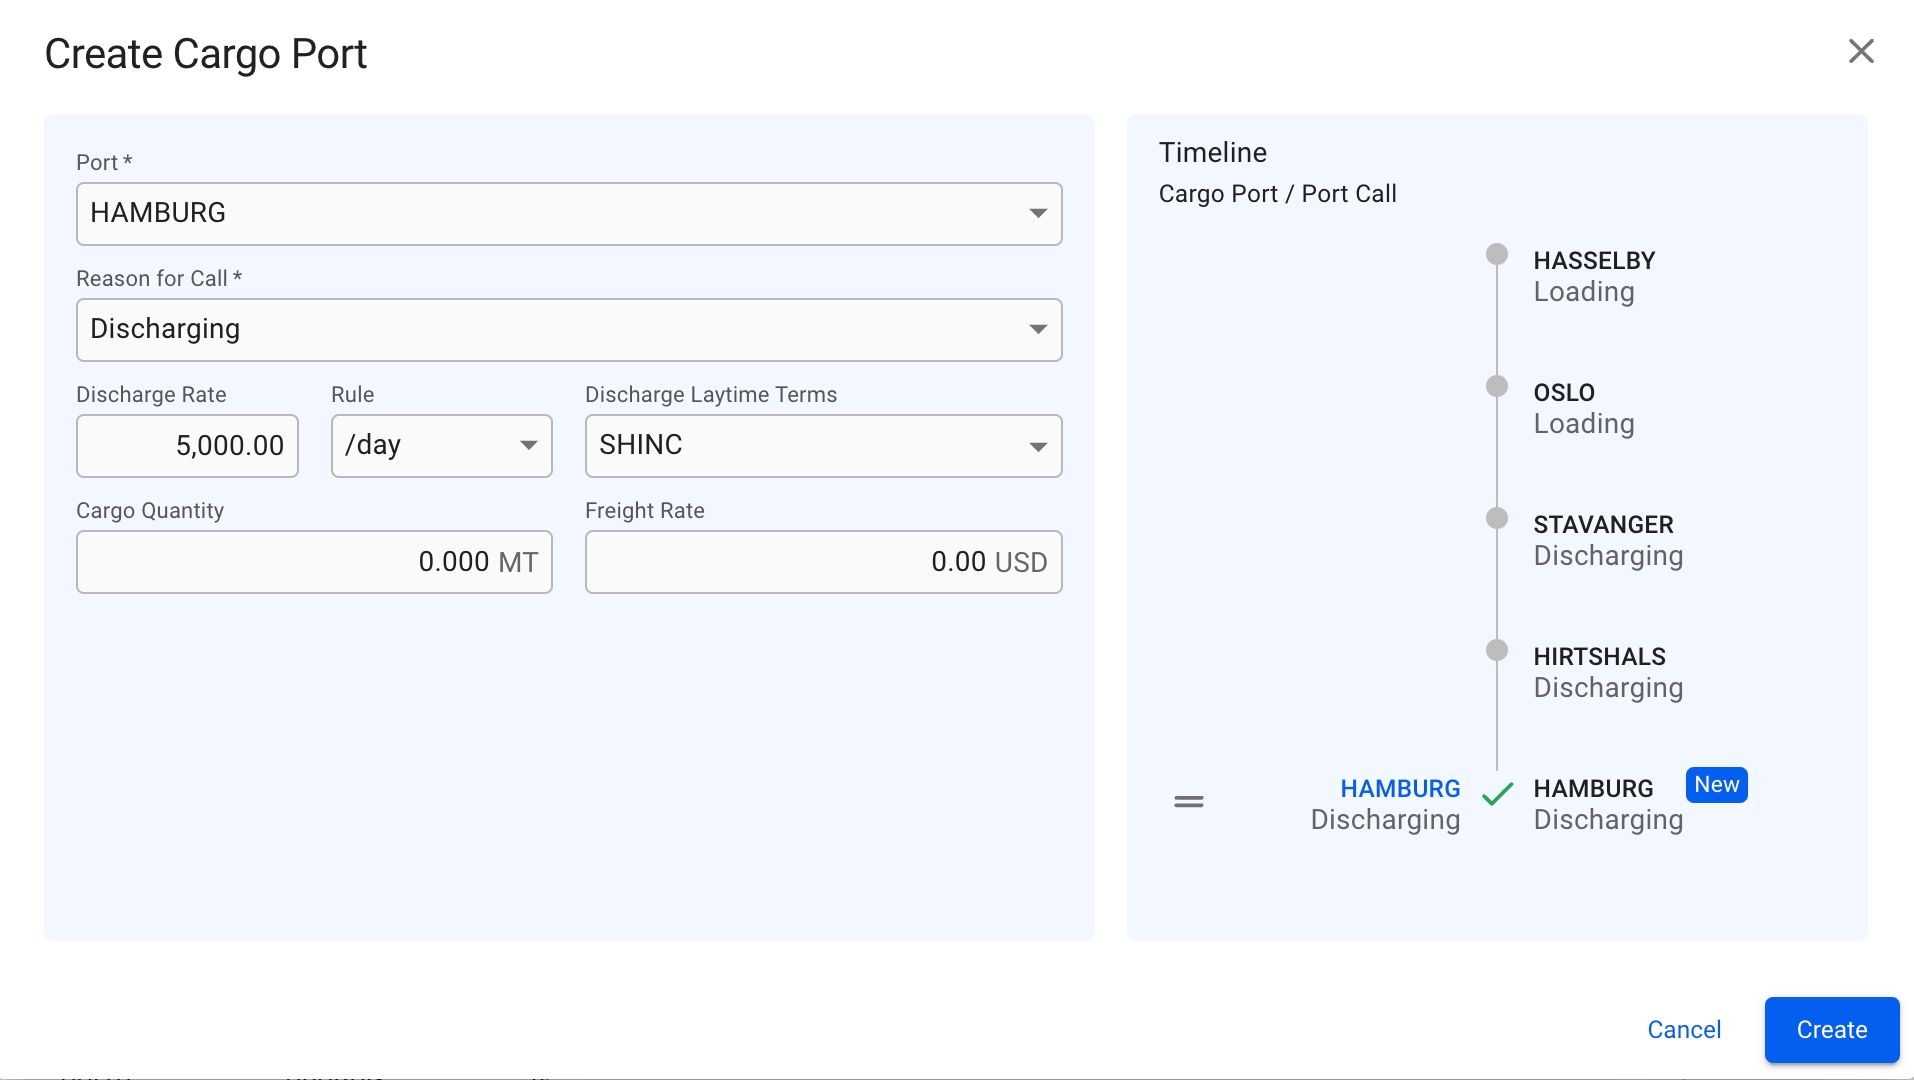
Similar to the design above, we now have a new Create Cargo Port modal:
This modal has the same features as the Create Cargo modal, listed below. To create a new cargo port on a cargo, there is now a simple icon at the top of the Cargo Port Timeline section of the . However unlike the Create Cargo modal, Reason for Call is set to 'Loading' by default and is limited to only 'Loading' and 'Discharging' for cargo ports.To change the order of ports, you can use the drag and drop features inside the modal. To edit or delete an existing cargo port you can, in the Cargo Port Timeline section, look for the grey icons on each of the cargo port rows, to specifically focus on a cargo port of choice to make the changes. Read more about the features below.
With the new multiple value component in the Create Cargo modal, you are now able to add multiple Load- and Discharge- cargo ports to the new cargo.
The fields are divided into 2 sections, while the 3rd section displays the Timeline component of the cargo ports that are added. In the Create Cargo Port modal, there are 2 sections, in which the 2nd one contains the Timeline.
It is possible to drag and drop the ports in the Timeline component to change the order of the cargo port rows, in both of the modals.
To view service orders on a Port Call, open the drawer for the given Port Call by clicking it in the list. When inside the drawer click the "Service Orders" tab, which will display registered service orders in a table.
By clicking a row in the service orders table, a new drawer view will open with additional service order information, like in Maintain Service Order.
Click Create Service Order in the top right corner of the table.
Fill in the required fields for your order.
Click in the Order Lines section to add an order line.
Also see .
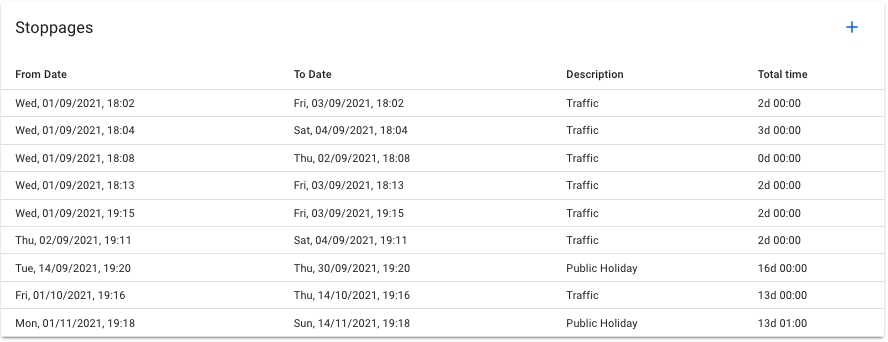
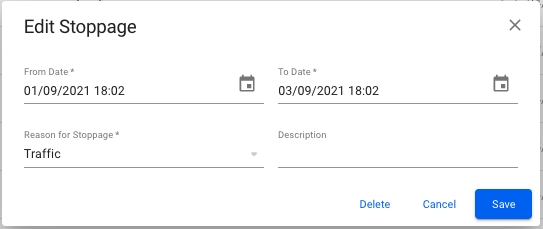
In the port log tab there will be an overview of stoppages registered for both cargo ports, and for the port call.
A list of all cargo ports connected to the port call will be displayed in the form of collapsible panels.
When opening a cargo port panel, a list of stoppages will be presented. The stoppages are editable if the cargo port does NOT have a laytime calculation connected.
It is possible to create new stoppages for a cargo port, by clicking the + sign in the top right corner of the cargo port panel. It is the same fields for creating and editing a stoppage.
Underneath all the cargo ports, a list of all stoppages related to the port call will be displayed. Stoppages that are related to the connected cargo ports will be marked with the commodity name as well.


With the Intake Calculation function you can change parameters of a voyage to get an overview of quantities available for cargo at the port calls.
Click on a voyage in the list or board to open it in the drawer.
At the top right, click on Functions.
Select
The capacity plan gives you a monthly overview if your fleet is over or under booked with cargoes. For each months and each trade, we compare the available cargoes to the capacity in your fleet which is serving that trade.
To open the Capacity Plan, go to Chartering > Cargoes and select Capacity Plan in the top bar.
You can navigate between the current month and future months at the top of the dashboard. You also filter to restrict the view to a particular set of trades.
The are three summary cards at the top displaying information on all trades selected in the filter :
Free capacity: Total deadweight - total weight
Deadweight: Total deadweight of vessels loading in the selected month
Weight: Total weight of cargoes with laydays commencement in the selected month.
For free capacity and weight, we distinguish between total values and fixed values. The latter takes only cargoes into account which have status "Clean Fix".
Category
Status
Not Fixed
Indication
Firm Offer
Working
On Subject
Fixed
Clean Fix
Summary
Description
Values
Free Capacity
Remaining deadweight tonnage summing all vessels and cargoes
Total: Deadweight - total weight
Fixed: Deadweight - fixed weight
Deadweight
Deadweight of vessels
Total: Sum of deadweight of vessels
Weight
Weight of cargoes
Total: Sum of weight of cargoes of any status
Fixed: Sum of weight of cargoes of fixed status
An expandable panel is shown for each trade, with totals for that trade. There are two lists inside the panel, one for cargoes by charterer and one for vessels.
In each trade panel there is a list of total cargo weight and volume grouped by charterer. Only cargoes where laydays commencement lies in the selected month are counted.
All "fixed" charterer cargo totals are listed first, while "not fixed" entries are indicated in grey.
Column
Description
Charterer
Name of the charterer
Weight (MT)
Total cargo weight in metric tons
Volume (M³)
Total cargo volume in cubic meters
In each trade panel there is a list of vessels. For each voyage in the master fleetplan, the vessel that voyage is allocated to is listed if the following two criteria are met:
The voyage is marked with this trade or its performance cargo belongs to the trade.
The voyage has arrival date in the first load port within the selected month.
Column
Description
Vessel
Name of vessel
DWT
Deadweight of the vessel
Open Date
Arrival date in the first load port
Open Port
First load port
Previous Trade
Trade of the previous voyage on the vessel
Route
Shows first and last Port Call ports
TCE
Type
Reference Number
Trade
CP Date
Shows the CP date of the Performance Cargo or TC
Status
Commodity
Shows the Commodity of the Performance Cargo
Responsible Charterer
Comments
Cargo Operator
Shows the Cargo Operator of the Performance Cargo.
Hidden by default.
Freight Rate
Shows the Freight Rate of the Performance Cargo.
Hidden by default.
Cargo Quantity
Shows the Cargo Quantity of the Performance Cargo.
Hidden by default.
Creator
Hidden by default.
Created Date
Hidden by default.

Yes
If Dry Dock is selected, an Offhire record will be created.
Port Cost
No
Only available if Reason For Call is set to Bunkering or Extra Port.
Days Extra In Port
No
Only available if Reason For Call is set to Bunkering or Extra Port.
Offhire Start Date
Yes (If enabled)
Only available if Reason For Call is set to Dry Dock.
Voyage Start Date will automatically be locked and set to the selected Offhire Start date.
Offhire End Date
Yes (If enabled)
Only available if Reason For Call is set to Dry Dock.
Must be after Offhire Start Date.
Vessel
Yes
Ballast Port
No
If none is selected the selected Port will be used.
Port
Yes
Reason For Call
At the top, below the vessel-chip and voyage reference, fields for changing the stowage and bunker properties for the entire voyage are displayed.
FO ROB Voyage Start
Fuel oil at voyage start
LS MGO ROB Voyage Start
Low-sulphur marine gas oil at voyage start
MGO ROB Voyage Start
Marine gas oil at voyage start
LS FO ROB Voyage Start
Low-sulphur fuel oil at voyage start
A table of all the port calls on this voyage is shown in this section. To change the intake reduction properties per port call, click a row to open a window where you can make adjustments. Some columns are hidden by default, and can be toggled on/off by using the "Customize Columns"-button in the top right corner of the table.
Port
Name of the port
Reason for call
Tells you the reason for the port call.
Arrival
Shows you date and time for arrival at the port.
Departure
Hidden by default. Shows you date and time for departure from the port.
Draft
Intake draft reduction of the vessel. Lower value increases intake.
Zone
Sets the vessel DWT that is used in the calculation.
A mixed chart of the calculation results is generated at the bottom. Each port call has multiple graphs to show the reductions, cargo quantity and quantity available for cargo. The charts gets updated automatically when there are changes to the voyage header, port call, or vessel parameters.
Click on the legends at the top of the chart to toggle the display of a graph. Hover the mouse over the chart to inspect the values of each calculation data point.
The loadline information table shows data on the voyage vessel that might affect the intake. To change these values, you need to edit the vessel in the Vessels module in master data.
Parameter
Calculated value
Freight Rate
TCE
Bunker Price / MT (DO, LS DO, FO, LS FO)
TCE
TCE
Freight Rate


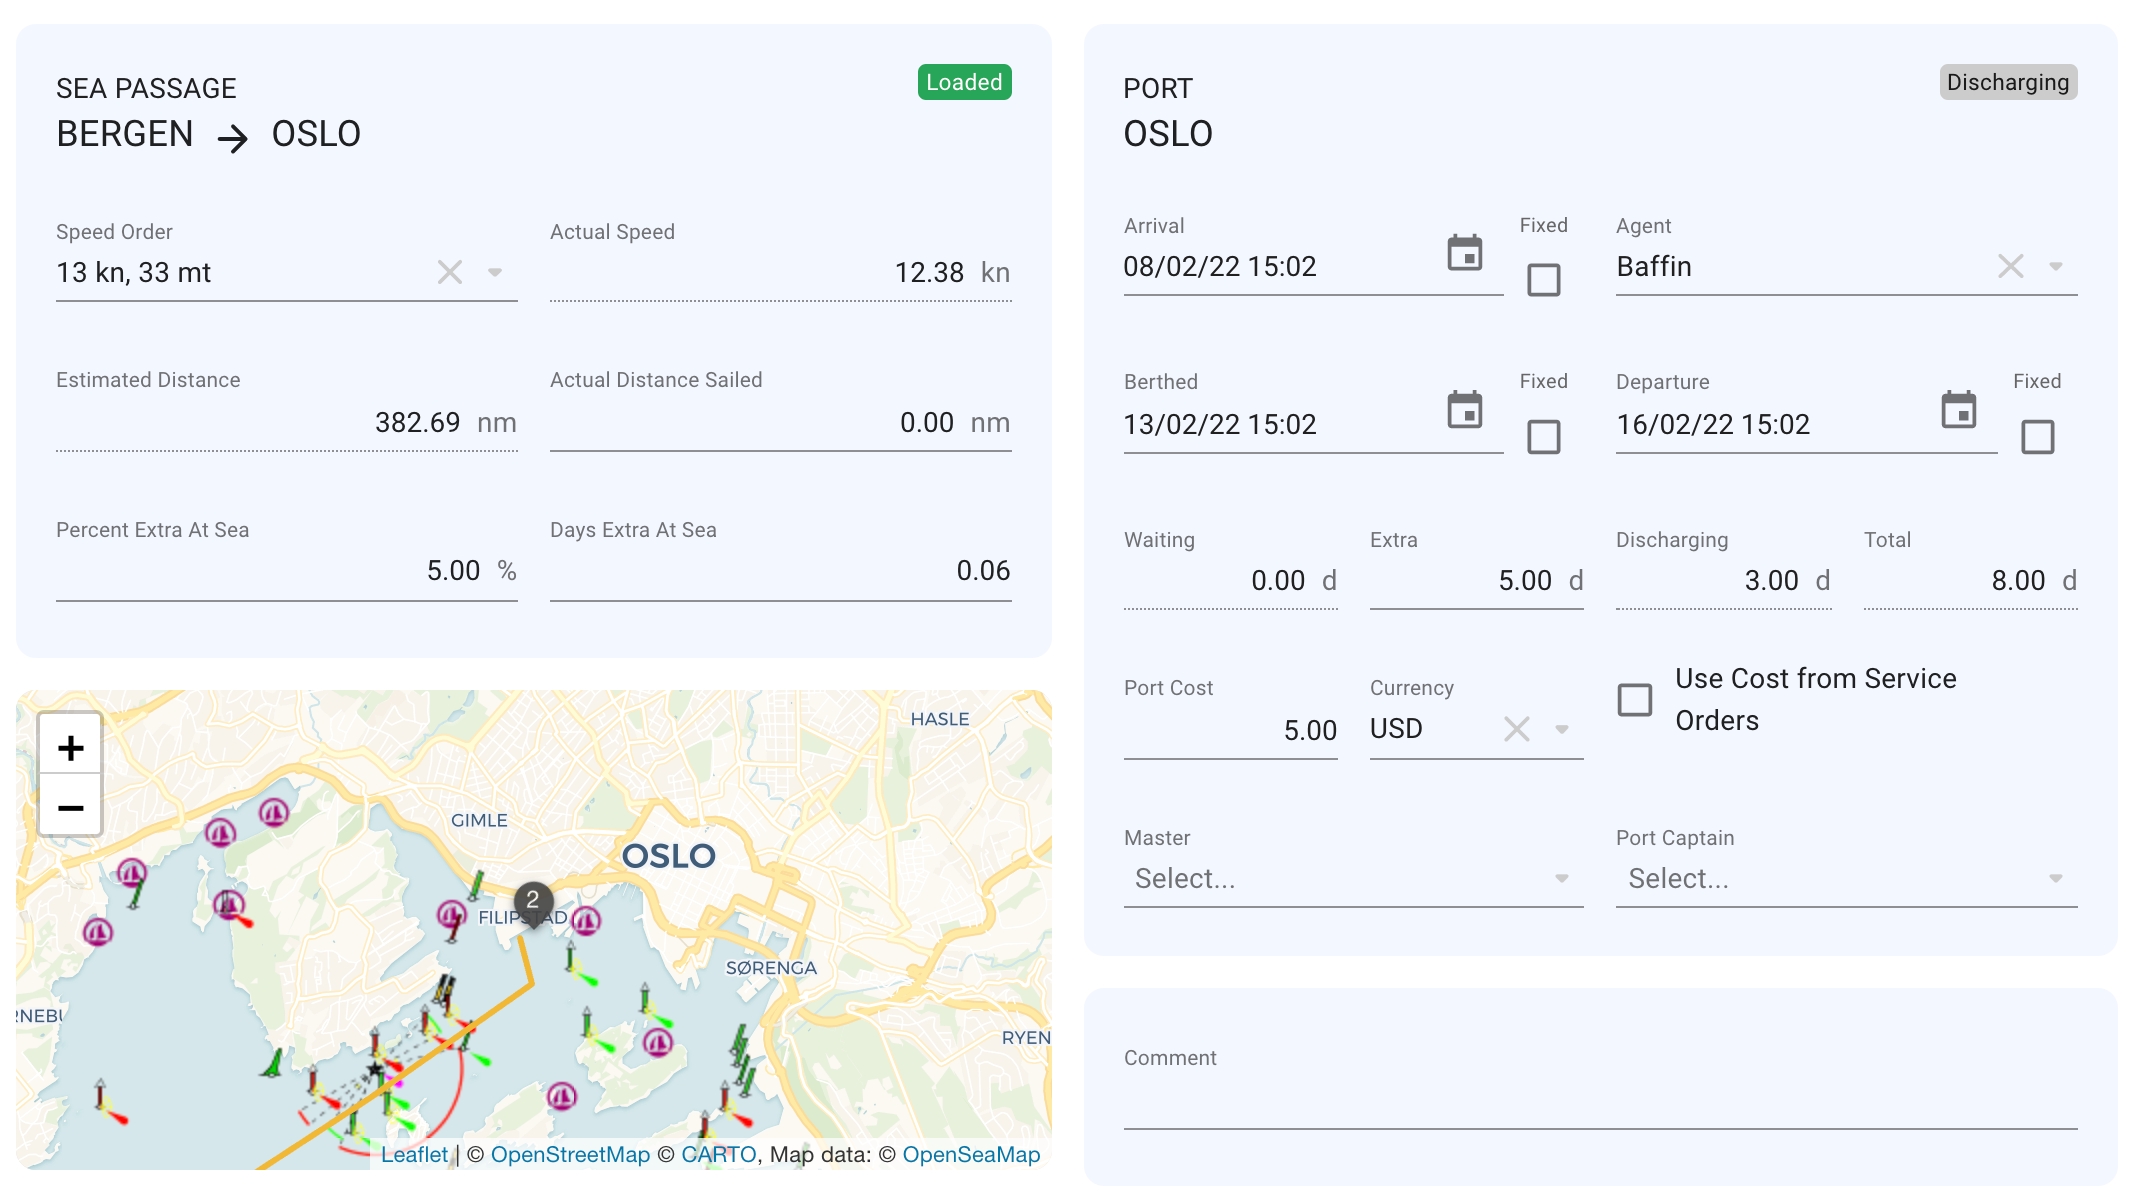
This tab contains all the main details for each of the port calls. Here we have the tile boxes displaying a vessel's number of days "at sea", as well as the "average speed/consumption", days "in port" and the "port cost". There are also sections for Sea Passage and Port, as well as sections for Comment and the Bunkers table. We also have a new Map component displaying a port call. By zooming out you will get the whole voyage that is linked to the port call:
The Sea Passage- and the Port sections contains these fields:
Look here for some more information about .
Arrival-, Berthed- and Departure dates are validated with comparisons to the Voyage Start- and Previous Portcall Departure dates, for correct date range. If the date you are trying to add is out of range, a warning prompt will show up, and you can choose different dates.
The Comment section is useful if you want to add in more additional information about a vessel or a voyage.
At the bottom of the Overview tab, we have the Bunkers table. It has been updated and contains now the fields "arrival", "arrival fixed", "quantity", "consumption", "departure", "departure fixed":


Extra
Loading
Total
Port Cost
Currency
Master (editable)
Port Captain (editable)
Sea Passage
Port
Speed Order
Arrival (editable)
Actual Speed
Agent
Estimated Distance
Berthed (editable)
Actual Distance Sailed (editable)
Departure (editable)
Percent Extra At Sea
Waiting
Days Extra At Sea
Water Salinity
One of Saltwater/Brackish Water/Fresh Water. Affects the water density.
Water Density
Hidden by default. Density of the water at port. Higher value increases intake.
Bunker reduction (Arriving)
Amount of bunker reduction on arrival in metric tonnes.
Bunker reduction (Departing)
Amount of bunker reduction on departure in metric tonnes.
Quantity on board (Arriving)
Amount of cargo on board on arrival in metric tonnes.
Quantity on board (Departing)
Amount of cargo on board on departure in metric tonnes.
Safety Margin
Hidden by default. Safety margin for the draft. Default value is 20%. Lower value increases intake.
Constant Reduction
Hidden by default. Intake constant reduction of the vessel. Lower value increases intake.
Fresh Water Reduction
Hidden by default. Intake fresh water reduction of the vessel. Lower value increases intake.


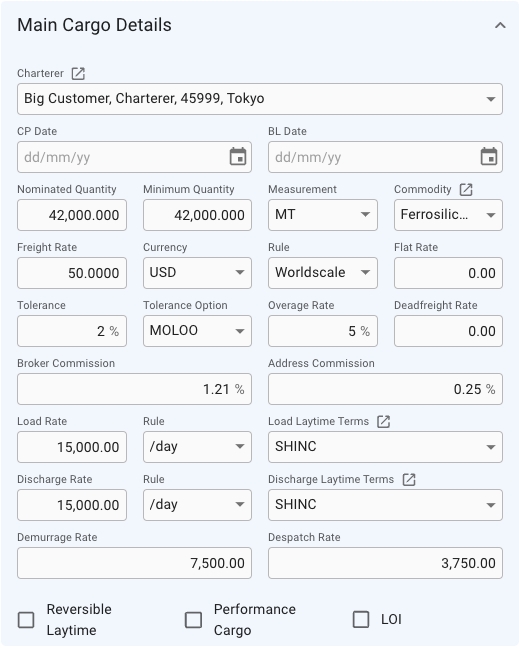
At the top in the main details you will find the KPI-cards.
First tile: Cargo quantity is the actual quantity, and booked is the booked quantity.
Second tile: Freight is the total freight for the cargo.
Third tile: Commission and various costs.
Fourth tile: Net Fio is all cargo related revenue aggregated and then deduct all aggregated cargo cost - divided by the quantity of the cargo.
Below the KPI tiles is the Main Cargo Details section on the left side:
All fields that are enabled can be changed from this view. The following fields and options may be disabled under certain circumstances.
Below Main Cargo Details section, there is a section for inputting fields and checkboxes regarding the stowage values of the cargo:
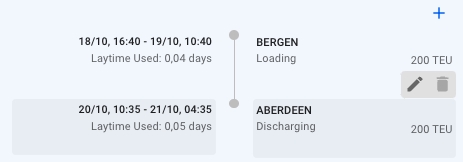
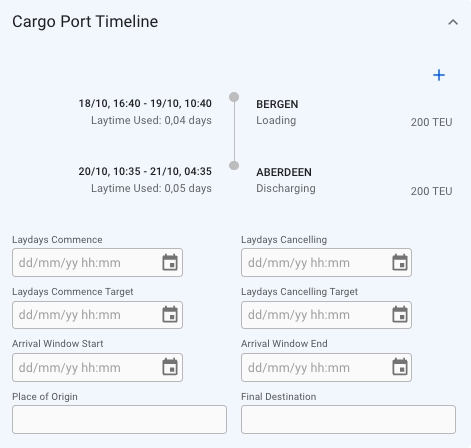
Below the KPI-cards on the right side is the Cargo Port Timeline together with LayCan dates. Laytime used is the estimated laytime allowed. The date fields are validated and if the validation fails the date field that needs to be corrected is highlighted in red and there is a short message under the date field indicating what is wrong.
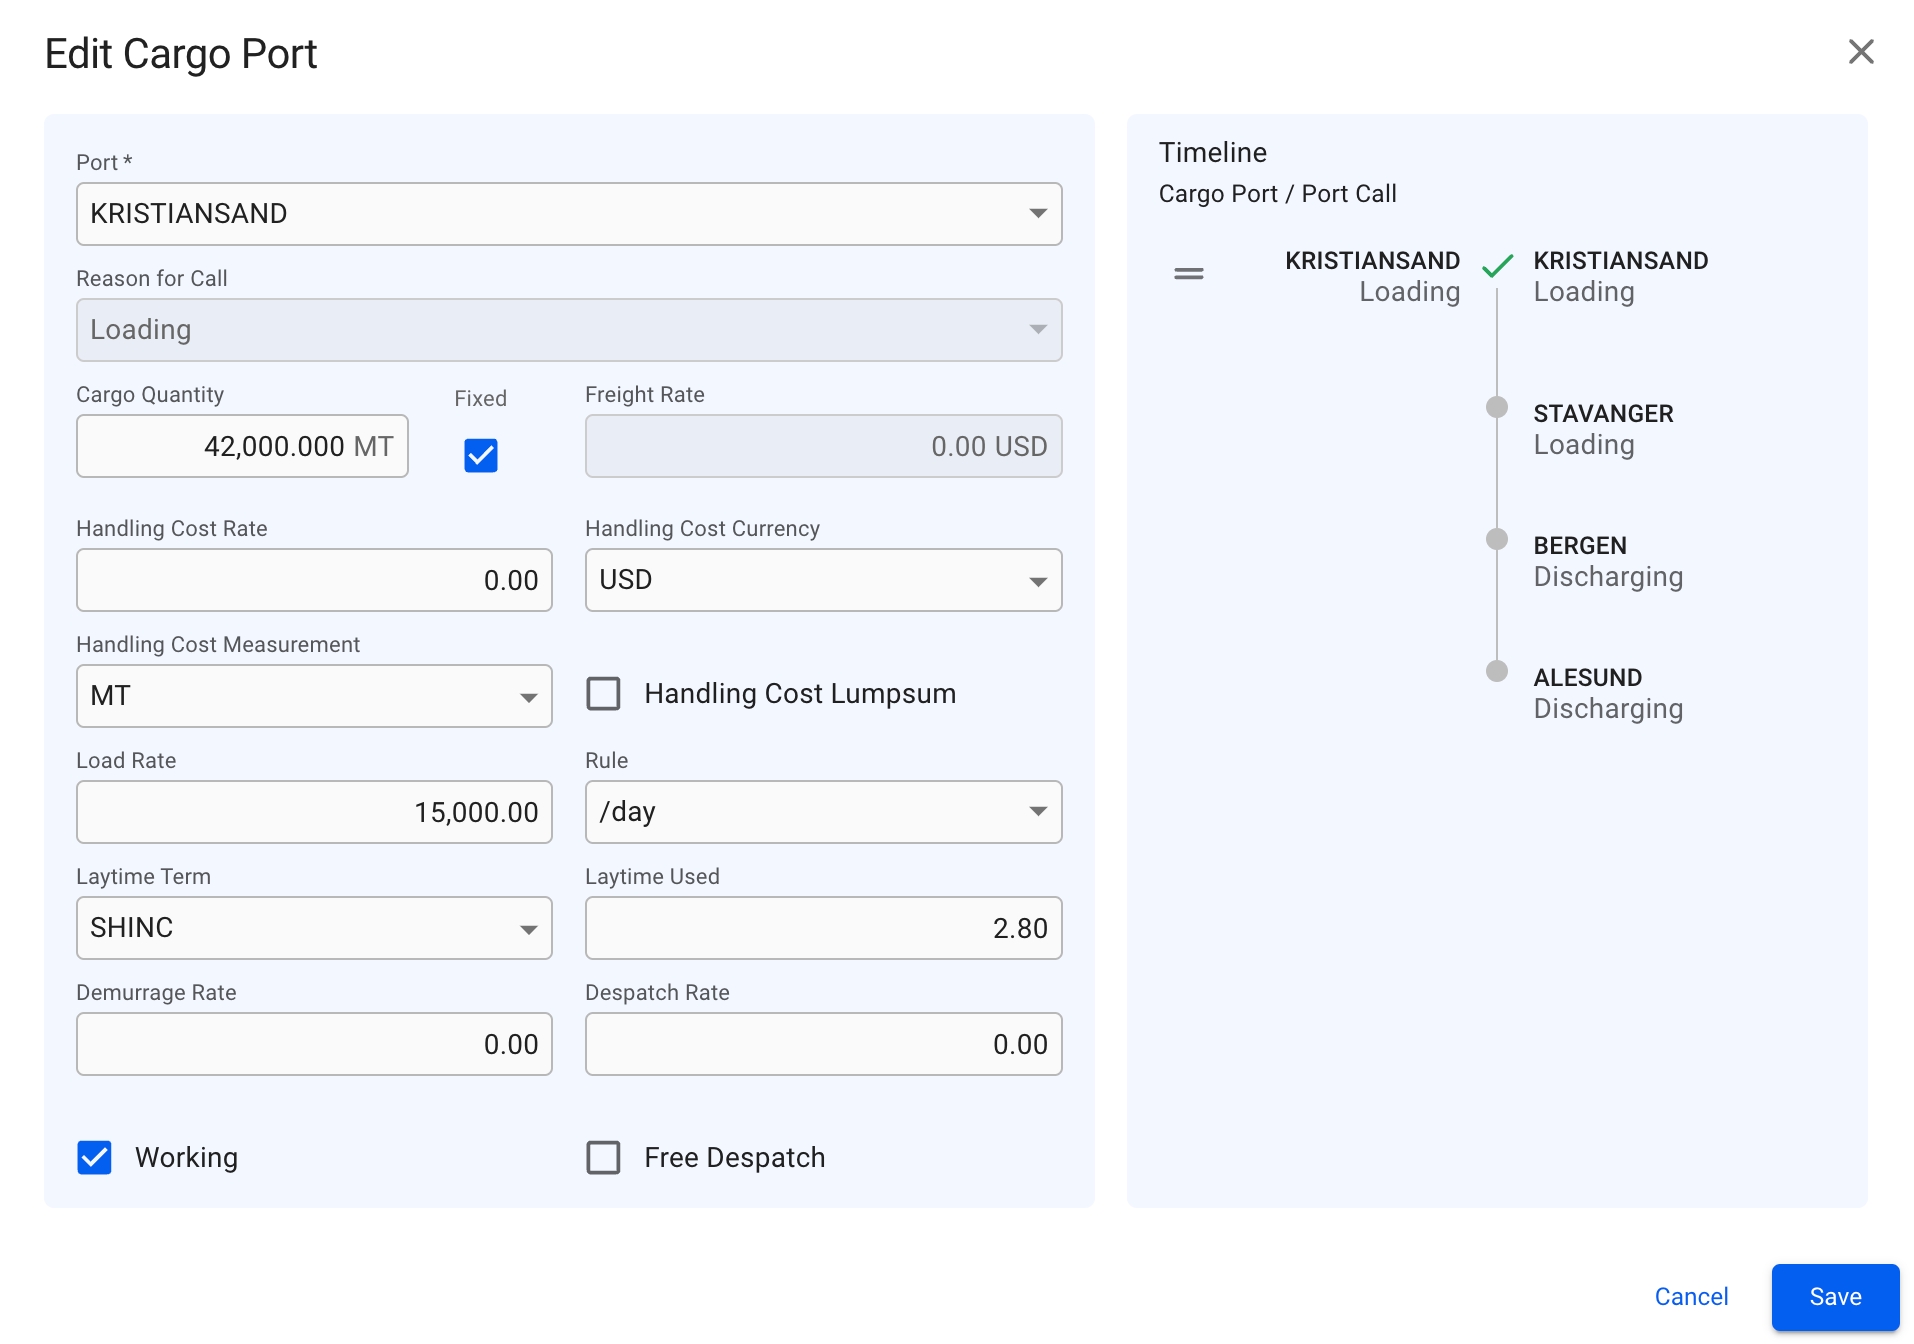
To add a cargo port, click on the -icon in the top right corner. To edit a cargo port or delete a cargo port hover one of the cargo ports in the timeline and the below view will appear:
Editing a Cargo Port will give you access to a few more fields, for instance Handling Cost, Laytime Terms and related fields.
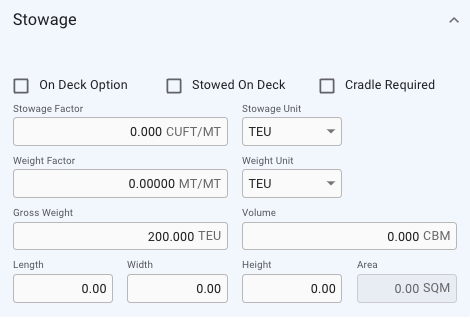
On the left side of the tab below the Main Cargo Details is the Stowage section
On the right side, below the Cargo Port Timeline section, you can create/edit and view a list of Bunker Adjustments on the cargo:
You can create a new Bunker Adjustment by clicking the -icon at the top right of the section, which will bring you to the Create-modal. Or you can click on one of the rows to edit the selected Bunker Adjustment, which will open the Edit-modal. If you choose the Adjustment Type to be set to "Freight", you will only see the Adjustment Factor field below. But if you have chosen "Consumption", you will only see the Agreed Consumption field below (the invisible field is not editable and does not affect the calculation). The Freight type is chosen by default.
For both of these options you will be able to choose the bunker types: DL (LS MGO), DO (MGO), FL (LS FO) or FO. You can also input/edit the other fields, such as: Min Price, Max Price, Adjustment Factor/Agreed Consumption and Price. The Price field is still editable even though the input of the Min-/Max Price fields calculates the average price.
The total adjustment is calculated if the price is outside the minimum/maximum range, i.e:
Min range: 500, Max range: 550, Price: 600 => Positive adjustment
Min range: 500, Max range: 550, Price 400 => Negative adjustment
This calculation you can see as the price value in the second KPI tile by the last field called Bunker Adjustment:
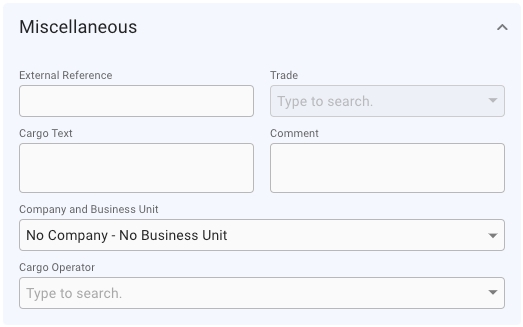
On the right side, below the Bunker Adjustment section, you can enter external reference, Trade, Cargo Text, Comment, Company, Business Unit and Cargo Operator:
At the bottom of this tab there is be a list of Relets and Transhipments for the cargo:


Flat Rate
Rule is not set to "World Scale"
Tolerance
Tolerance Option is not set to "MOLCO" or "LCOPT"
Broker Commission
The Cargo has one or more Commissions connected to it
Demurrage Rate
One or more of the Cargo Ports have a demurrage rate
Despatch rate
One or more of the Cargo Ports have a despatch rate
Performance Cargo
The Cargo does not have a Voyage connected to it
Agreed Consumption, Mandatory(*), displays if Adjustment Type is set to 'Consumption'
Price
The price, Mandatory(*)
Cargo Quantity / Nominated Quantity
The Cargo has one or more SubCargos, or if there are load/discharge amount on CargoPorts that are not the first in the timeline.
Minimum Quantity
Tolerance Option is not set to "MOLOO"
Cargo Measurement
The Cargo has one or more SubCargos, or if there are load/discharge amount on CargoPorts that are not the first in the timeline.
Freight Rate
The Cargo has one or more SubCargos, or the CargoPorts have different freight rates, or the Cargo has multiple freight rate tiers.
Rule
The cargo has one or more freight rate tiers.
Adjustment Type
Adjustment types, Mandatory(*), defaulted by "Freight"
Bunker Type
The different fuel types, Mandatory(*)
Min Price
Minimum price range, Mandatory(*)
Max Price
Maximum price range, Mandatory(*)
Adjustment Factor
Adjustment Factor, Mandatory(*), displays if Adjustment Type is set to 'Freight'
Agreed Consumption